Bareos ®
Backup Archiving REcovery Open Sourced
Main Reference
Bareos GmbH & Co KG
This manual documents Bareos version master (January 10, 2019)
Copyright © 1999-2012, Free Software Foundation Europe e.V.
Copyright © 2010-2012, Planets Communications B.V.
Copyright © 2013-2018, Bareos GmbH & Co. KG
Bareos ® is a registered trademark of Bareos GmbH & Co KG.
Bacula ® is a registered trademark of Kern Sibbald.
Permission is granted to copy, distribute and/or modify this document under the terms of
the GNU Free Documentation License, Version 1.2 published by the Free Software
Foundation; with no Invariant Sections, no Front-Cover Texts, and no Back-Cover Texts. A
copy of the license is included in the section entitled ”GNU Free Documentation License”.
#
Bareos is a set of computer programs that permits the system administrator to manage backup, recovery,
and verification of computer data across a network of computers of different kinds. Bareos can also
run entirely upon a single computer and can backup to various types of media, including tape and
disk.
In technical terms, it is a network Client/Server based backup program. Bareos is relatively easy to use and efficient,
while offering many advanced storage management features that make it easy to find and recover lost or damaged
files. Due to its modular design, Bareos is scalable from small single computer systems to systems consisting of
hundreds of computers located over a large network.
#
Bareos is a fork of the open source project Bacula version 5.2. In 2010 the Bacula community developer Marco
van Wieringen started to collect rejected or neglected community contributions in his own branch. This branch was
later on the base of Bareos and since then was enriched by a lot of new features.
This documentation also bases on the original Bacula documentation, it is technically also a fork of the
documenation created following the rules of the GNU Free Documentation License.
Original author of Bacula and its documentation is Kern Sibbald. We thank Kern and all contributors to Bacula
and it’s documentation. We maintain a list of contributors to Bacula (until the time we’ve started the fork) and
Bareos in our AUTHORS file.
#
If you are currently using a program such as tar, dump, or bru to backup your computer data, and you would like a
network solution, more flexibility, or catalog services, Bareos will most likely provide the additional features you
want. However, if you are new to Unix systems or do not have offsetting experience with a sophisticated backup
package, the Bareos project does not recommend using Bareos as it is much more difficult to setup and use than tar
or dump.
If you want Bareos to behave like the above mentioned simple programs and write over any tape that you put in the
drive, then you will find working with Bareos difficult. Bareos is designed to protect your data following the rules
you specify, and this means reusing a tape only as the last resort. It is possible to ”force” Bareos to write over
any tape in the drive, but it is easier and more efficient to use a simpler program for that kind of
operation.
If you would like a backup program that can write to multiple volumes (i.e. is not limited by your tape drive
capacity), Bareos can most likely fill your needs.
If you are currently using a sophisticated commercial package such as Legato Networker, ARCserveIT,
Arkeia, IBM Tivoli Storage Manager or PerfectBackup+, you may be interested in Bareos, which
provides many of the same features and is free software available under the GNU AGPLv3 software
license.
#
Bareos is made up of the following major components or services: Director, Console, File, Storage, and Monitor
services.
The Director is the central control program for all the other daemons. It schedules and supervises all the
backup, restore, verify and archive operations. The system administrator uses the Bareos Director to
schedule backups and to recover files. The Director runs as a daemon (or service) in the background.
The Bareos Console (bconsole) is the program that allows the administrator or user to communicate with the
Bareos Director. It runs in a shell window (i.e. TTY interface). Most system administrators will find this completely
adequate. For more details see the Bareos Console.
The Bareos File Daemon is a program that must be installed on each (Client) machine that should be backed up.
At the request of the Bareos Director, it finds the files to be backed up and sends them (their data) to the Bareos
Storage Daemon.
It is specific to the operating system on which it runs and is responsible for providing the file attributes and data
when requested by the Bareos Director.
The Bareos File Daemon is also responsible for the file system dependent part of restoring the file attributes
and data during a recovery operation. This program runs as a daemon on the machine to be backed
up.
The Bareos Storage Daemon is responsible, at the Bareos Director request, for accepting data from a Bareos File
Daemon and storing the file attributes and data to the physical backup media or volumes. In the case of a restore
request, it is responsible to find the data and send it to the Bareos File Daemon.
There can be multiple Bareos Storage Daemon in your environment, all controlled by the same Bareos
Director.
The Storage services runs as a daemon on the machine that has the backup device (such as a tape
drive).
The Catalog services are comprised of the software programs responsible for maintaining the file indexes and
volume databases for all files backed up. The Catalog services permit the system administrator or user to quickly
locate and restore any desired file. The Catalog services sets Bareos apart from simple backup programs
like tar and bru, because the catalog maintains a record of all Volumes used, all Jobs run, and all
Files saved, permitting efficient restoration and Volume management. Bareos currently supports three
different databases, MySQL, PostgreSQL, and SQLite, one of which must be chosen when building
Bareos.
The three SQL databases currently supported (MySQL, PostgreSQL or SQLite) provide quite a number of features,
including rapid indexing, arbitrary queries, and security. Although the Bareos project plans to support other
major SQL databases, the current Bareos implementation interfaces only to MySQL, PostgreSQL and
SQLite.
To perform a successful save or restore, the following four daemons must be configured and running: the
Director daemon, the File daemon, the Storage daemon, and the Catalog service (MySQL, PostgreSQL or
SQLite).
#
Bareos version numbers consists of three parts: YY.Q.C
YY | year (last two digits) |
Q | quarter of the year |
YY.Q | year and quarter of the code freeze. After this, as a general rule, no new feature should
get introduced to this Bareos branch. Subsequent release are for bugfixing. |
C | Release counter. For every subsequent release, this counter is incremented. Beginning
with 16.2, numbers from 1 to 3 represents the month of the quarter during development.
After the code freeze, the number is set to 4. So, stable releases get number from 4
onwards. Maintenance releases get numbers starting from 5 onwards. |
| |
Following information can be determined from the Bareos release bareos-16.2.4:
- 16.2: Code freeze have been in the second quarter of 2016
- 4: this is the first stable release of the bareos-16.2 branch
For details about the different releases see Release Notes.
#
Following Bareos Linux packages are available (release 17.2.4):
|
|
| Package Name | Description |
|
|
| bareos | Backup Archiving REcovery Open Sourced - metapackage |
| bareos-bconsole | Bareos administration console (CLI) |
| bareos-client | Bareos client Meta-All-In-One package |
| bareos-common | Common files, required by multiple Bareos packages |
| bareos-database-common | Generic abstraction libs and files to connect to a database |
| bareos-database-mysql | Libs and tools for mysql catalog |
| bareos-database-postgresql | Libs and tools for postgresql catalog |
| bareos-database-sqlite3 | Libs and tools for sqlite3 catalog |
| bareos-database-tools | Bareos CLI tools with database dependencies (bareos-dbcheck, bscan) |
| bareos-devel | Devel headers |
| bareos-director | Bareos Director daemon |
| bareos-director-python-plugin | Python plugin for Bareos Director daemon |
| bareos-filedaemon | Bareos File daemon (backup and restore client) |
| bareos-filedaemon-ceph-plugin | CEPH plugin for Bareos File daemon |
| bareos-filedaemon-glusterfs-plugin | GlusterFS plugin for Bareos File daemon |
| bareos-filedaemon-ldap-python-plugin | LDAP Python plugin for Bareos File daemon |
| bareos-filedaemon-python-plugin | Python plugin for Bareos File daemon |
| bareos-regress-config | Required files for bareos-regress |
| bareos-storage | Bareos Storage daemon |
| bareos-storage-ceph | CEPH support for the Bareos Storage daemon |
| bareos-storage-droplet | Object Storage support (through libdroplet) for the Bareos Storage daemon |
| bareos-storage-fifo | FIFO support for the Bareos Storage backend |
| bareos-storage-glusterfs | GlusterFS support for the Bareos Storage daemon |
| bareos-storage-python-plugin | Python plugin for Bareos Storage daemon |
| bareos-storage-tape | Tape support for the Bareos Storage daemon |
| bareos-tools | Bareos CLI tools (bcopy, bextract, bls, bregex, bwild) |
| bareos-traymonitor | Bareos Tray Monitor (QT) |
| bareos-vadp-dumper | VADP Dumper - vStorage APIs for Data Protection Dumper program |
| bareos-vmware-plugin | Bareos VMware plugin |
| bareos-vmware-plugin-compat | Bareos VMware plugin compatibility |
| bareos-vmware-vix-disklib | VMware vix disklib distributable libraries |
| bareos-webui | Bareos Web User Interface |
| python-bareos | Backup Archiving REcovery Open Sourced - Python module |
|
|
| |
Not all packages (especially optional backends and plugins) are available on all platforms. For details, see Packages
for the different Linux platforms.
Additionally, packages containing debug information are available. These are named differently depending on the
distribution (bareos-debuginfo or bareos-dbg or …).
Not all packages are required to run Bareos.
- For the Bareos Director, the package bareos-director and one of bareos-database-postgresql,
bareos-database-mysql or bareos-database-sqlite3 are required. It is recommended to use
bareos-database-postgresql.
- For the Bareos Storage Daemon, the package bareos-storage is required. If you plan to connect tape
drives to the storage director, also install the package bareos-storage-tape. This is kept separately,
because it has additional dependencies for tape tools.
- On a client, only the package bareos-filedaemon is required. If you run it on a workstation, the
packages bareos-traymonitor gives the user information about running backups.
- On a Backup Administration system you need to install at least bareos-bconsole to have an interactive
console to the Bareos Director.
#
To get Bareos up and running quickly, the author recommends that you first scan the Terminology section below,
then quickly review the next chapter entitled The Current State of Bareos, then the Installing Bareos, the
Getting Started with Bareos, which will give you a quick overview of getting Bareos running. After
which, you should proceed to the chapter How to Configure Bareos, and finally the chapter on Running
Bareos.
#
-
Administrator
- The person or persons responsible for administrating the Bareos system.
-
Backup
- The term Backup refers to a Bareos Job that saves files.
-
Bootstrap File
- The bootstrap file is an ASCII file containing a compact form of commands that allow
Bareos or the stand-alone file extraction utility (bextract) to restore the contents of one or more
Volumes, for example, the current state of a system just backed up. With a bootstrap file, Bareos can
restore your system without a Catalog. You can create a bootstrap file from a Catalog to extract any
file or files you wish.
-
Catalog
- The Catalog is used to store summary information about the Jobs, Clients, and Files that
were backed up and on what Volume or Volumes. The information saved in the Catalog permits
the administrator or user to determine what jobs were run, their status as well as the important
characteristics of each file that was backed up, and most importantly, it permits you to choose what
files to restore. The Catalog is an online resource, but does not contain the data for the files backed
up. Most of the information stored in the catalog is also stored on the backup volumes (i.e. tapes). Of
course, the tapes will also have a copy of the file data in addition to the File Attributes (see below).
The catalog feature is one part of Bareos that distinguishes it from simple backup and archive programs
such as dump and tar.
-
Client
- In Bareos’s terminology, the word Client refers to the machine being backed up, and it is synonymous
with the File services or File daemon, and quite often, it is referred to it as the FD. A Client is defined
in a configuration file resource.
-
Console
- The program that interfaces to the Director allowing the user or system administrator to control
Bareos.
-
Daemon
- Unix terminology for a program that is always present in the background to carry out a designated
task. On Windows systems, as well as some Unix systems, daemons are called Services.
-
Directive
- The term directive is used to refer to a statement or a record within a Resource in a configuration
file that defines one specific setting. For example, the Name directive defines the name of the Resource.
-
Director
- The main Bareos server daemon that schedules and directs all Bareos operations. Occasionally,
the project refers to the Director as DIR.
-
Differential
- A backup that includes all files changed since the last Full save started. Note, other backup
programs may define this differently.
-
File Attributes
- The File Attributes are all the information necessary about a file to identify it and all its
properties such as size, creation date, modification date, permissions, etc. Normally, the attributes are
handled entirely by Bareos so that the user never needs to be concerned about them. The attributes
do not include the file’s data.
-
File daemon
- The daemon running on the client computer to be backed up. This is also referred to as the
File services, and sometimes as the Client services or the FD.
-
FileSet
- A FileSet is a Resource contained in a configuration file that defines the files to be backed up.
It consists of a list of included files or directories, a list of excluded files, and how the file is to be
stored (compression, encryption, signatures). For more details, see the FileSet Resource in the Director
chapter of this document.
-
Incremental
- A backup that includes all files changed since the last Full, Differential, or Incremental backup
started. It is normally specified on the Level directive within the Job resource definition, or in a
Schedule resource.
-
Job
- A Bareos Job is a configuration resource that defines the work that Bareos must perform to backup
or restore a particular Client. It consists of the Type (backup, restore, verify, etc), the Level (full,
differential, incremental, etc.), the FileSet, and Storage the files are to be backed up (Storage device,
Media Pool). For more details, see the Job Resource in the Director chapter of this document.
-
Monitor
- The program that interfaces to all the daemons allowing the user or system administrator to
monitor Bareos status.
-
Resource
- A resource is a part of a configuration file that defines a specific unit of information that is
available to Bareos. It consists of several directives (individual configuration statements). For example,
the Job resource defines all the properties of a specific Job: name, schedule, Volume pool, backup type,
backup level, ...
-
Restore
- A restore is a configuration resource that describes the operation of recovering a file from backup
media. It is the inverse of a save, except that in most cases, a restore will normally have a small set
of files to restore, while normally a Save backs up all the files on the system. Of course, after a disk
crash, Bareos can be called upon to do a full Restore of all files that were on the system.
-
Schedule
- A Schedule is a configuration resource that defines when the Bareos Job will be scheduled for
execution. To use the Schedule, the Job resource will refer to the name of the Schedule. For more
details, see the Schedule Resource in the Director chapter of this document.
-
Service
- This is a program that remains permanently in memory awaiting instructions. In Unix
environments, services are also known as daemons.
-
Storage Coordinates
- The information returned from the Storage Services that uniquely locates a file
on a backup medium. It consists of two parts: one part pertains to each file saved, and the other
part pertains to the whole Job. Normally, this information is saved in the Catalog so that the user
doesn’t need specific knowledge of the Storage Coordinates. The Storage Coordinates include the File
Attributes (see above) plus the unique location of the information on the backup Volume.
-
Storage Daemon
- The Storage daemon, sometimes referred to as the SD, is the code that writes the
attributes and data to a storage Volume (usually a tape or disk).
-
Session
- Normally refers to the internal conversation between the File daemon and the Storage daemon.
The File daemon opens a session with the Storage daemon to save a FileSet or to restore it. A session
has a one-to-one correspondence to a Bareos Job (see above).
-
Verify
- A verify is a job that compares the current file attributes to the attributes that have previously been
stored in the Bareos Catalog. This feature can be used for detecting changes to critical system files
similar to what a file integrity checker like Tripwire does. One of the major advantages of using Bareos
to do this is that on the machine you want protected such as a server, you can run just the File daemon,
and the Director, Storage daemon, and Catalog reside on a different machine. As a consequence, if
your server is ever compromised, it is unlikely that your verification database will be tampered with.
Verify can also be used to check that the most recent Job data written to a Volume agrees with what is
stored in the Catalog (i.e. it compares the file attributes), *or it can check the Volume contents against
the original files on disk.
-
Retention Period
- There are various kinds of retention periods that Bareos recognizes. The most important
are the File Retention Period, Job Retention Period, and the Volume Retention Period. Each of
these retention periods applies to the time that specific records will be kept in the Catalog database.
This should not be confused with the time that the data saved to a Volume is valid.
The File Retention Period determines the time that File records are kept in the catalog database. This
period is important for two reasons: the first is that as long as File records remain in the database,
you can ”browse” the database with a console program and restore any individual file. Once the File
records are removed or pruned from the database, the individual files of a backup job can no longer be
”browsed”. The second reason for carefully choosing the File Retention Period is because the volume
of the database File records use the most storage space in the database. As a consequence, you must
ensure that regular ”pruning” of the database file records is done to keep your database from growing
too large. (See the Console prune command for more details on this subject).
The Job Retention Period is the length of time that Job records will be kept in the database. Note, all
the File records are tied to the Job that saved those files. The File records can be purged leaving the
Job records. In this case, information will be available about the jobs that ran, but not the details of
the files that were backed up. Normally, when a Job record is purged, all its File records will also be
purged.
The Volume Retention Period is the minimum of time that a Volume will be kept before it is reused.
Bareos will normally never overwrite a Volume that contains the only backup copy of a file. Under
ideal conditions, the Catalog would retain entries for all files backed up for all current Volumes. Once a
Volume is overwritten, the files that were backed up on that Volume are automatically removed from the
Catalog. However, if there is a very large pool of Volumes or a Volume is never overwritten, the Catalog
database may become enormous. To keep the Catalog to a manageable size, the backup information
should be removed from the Catalog after the defined File Retention Period. Bareos provides the
mechanisms for the catalog to be automatically pruned according to the retention periods defined.
-
Scan
- A Scan operation causes the contents of a Volume or a series of Volumes to be scanned. These
Volumes with the information on which files they contain are restored to the Bareos Catalog. Once the
information is restored to the Catalog, the files contained on those Volumes may be easily restored.
This function is particularly useful if certain Volumes or Jobs have exceeded their retention period and
have been pruned or purged from the Catalog. Scanning data from Volumes into the Catalog is done
by using the bscan program. See the bscan section of the Bareos Utilities chapter of this manual for
more details.
-
Volume
- A Volume is an archive unit, normally a tape or a named disk file where Bareos stores the data
from one or more backup jobs. All Bareos Volumes have a software label written to the Volume by
Bareos so that it identifies what Volume it is really reading. (Normally there should be no confusion
with disk files, but with tapes, it is easy to mount the wrong one.)
#
Bareos is a backup, restore and verification program and is not a complete disaster recovery system in itself, but it
can be a key part of one if you plan carefully and follow the instructions included in the Disaster Recovery chapter
of this manual.
#
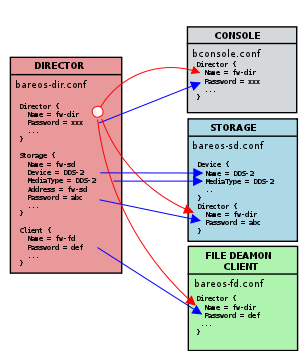
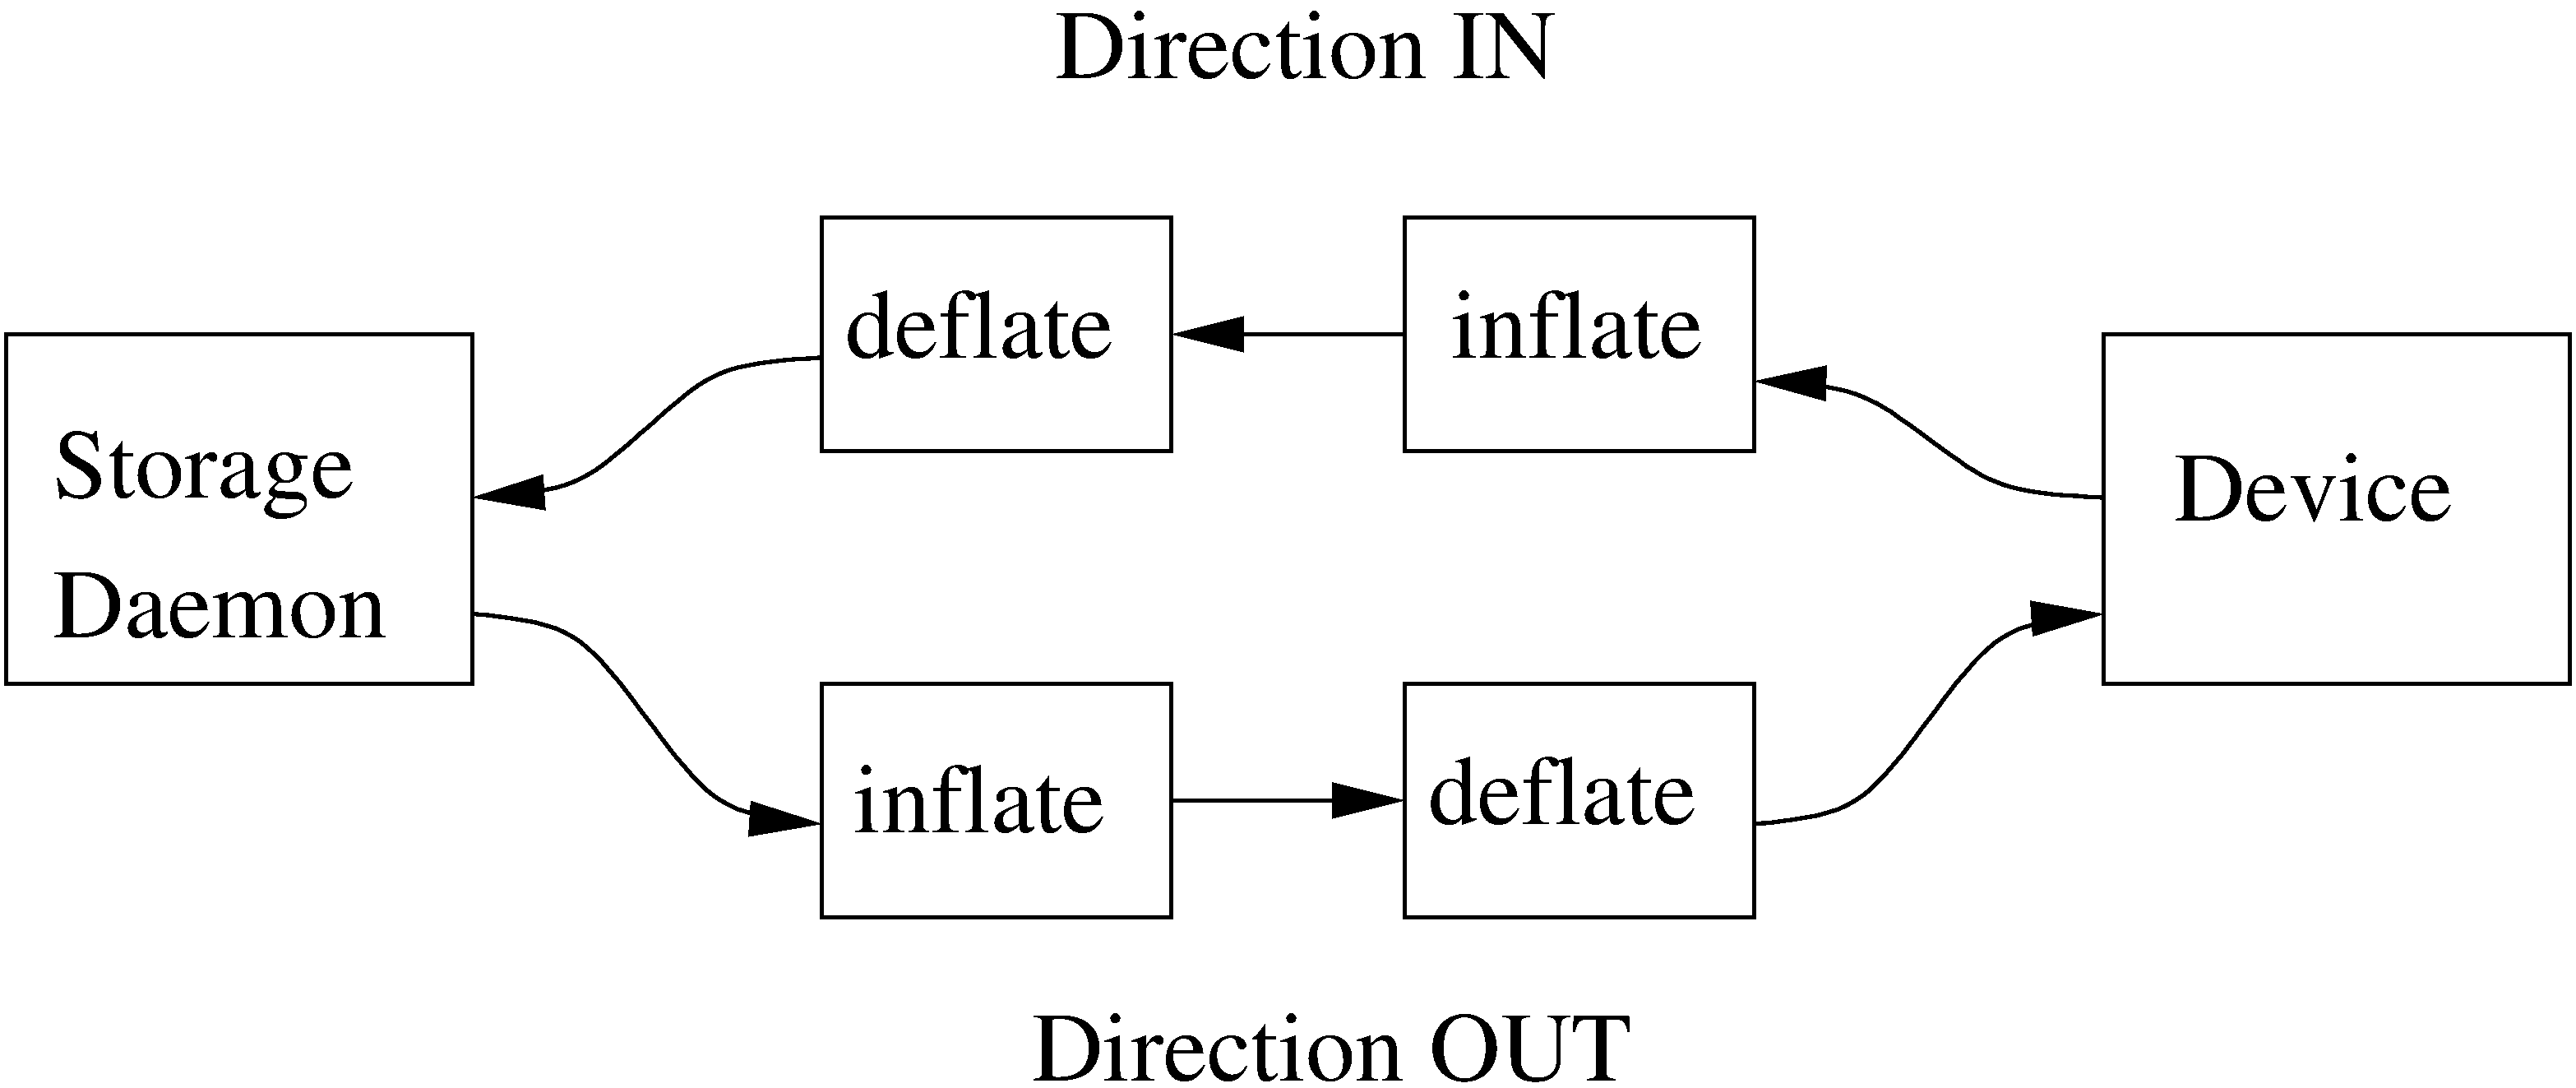
The following block diagram shows the typical interactions between the Bareos Services for a backup job. Each
block represents in general a separate process (normally a daemon). In general, the Director oversees the flow of
information. It also maintains the Catalog.
#
#
- Job Control
- Network backup/restore with centralized Director.
- Internal scheduler for automatic Job execution.
- Scheduling of multiple Jobs at the same time.
- You may run one Job at a time or multiple simultaneous Jobs (sometimes called multiplexing).
- Job sequencing using priorities.
- Console interface to the Director allowing complete control. Some GUIs are also available.
- Security
- Verification of files previously cataloged, permitting a Tripwire like capability (system break-in
detection).
- CRAM-MD5 password authentication between each component (daemon).
- Configurable TLS (SSL) communications encryption between each component.
- Configurable Data (on Volume) encryption on a Client by Client basis.
- Computation of MD5 or SHA1 signatures of the file data if requested.
- Restore Features
- Restore of one or more files selected interactively either for the current backup or a backup prior
to a specified time and date.
- Listing and Restoration of files using stand-alone bls and bextract tool programs. Among other
things, this permits extraction of files when Bareos and/or the catalog are not available. Note, the
recommended way to restore files is using the restore command in the Console. These programs
are designed for use as a last resort.
- Ability to restore the catalog database rapidly by using bootstrap files (previously saved).
- Ability to recreate the catalog database by scanning backup Volumes using the bscan program.
- SQL Catalog
- Catalog database facility for remembering Volumes, Pools, Jobs, and Files backed up.
- Support for PostgreSQL, MySQL and SQLite Catalog databases.
- User extensible queries to the PostgreSQL, MySQL and SQLite databases.
- Advanced Volume and Pool Management
- Labeled Volumes, preventing accidental overwriting (at least by Bareos).
- Any number of Jobs and Clients can be backed up to a single Volume. That is, you can backup
and restore Linux, Unix and Windows machines to the same Volume.
- Multi-volume saves. When a Volume is full, Bareos automatically requests the next Volume and
continues the backup.
- Pool and Volume library management providing Volume flexibility (e.g. monthly, weekly, daily
Volume sets, Volume sets segregated by Client, ...).
- Machine independent Volume data format. Linux, Solaris, and Windows clients can all be backed
up to the same Volume if desired.
- The Volume data format is upwards compatible so that old Volumes can always be read.
- A flexible message handler including routing of messages from any daemon back to the Director
and automatic email reporting.
- Data spooling to disk during backup with subsequent write to tape from the spooled disk files.
This prevents tape ”shoe shine” during Incremental/Differential backups.
- Advanced Support for most Storage Devices
- Autochanger support using a simple shell interface that can interface to virtually any autoloader
program. A script for mtx is provided.
- Support for autochanger barcodes – automatic tape labeling from barcodes.
- Automatic support for multiple autochanger magazines either using barcodes or by reading the
tapes.
- Support for multiple drive autochangers.
- Raw device backup/restore. Restore must be to the same device.
- All Volume blocks contain a data checksum.
- Migration support – move data from one Pool to another or one Volume to another.
- Multi-Operating System Support
- Programmed to handle arbitrarily long filenames and messages.
- Compression on a file by file basis done by the Client program if requested before network transit.
- Saves and restores POSIX ACLs and Extended Attributes on most OSes if enabled.
- Access control lists for Consoles that permit restricting user access to only their data.
- Support for save/restore of files larger than 2GB.
- Support ANSI and IBM tape labels.
- Support for Unicode filenames (e.g. Chinese) on Win32 machines
- Consistent backup of open files on Win32 systems using Volume Shadow Copy (VSS).
- Support for path/filename lengths of up to 64K on Win32 machines (unlimited on Unix/Linux
machines).
- Miscellaneous
- Multi-threaded implementation.
#
- Bareos handles multi-volume backups.
- A full comprehensive SQL standard database of all files backed up. This permits online viewing of files
saved on any particular Volume.
- Automatic pruning of the database (removal of old records) thus simplifying database administration.
- The modular but integrated design makes Bareos very scalable.
- Bareos has a built-in Job scheduler.
- The Volume format is documented and there are simple C programs to read/write it.
- Bareos uses well defined (IANA registered) TCP/IP ports – no rpcs, no shared memory.
- Bareos installation and configuration is relatively simple compared to other comparable products.
- Aside from several GUI administrative interfaces, Bareos has a comprehensive shell administrative
interface, which allows the administrator to use tools such as ssh to administrate any part of Bareos
from anywhere.
#
- It is possible to configure the Bareos Director to use multiple Catalogs. However, this is neither
advised, nor supported. Multiple catalogs require more management because in general you must know
what catalog contains what data, e.g. currently, all Pools are defined in each catalog.
- Bareos can generally restore any backup made from one client to any other client. However, if the
architecture is significantly different (i.e. 32 bit architecture to 64 bit or Win32 to Unix), some
restrictions may apply (e.g. Solaris door files do not exist on other Unix/Linux machines; there are
reports that Zlib compression written with 64 bit machines does not always read correctly on a 32 bit
machine).
#
- Names (resource names, volume names, and such) defined in Bareos configuration files are limited to a
fixed number of characters. Currently the limit is defined as 127 characters. Note, this does not apply
to filenames, which may be arbitrarily long.
- Command line input to some of the stand alone tools – e.g. btape, bconsole is restricted to several
hundred characters maximum. Normally, this is not a restriction, except in the case of listing multiple
Volume names for programs such as bscan. To avoid this command line length restriction, please use
a .bsr file to specify the Volume names.
- Bareos configuration files for each of the components can be any length. However, the length of an
individual line is limited to 500 characters after which it is truncated. If you need lines longer than 500
characters for directives such as ACLs where they permit a list of names are character strings simply
specify multiple short lines repeating the directive on each line but with different list values.
#
- Bareos’s Differential and Incremental normal backups are based on time stamps. Consequently, if you
move files into an existing directory or move a whole directory into the backup fileset after a Full
backup, those files will probably not be backed up by an Incremental save because they will have
old dates. This problem is corrected by using Accurate mode backups or by explicitly updating the
date/time stamp on all moved files.
- In non Accurate mode, files deleted after a Full save will be included in a restoration. This is typical
for most similar backup programs. To avoid this, use Accurate mode backup.
#
If you are like me, you want to get Bareos running immediately to get a feel for it, then later you want to go back
and read about all the details. This chapter attempts to accomplish just that: get you going quickly without all the
details.
Bareos comes prepackaged for a number of Linux distributions. So the easiest way to get to a running Bareos
installation, is to use a platform where prepacked Bareos packages are available. Additional information can be
found in the chapter Operating Systems.
If Bareos is available as a package, only 4 steps are required to get to a running Bareos system:
- Decide about the Bareos release to use
- Install the Bareos Software Packages
- Prepare Bareos database
- Start the daemons
This will start a very basic Bareos installation which will regularly backup a directory to disk. In
order to fit it to your needs, you’ll have to adapt the configuration and might want to backup other
clients.
#
You’ll find Bareos binary package repositories at http://download.bareos.org/. The latest stable released version
is available at http://download.bareos.org/bareos/release/latest/.
The public key to verify the repository is also in repository directory (Release.key for Debian based distributions,
repodata/repomd.xml.key for RPM based distributions).
Section Install the Bareos Software Packages describes how to add the software repository to your
system.
#
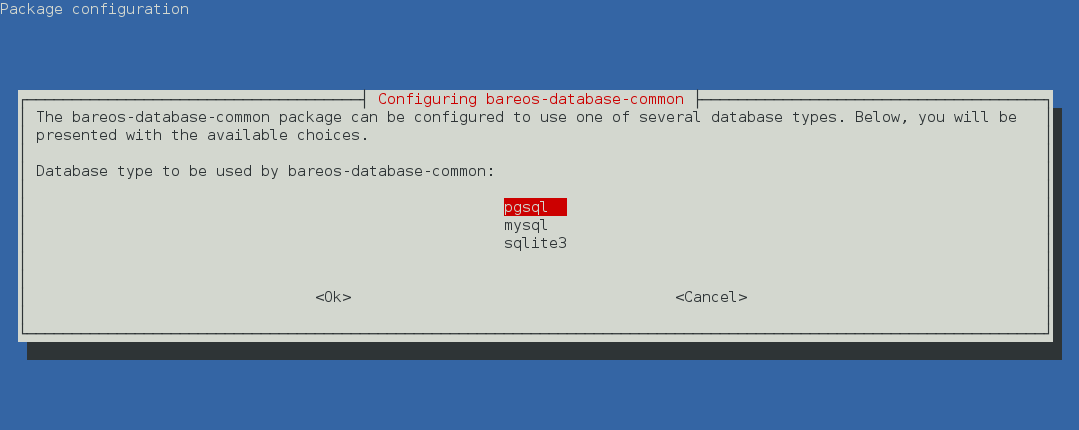
Bareos offers the following database backends:
- PostgreSQL by package bareos-database-postgresql. This is the recommended backend.
- MariaDB/MySQL by package bareos-database-mysql
- Sqlite by package bareos-database-sqlite3
Please note! The Sqlite backend is only intended for testing, not for productive use.
PostgreSQL
is the default backend.
MariaDB/MySQL
backend is also included.
Sqlite
backend is intended for testing purposes only.
The Bareos database packages have there dependencies only to the database client packages, therefore the database
itself must be installed manually.
If you do not explicitly choose a database backend, your operating system installer will choose one for you. The
default should be PostgreSQL, but depending on your operating system and the already installed packages, this may
differ.
#
The package bareos is only a meta package, that contains dependencies to the main components of Bareos, see
Bareos Packages. If you want to setup a distributed environment (like one Director, separate database server,
multiple Storage daemons) you have to choose the corresponding Bareos packages to install on each hosts instead of
just installing the bareos package.
#
Bareos Version >= 15.2.0 requires the Jansson library package. On RHEL 7 it is available through the RHEL Server
Optional channel. On CentOS 7 and Fedora is it included on the main repository.
#
# define parameter
#
DIST=RHEL_7
# or
# DIST=CentOS_7
# DIST=Fedora_26
# DIST=Fedora_25
RELEASE=release/17.2/
# or
# RELEASE=release/latest/
# RELEASE=experimental/nightly/
# add the Bareos repository
URL=http://download.bareos.org/bareos/$RELEASE/$DIST
wget -O /etc/yum.repos.d/bareos.repo $URL/bareos.repo
# install Bareos packages
yum install bareos bareos-database-postgresql
Commands 2.1:
Bareos installation on RHEL ≥ 7 / CentOS ≥ 7 / Fedora
Bareos Version >= 15.2.0 requires the Jansson library package. This package is available on EPEL 6. Make sure, it
is available on your system.
#
# add EPEL repository, if not already present.
# Required for the jansson package.
#
rpm -Uhv https://dl.fedoraproject.org/pub/epel/epel-release-latest-6.noarch.rpm
#
# define parameter
#
DIST=RHEL_6
# DIST=CentOS_6
RELEASE=release/17.2/
# or
# RELEASE=release/latest/
# RELEASE=experimental/nightly/
# add the Bareos repository
URL=http://download.bareos.org/bareos/$RELEASE/$DIST
wget -O /etc/yum.repos.d/bareos.repo $URL/bareos.repo
# install Bareos packages
yum install bareos bareos-database-postgresql
Commands 2.2:
Bareos installation on RHEL ≥ 6 / CentOS ≥ 6
yum in RHEL 5/CentOS 5 has slightly different behaviour as far as dependency resolving is concerned: it sometimes
install a dependent package after the one that has the dependency defined. To make sure that it works, install the
desired Bareos database backend package first in a separate step:
#
# define parameter
#
DIST=RHEL_5
RELEASE=release/17.2/
# or
# RELEASE=release/latest/
# RELEASE=experimental/nightly/
# add the Bareos repository
URL=http://download.bareos.org/bareos/$RELEASE/$DIST
wget -O /etc/yum.repos.d/bareos.repo $URL/bareos.repo
# install Bareos packages
yum install bareos-database-postgresql
yum install bareos
Commands 2.3:
Bareos installation on RHEL 5 / CentOS 5
#
#
# define parameter
#
DIST=SLE_12_SP3
# or
# DIST=SLE_12_SP2
# DIST=SLE_12_SP1
# DIST=SLE_11_SP4
# DIST=openSUSE_Leap_42.3
# DIST=openSUSE_Leap_42.2
RELEASE=release/17.2/
# or
# RELEASE=release/latest/
# RELEASE=experimental/nightly/
# add the Bareos repository
URL=http://download.bareos.org/bareos/$RELEASE/$DIST
zypper addrepo --refresh $URL/bareos.repo
# install Bareos packages
zypper install bareos bareos-database-postgresql
Commands 2.4:
Bareos installation on SLES / openSUSE
#
Bareos Version >= 15.2.0 requires the Jansson library package. On Ubuntu is it available in Ubuntu Universe. In
Debian, is it included in the main repository.
#
# define parameter
#
DIST=Debian_9.0
# or
# DIST=Debian_8.0
# DIST=xUbuntu_16.04
# DIST=xUbuntu_14.04
# DIST=xUbuntu_12.04
RELEASE=release/17.2/
# or
# RELEASE=release/latest/
# RELEASE=experimental/nightly/
URL=http://download.bareos.org/bareos/$RELEASE/$DIST
# add the Bareos repository
printf "deb $URL /\n" > /etc/apt/sources.list.d/bareos.list
# add package key
wget -q $URL/Release.key -O- | apt-key add -
# install Bareos packages
apt-get update
apt-get install bareos bareos-database-postgresql
Commands 2.5:
Bareos installation on Debian / Ubuntu
If you prefer using the versions of Bareos directly integrated into the distributions, please note that there are some
differences, see Limitations of the Debian.org/Ubuntu Universe version of Bareos.
#
Univention
Bareos offers additional functionality and integration into an Univention Corporate Server environment. Please
follow the intructions in Univention Corporate Server.
If you are not interested in this additional functionality, the commands described in Install on Debian based Linux
Distributions will also work for Univention Corporate Servers.
#
We assume that you have already your database installed and basically running. Using the PostgreSQL database
backend is recommended.
The easiest way to set up a database is using an system account that have passwordless local access to the database.
Often this is the user root for MySQL and the user postgres for PostgreSQL.
For details, see chapter Catalog Maintenance.
#
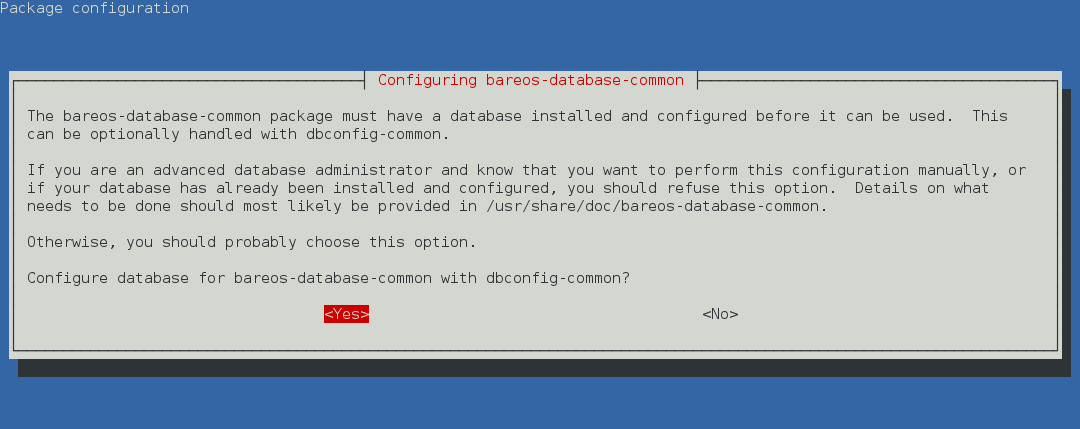
Since Bareos Version >= 14.2.0 the Debian (and Ubuntu) based packages support the dbconfig-common mechanism
to create and update the Bareos database.
Follow the instructions during install to configure it according to your needs.
If you decide not to use dbconfig-common (selecting <No> on the initial dialog), follow the instructions for Other
Platforms.
The selectable database backends depend on the bareos-database-* packages installed.
For details see dbconfig-common (Debian).
#
If your are using PostgreSQL and your PostgreSQL administration user is postgres (default), use following
commands:
su postgres -c /usr/lib/bareos/scripts/create_bareos_database
su postgres -c /usr/lib/bareos/scripts/make_bareos_tables
su postgres -c /usr/lib/bareos/scripts/grant_bareos_privileges
Commands 2.6:
Setup Bareos catalog with PostgreSQL
Make sure, that root has direct access to the local MySQL server. Check if the command mysql connects to the
database without defining the password. This is the default on RedHat and SUSE distributions. On other systems
(Debian, Ubuntu), create the file ~/.my.cnf with your authentication informations:
[client]
host=localhost
user=root
password=YourPasswordForAccessingMysqlAsRoot
Configuration 2.7:
MySQL
credentials
file
.my.cnf
It is recommended, to secure the Bareos database connection with a password. See Catalog Maintenance – MySQL
about how to archieve this. For testing, using a password-less MySQL connection is probable okay. Setup the Bareos
database tables by following commands:
/usr/lib/bareos/scripts/create_bareos_database
/usr/lib/bareos/scripts/make_bareos_tables
/usr/lib/bareos/scripts/grant_bareos_privileges
Commands 2.8:
Setup Bareos catalog with MySQL
As some Bareos updates require a database schema update, therefore the file /root/.my.cnf might also be useful in
the future.
#
service bareos-dir start
service bareos-sd start
service bareos-fd start
Commands 2.9:
Start the Bareos Daemons
You will eventually have to allow access to the ports 9101-9103, used by Bareos.
Now you should be able to access the director using the bconsole.
When you want to use the bareos-webui, please refer to the chapter Installing Bareos Webui.
#
This chapter addresses the installation process of the Bareos Webui.
Since Version >= 15.2.0 Bareos Webui is part of the Bareos project and available for a number of
platforms.
#
- Intuitive web interface
- Multilinugual
- Can access multiple directors and catalogs
- Individual accounts and ACL support via Bareos restricted named consoles
- Tape Autochanger management, with the possibility to label, import/export media and update your
autochanger slot status
- Temporarly enable or disable jobs, clients and schedules and also see their current state
- Show
- Detailed information about Jobs, Clients, Filesets, Pools, Volumes, Storages, Schedules, Logs and
Director messages
- Filedaemon, Storage- and Director updates
- Client, Director, Storage and Scheduler status
- Backup Jobs
- Start, cancel, rerun and restore from.
- Show the file list of backup jobs
- Restore files by browsing through a filetree of your backup jobs.
- Merge your backup jobs history and filesets of a client or use a single backup job for restore.
- Restore files to a different client instead of the origin
- bconsole interface (limited to non-interactive commands)
#
- A platform, for which the bareos-webui package is available, see Bareos Packages.
- A working Bareos environment.
- Bareos Director version >= Bareos Webui version.
- The Bareos Webui can be installed on any host. It does not have to be installed on the same as the
Bareos Director.
- The default installation uses an Apache webserver with mod-rewrite, mod-php and mod-setenv.
- PHP >= 5.3.23
- On SUSE Linux Enterprise 12 you need the additional SUSE Linux Enterprise Module for Web Scripting
12.
#
Bareos Webui Version >= 16.2.4 incorporates the required Zend Framework 2 components, no extra Zend
Framework installation is required. For older versions of bareos-webui, you must install Zend Framework
separately. Unfortunately, not all distributions offer Zend Framework 2 packages. The following list shows where to
get the Zend Framework 2 package:
- RHEL, CentOS
- Fedora
- SUSE, Debian, Ubuntu
Also be aware, that older versions of Bareos Director do not support the Subdirectory Configuration Scheme and
therefore Bareos configuration resource files must be included manually.
#
#
If not already done, add the Bareos repository that is matching your Linux distribution. Please have
a look at the chapter Install the Bareos Software Packages for more information on how to achieve
this.
#
After adding the repository simply install the bareos-webui package via your package manager.
- RHEL, CentOS and Fedora
yum install bareos-webui
Commands 3.1:
or
dnf install bareos-webui
Commands 3.2:
#
This assumes, Bareos Director and Bareos Webui are installed on the same host.
- If you are using SELinux, allow HTTPD scripts and modules make network connections:
setsebool -P httpd_can_network_connect on
Commands 3.5:
For details, see SELinux.
- Restart Apache (to load configuration provided by bareos-webui, see Configure your Apache
Webserver)
- Use bconsole to create a user with name admin and password secret and permissions defined in
webui-adminDir
Profile:
*configure add console name=admin password=secret profile=webui-admin
bconsole 3.6:
add a named console
Of course, you can choose other names and passwords. For details, see Create a restricted consoles.
- Login to http://HOSTNAME/bareos-webui with username and password as created in 3.
#
There is not need, that Bareos Webui itself provide a user management. Instead it uses so named ConsoleDir defined
in the Bareos Director. You can have multiple consoles with different names and passwords, sort of like multiple
users, each with different privileges.
At least one ConsoleDir is required to use the Bareos Webui.
To allow a user with name admin and password secret to access the Bareos Director with permissions defined in
the webui-adminDir
Profile (see Configuration of profile resources), either
- create a file /etc/bareos/bareos-dir.d/console/admin.conf with following content:
Console {
Name = "admin"
Password = "secret"
Profile = "webui-admin"
}
Resource 3.7:
bareos-dir.d/console/admin.conf
To enable this, reload or restart your Bareos Director.
- or use the bconsole:
*configure add console name=admin password=secret profile=webui-admin
bconsole 3.8:
add console
For details, please read Console Resource.
The package bareos-webui comes with a predefined profile for Bareos Webui: webui-adminDir
Profile.
If your Bareos Webui is installed on another system than the Bareos Director, you have to copy the profile to the
Bareos Director.
This is the default profile, giving access to all Bareos resources and allowing all commands used by the Bareos
Webui:
Profile {
Name = webui-admin
CommandACL = !.bvfs_clear_cache, !.exit, !.sql, !configure, !create, !delete, !purge, !sqlquery, !umount, !unmount, *all*
Job ACL = *all*
Schedule ACL = *all*
Catalog ACL = *all*
Pool ACL = *all*
Storage ACL = *all*
Client ACL = *all*
FileSet ACL = *all*
Where ACL = *all*
Plugin Options ACL = *all*
}
Resource 3.9:
bareos-dir.d/profile/webui-admin.conf
The ProfileDir itself does not give any access to the Bareos Director, but can be used by ConsoleDir, which do give
access to the Bareos Director, see Create a restricted consoles.
For details, please read Profile Resource.
To use Bareos Director on a system with SELinux enabled, permission must be given to HTTPD to make network
connections:
setsebool -P httpd_can_network_connect on
Commands 3.10:
The package bareos-webui provides a default configuration for Apache. Depending on your distribution, it is
installed at /etc/apache2/conf.d/bareos-webui.conf, /etc/httpd/conf.d/bareos-webui.conf or
/etc/apache2/available-conf/bareos-webui.conf.
The required Apache modules, setenv, rewrite and php are enabled via package postinstall script. However, after
installing the bareos-webui package, you need to restart your Apache webserver manually.
Configure your directors in /etc/bareos-webui/directors.ini to match your settings.
The configuration file /etc/bareos-webui/directors.ini should look similar to this:
;
; Bareos WebUI Configuration File
;
; File: /etc/bareos-webui/directors.ini
;
;------------------------------------------------------------------------------
; Section localhost-dir
;------------------------------------------------------------------------------
[localhost-dir]
; Enable or disable section. Possible values are "yes" or "no", the default is "yes".
enabled = "yes"
; Fill in the IP-Address or FQDN of you director.
diraddress = "localhost"
; Default value is 9101
dirport = 9101
; Set catalog to explicit value if you have multiple catalogs
;catalog = "MyCatalog"
; TLS verify peer
; Possible values: true or false
tls_verify_peer = false
; Server can do TLS
; Possible values: true or false
server_can_do_tls = false
; Server requires TLS
; Possible values: true or false
server_requires_tls = false
; Client can do TLS
; Possible values: true or false
client_can_do_tls = false
; Client requires TLS
; Possible value: true or false
client_requires_tls = false
; Path to the certificate authority file
; E.g. ca_file = "/etc/bareos-webui/tls/BareosCA.crt"
;ca_file = ""
; Path to the cert file which needs to contain the client certificate and the key in PEM encoding
; E.g. ca_file = "/etc/bareos-webui/tls/restricted-named-console.pem"
;cert_file = ""
; Passphrase needed to unlock the above cert file if set
;cert_file_passphrase = ""
; Allowed common names
; E.g. allowed_cns = "host1.example.com"
;allowed_cns = ""
;------------------------------------------------------------------------------
; Section another-host-dir
;------------------------------------------------------------------------------
[another-host-dir]
enabled = "no"
diraddress = "192.168.120.1"
dirport = 9101
;catalog = "MyCatalog"
;tls_verify_peer = false
;server_can_do_tls = false
;server_requires_tls = false
;client_can_do_tls = false
;client_requires_tls = false
;ca_file = ""
;cert_file = ""
;cert_file_passphrase = ""
;allowed_cns = ""
Configuration 3.11:
/etc/bareos-webui/directors.ini
You can add as many directors as you want, also the same host with a different name and different catalog, if you
have multiple catalogs.
Since Version >= 16.2.2 you are able to configure some parameters of the Bareos Webui to your needs.
;
; Bareos WebUI Configuration File
;
; File: /etc/bareos-webui/configuration.ini
;
;------------------------------------------------------------------------------
; SESSION SETTINGS
;------------------------------------------------------------------------------
;
[session]
; Default: 3600 seconds
timeout=3600
;------------------------------------------------------------------------------
; DASHBOARD SETTINGS
;------------------------------------------------------------------------------
[dashboard]
; Autorefresh Interval
; Default: 60000 milliseconds
autorefresh_interval=60000
;------------------------------------------------------------------------------
; TABLE SETTINGS
;------------------------------------------------------------------------------
[tables]
; Possible values for pagination
; Default: 10,25,50,100
pagination_values=10,25,50,100
; Default number of rows per page
; for possible values see pagination_values
; Default: 25
pagination_default_value=25
; State saving - restore table state on page reload.
; Default: false
save_previous_state=false
;------------------------------------------------------------------------------
; VARIOUS SETTINGS
;------------------------------------------------------------------------------
[autochanger]
; Pooltype for label to use as filter.
; Default: none
labelpooltype=scratch
Configuration 3.12:
/etc/bareos-webui/configuration.ini
#
#
The Bareos Webui Director profile shipped with Bareos 15.2 (webuiDir
Profile in the file
/etc/bareos/bareos-dir.d/webui-profiles.conf) is not sufficient to use the Bareos Webui 16.2. This has
several reasons:
- The handling of acls is more strict in Bareos 16.2 than it has been in Bareos 15.2. Substring matching
is no longer enabled, therefore you need to change .bvfs_* to .bvfs_.* in your Command ACL Dir
Profile
to have a proper regular expression. Otherwise the restore module won’t work any longer, especially
the file browser.
- The Bareos Webui 16.2 uses following additional commands:
- .help
- .schedule
- .pools
- import
- export
- update
- release
- enable
- disable
If you used an unmodified /etc/bareos/bareos-dir.d/webui-profiles.conf file, the easiest way is to
overwrite it with the new profile file /etc/bareos/bareos-dir.d/profile/webui-admin.conf. The new
webui-adminDir
Profile allows all commands, except of the dangerous ones, see Configuration of profile
resources.
#
Since Version >= 16.2.0 it is possible to work with different catalogs. Therefore the catalog parameter has been
introduced. If you don’t set a catalog explicitly the default MyCatalogDir
Catalog will be used. Please see Configure your
/etc/bareos-webui/directors.ini for more details.
#
Since 16.2 the Bareos Webui introduced an additional configuration file besides the directors.ini file named
configuration.ini where you are able to adjust some parameters of the webui to your needs. Please see Configure
your /etc/bareos-webui/directors.ini for more details.
#
#
If you prefer to use Bareos Webui on Nginx with php5-fpm instead of Apache, a basic working configuration could
look like this:
server {
listen 9100;
server_name bareos;
root /var/www/bareos-webui/public;
location / {
index index.php;
try_files $uri $uri/ /index.php?$query_string;
}
location ~ .php$ {
include snippets/fastcgi-php.conf;
# php5-cgi alone:
# pass the PHP
# scripts to FastCGI server
# listening on 127.0.0.1:9000
#fastcgi_pass 127.0.0.1:9000;
# php5-fpm:
fastcgi_pass unix:/var/run/php5-fpm.sock;
# APPLICATION_ENV: set to ’development’ or ’production’
#fastcgi_param APPLICATION_ENV development;
fastcgi_param APPLICATION_ENV production;
}
}
Configuration 3.13:
bareos-webui on nginx
This will make the Bareos Webui accessible at http://bareos:9100/ (assuming your DNS resolve the hostname
bareos to the NGINX server).
#
In most cases, a Bareos update is simply done by a package update of the distribution. Please remind, that Bareos
Director and Bareos Storage Daemon must always have the same version. The version of the File Daemon may
differ, see chapter about ??.
#
When updating Bareos through the distribution packaging mechanism, the existing configuration kept as they
are.
If you don’t want to modify the behavior, there is normally no need to modify the configuration.
However, in some rare cases, configuration changes are required. These cases are described in the Release
Notes.
With Bareos version 16.2.4 the default configuration uses the Subdirectory Configuration Scheme. This scheme
offers various improvements. However, if your are updating from earlier versions, your existing single configuration
files (/etc/bareos/bareos-*.conf) stay in place and are contentiously used by Bareos. The new default
configuration resource files will also be installed (/etc/bareos/bareos-*.d/*/*.conf). However, they will only be
used, when the legacy configuration file does not exist.
See Updates from Bareos < 16.2.4 for details and how to migrate to Subdirectory Configuration Scheme.
#
Sometimes improvements in Bareos make it necessary to update the database scheme.
Please note! If the Bareos catalog database does not have the current schema, the Bareos Director refuses to
start.
Detailed information can then be found in the log file /var/log/bareos/bareos.log.
Take a look into the Release Notes to see which Bareos updates do require a database scheme update.
Please note! Especially the upgrade to Bareos ≥ 17.2.0 restructures the File database table. In larger
installations this is very time consuming and temporarily doubles the amount of required database disk
space.
#
Since Bareos Version >= 14.2.0 the Debian (and Ubuntu) based packages support the dbconfig-common mechanism
to create and update the Bareos database. If this is properly configured, the database schema will be automatically
adapted by the Bareos packages.
Please note! When using the PostgreSQL backend and updating to Bareos < 14.2.3, it is necessary to manually grant
database permissions, normally by using
root@linux:~#
su - postgres -c /usr/lib/bareos/scripts/grant_bareos_privileges
Commands 4.1:
For details see dbconfig-common (Debian).
If you disabled the usage of dbconfig-common, follow the instructions for Other Platforms.
#
This has to be done as database administrator. On most platforms Bareos knows only about the credentials to
access the Bareos database, but not about the database administrator to modify the database schema.
The task of updating the database schema is done by the script /usr/lib/bareos/scripts/update_bareos_tables.
However, this script requires administration access to the database. Depending on your distribution
and your database, this requires different preparations. More details can be found in chapter Catalog
Maintenance.
Please note! If you’re updating to Bareos <= 13.2.3 and have configured the Bareos database during install using
Bareos environment variables (db_name, db_user or db_password, see Catalog Maintenance), make sure to have
these variables defined in the same way when calling the update and grant scripts. Newer versions of Bareos read
these variables from the Director configuration file /etc/bareos/bareos-dir.conf. However, make sure that the
user running the database scripts has read access to this file (or set the environment variables). The postgres user
normally does not have the required permissions.
If your are using PostgreSQL and your PostgreSQL administrator is postgres (default), use following
commands:
su postgres -c /usr/lib/bareos/scripts/update_bareos_tables
su postgres -c /usr/lib/bareos/scripts/grant_bareos_privileges
Commands 4.2:
Update PostgreSQL database schema
The grant_bareos_privileges command is required, if new databases tables are introduced. It does not hurt to
run it multiple times.
After this, restart the Bareos Director and verify it starts without problems.
Make sure, that root has direct access to the local MySQL server. Check if the command mysql without parameter
connects to the database. If not, you may be required to adapt your local MySQL configuration file ~/.my.cnf. It
should look similar to this:
[client]
host=localhost
user=root
password=YourPasswordForAccessingMysqlAsRoot
Configuration 4.3:
MySQL
credentials
file
.my.cnf
If you are able to connect via the mysql to the database, run the following script from the Unix prompt:
/usr/lib/bareos/scripts/update_bareos_tables
Commands 4.4:
Update MySQL database schema
Currently on MySQL is it not necessary to run grant_bareos_privileges, because access to the database is
already given using wildcards.
After this, restart the Bareos Director and verify it starts without problems.
#
#
In order to make Bareos as flexible as possible, the directions given to Bareos are specified in several pieces. The
main instruction is the job resource, which defines a job. A backup job generally consists of a FileSet, a Client, a
Schedule for one or several levels or times of backups, a Pool, as well as additional instructions. Another way of
looking at it is the FileSet is what to backup; the Client is who to backup; the Schedule defines when, and the Pool
defines where (i.e. what Volume).
Typically one FileSet/Client combination will have one corresponding job. Most of the directives, such as FileSets,
Pools, Schedules, can be mixed and matched among the jobs. So you might have two different Job
definitions (resources) backing up different servers using the same Schedule, the same Fileset (backing
up the same directories on two machines) and maybe even the same Pools. The Schedule will define
what type of backup will run when (e.g. Full on Monday, incremental the rest of the week), and when
more than one job uses the same schedule, the job priority determines which actually runs first. If you
have a lot of jobs, you might want to use JobDefs, where you can set defaults for the jobs, which
can then be changed in the job resource, but this saves rewriting the identical parameters for each
job. In addition to the FileSets you want to back up, you should also have a job that backs up your
catalog.
Finally, be aware that in addition to the backup jobs there are restore, verify, and admin jobs, which have different
requirements.
#
If you have been using a program such as tar to backup your system, Pools, Volumes, and labeling may be a
bit confusing at first. A Volume is a single physical tape (or possibly a single file) on which Bareos
will write your backup data. Pools group together Volumes so that a backup is not restricted to the
length of a single Volume (tape). Consequently, rather than explicitly naming Volumes in your Job,
you specify a Pool, and Bareos will select the next appendable Volume from the Pool and mounts
it.
Although the basic Pool options are specified in the Director’s Pool resource, the real Pool is maintained in the
Bareos Catalog. It contains information taken from the Pool resource (configuration file) as well as information on
all the Volumes that have been added to the Pool.
For each Volume, Bareos maintains a fair amount of catalog information such as the first write date/time, the last
write date/time, the number of files on the Volume, the number of bytes on the Volume, the number of Mounts,
etc.
Before Bareos will read or write a Volume, the physical Volume must have a Bareos software label so that Bareos
can be sure the correct Volume is mounted. Depending on your configuration, this is either done automatically by
Bareos or manually using the label command in the Console program.
The steps for creating a Pool, adding Volumes to it, and writing software labels to the Volumes, may seem tedious
at first, but in fact, they are quite simple to do, and they allow you to use multiple Volumes (rather than being
limited to the size of a single tape). Pools also give you significant flexibility in your backup process. For example,
you can have a ”Daily” Pool of Volumes for Incremental backups and a ”Weekly” Pool of Volumes for Full backups.
By specifying the appropriate Pool in the daily and weekly backup Jobs, you thereby insure that no daily Job ever
writes to a Volume in the Weekly Pool and vice versa, and Bareos will tell you what tape is needed and
when.
For more on Pools, see the Pool Resource section of the Director Configuration chapter, or simply read on, and we
will come back to this subject later.
#
On Unix, Bareos configuration files are usually located in the /etc/bareos/ directory and are named accordingly to
the programs that use it. Since Bareos Version >= 16.2.4 the default configuration is stored as one file per resource
in subdirectories under bareos-dir.d, bareos-sd.d or bareos-fd.d. For details, see Customizing the
Configuration and Subdirectory Configuration Scheme.
#
You can test if your configuration file is syntactically correct by running the appropriate daemon with the -t option.
The daemon will process the configuration file and print any error messages then terminate.
As the Bareos Director and Bareos Storage Daemon runs as user bareos, testing the configuration should be done
as bareos.
This is especially required to test the Bareos Director, as it also connects to the database and checks if the catalog
schema version is correct. Depending on your database, only the bareos has permission to access
it.
su bareos -s /bin/sh -c "/usr/sbin/bareos-dir -t"
su bareos -s /bin/sh -c "/usr/sbin/bareos-sd -t"
bareos-fd -t
bconsole -t
bareos-tray-monitor -t
Commands 5.1:
Testing Configuration Files
#
This chapter will guide you through running Bareos. To do so, we assume you have installed Bareos.
However, we assume that you have not modified the configuration. The examples in this chapter use the
default configuration files and will write the volumes to disk in your /var/lib/bareos/storage/
directory.
The general flow of running Bareos is:
- Start the Database (if using PostgreSQL or MySQL/MariaDB)
- Installing Bareos
- Start the Bareos Daemons
- Start the Console program to interact with the Bareos Director
- Run a job
- Test recovering some files from the Volume just written to ensure the backup is good and that you
know how to recover. Better test before disaster strikes
- Add a second client.
Each of these steps is described in more detail below.
#
If you are using PostgreSQL or MySQL/MariaDB as the Bareos database, you should start it before you install
Bareos. If you are using Sqlite you need do nothing. Sqlite is automatically started by the Bareos
Director.
#
For installing Bareos, follow the instructions from the Installing Bareos chapter.
#
Assuming you have installed the packages, to start the three daemons, from your installation directory, simply
enter:
service bareos-dir start
service bareos-sd start
service bareos-fd start
bconsole 6.1:
start services
#
To communicate with the Bareos Director and to query the state of Bareos or run jobs, the bconsole program can
be used as a textual interface. Alternatively, for most purposes, also the Bareos Webui can be used, but for
simplicity, here we will describe only the bconsole program.
The bconsole runs the Bareos Console program, which connects to the Bareos Director. Since Bareos is a network
program, you can run the Console program anywhere on your network. Most frequently, however, one runs it on the
same machine as the Bareos Director. Normally, the Console program will print something similar to the
following:
root@linux:~#
bconsole
Connecting to Director bareos:9101
Enter a period to cancel a command.
*
Commands 6.2:
bconsole
The asterisk is the console command prompt.
Type help to see a list of available commands:
*help
Command Description
======= ===========
add Add media to a pool
autodisplay Autodisplay console messages
automount Automount after label
cancel Cancel a job
create Create DB Pool from resource
delete Delete volume, pool or job
disable Disable a job
enable Enable a job
estimate Performs FileSet estimate, listing gives full listing
exit Terminate Bconsole session
export Export volumes from normal slots to import/export slots
gui Non-interactive gui mode
help Print help on specific command
import Import volumes from import/export slots to normal slots
label Label a tape
list List objects from catalog
llist Full or long list like list command
messages Display pending messages
memory Print current memory usage
mount Mount storage
move Move slots in an autochanger
prune Prune expired records from catalog
purge Purge records from catalog
quit Terminate Bconsole session
query Query catalog
restore Restore files
relabel Relabel a tape
release Release storage
reload Reload conf file
rerun Rerun a job
run Run a job
status Report status
setbandwidth Sets bandwidth
setdebug Sets debug level
setip Sets new client address -- if authorized
show Show resource records
sqlquery Use SQL to query catalog
time Print current time
trace Turn on/off trace to file
unmount Unmount storage
umount Umount - for old-time Unix guys, see unmount
update Update volume, pool or stats
use Use specific catalog
var Does variable expansion
version Print Director version
wait Wait until no jobs are running
bconsole 6.3:
help
Details of the console program’s commands are explained in the Bareos Console chapter.
#
At this point, we assume you have done the following:
- Started the Database
- Installed Bareos
- Prepared the database for Bareos
- Started Bareos Director, Storage Daemon and File Daemon
- Invoked the Console program with bconsole
Furthermore, we assume for the moment you are using the default configuration files.
At this point, enter the show filesets and you should get something similar this:
*show filesets
...
FileSet {
Name = "SelfTest"
Include {
Options {
Signature = MD5
}
File = "/usr/sbin"
}
}
FileSet {
Name = "Catalog"
Include {
Options {
Signature = MD5
}
File = "/var/lib/bareos/bareos.sql"
File = "/etc/bareos"
}
}
...
bconsole 6.4:
show filesets
One of the FileSets is the pre-defined SelfTestDir
FileSet FileSet that will backup the /usr/sbin directory. For testing
purposes, we have chosen a directory of moderate size (about 30 Megabytes) and complexity without being too big.
The FileSet CatalogDir
FileSet is used for backing up Bareos’s catalog and is not of interest to us for the moment. You
can change what is backed up by editing the configuration and changing the File = line in the FileSetDir
resource.
Now is the time to run your first backup job. We are going to backup your Bareos source directory to
a File Volume in your /var/lib/bareos/storage/ directory just to show you how easy it is. Now
enter:
*status dir
bareos-dir Version: 13.2.0 (09 April 2013) x86_64-pc-linux-gnu debian Debian GNU/Linux 6.0 (squeeze)
Daemon started 23-May-13 13:17. Jobs: run=0, running=0 mode=0
Heap: heap=270,336 smbytes=59,285 max_bytes=59,285 bufs=239 max_bufs=239
Scheduled Jobs:
Level Type Pri Scheduled Name Volume
===================================================================================
Incremental Backup 10 23-May-13 23:05 BackupClient1 testvol
Full Backup 11 23-May-13 23:10 BackupCatalog testvol
====
Running Jobs:
Console connected at 23-May-13 13:34
No Jobs running.
====
bconsole 6.5:
status dir
where the times and the Director’s name will be different according to your setup. This shows that an Incremental
job is scheduled to run for the Job BackupClient1Dir
Job at 1:05am and that at 1:10, a BackupCatalogDir
Job is scheduled
to run.
Now enter:
*status client
Automatically selected Client: bareos-fd
Connecting to Client bareos-fd at bareos:9102
bareos-fd Version: 13.2.0 (09 April 2013) x86_64-pc-linux-gnu debian Debian GNU/Linux 6.0 (squeeze)
Daemon started 23-May-13 13:17. Jobs: run=0 running=0.
Heap: heap=135,168 smbytes=26,000 max_bytes=26,147 bufs=65 max_bufs=66
Sizeof: boffset_t=8 size_t=8 debug=0 trace=0 bwlimit=0kB/s
Running Jobs:
Director connected at: 23-May-13 13:58
No Jobs running.
====
bconsole 6.6:
status client
In this case, the client is named bareos-fdDir
Client your name might be different, but the line beginning
with bareos-fd Version is printed by your Bareos File Daemon, so we are now sure it is up and
running.
Finally do the same for your Bareos Storage Daemon with:
*status storage
Automatically selected Storage: File
Connecting to Storage daemon File at bareos:9103
bareos-sd Version: 13.2.0 (09 April 2013) x86_64-pc-linux-gnu debian Debian GNU/Linux 6.0 (squeeze)
Daemon started 23-May-13 13:17. Jobs: run=0, running=0.
Heap: heap=241,664 smbytes=28,574 max_bytes=88,969 bufs=73 max_bufs=74
Sizes: boffset_t=8 size_t=8 int32_t=4 int64_t=8 mode=0 bwlimit=0kB/s
Running Jobs:
No Jobs running.
====
Device status:
Device "FileStorage" (/var/lib/bareos/storage) is not open.
==
====
Used Volume status:
====
====
bconsole 6.7:
status storage
You will notice that the default Bareos Storage Daemon device is named FileDir
Storage and that it will use device
/var/lib/bareos/storage, which is not currently open.
Now, let’s actually run a job with:
run
bconsole 6.8:
run
you should get the following output:
Automatically selected Catalog: MyCatalog
Using Catalog "MyCatalog"
A job name must be specified.
The defined Job resources are:
1: BackupClient1
2: BackupCatalog
3: RestoreFiles
Select Job resource (1-3):
bconsole 6.9:
select job
Here, Bareos has listed the three different Jobs that you can run, and you should choose number 1 and type enter,
at which point you will get:
Run Backup job
JobName: BackupClient1
Level: Incremental
Client: bareos-fd
Format: Native
FileSet: SelfTest
Pool: Full (From Job resource)
NextPool: *None* (From unknown source)
Storage: File (From Job resource)
When: 2013-05-23 14:50:04
Priority: 10
OK to run? (yes/mod/no):
bconsole 6.10:
run job
At this point, take some time to look carefully at what is printed and understand it. It is asking you if it is OK to
run a job named BackupClient1Dir
Job with FileSet SelfTestDir
FileSet as an Incremental job on your Client, and to use
Storage FileDir
Storage and Pool FullDir
Pool, and finally, it wants to run it now (the current time should be displayed by
your console).
Here we have the choice to run (yes), to modify one or more of the above parameters (mod), or to not run
the job (no). Please enter yes, at which point you should immediately get the command prompt (an
asterisk).
If you wait a few seconds, then enter the command messages you will get back something like:
TODO: Replace bconsole output by current version of Bareos.
*messages
28-Apr-2003 14:30 bareos-sd: Wrote label to prelabeled Volume
"TestVolume001" on device /var/lib/bareos/storage
28-Apr-2003 14:30 rufus-dir: Bareos 1.30 (28Apr03): 28-Apr-2003 14:30
JobId: 1
Job: BackupClient1.2003-04-28_14.22.33
FileSet: Full Set
Backup Level: Full
Client: bareos-fd
Start time: 28-Apr-2003 14:22
End time: 28-Apr-2003 14:30
Files Written: 1,444
Bytes Written: 38,988,877
Rate: 81.2 KB/s
Software Compression: None
Volume names(s): TestVolume001
Volume Session Id: 1
Volume Session Time: 1051531381
Last Volume Bytes: 39,072,359
FD termination status: OK
SD termination status: OK
Termination: Backup OK
28-Apr-2003 14:30 rufus-dir: Begin pruning Jobs.
28-Apr-2003 14:30 rufus-dir: No Jobs found to prune.
28-Apr-2003 14:30 rufus-dir: Begin pruning Files.
28-Apr-2003 14:30 rufus-dir: No Files found to prune.
28-Apr-2003 14:30 rufus-dir: End auto prune.
bconsole 6.11:
run
If you don’t see the output immediately, you can keep entering messages until the job terminates.
Instead of typing messages multiple times, you can also ask bconsole to wait, until a specific job is
finished:
*wait jobid=1
bconsole 6.12:
wait
or just wait , which waits for all running jobs to finish.
Another useful command is autodisplay on. With autodisplay activated, messages will automatically be displayed
as soon as they are ready.
If you do an ls -l of your /var/lib/bareos/storage directory, you will see that you have the following
item:
-rw-r----- 1 bareos bareos 39072153 Apr 28 14:30 Full-001
bconsole 6.13:
volume
This is the file Volume that you just wrote and it contains all the data of the job just run. If you run additional jobs,
they will be appended to this Volume unless you specify otherwise.
If you would like to stop here, you can simply enter quit in the Console program.
If you would like to try restoring the files that you just backed up, read the following section.
#
If you have run the default configuration and run the job as demonstrated above, you can restore the backed up files
in the Console program by entering:
*restore all
First you select one or more JobIds that contain files
to be restored. You will be presented several methods
of specifying the JobIds. Then you will be allowed to
select which files from those JobIds are to be restored.
To select the JobIds, you have the following choices:
1: List last 20 Jobs run
2: List Jobs where a given File is saved
3: Enter list of comma separated JobIds to select
4: Enter SQL list command
5: Select the most recent backup for a client
6: Select backup for a client before a specified time
7: Enter a list of files to restore
8: Enter a list of files to restore before a specified time
9: Find the JobIds of the most recent backup for a client
10: Find the JobIds for a backup for a client before a specified time
11: Enter a list of directories to restore for found JobIds
12: Select full restore to a specified Job date
13: Cancel
Select item: (1-13):
bconsole 6.14:
restore
As you can see, there are a number of options, but for the current demonstration, please enter 5 to do a restore of
the last backup you did, and you will get the following output:
Automatically selected Client: bareos-fd
The defined FileSet resources are:
1: Catalog
2: Full Set
Select FileSet resource (1-2):
bconsole 6.15:
select resource
As you can see, Bareos knows what client you have, and since there was only one, it selected it automatically. Select
2, because you want to restore files from the file set.
+-------+-------+----------+------------+---------------------+---------------+
| jobid | level | jobfiles | jobbytes | starttime | volumename |
+-------+-------+----------+------------+---------------------+---------------+
| 1 | F | 166 | 19,069,526 | 2013-05-05 23:05:02 | TestVolume001 |
+-------+-------+----------+------------+---------------------+---------------+
You have selected the following JobIds: 1
Building directory tree for JobId(s) 1 ... +++++++++++++++++++++++++++++++++++++++++
165 files inserted into the tree and marked for extraction.
You are now entering file selection mode where you add (mark) and
remove (unmark) files to be restored. No files are initially added, unless
you used the "all" keyword on the command line.
Enter "done" to leave this mode.
cwd is: /
$
bconsole 6.16:
restore filesystem
where I have truncated the listing on the right side to make it more readable.
Then Bareos produced a listing containing all the jobs that form the current backup, in this case, there is only one,
and the Storage daemon was also automatically chosen. Bareos then took all the files that were in Job number 1 and
entered them into a directory tree (a sort of in memory representation of your filesystem). At this point, you can
use the cd and ls or dir commands to walk up and down the directory tree and view what files
will be restored. For example, if you enter cd /usr/sbin and then enter dir you will get a listing
of all the files in the /usr/sbin/ directory. On your system, the path might be somewhat different.
For more information on this, please refer to the Restore Command Chapter of this manual for more
details.
To exit this mode, simply enter:
done
bconsole 6.17:
done
and you will get the following output:
Bootstrap records written to
/home/user/bareos/testbin/working/restore.bsr
The restore job will require the following Volumes:
TestVolume001
1444 files selected to restore.
Run Restore job
JobName: RestoreFiles
Bootstrap: /home/user/bareos/testbin/working/restore.bsr
Where: /tmp/bareos-restores
Replace: always
FileSet: Full Set
Backup Client: rufus-fd
Restore Client: rufus-fd
Storage: File
JobId: *None*
When: 2005-04-28 14:53:54
OK to run? (yes/mod/no):
Bootstrap records written to /var/lib/bareos/bareos-dir.restore.1.bsr
The job will require the following
Volume(s) Storage(s) SD Device(s)
===========================================================================
TestVolume001 File FileStorage
Volumes marked with "*" are online.
166 files selected to be restored.
Run Restore job
JobName: RestoreFiles
Bootstrap: /var/lib/bareos/bareos-dir.restore.1.bsr
Where: /tmp/bareos-restores
Replace: Always
FileSet: Full Set
Backup Client: bareos-fd
Restore Client: bareos-fd
Format: Native
Storage: File
When: 2013-05-23 15:56:53
Catalog: MyCatalog
Priority: 10
Plugin Options: *None*
OK to run? (yes/mod/no):
bconsole 6.18:
job report
If you answer yes your files will be restored to /tmp/bareos-restores. If you want to restore the files to their
original locations, you must use the mod option and explicitly set Where: to nothing (or to /). We recommend
you go ahead and answer yes and after a brief moment, enter messages , at which point you should
get a listing of all the files that were restored as well as a summary of the job that looks similar to
this:
23-May 15:24 bareos-dir JobId 2: Start Restore Job RestoreFiles.2013-05-23_15.24.01_10
23-May 15:24 bareos-dir JobId 2: Using Device "FileStorage" to read.
23-May 15:24 bareos-sd JobId 2: Ready to read from volume "TestVolume001" on device "FileStorage" (/var/lib/bareos/storage).
23-May 15:24 bareos-sd JobId 2: Forward spacing Volume "TestVolume001" to file:block 0:194.
23-May 15:58 bareos-dir JobId 3: Bareos bareos-dir 13.2.0 (09Apr13):
Build OS: x86_64-pc-linux-gnu debian Debian GNU/Linux 6.0 (squeeze)
JobId: 2
Job: RestoreFiles.2013-05-23_15.58.48_11
Restore Client: bareos-fd
Start time: 23-May-2013 15:58:50
End time: 23-May-2013 15:58:52
Files Expected: 166
Files Restored: 166
Bytes Restored: 19,069,526
Rate: 9534.8 KB/s
FD Errors: 0
FD termination status: OK
SD termination status: OK
Termination: Restore OK
bconsole 6.19:
job report
After exiting the Console program, you can examine the files in /tmp/bareos-restores, which will contain a small
directory tree with all the files. Be sure to clean up at the end with:
root@linux:~#
rm -rf /tmp/bareos-restore
Commands 6.20:
remove restore directory
#
Simply enter the command quit .
#
If you have gotten the example shown above to work on your system, you may be ready to add a second Client
(Bareos File Daemon). That is you have a second machine that you would like backed up. Lets assume, following
settings about the machine you want to add to your backup environment:
-
Hostname (FQDN)
- client2.example.com
-
IP Address
- 192.168.0.2
-
OS
- Linux (otherwise the paths may differ)
For this you have to make changes on the server side (Bareos Director) and the client side.
See Installing Bareos about how to add the Bareos repository. The only part you need installed on the other
machine is the bareos-filedaemon.
Bareos Version >= 16.2.4 offers the configure add command to add resources to the Bareos Director.
Start the bconsole and use the configure add client command. Address must be a DNS resolvable name or an
IP address.
*configure add client name=client2-fd address=192.168.0.2 password=secret
Created resource config file "/etc/bareos/bareos-dir.d/client/client2-fd.conf":
Client {
Name = client2-fd
Address = 192.168.0.2
Password = secret
}
bconsole 6.21:
add a client
This creates two resource configuration files:
- /etc/bareos/bareos-dir.d/client/client2-fd.conf
- /etc/bareos/bareos-dir-export/client/client2-fd/bareos-fd.d/director/bareos-dir.conf
(assuming your director resource is named bareos-dir)
The /etc/bareos/bareos-dir-export/client/client2-fd/bareos-fd.d/director/bareos-dir.conf is the
required resource needed on the Bareos File Daemon. You can copy it to the destination:
scp /etc/bareos/bareos-dir-export/client/client2-fd/bareos-fd.d/director/bareos-dir.conf root@client2.example.com:/etc/bareos/bareos-fd.d/director/
Commands 6.22:
Copy the bareos-fd director resource to the new client
Alternatively you can configure your resources manually. On the Bareos Director create the file
Client {
Name = client2-fd
Address = 192.168.0.2
Password = secret
}
Resource 6.23:
bareos-dir.d/client/client2-fd.conf
Reload or restart your Bareos Director:
*reload
reloaded
bconsole 6.24:
reload the Director configuration
The corresponding Bareos File Daemon director resource can be created directly on the client, see
below.
The package bareos-filedaemon Version >= 16.2.4 brings several configuration files:
- /etc/bareos/bareos-fd.d/client/myself.conf
- /etc/bareos/bareos-fd.d/director/bareos-dir.conf
- /etc/bareos/bareos-fd.d/director/bareos-mon.conf
- /etc/bareos/bareos-fd.d/messages/Standard.conf
In detail:
-
client/myself.conf
- defines the name of the client. The default is <hostname>-fd. Changes are only
required, if you want to use another name or en- or disable special Bareos File Daemon features. See
Client Resource.
-
director/bareos-dir.conf
- gives the Bareos Director bareos-dir full access to this Bareos File Daemon.
During installation, the Password Fd
Director is set to a random default. Adapt the name and/or the
password to your Bareos Director. (The name bareos-dir is the default Bareos Director name since
Bareos Version >= 16.2.4.)
-
director/bareos-mon.conf
- gives the Bareos Director bareos-mon restricted access to this Bareos File
Daemon. During installation, the Password Fd
Director is set to a random value. This resource is intended
to be used by the local bareos-tray-monitor.
-
messages/Standard.conf
- defines, how messages should be handled. The default sends all relevant messages
to the Bareos Director.
If your Bareos Director is named bareos-dir, the /etc/bareos/bareos-fd.d/director/bareos-dir.conf may
already be overwritten by the file you copied from the Bareos Director. If your Director has another name, an
addition resource file will exists. You can define an arbitrary number of Bareos Director’s in your Bareos
File Daemon configuration. However, normally you will only have one DirectorFd with full control
of your Bareos File Daemon and optional one DirectorFd for monitoring (used by the Bareos Tray
Monitor).
Anyhow, the resource will look similar to this:
Director {
Name = bareos-dir
Password = "[md5]5ebe2294ecd0e0f08eab7690d2a6ee69"
}
Resource 6.25:
bareos-fd.d/director/bareos-dir.conf
After a restart of the Bareos File Daemon to reload the configuration this resource allows the access for a Bareos
Director with name bareos-dir and password secret (stored in MD5 format).
service bareos-fd restart
Commands 6.26:
restart bareos-fd
If you have not created the DirectorFd by configure , you can create it also manually. If your Bareos Director is
also named bareos-dir, modify or create the file /etc/bareos/bareos-fd.d/director/bareos-dir.conf:
Director {
Name = "bareos-dir" # Name of your Bareos Director
Password = "secret" # Password (cleartext or MD5) must be identical
# to the password of your client reosurce in the Direcotr
# (bareos-dir.d/client/client2-fd.conf)
}
Resource 6.27:
bareos-fd.d/director/bareos-dir.conf
See the relation between resource names and password of the different Bareos components in Names, Passwords and
Authorization.
If your are not using the Subdirectory Configuration Scheme, make sure that this resource file gets included in your
Bareos File Daemon configuration. You can verify this by
bareos-fd -xc
Commands 6.28:
show how bareos-fd would read the current configuration files
After modifying the file, you have to restart the Bareos File Daemon:
service bareos-fd restart
Commands 6.29:
restart bareos-fd
The following example show how to
- Verify the network connection from Bareos Director to the Bareos File Daemon.
- Add a job resource.
- Dry-run the job (estimate listing).
- Run the job.
- Wait for the job to finish.
- Verify the job.
*status client=client2-fd
...
*configure add job name=client2-job client=client2-fd jobdefs=DefaultJob
Created resource config file "/etc/bareos/bareos-dir.d/job/client2-job.conf":
Job {
Name = client2-job
Client = client2-fd
JobDefs = DefaultJob
}
*estimate listing job=client2-job
...
*run job=client2-job
...
*wait jobid=...
...
*list joblog jobid=...
...
*list files jobid=...
...
*list volumes
...
bconsole 6.30:
test the client and add a job resource
#
When you start the Bareos daemons, the Storage daemon attempts to open all defined storage devices and verify the
currently mounted Volume (if configured). Until all the storage devices are verified, the Storage daemon will not
accept connections from the Console program. If a tape was previously used, it will be rewound, and on some
devices this can take several minutes. As a consequence, you may need to have a bit of patience when first
contacting the Storage daemon after starting the daemons. If you can see your tape drive, once the lights stop
flashing, the drive will be ready to be used.
The same considerations apply if you have just mounted a blank tape in a drive. It can take a minute or two before
the drive properly recognizes that the tape is blank. If you attempt to mount the tape with the Console program
during this recognition period, it is quite possible that you will hang your SCSI driver. As a consequence, you are
again urged to have patience when inserting blank tapes. Let the device settle down before attempting to access
it.
#
Creating the Pool is automatically done when the Bareos Director starts, so if you understand Pools, you can skip to
the next section.
When you run a backup job, one of the things that Bareos must know is what Volumes to use. Instead of specifying
a Volume (tape) directly, you specify which Pool of Volumes you want Bareos to consult when it wants a Volume for
writing backups. Bareos will select the first available Volume from the Pool that is appropriate for the Storage Dir
Job
you have specified for the Job being run. When a volume has filled up with data, Bareos will change its VolStatus
from Append to Full, and then Bareos will use the next volume and so on. If no appendable Volume exists in the
Pool, the Director will attempt to recycle an old Volume. For details, please read the Automatic Volume Recycling
chapter.
If there are still no appendable Volumes available, Bareos will send a message requesting the operator to create an
appropriate Volume.
Bareos keeps track of the Pool name, the volumes contained in the Pool, and a number of attributes of each of those
Volumes.
When Bareos starts, it ensures that all Pool resource definitions have been recorded in the catalog. You can verify
this by entering:
*list pools
+--------+--------------+---------+---------+----------+---------------+
| PoolId | Name | NumVols | MaxVols | PoolType | LabelFormat |
+--------+--------------+---------+---------+----------+---------------+
| 1 | Full | 1 | 100 | Backup | Full- |
| 2 | Differential | 0 | 100 | Backup | Differential- |
| 3 | Incremental | 1 | 100 | Backup | Incremental- |
| 4 | Scratch | 0 | 0 | Backup | * |
+--------+--------------+---------+---------+----------+---------------+
bconsole 6.31:
list pools
#
-
help
- Show the list all all available commands.
-
help list
- Show detail information about a specific command, in this case the command list .
-
status dir
- Print a status of all running jobs and jobs scheduled in the next 24 hours.
-
status
- The console program will prompt you to select a daemon type, then will request the daemon’s
status.
-
status jobid=nn
- Print a status of JobId nn if it is running. The Storage daemon is contacted and requested
to print a current status of the job as well.
-
list pools
- List the pools defined in the Catalog (normally only Default is used).
-
list volumes
- Lists all the media defined in the Catalog.
-
list jobs
- Lists all jobs in the Catalog that have run.
-
list jobid=nn
- Lists JobId nn from the Catalog.
-
list jobtotals
- Lists totals for all jobs in the Catalog.
-
list files jobid=nn
- List the files that were saved for JobId nn.
-
list jobmedia
- List the media information for each Job run.
-
messages
- Prints any messages that have been directed to the console.
-
quit
- Exit or quit the console program.
Most of the commands given above, with the exception of list, will prompt you for the necessary arguments if you
simply enter the command name.
The full list of commands is shown in the chapter Console Commands.
#
We recommend you take your time before implementing a production on a Bareos backup system since Bareos is a
rather complex program, and if you make a mistake, you may suddenly find that you cannot restore
your files in case of a disaster. This is especially true if you have not previously used a major backup
product.
If you follow the instructions in this chapter, you will have covered most of the major problems that can occur. It
goes without saying that if you ever find that we have left out an important point, please inform us, so that we can
document it to the benefit of everyone.
#
The following assumes that you have installed Bareos, you more or less understand it, you have at
least worked through the tutorial or have equivalent experience, and that you have set up a basic
production configuration. If you haven’t done the above, please do so and then come back here. The
following is a sort of checklist that points with perhaps a brief explanation of why you should do it.
In most cases, you will find the details elsewhere in the manual. The order is more or less the order
you would use in setting up a production system (if you already are in production, use the checklist
anyway).
#
Although these items may not be critical, they are recommended and will help you avoid problems.
If you absolutely must implement a system where you write a different tape each night and take it offsite in the
morning. We recommend that you do several things:
- Write a bootstrap file of your backed up data and a bootstrap file of your catalog backup to a external
media like CDROM or USB stick, and take that with the tape. If this is not possible, try to write
those files to another computer or offsite computer, or send them as email to a friend. If none of that
is possible, at least print the bootstrap files and take that offsite with the tape. Having the bootstrap
files will make recovery much easier.
- It is better not to force Bareos to load a particular tape each day. Instead, let Bareos choose the tape. If
you need to know what tape to mount, you can print a list of recycled and appendable tapes daily, and
select any tape from that list. Bareos may propose a particular tape for use that it considers optimal,
but it will accept any valid tape from the correct pool.
#
Each Bareos component (Director, Client, Storage, Console) has its own configuration containing a set of resource
definitions. These resources are very similar from one service to another, but may contain different directives
(records) depending on the component. For example, in the Director configuration, the Director Resource
defines the name of the Director, a number of global Director parameters and his password. In the File
daemon configuration, the Director Resource specifies which Directors are permitted to use the File
daemon.
If you install all Bareos daemons (Director, Storage and File Daemon) onto one system, the Bareos package tries its
best to generate a working configuration as a basis for your individual configuration.
The details of each resource and the directives permitted therein are described in the following chapters.
The following configuration files must be present:
- Director Configuration – to define the resources necessary for the Director. You define all the Clients
and Storage daemons that you use in this configuration file.
- Storage Daemon Configuration – to define the resources to be used by each Storage daemon. Normally,
you will have a single Storage daemon that controls your disk storage or tape drives. However, if you
have tape drives on several machines, you will have at least one Storage daemon per machine.
- Client/File Daemon Configuration – to define the resources for each client to be backed up. That is,
you will have a separate Client resource file on each machine that runs a File daemon.
- Console Configuration – to define the resources for the Console program (user interface to the Director).
It defines which Directors are available so that you may interact with them.
#
When a Bareos component starts, it reads its configuration. In Bareos < 16.2.2 only configuration files (which
optionally can include other files) are supported. Since Bareos Version >= 16.2.2 also configuration subdirectories
are supported.
In this section, the following naming is used:
- $CONFIGDIR refers to the base configuration directory. Bareos Linux packages use /etc/bareos/.
- A component is one of the following Bareos programs:
- bareos-dir
- bareos-sd
- bareos-fd
- bareos-traymonitor
- bconsole
- bat (only legacy config file: bat.conf)
- Bareos tools, like Volume Utility Commands and others.
- $COMPONENT refers to one of the listed components.
#
When starting a Bareos component, it will look for its configuration. Bareos components allow the configuration
file/directory to be specified as a command line parameter -c $PATH.
- configuration path parameter is not given (default)
- $CONFIGDIR/$COMPONENT.conf is a file
- the configuration is read from the file $CONFIGDIR/$COMPONENT.conf
- $CONFIGDIR/$COMPONENT.d/ is a directory
- the configuration is read from $CONFIGDIR/$COMPONENT.d/*/*.conf (subdirectory
configuration)
- configuration path parameter is given (-c $PATH)
- $PATH is a file
- the configuration is read from the file specified in $PATH
- $PATH is a directory
- the configuration is read from $PATH/$COMPONENT.d/*/*.conf (subdirectory configuration)
As the $CONFIGDIR differs between platforms or is overwritten by the path parameter, the documentation will
often refer to the configuration without the leading path (e.g. $COMPONENT.d/*/*.conf instead of
$CONFIGDIR/$COMPONENT.d/*/*.conf).
When subdirectory configuration is used, all files matching $PATH/$COMPONENT.d/*/*.conf will be read, see
Subdirectory Configuration Scheme.
Relation between Bareos components and configuration
| Bareos component | 
| 
|
|
|
|
|
|
|
| bareos-dir | bareos-dir.conf | bareos-dir.d |
| Director Configuration | (/etc/bareos/bareos-dir.conf) | (/etc/bareos/bareos-dir.d/) |
|
|
|
| bareos-sd | bareos-sd.conf | bareos-sd.d |
| Storage Daemon Configuration | (/etc/bareos/bareos-sd.conf) | (/etc/bareos/bareos-sd.d/) |
|
|
|
| bareos-fd | bareos-fd.conf | bareos-fd.d |
| Client/File Daemon Configuration | (/etc/bareos/bareos-fd.conf) | (/etc/bareos/bareos-fd.d/) |
|
|
|
| bconsole | bconsole.conf | bconsole.d |
| Console Configuration | (/etc/bareos/bconsole.conf) | (/etc/bareos/bconsole.d/) |
|
|
|
| bareos-traymonitor | tray-monitor.conf | tray-monitor.d |
| Monitor Configuration | (/etc/bareos/tray-monitor.conf) | (/etc/bareos/tray-monitor.d/) |
|
|
|
| bat | bat.conf | (not supported) |
| | (/etc/bareos/bat.conf) | |
|
|
|
| Volume Utility Commands | bareos-sd.conf | bareos-sd.d |
| (use the bareos-sd configuration) | (/etc/bareos/bareos-sd.conf) | (/etc/bareos/bareos-sd.d/) |
| |
#
If the subdirectory configuration is used, instead of a single configuration file, all files matching $COMPONENT.d/*/*.conf
are read as a configuration, see What configuration will be used?.
In Bareos < 16.2.2, Bareos uses one configuration file per component.
Most larger Bareos environments split their configuration into separate files, making it easier to manage the
configuration.
Also some extra packages (bareos-webui, plugins, ...) require a configuration, which must be included into the
Bareos Director or Bareos Storage Daemon configuration. The subdirectory approach makes it easier to add or
modify the configuration resources of different Bareos packages.
The Bareos configure command requires a configuration directory structure, as provided by the subdirectory
approach.
From Bareos Version >= 16.2.4 on, new installations will use configuration subdirectories by default.
- Each configuration resource has to use its own configuration file.
- The path of a resource file is $COMPONENT.d/$RESOURCETYPE/$RESOURCENAME.conf.
- The name of the configuration file is identical with the resource name:
- e.g.
- bareos-dir.d/director/bareos-dir.conf
- bareos-dir.d/pool/Full.conf
- Exceptions:
- The resource file bareos-fd.d/client/myself.conf always has the file name myself.conf,
while the name is normally set to the hostname of the system.
- Example resource files:
- Additional packages can contain configuration files that are automatically included. However, most
additional configuration resources require configuration. When a resource file requires configuration, it
has to be included as an example file:
- $CONFIGDIR/$COMPONENT.d/$RESOURCE/$NAME.conf.example
- For example, the Bareos Webui entails one config resource and one config resource example for the
Bareos Director:
- $CONFIGDIR/bareos-director.d/profile/webui-admin.conf
- $CONFIGDIR/bareos-director.d/console/admin.conf.example
- Disable/remove configuration resource files:
- Normally you should not remove resources that are already in use (jobs, clients, ...). Instead
you should disable them by adding the directive Enable = no. Otherwise you take the risk that
orphaned entries are kept in the Bareos catalog. However, if a resource has not been used or all
references have been cleared from the database, they can also be removed from the configuration.
Please note! If you want to remove a configuration resource that is part of a Bareos package,
replace the resource configuration file by an empty file. This prevents the resource from reappearing
in the course of a package update.
New installation
- The Subdirectories Configuration Scheme is used by default from Bareos Version >= 16.2.4 onwards.
- They will be usable immediately after installing a Bareos component.
- If additional packages entail example configuration files ($NAME.conf.example), copy them to $NAME.
conf, modify it as required and reload or restart the component.
Updates from Bareos < 16.2.4
- When updating to a Bareos version containing the Subdirectories Configuration, the existing configuration will
not be touched and is still the default configuration.
- Please note! Problems can occur if you have implemented an own wildcard mechanism to load
your configuration from the same subdirectories as used by the new packages ($CONFIGDIR/
$COMPONENT.d/*/*.conf). In this case, newly installed configuration resource files can alter
your current configuration by adding resources. Best create a copy of your configuration directory
before updating Bareos and modify your existing configuration file to use that other directory.
- As long as the old configuration file ($CONFIGDIR/$COMPONENT.conf) exists, it will be used.
- The correct way of migrating to the new configuration scheme would be to split the configuration file
into resources, store them in the resource directories and then remove the original configuration
file.
- For migrating the Bareos Director configuration, the script bareos-migrate-config.sh exists. Being called,
it connects via bconsole to a running Bareos Director and creates subdirectories with the resource
configuration files.
# prepare temporary directory
mkdir /tmp/baroes-dir.d
cd /tmp/baroes-dir.d
# download migration script
wget https://raw.githubusercontent.com/bareos/bareos-contrib/master/misc/bareos-migrate-config/bareos-migrate-config.sh
# execute the script
bash bareos-migrate-config.sh
# backup old configuration
mv /etc/bareos/bareos-dir.conf /etc/bareos/bareos-dir.conf.bak
mv /etc/bareos/bareos-dir.d /etc/bareos/bareos-dir.d.bak
# make sure, that all packaged configuration resources exists,
# otherwise they will be added when updating Bareos.
for i in ‘find /etc/bareos/bareos-dir.d.bak/ -name *.conf -type f -printf "%P\n"‘; do touch "$i"; done
# install newly generated configuration
cp -a /tmp/bareos-dir.d /etc/bareos/
Restart the Bareos Director and verify your configuration. Also make sure, that all resource configuration
files coming from Bareos packages exists, in doubt as empty files, see remove configuration resource
files.
- Another way, without splitting the configuration into resource files is:
#
A configuration file consists of one or more resources (see Resource).
Bareos programs can work with
#
Bareos is designed to handle most character sets of the world, US ASCII, German, French, Chinese, ... However, it
does this by encoding everything in UTF-8, and it expects all configuration files (including those read on Win32
machines) to be in UTF-8 format. UTF-8 is typically the default on Linux machines, but not on all Unix machines,
nor on Windows, so you must take some care to ensure that your locale is set properly before starting
Bareos.
To ensure that Bareos configuration files can be correctly read including foreign characters, the LANG
environment variable must end in .UTF-8. A full example is en_US.UTF-8. The exact syntax may
vary a bit from OS to OS, so that the way you have to define it will differ from the example. On
most newer Win32 machines you can use notepad to edit the conf files, then choose output encoding
UTF-8.
Bareos assumes that all filenames are in UTF-8 format on Linux and Unix machines. On Win32 they are in Unicode
(UTF-16) and will hence be automatically converted to UTF-8 format.
#
When reading a configuration, blank lines are ignored and everything after a hash sign (#) until the end of the line
is taken to be a comment.
#
A semicolon (;) is a logical end of line and anything after the semicolon is considered as the next statement. If a
statement appears on a line by itself, a semicolon is not necessary to terminate it, so generally in the examples in
this manual, you will not see many semicolons.
#
If you wish to break your configuration file into smaller pieces, you can do so by including other files using the
syntax @filename where filename is the full path and filename of another file. The @filename specification can be
given anywhere a primitive token would appear.
@/etc/bareos/extra/clients.conf
Configuration 8.3:
include a configuration file
Since Bareos Version >= 16.2.1 wildcards in pathes are supported:
@/etc/bareos/extra/*.conf
Configuration 8.4:
include multiple configuration files
By using @|command it is also possible to include the output of a script as a configuration:
@|"/etc/bareos/generate_configuration_to_stdout.sh"
Configuration 8.5:
use the output of a script as configuration
or if a parameter should be used:
@|"sh -c ’/etc/bareos/generate_client_configuration_to_stdout.sh clientname=client1.example.com’"
Configuration 8.6:
use the output of a script with parameter as a configuration
The scripts are called at the start of the daemon. You should use this with care.
#
A resource is defined as the resource type (see Resource Types), followed by an open brace ({), a number of
Resource Directives, and ended by a closing brace (})
Each resource definition MUST contain a Name directive. It can contain a Description directive. The Name directive
is used to uniquely identify the resource. The Description directive can be used during the display of the Resource
to provide easier human recognition. For example:
Director {
Name = "bareos-dir"
Description = "Main Bareos Director"
Query File = "/usr/lib/bareos/scripts/query.sql"
}
Configuration 8.7:
Resource example
defines the Director resource with the name bareos-dir and a query file /usr/lib/bareos/scripts/query.sql.
When naming resources, for some resource types naming conventions should be applied:
-
Client
- names should be postfixed with -fd
-
Storage
- names should be postfixed with -sd
-
Director
- names should be postfixed with -dir
These conventions helps a lot when reading log messages.
#
Each directive contained within the resource (within the curly braces {}) is composed of a Resource Directive
Keyword followed by an equal sign (=) followed by a Resource Directive Value. The keywords must be one of the
known Bareos resource record keywords.
#
A resource directive keyword is the part before the equal sign (=) in a Resource Directive. The following sections will
list all available directives by Bareos component resources.
Case (upper/lower) and spaces are ignored in the resource directive keywords.
Within the keyword (i.e. before the equal sign), spaces are not significant. Thus the keywords: name, Name, and N
a m e are all identical.
#
A resource directive value is the part after the equal sign (=) in a Resource Directive.
Spaces after the equal sign and before the first character of the value are ignored. Other spaces within a value may
be significant (not ignored) and may require quoting.
In general, if you want spaces in a name to the right of the first equal sign (=), you must enclose that name within
double quotes. Otherwise quotes are not generally necessary because once defined, quoted strings and unquoted
strings are all equal.
Within a quoted string, any character following a backslash (∖) is taken as itself (handy for inserting backslashes
and double quotes (”)).
Please note! If the configure directive is used to define a number, the number is never to be put between surrounding
quotes. This is even true if the number is specified together with its unit, like 365 days.
Numbers are not to be quoted, see Quotes. Also do not prepend numbers by zeros (0), as these are not parsed in the
expected manner (write 1 instead of 01).
When parsing the resource directives, Bareos classifies the data according to the types listed below.
-
acl
- This directive defines what is permitted to be accessed. It does this by using a list of regular
expressions, separated by commas (,) or using multiple directives. If ! is prepended, the expression is
negated. The special keyword *all* allows unrestricted access.
Depending on the type of the ACL, the regular expressions can be either resource names, paths or
console commands.
Since Bareos Version >= 16.2.4 regular expression are handled more strictly. Before also substring
matches has been accepted.
For clarification, we demonstrate the usage of ACLs by some examples for Command ACL
Dir
Console:
Command ACL = help
Configuration 8.8:
Allow only the help command
Command ACL = help, list
Configuration 8.9:
Allow the help and the list command
Command ACL = help, iDoNotExist
Configuration 8.10:
Allow the help and the (not existing) iDoNotExist command
Command ACL = *all*
Configuration 8.11:
Allow all commands (special keyword)
Command ACL = !sqlquery, !u.*, *all*
Configuration 8.12:
Allow all commands except sqlquery and commands starting with u
Same:
Command ACL = !sqlquery, !u.*
Command ACL = *all*
Configuration 8.13:
Some as above. Specifying it in multiple lines doesn’t change the meaning
Command ACL = !sqlquery
Command ACL = !u.*
Comamnd ACL = !set(ip|debug)
Comamnd ACL = *all*
Configuration 8.14:
Additional deny the setip and setdebug commands
Please note! ACL checking stops at the first match. So the following definition allows all commands, which
might not be what you expected:
# WARNING: this configuration ignores !sqlquery, as *all* is matched before.
Command ACL = *all*, !sqlquery
Configuration 8.15:
Wrong: Allows all commands
-
auth-type
- Specifies the authentication type that must be supplied when connecting to a backup protocol that
uses a specific authentication type. Currently only used for NDMP Resource.
The following values are allowed:
-
None
- - Use no password
-
Clear
- - Use clear text password
-
MD5
- - Use MD5 hashing
-
integer
- A 32 bit integer value. It may be positive or negative.
Don’t use quotes around the number, see Quotes.
-
long integer
- A 64 bit integer value. Typically these are values such as bytes that can exceed 4 billion and thus
require a 64 bit value.
Don’t use quotes around the number, see Quotes.
-
job protocol
-
The protocol to run a the job. Following protocols are available:
-
Native
- Native Bareos job protocol.
-
NDMP
- Deprecated. Alias for NDMP_BAREOS.
-
NDMP_BAREOS
- Since Bareos Version >= 17.2.3. See NDMP_BAREOS.
-
NDMP_NATIVE
- Since Bareos Version >= 17.2.3. See NDMP_NATIVE.
-
name
- A keyword or name consisting of alphanumeric characters, including the hyphen, underscore, and dollar
characters. The first character of a name must be a letter. A name has a maximum length currently set to 127
bytes.
Please note that Bareos resource names as well as certain other names (e.g. Volume names) must contain only
letters (including ISO accented letters), numbers, and a few special characters (space, underscore, ...). All
other characters and punctuation are invalid.
-
password
- This is a Bareos password and it is stored internally in MD5 hashed format.
-
path
- A path is either a quoted or non-quoted string. A path will be passed to your standard shell for expansion
when it is scanned. Thus constructs such as $HOME are interpreted to be their correct values. The path can
either reference to a file or a directory.
-
positive integer
- A 32 bit positive integer value.
Don’t use quotes around the number, see Quotes.
-
speed
- The speed parameter can be specified as k/s, kb/s, m/s or mb/s.
Don’t use quotes around the parameter, see Quotes.
-
string
- A quoted string containing virtually any character including spaces, or a non-quoted string. A string
may be of any length. Strings are typically values that correspond to filenames, directories, or
system command names. A backslash (∖) turns the next character into itself, so to include a
double quote in a string, you precede the double quote with a backslash. Likewise to include a
backslash.
-
string-list
- Multiple strings, specified in multiple directives, or in a single directive, separated by commas
(,).
-
strname
- is similar to a name, except that the name may be quoted and can thus contain additional characters
including spaces.
-
net-address
- is either a domain name or an IP address specified as a dotted quadruple in string or quoted
string format. This directive only permits a single address to be specified. The net-port must be
specificly separated. If multiple net-addresses are needed, please assess if it is also possible to specify
net-addresses (plural).
-
net-addresses
- Specify a set of net-addresses and net-ports. Probably the simplest way to explain this is to
show an example:
Addresses = {
ip = { addr = 1.2.3.4; port = 1205;}
ipv4 = {
addr = 1.2.3.4; port = http;}
ipv6 = {
addr = 1.2.3.4;
port = 1205;
}
ip = {
addr = 1.2.3.4
port = 1205
}
ip = { addr = 1.2.3.4 }
ip = { addr = 201:220:222::2 }
ip = {
addr = server.example.com
}
}
Configuration 8.16:
net-addresses
where ip, ip4, ip6, addr, and port are all keywords. Note, that the address can be specified as either a dotted
quadruple, or in IPv6 colon notation, or as a symbolic name (only in the ip specification). Also, the port can
be specified as a number or as the mnemonic value from the /etc/services file. If a port is not specified,
the default one will be used. If an ip section is specified, the resolution can be made either by
IPv4 or IPv6. If ip4 is specified, then only IPv4 resolutions will be permitted, and likewise with
ip6.
-
net-port
- Specify a network port (a positive integer).
Don’t use quotes around the parameter, see Quotes.
-
resource
- A resource defines a relation to the name of another resource.
-
size
- A size specified as bytes. Typically, this is a floating point scientific input format followed by an optional
modifier. The floating point input is stored as a 64 bit integer value. If a modifier is present,
it must immediately follow the value with no intervening spaces. The following modifiers are
permitted:
-
k
- 1,024 (kilobytes)
-
kb
- 1,000 (kilobytes)
-
m
- 1,048,576 (megabytes)
-
mb
- 1,000,000 (megabytes)
-
g
- 1,073,741,824 (gigabytes)
-
gb
- 1,000,000,000 (gigabytes)
Don’t use quotes around the parameter, see Quotes.
-
time
- A time or duration specified in seconds. The time is stored internally as a 64 bit integer value, but it is
specified in two parts: a number part and a modifier part. The number can be an integer or a floating point
number. If it is entered in floating point notation, it will be rounded to the nearest integer. The modifier is
mandatory and follows the number part, either with or without intervening spaces. The following modifiers are
permitted:
-
seconds
-
-
minutes
- (60 seconds)
-
hours
- (3600 seconds)
-
days
- (3600*24 seconds)
-
weeks
- (3600*24*7 seconds)
-
months
- (3600*24*30 seconds)
-
quarters
- (3600*24*91 seconds)
-
years
- (3600*24*365 seconds)
Any abbreviation of these modifiers is also permitted (i.e. seconds may be specified as sec or s). A
specification of m will be taken as months.
The specification of a time may have as many number/modifier parts as you wish. For example:
1 week 2 days 3 hours 10 mins
1 month 2 days 30 sec
are valid date specifications.
Don’t use quotes around the parameter, see Quotes.
-
audit-command-list
- Specifies the commands that should be logged on execution (audited).
E.g.
Audit Events = label
Audit Events = restore
Configuration 8.17:
Based on the type string-list.
-
yes|no
- Either a yes or a no (or true or false).
Depending on the directive, Bareos will expand to the following variables:
Variable Expansion on Volume Labels
When labeling a new volume (see Label Format Dir
Pool), following Bareos internal variables can be used:
Internal
Variable | Description |
$Year | Year |
$Month | Month: 1-12 |
$Day | Day: 1-31 |
$Hour | Hour: 0-24 |
$Minute | Minute: 0-59 |
$Second | Second: 0-59 |
$WeekDay | Day of the week: 0-6, using 0 for Sunday |
$Job | Name of the Job |
$Dir | Name of the Director |
$Level | Job Level |
$Type | Job Type |
$JobId | JobId |
$JobName | unique name of a job |
$Storage | Name of the Storage Daemon |
$Client | Name of the Clients |
$NumVols | Numbers of volumes in the pool |
$Pool | Name of the Pool |
$Catalog | Name of the Catalog |
$MediaType | Type of the media |
Additional, normal environment variables can be used, e.g. $HOME oder $HOSTNAME.
With the exception of Job specific variables, you can trigger the variable expansion by using the var
command.
Variable Expansion in Autochanger Commands
At the configuration of autochanger commands the following variables can be used:
Variable | Description |
\%a | Archive Device Name |
\%c | Changer Device Name |
\%d | Changer Drive Index |
\%f | Client’s Name |
\%j | Job Name |
\%o | Command |
\%s | Slot Base 0 |
\%S | Slot Base 1 |
\%v | Volume Name |
Variable Expansion in Mount Commands
At the configuration of mount commands the following variables can be used:
Variable | Description |
\%a | Archive Device Name |
\%e | Erase |
\%n | Part Number |
\%m | Mount Point |
\%v | Last Part Name |
Variable Expansion on RunScripts
Variable Expansion on RunScripts is described at Run Script Dir
Job.
Variable Expansion in Mail and Operator Commands
At the configuration of mail and operator commands the following variables can be used:
Variable | Description |
\%c | Client’s Name |
\%d | Director’s Name |
\%e | Job Exit Code |
\%i | JobId |
\%j | Unique Job Id |
\%l | Job Level |
\%n | Unadorned Job Name |
\%s | Since Time |
\%t | Job Type (Backup, ...) |
\%r | Recipients |
\%v | Read Volume Name |
\%V | Write Volume Name |
\%b | Job Bytes |
\%B | Job Bytes in human readable format |
\%F | Job Files |
#
The following table lists all current Bareos resource types. It shows what resources must be defined for each service
(daemon). The default configuration files will already contain at least one example of each permitted
resource.
|
|
|
|
|
| Resource | | | |
|
|
|
|
|
|
| Autochanger | | | x | |
|
|
|
|
|
| Catalog | x | | | |
|
|
|
|
|
| Client | x | x | | |
|
|
|
|
|
| Console | x | | | x |
|
|
|
|
|
| Device | | | x | |
|
|
|
|
|
| Director | x | x | x | x |
|
|
|
|
|
| FileSet | x | | | |
|
|
|
|
|
| Job | x | | | |
|
|
|
|
|
| JobDefs | x | | | |
|
|
|
|
|
| Message | x | x | x | |
|
|
|
|
|
| NDMP | | | x | |
|
|
|
|
|
| Pool | x | | | |
|
|
|
|
|
| Profile | x | | | |
|
|
|
|
|
| Schedule | x | | | |
|
|
|
|
|
| Storage | x | | x | |
|
|
|
|
|
| |
| |
| |
| |
| | | | | |
#
In order for one daemon to contact another daemon, it must authorize itself with a password. In most cases, the
password corresponds to a particular name, so both the name and the password must match to be authorized.
Passwords are plain text, any text. They are not generated by any special process; just use random
text.
The default configuration files are automatically defined for correct authorization with random passwords. If you
add to or modify these files, you will need to take care to keep them consistent.
In the left column, you can see the Director, Storage, and Client resources and their corresponding names and
passwords – these are all in bareos-dir.conf. In the right column the corresponding values in the Console, Storage
daemon (SD), and File daemon (FD) configuration files are shown.
Please note that the address fw-sd, that appears in the Storage resource of the Director, is passed to the File
daemon in symbolic form. The File daemon then resolves it to an IP address. For this reason you must use
either an IP address or a resolvable fully qualified name. A name such as localhost, not being a fully
qualified name, will resolve in the File daemon to the localhost of the File daemon, which is most likely
not what is desired. The password used for the File daemon to authorize with the Storage daemon is
a temporary password unique to each Job created by the daemons and is not specified in any .conf
file.
#
Of all the configuration files needed to run Bareos, the Director’s is the most complicated and the one that you will
need to modify the most often as you add clients or modify the FileSets.
For a general discussion of configuration files and resources including the recognized data types see Customizing the
Configuration.
Everything revolves around a job and is tied to a job in one way or another.
The Bareos Director knows about following resource types:
- Director Resource – to define the Director’s name and its access password used for authenticating the
Console program. Only a single Director resource definition may appear in the Director’s configuration
file.
- Job Resource – to define the backup/restore Jobs and to tie together the Client, FileSet and Schedule
resources to be used for each Job. Normally, you will Jobs of different names corresponding to each
client (i.e. one Job per client, but a different one with a different name for each client).
- JobDefs Resource – optional resource for providing defaults for Job resources.
- Schedule Resource – to define when a Job has to run. You may have any number of Schedules, but
each job will reference only one.
- FileSet Resource – to define the set of files to be backed up for each Client. You may have any number
of FileSets but each Job will reference only one.
- Client Resource – to define what Client is to be backed up. You will generally have multiple Client
definitions. Each Job will reference only a single client.
- Storage Resource – to define on what physical device the Volumes should be mounted. You may have
one or more Storage definitions.
- Pool Resource – to define the pool of Volumes that can be used for a particular Job. Most people use
a single default Pool. However, if you have a large number of clients or volumes, you may want to have
multiple Pools. Pools allow you to restrict a Job (or a Client) to use only a particular set of Volumes.
- Catalog Resource – to define in what database to keep the list of files and the Volume names where
they are backed up. Most people only use a single catalog. It is possible, however not adviced and not
supported to use multiple catalogs, see Current Implementation Restrictions.
- Messages Resource – to define where error and information messages are to be sent or logged. You may
define multiple different message resources and hence direct particular classes of messages to different
users or locations (files, ...).
#
The Director resource defines the attributes of the Directors running on the network. Only a single Director resource
is allowed.
The following is an example of a valid Director resource definition:
Director {
Name = bareos-dir
Password = secretpassword
QueryFile = "/etc/bareos/query.sql"
Maximum Concurrent Jobs = 10
Messages = Daemon
}
Configuration 9.1:
Director Resource example
-
Absolute Job Timeout = <positive-integer>
-
Version >= 14.2.0
-
Audit Events = <audit-command-list>
-
Specify which commands (see Console Commands) will be audited. If nothing is specified (and Auditing
Dir
Director is enabled), all commands will be audited.
Version >= 14.2.0
-
Auditing = <yes|no>
- (default: no)
This directive allows to en- or disable auditing of interaction with the Bareos Director. If enabled,
audit messages will be generated. The messages resource configured in Messages Dir
Director defines, how
these messages are handled.
Version >= 14.2.0
-
Backend Directory = <DirectoryList>
- (default: /usr/lib/bareos/backends (platform specific))
This directive specifies a directory from where the Bareos Director loads his dynamic backends.
-
Description = <string>
-
The text field contains a description of the Director that will be displayed in the graphical user interface.
This directive is optional.
-
Dir Address = <net-address>
- (default: 9101)
This directive is optional, but if it is specified, it will cause the Director server (for the Console program)
to bind to the specified address. If this and the Dir Addresses Dir
Director directives are not specified, the
Director will bind to any available address (the default).
-
Dir Addresses = <net-addresses>
- (default: 9101)
Specify the ports and addresses on which the Director daemon will listen for Bareos Console
connections.
Please note that if you use the Dir Addresses Dir
Director directive, you must not use either a Dir Port Dir
Director
or a Dir Address Dir
Director directive in the same resource.
-
Dir Port = <net-port>
- (default: 9101)
Specify the port on which the Director daemon will listen for Bareos Console connections. This same
port number must be specified in the Director resource of the Console configuration file. This directive
should not be used if you specify Dir Addresses Dir
Director (N.B plural) directive.
-
Dir Source Address = <net-address>
- (default: 0)
This record is optional, and if it is specified, it will cause the Director server (when initiating connections
to a storage or file daemon) to source its connections from the specified address. Only a single IP
address may be specified. If this record is not specified, the Director server will source its outgoing
connections according to the system routing table (the default).
-
FD Connect Timeout = <time>
- (default: 180)
where time is the time that the Director should continue attempting to contact the File daemon to
start a job, and after which the Director will cancel the job.
-
Heartbeat Interval = <time>
- (default: 0)
This directive is optional and if specified will cause the Director to set a keepalive interval (heartbeat)
in seconds on each of the sockets it opens for the Client resource. This value will override any specified
at the Director level. It is implemented only on systems that provide the setsockopt TCP_KEEPIDLE
function (Linux, ...). The default value is zero, which means no change is made to the socket.
-
Key Encryption Key = <password>
-
This key is used to encrypt the Security Key that is exchanged between the Director and the Storage
Daemon for supporting Application Managed Encryption (AME). For security reasons each Director
should have a different Key Encryption Key.
-
Log Timestamp Format = <string>
-
Version >= 15.2.3
-
Maximum Concurrent Jobs = <positive-integer>
- (default: 1)
This directive specifies the maximum number of total Director Jobs that should run concurrently.
The Volume format becomes more complicated with multiple simultaneous jobs, consequently, restores
may take longer if Bareos must sort through interleaved volume blocks from multiple simultaneous
jobs. This can be avoided by having each simultaneous job write to a different volume or by using data
spooling, which will first spool the data to disk simultaneously, then write one spool file at a time to
the volume thus avoiding excessive interleaving of the different job blocks.
See also the section about Concurrent Jobs.
-
Maximum Connections = <positive-integer>
- (default: 30)
-
Maximum Console Connections = <positive-integer>
- (default: 20)
This directive specifies the maximum number of Console Connections that could run concurrently.
-
Messages = <resource-name>
-
The messages resource specifies where to deliver Director messages that are not associated with a
specific Job. Most messages are specific to a job and will be directed to the Messages resource specified
by the job. However, there are a messages that can occur when no job is running.
-
Name = <name>
- (required)
The name of the resource.
The director name used by the system administrator.
-
NDMP Log Level = <positive-integer>
- (default: 4)
This directive sets the loglevel for the NDMP protocol library.
Version >= 13.2.0
-
NDMP Snooping = <yes|no>
-
This directive enables the Snooping and pretty printing of NDMP protocol information in debugging
mode.
Version >= 13.2.0
-
Omit Defaults = <yes|no>
- (default: yes)
Please note! This directive is deprecated.
Omit config variables with default values when dumping the config.
When showing the configuration, omit those parameter that have there default value assigned.
-
Optimize For Size = <yes|no>
- (default: no)
If set to yes this directive will use the optimizations for memory size over speed. So it will try to
use less memory which may lead to a somewhat lower speed. Its currently mostly used for keeping all
hardlinks in memory.
If none of Optimize For Size Dir
Director and Optimize For Speed Dir
Director is enabled, Optimize For Size Dir
Director
is enabled by default.
-
Optimize For Speed = <yes|no>
- (default: no)
If set to yes this directive will use the optimizations for speed over the memory size. So it will try to
use more memory which lead to a somewhat higher speed. Its currently mostly used for keeping all
hardlinks in memory. Its relates to the Optimize For Size Dir
Director option set either one to yes as they
are mutually exclusive.
-
Password = <password>
- (required)
Specifies the password that must be supplied for the default Bareos Console to be authorized. This
password correspond to Password Console
Director of the Console configuration file.
The password is plain text.
-
Pid Directory = <path>
- (default: /var/lib/bareos (platform specific))
This directive is optional and specifies a directory in which the Director may put its process Id file.
The process Id file is used to shutdown Bareos and to prevent multiple copies of Bareos from running
simultaneously. Standard shell expansion of the Directory is done when the configuration file is read
so that values such as $HOME will be properly expanded.
The PID directory specified must already exist and be readable and writable by the Bareos daemon
referencing it.
Typically on Linux systems, you will set this to: /var/run. If you are not installing Bareos in the
system directories, you can use the Working Directory as defined above.
-
Plugin Directory = <path>
-
Plugins are loaded from this directory. To load only specific plugins, use ’Plugin Names’.
Version >= 14.2.0
-
Plugin Names = <PluginNames>
-
List of plugins, that should get loaded from ’Plugin Directory’ (only basenames, ’-dir.so’ is added
automatically). If empty, all plugins will get loaded.
Version >= 14.2.0
-
Query File = <path>
- (required)
This directive is required and specifies a directory and file in which the Director can find the canned
SQL statements for the query command.
-
Scripts Directory = <path>
-
This directive is currently unused.
-
SD Connect Timeout = <time>
- (default: 1800)
where time is the time that the Director should continue attempting to contact the Storage daemon
to start a job, and after which the Director will cancel the job.
-
Secure Erase Command = <string>
-
Specify command that will be called when bareos unlinks files.
When files are no longer needed, Bareos will delete (unlink) them. With this directive, it will call the
specified command to delete these files. See Secure Erase Command for details.
Version >= 15.2.1
-
Statistics Collect Interval = <positive-integer>
- (default: 150)
Bareos offers the possibility to collect statistic information from its connected devices. To do so, Collect
Statistics Dir
Storage must be enabled. This interval defines, how often the Director connects to the attached
Storage Daemons to collect the statistic information.
Version >= 14.2.0
-
Statistics Retention = <time>
- (default: 160704000)
The Statistics Retention directive defines the length of time that Bareos will keep statistics job
records in the Catalog database after the Job End time (in the catalog JobHisto table). When this
time period expires, and if user runs prune stats command, Bareos will prune (remove) Job records
that are older than the specified period.
Theses statistics records aren’t use for restore purpose, but mainly for capacity planning, billings, etc.
See chapter Job Statistics for additional information.
-
Sub Sys Directory = <path>
-
Please note! This directive is deprecated.
-
Subscriptions = <positive-integer>
- (default: 0)
In case you want check that the number of active clients don’t exceed a specific number, you can define
this number here and check with the status subscriptions command.
However, this is only intended to give a hint. No active limiting is implemented.
Version >= 12.4.4
-
TLS Allowed CN = <string-list>
-
”Common Name”s (CNs) of the allowed peer certificates.
-
TLS Authenticate = <yes|no>
- (default: no)
Use TLS only to authenticate, not for encryption.
-
TLS CA Certificate Dir = <path>
-
Path of a TLS CA certificate directory.
-
TLS CA Certificate File = <path>
-
Path of a PEM encoded TLS CA certificate(s) file.
-
TLS Certificate = <path>
-
Path of a PEM encoded TLS certificate.
-
TLS Certificate Revocation List = <path>
-
Path of a Certificate Revocation List file.
-
TLS Cipher List = <string>
-
List of valid TLS Ciphers.
-
TLS DH File = <path>
-
Path to PEM encoded Diffie-Hellman parameter file. If this directive is specified, DH key exchange will
be used for the ephemeral keying, allowing for forward secrecy of communications.
-
TLS Enable = <yes|no>
- (default: no)
Enable TLS support.
Bareos can be configured to encrypt all its network traffic. See chapter TLS Configuration Directives
to see, how the Bareos Director (and the other components) must be configured to use TLS.
-
TLS Key = <path>
-
Path of a PEM encoded private key. It must correspond to the specified ”TLS Certificate”.
-
TLS Psk Enable = <yes|no>
- (default: yes)
Enable TLS-PSK support.
-
TLS Psk Require = <yes|no>
- (default: no)
Without setting this to yes, Bareos can fall back to use unencryption connections. Enabling this
implicitly sets ”TLS-PSK Enable = yes”.
-
TLS Require = <yes|no>
- (default: no)
Without setting this to yes, Bareos can fall back to use unencrypted connections. Enabling this
implicitly sets ”TLS Enable = yes”.
-
TLS Verify Peer = <yes|no>
- (default: no)
If disabled, all certificates signed by a known CA will be accepted. If enabled, the CN of a certificate
must the Address or in the ”TLS Allowed CN” list.
-
Use Pam Authentication = <yes|no>
- (default: no)
-
Ver Id = <string>
-
where string is an identifier which can be used for support purpose. This string is displayed using the
version command.
-
Working Directory = <path>
- (default: /var/lib/bareos (platform specific))
This directive is optional and specifies a directory in which the Director may put its status files. This
directory should be used only by Bareos but may be shared by other Bareos daemons. Standard shell
expansion of the directory is done when the configuration file is read so that values such as $HOME
will be properly expanded.
The working directory specified must already exist and be readable and writable by the Bareos daemon
referencing it.
#
The Job resource defines a Job (Backup, Restore, ...) that Bareos must perform. Each Job resource definition
contains the name of a Client and a FileSet to backup, the Schedule for the Job, where the data are to be stored,
and what media Pool can be used. In effect, each Job resource must specify What, Where, How, and When or
FileSet, Storage, Backup/Restore/Level, and Schedule respectively. Note, the FileSet must be specified for a restore
job for historical reasons, but it is no longer used.
Only a single type (Backup, Restore, ...) can be specified for any job. If you want to backup multiple FileSets on
the same Client or multiple Clients, you must define a Job for each one.
Note, you define only a single Job to do the Full, Differential, and Incremental backups since the different backup
levels are tied together by a unique Job name. Normally, you will have only one Job per Client, but if a client has a
really huge number of files (more than several million), you might want to split it into to Jobs each with a different
FileSet covering only part of the total files.
Multiple Storage daemons are not currently supported for Jobs, so if you do want to use multiple storage daemons,
you will need to create a different Job and ensure that for each Job that the combination of Client and FileSet are
unique. The Client and FileSet are what Bareos uses to restore a client, so if there are multiple Jobs with the same
Client and FileSet or multiple Storage daemons that are used, the restore will not work. This problem can be
resolved by defining multiple FileSet definitions (the names must be different, but the contents of the FileSets may
be the same).
-
Accurate = <yes|no>
- (default: no)
In accurate mode, the File daemon knowns exactly which files were present after the last backup.
So it is able to handle deleted or renamed files.
When restoring a FileSet for a specified date (including ”most recent”), Bareos is able to restore exactly
the files and directories that existed at the time of the last backup prior to that date including ensuring
that deleted files are actually deleted, and renamed directories are restored properly.
When doing VirtualFull backups, it is advised to use the accurate mode, otherwise the VirtualFull
might contain already deleted files.
However, using the accurate mode has also disadvantages:
- The File daemon must keep data concerning all files in memory. So If you do not have sufficient
memory, the backup may either be terribly slow or fail. For 500.000 files (a typical desktop linux
system), it will require approximately 64 Megabytes of RAM on your File daemon to hold the
required information.
-
Add Prefix = <string>
-
This directive applies only to a Restore job and specifies a prefix to the directory name of all files being
restored. This will use File Relocation feature.
-
Add Suffix = <string>
-
This directive applies only to a Restore job and specifies a suffix to all files being restored. This will use File
Relocation feature.
Using Add Suffix=.old, /etc/passwd will be restored to /etc/passwsd.old
-
Allow Duplicate Jobs = <yes|no>
- (default: yes)
A duplicate job in the sense we use it here means a second or subsequent job with the same name starts.
This happens most frequently when the first job runs longer than expected because no tapes are
available.
If this directive is enabled duplicate jobs will be run. If the directive is set to no then only one job of a given
name may run at one time. The action that Bareos takes to ensure only one job runs is determined by the
directives
If none of these directives is set to yes, Allow Duplicate Jobs is set to no and two jobs are present, then the
current job (the second one started) will be cancelled.
-
Allow Higher Duplicates = <yes|no>
- (default: yes)
-
Allow Mixed Priority = <yes|no>
- (default: no)
When set to yes, this job may run even if lower priority jobs are already running. This means a high priority
job will not have to wait for other jobs to finish before starting. The scheduler will only mix priorities when all
running jobs have this set to true.
Note that only higher priority jobs will start early. Suppose the director will allow two concurrent jobs, and
that two jobs with priority 10 are running, with two more in the queue. If a job with priority 5 is added to the
queue, it will be run as soon as one of the running jobs finishes. However, new priority 10 jobs will not be run
until the priority 5 job has finished.
-
Always Incremental = <yes|no>
- (default: no)
Enable/disable always incremental backup scheme.
Version >= 16.2.4
-
Always Incremental Job Retention = <time>
- (default: 0)
Backup Jobs older than the specified time duration will be merged into a new Virtual backup.
Version >= 16.2.4
-
Always Incremental Keep Number = <positive-integer>
- (default: 0)
Guarantee that at least the specified number of Backup Jobs will persist, even if they are older than ”Always
Incremental Job Retention”.
Version >= 16.2.4
-
Always Incremental Max Full Age = <time>
-
If ”AlwaysIncrementalMaxFullAge” is set, during consolidations only incremental backups will be considered
while the Full Backup remains to reduce the amount of data being consolidated. Only if the Full Backup is
older than ”AlwaysIncrementalMaxFullAge”, the Full Backup will be part of the consolidation to avoid the
Full Backup becoming too old .
Version >= 16.2.4
-
Backup Format = <string>
- (default: Native)
The backup format used for protocols which support multiple formats. By default, it uses the
Bareos Native Backup format. Other protocols, like NDMP supports different backup formats for
instance:
-
Base = <ResourceList>
-
The Base directive permits to specify the list of jobs that will be used during Full backup as base. This
directive is optional. See the Base Job chapter for more information.
-
Bootstrap = <path>
-
The Bootstrap directive specifies a bootstrap file that, if provided, will be used during Restore Jobs and is
ignored in other Job types. The bootstrap file contains the list of tapes to be used in a restore Job as well as
which files are to be restored. Specification of this directive is optional, and if specified, it is used only
for a restore job. In addition, when running a Restore job from the console, this value can be
changed.
If you use the restore command in the Console program, to start a restore job, the bootstrap file will be
created automatically from the files you select to be restored.
For additional details see The Bootstrap File chapter.
-
Cancel Lower Level Duplicates = <yes|no>
- (default: no)
If Allow Duplicate Jobs Dir
Job is set to no and this directive is set to yes, Bareos will choose between duplicated
jobs the one with the highest level. For example, it will cancel a previous Incremental to run a Full backup. It
works only for Backup jobs. If the levels of the duplicated jobs are the same, nothing is done and the
directives Cancel Queued Duplicates Dir
Job and Cancel Running Duplicates Dir
Job will be examined.
-
Cancel Queued Duplicates = <yes|no>
- (default: no)
If Allow Duplicate Jobs Dir
Job is set to no and if this directive is set to yes any job that is already queued to run
but not yet running will be canceled.
-
Cancel Running Duplicates = <yes|no>
- (default: no)
If Allow Duplicate Jobs Dir
Job is set to no and if this directive is set to yes any job that is already running will be
canceled.
-
Catalog = <resource-name>
-
This specifies the name of the catalog resource to be used for this Job. When a catalog is defined in a Job it
will override the definition in the client.
Version >= 13.4.0
-
Client = <resource-name>
-
The Client directive specifies the Client (File daemon) that will be used in the current Job. Only a single
Client may be specified in any one Job. The Client runs on the machine to be backed up, and sends the
requested files to the Storage daemon for backup, or receives them when restoring. For additional details, see
the Client Resource of this chapter. This directive is required For versions before 13.3.0, this directive is
required for all Jobtypes. For Version >= 13.3.0 it is required for all Jobtypes but Copy or Migrate jobs.
-
Client Run After Job = <RunscriptShort>
-
This is a shortcut for the Run Script Dir
Job resource, that run on the client after a backup job.
-
Client Run Before Job = <RunscriptShort>
-
This is basically a shortcut for the Run Script Dir
Job resource, that run on the client before the backup
job.
Please note! For compatibility reasons, with this shortcut, the command is executed directly when
the client receive it. And if the command is in error, other remote runscripts will be discarded.
To be sure that all commands will be sent and executed, you have to use Run Script Dir
Job syntax.
-
Description = <string>
-
-
Differential Backup Pool = <resource-name>
-
The Differential Backup Pool specifies a Pool to be used for Differential backups. It will override any Pool Dir
Job
specification during a Differential backup.
-
Differential Max Runtime = <time>
-
The time specifies the maximum allowed time that a Differential backup job may run, counted from when the
job starts (not necessarily the same as when the job was scheduled).
-
Differential Max Wait Time = <time>
-
Please note! This directive is deprecated.
This directive has been deprecated in favor of Differential Max Runtime Dir
Job.
-
Dir Plugin Options = <string-list>
-
These settings are plugin specific, see Director Plugins.
-
Enabled = <yes|no>
- (default: yes)
En- or disable this resource.
This directive allows you to enable or disable automatic execution via the scheduler of a Job.
-
FD Plugin Options = <string-list>
-
These settings are plugin specific, see File Daemon Plugins.
-
File History Size = <Size64>
- (default: 10000000)
When using NDMP and Save File History Dir
Job is enabled, this directives controls the size of the internal
temporary database (LMDB) to translate NDMP file and directory information into Bareos file and directory
information.
File History Size must be greater the number of directories + files of this NDMP backup
job.
Please note! This uses a large memory mapped file (File History Size ∗256 around 2,3 GB for the
File History Size = 10000000). On 32-bit systems or if a memory limit for the user running the Bareos
Director (normally bareos) exists (verify by su - bareos -s /bin/sh -c "ulimit -a"), this may fail.
around 2,3 GB for the
File History Size = 10000000). On 32-bit systems or if a memory limit for the user running the Bareos
Director (normally bareos) exists (verify by su - bareos -s /bin/sh -c "ulimit -a"), this may fail.
Version >= 15.2.4
-
File Set = <resource-name>
-
The FileSet directive specifies the FileSet that will be used in the current Job. The FileSet specifies which
directories (or files) are to be backed up, and what options to use (e.g. compression, ...). Only a single FileSet
resource may be specified in any one Job. For additional details, see the FileSet Resource section of this
chapter. This directive is required (For versions before 13.3.0 for all Jobtypes and for versions after that for all
Jobtypes but Copy and Migrate).
-
Full Backup Pool = <resource-name>
-
The Full Backup Pool specifies a Pool to be used for Full backups. It will override any Pool Dir
Job specification
during a Full backup.
-
Full Max Runtime = <time>
-
The time specifies the maximum allowed time that a Full backup job may run, counted from when the job
starts (not necessarily the same as when the job was scheduled).
-
Full Max Wait Time = <time>
-
Please note! This directive is deprecated.
This directive has been deprecated in favor of Full Max Runtime Dir
Job.
-
Incremental Backup Pool = <resource-name>
-
The Incremental Backup Pool specifies a Pool to be used for Incremental backups. It will override any Pool Dir
Job
specification during an Incremental backup.
-
Incremental Max Runtime = <time>
-
The time specifies the maximum allowed time that an Incremental backup job may run, counted from when
the job starts, (not necessarily the same as when the job was scheduled).
-
Incremental Max Wait Time = <time>
-
Please note! This directive is deprecated.
This directive has been deprecated in favor of Incremental Max Runtime Dir
Job
-
Job Defs = <resource-name>
-
If a Job Defs resource name is specified, all the values contained in the named Job Defs resource will be used
as the defaults for the current Job. Any value that you explicitly define in the current Job resource, will
override any defaults specified in the Job Defs resource. The use of this directive permits writing much more
compact Job resources where the bulk of the directives are defined in one or more Job Defs. This is
particularly useful if you have many similar Jobs but with minor variations such as different Clients. To
structure the configuration even more, Job Defs themselves can also refer to other Job Defs.
-
Job To Verify = <resource-name>
-
-
Level = <BackupLevel>
-
The Level directive specifies the default Job level to be run. Each different Type Dir
Job (Backup,
Restore, Verify, ...) has a different set of Levels that can be specified. The Level is normally
overridden by a different value that is specified in the Schedule Resource. This directive is not
required, but must be specified either by this directive or as an override specified in the Schedule
Resource.
-
Backup
-
For a Backup Job, the Level may be one of the following:
-
Full
-
When the Level is set to Full all files in the FileSet whether or not they have changed will
be backed up.
-
Incremental
-
When the Level is set to Incremental all files specified in the FileSet that have changed
since the last successful backup of the the same Job using the same FileSet and Client, will
be backed up. If the Director cannot find a previous valid Full backup then the job will be
upgraded into a Full backup. When the Director looks for a valid backup record in the catalog
database, it looks for a previous Job with:
- The same Job name.
- The same Client name.
- The same FileSet (any change to the definition of the FileSet such as adding or deleting
a file in the Include or Exclude sections constitutes a different FileSet.
- The Job was a Full, Differential, or Incremental backup.
- The Job terminated normally (i.e. did not fail or was not canceled).
- The Job started no longer ago than Max Full Interval.
If all the above conditions do not hold, the Director will upgrade the Incremental to a Full save.
Otherwise, the Incremental backup will be performed as requested.
The File daemon (Client) decides which files to backup for an Incremental backup by comparing start
time of the prior Job (Full, Differential, or Incremental) against the time each file was last ”modified”
(st_mtime) and the time its attributes were last ”changed”(st_ctime). If the file was
modified or its attributes changed on or after this start time, it will then be backed
up.
Some virus scanning software may change st_ctime while doing the scan. For example, if the virus
scanning program attempts to reset the access time (st_atime), which Bareos does not use, it will
cause st_ctime to change and hence Bareos will backup the file during an Incremental or Differential
backup. In the case of Sophos virus scanning, you can prevent it from resetting the access time
(st_atime) and hence changing st_ctime by using the --no-reset-atime option. For other software,
please see their manual.
When Bareos does an Incremental backup, all modified files that are still on the system are backed
up. However, any file that has been deleted since the last Full backup remains in the Bareos catalog,
which means that if between a Full save and the time you do a restore, some files are deleted, those
deleted files will also be restored. The deleted files will no longer appear in the catalog after doing
another Full save.
In addition, if you move a directory rather than copy it, the files in it do not have
their modification time (st_mtime) or their attribute change time (st_ctime) changed.
As a consequence, those files will probably not be backed up by an Incremental or
Differential backup which depend solely on these time stamps. If you move a directory, and
wish it to be properly backed up, it is generally preferable to copy it, then delete the
original.
However, to manage deleted files or directories changes in the catalog during an Incremental backup
you can use Job Resource. This is quite memory consuming process.
-
Differential
-
When the Level is set to Differential all files specified in the FileSet that have changed since the last
successful Full backup of the same Job will be backed up. If the Director cannot find a valid previous
Full backup for the same Job, FileSet, and Client, backup, then the Differential job will be upgraded
into a Full backup. When the Director looks for a valid Full backup record in the catalog database, it
looks for a previous Job with:
- The same Job name.
- The same Client name.
- The same FileSet (any change to the definition of the FileSet such as adding or deleting
a file in the Include or Exclude sections constitutes a different FileSet.
- The Job was a FULL backup.
- The Job terminated normally (i.e. did not fail or was not canceled).
- The Job started no longer ago than Max Full Interval.
If all the above conditions do not hold, the Director will upgrade the Differential to a Full save.
Otherwise, the Differential backup will be performed as requested.
The File daemon (Client) decides which files to backup for a differential backup by comparing the
start time of the prior Full backup Job against the time each file was last ”modified” (st_mtime) and
the time its attributes were last ”changed” (st_ctime). If the file was modified or its attributes were
changed on or after this start time, it will then be backed up. The start time used is
displayed after the Since on the Job report. In rare cases, using the start time of the prior
backup may cause some files to be backed up twice, but it ensures that no change is
missed.
When Bareos does a Differential backup, all modified files that are still on the system are backed up.
However, any file that has been deleted since the last Full backup remains in the Bareos catalog,
which means that if between a Full save and the time you do a restore, some files are deleted, those
deleted files will also be restored. The deleted files will no longer appear in the catalog after doing
another Full save. However, to remove deleted files from the catalog during a Differential backup is
quite a time consuming process and not currently implemented in Bareos. It is, however, a planned
future feature.
As noted above, if you move a directory rather than copy it, the files in it do not have their
modification time (st_mtime) or their attribute change time (st_ctime) changed. As a
consequence, those files will probably not be backed up by an Incremental or Differential
backup which depend solely on these time stamps. If you move a directory, and wish it to
be properly backed up, it is generally preferable to copy it, then delete the original.
Alternatively, you can move the directory, then use the touch program to update the
timestamps.
However, to manage deleted files or directories changes in the catalog during an Differential backup
you can use accurate mode. This is quite memory consuming process. See for more
details.
Every once and a while, someone asks why we need Differential backups as long as Incremental
backups pickup all changed files. There are possibly many answers to this question, but the one that
is the most important for me is that a Differential backup effectively merges all the Incremental and
Differential backups since the last Full backup into a single Differential backup. This has
two effects: 1. It gives some redundancy since the old backups could be used if the
merged backup cannot be read. 2. More importantly, it reduces the number of Volumes
that are needed to do a restore effectively eliminating the need to read all the volumes
on which the preceding Incremental and Differential backups since the last Full are
done.
-
VirtualFull
-
When the Level is set to VirtualFull, a new Full backup is generated from the last existing Full
backup and the matching Differential- and Incremental-Backups. It matches this according the Name
Dir
Client and Name Dir
FileSet. This means, a new Full backup get created without transfering all the data
from the client to the backup server again. The new Full backup will be stored in the pool defined in
Next Pool Dir
Pool.
Please note! Opposite to the other backup levels, VirtualFull may require read and write access to
multiple volumes. In most cases you have to make sure, that Bareos does not try to read and write to
the same Volume.
-
Restore
-
For a Restore Job, no level needs to be specified.
-
Verify
-
For a Verify Job, the Level may be one of the following:
-
InitCatalog
-
does a scan of the specified FileSet and stores the file attributes in the Catalog database.
Since no file data is saved, you might ask why you would want to do this. It turns out to be
a very simple and easy way to have a Tripwire like feature using Bareos. In other words, it
allows you to save the state of a set of files defined by the FileSet and later check to see if
those files have been modified or deleted and if any new files have been added. This can be
used to detect system intrusion. Typically you would specify a FileSet that contains the set
of system files that should not change (e.g. /sbin, /boot, /lib, /bin, ...). Normally, you run
the InitCatalog level verify one time when your system is first setup, and then once again
after each modification (upgrade) to your system. Thereafter, when your want to check the
state of your system files, you use a Verify level = Catalog. This compares the results of
your InitCatalog with the current state of the files.
-
Catalog
-
Compares the current state of the files against the state previously saved during an
InitCatalog. Any discrepancies are reported. The items reported are determined by the
verify options specified on the Include directive in the specified FileSet (see the FileSet
resource below for more details). Typically this command will be run once a day (or night)
to check for any changes to your system files.
Please note! If you run two Verify Catalog jobs on the same client at the same time, the
results will certainly be incorrect. This is because Verify Catalog modifies the Catalog database
while running in order to track new files.
-
VolumeToCatalog
-
This level causes Bareos to read the file attribute data written to the Volume from the last
backup Job for the job specified on the VerifyJob directive. The file attribute data are
compared to the values saved in the Catalog database and any differences are reported. This is
similar to the DiskToCatalog level except that instead of comparing the disk file attributes
to the catalog database, the attribute data written to the Volume is read and compared to
the catalog database. Although the attribute data including the signatures (MD5 or SHA1)
are compared, the actual file data is not compared (it is not in the catalog).
VolumeToCatalog jobs need a client to extract the metadata, but this client does not have to
be the original client. We suggest to use the client on the backup server itself for maximum
performance.
Please note! If you run two Verify VolumeToCatalog jobs on the same client at the same time,
the results will certainly be incorrect. This is because the Verify VolumeToCatalog modifies
the Catalog database while running.
-
DiskToCatalog
-
This level causes Bareos to read the files as they currently are on disk, and to compare the
current file attributes with the attributes saved in the catalog from the last backup for the job
specified on the VerifyJob directive. This level differs from the VolumeToCatalog level
described above by the fact that it doesn’t compare against a previous Verify job but against
a previous backup. When you run this level, you must supply the verify options on your
Include statements. Those options determine what attribute fields are compared.
This command can be very useful if you have disk problems because it will compare the
current state of your disk against the last successful backup, which may be several jobs.
Note, the current implementation does not identify files that have been deleted.
-
Max Concurrent Copies = <positive-integer>
- (default: 100)
-
Max Diff Interval = <time>
-
The time specifies the maximum allowed age (counting from start time) of the most recent successful
Differential backup that is required in order to run Incremental backup jobs. If the most recent Differential
backup is older than this interval, Incremental backups will be upgraded to Differential backups automatically.
If this directive is not present, or specified as 0, then the age of the previous Differential backup is not
considered.
-
Max Full Consolidations = <positive-integer>
- (default: 0)
If ”AlwaysIncrementalMaxFullAge” is configured, do not run more than ”MaxFullConsolidations”
consolidation jobs that include the Full backup.
Version >= 16.2.4
-
Max Full Interval = <time>
-
The time specifies the maximum allowed age (counting from start time) of the most recent successful Full
backup that is required in order to run Incremental or Differential backup jobs. If the most recent Full backup
is older than this interval, Incremental and Differential backups will be upgraded to Full backups
automatically. If this directive is not present, or specified as 0, then the age of the previous Full backup is not
considered.
-
Max Run Sched Time = <time>
-
The time specifies the maximum allowed time that a job may run, counted from when the job was scheduled.
This can be useful to prevent jobs from running during working hours. We can see it like Max Start Delay +
Max Run Time.
-
Max Run Time = <time>
-
The time specifies the maximum allowed time that a job may run, counted from when the job starts, (not
necessarily the same as when the job was scheduled).
By default, the watchdog thread will kill any Job that has run more than 6 days. The maximum watchdog
timeout is independent of Max Run Time and cannot be changed.
-
Max Start Delay = <time>
-
The time specifies the maximum delay between the scheduled time and the actual start time for the Job. For
example, a job can be scheduled to run at 1:00am, but because other jobs are running, it may wait to run. If
the delay is set to 3600 (one hour) and the job has not begun to run by 2:00am, the job will be canceled. This
can be useful, for example, to prevent jobs from running during day time hours. The default is no limit.
-
Max Virtual Full Interval = <time>
-
The time specifies the maximum allowed age (counting from start time) of the most recent successful Virtual
Full backup that is required in order to run Incremental or Differential backup jobs. If the most recent Virtual
Full backup is older than this interval, Incremental and Differential backups will be upgraded to Virtual Full
backups automatically. If this directive is not present, or specified as 0, then the age of the previous Virtual
Full backup is not considered.
Version >= 14.4.0
-
Max Wait Time = <time>
-
The time specifies the maximum allowed time that a job may block waiting for a resource (such as
waiting for a tape to be mounted, or waiting for the storage or file daemons to perform their
duties), counted from the when the job starts, (not necessarily the same as when the job was
scheduled).
-
Maximum Bandwidth = <speed>
-
The speed parameter specifies the maximum allowed bandwidth that a job may use.
-
Maximum Concurrent Jobs = <positive-integer>
- (default: 1)
Specifies the maximum number of Jobs from the current Job resource that can run concurrently. Note, this
directive limits only Jobs with the same name as the resource in which it appears. Any other restrictions on
the maximum concurrent jobs such as in the Director, Client or Storage resources will also apply in addition to
the limit specified here.
For details, see the Concurrent Jobs chapter.
-
Messages = <resource-name>
- (required)
The Messages directive defines what Messages resource should be used for this job, and thus how and where
the various messages are to be delivered. For example, you can direct some messages to a log file, and others
can be sent by email. For additional details, see the Messages Resource Chapter of this manual. This directive
is required.
-
Name = <name>
- (required)
The name of the resource.
The Job name. This name can be specified on the Run command in the console program to start a job. If the
name contains spaces, it must be specified between quotes. It is generally a good idea to give
your job the same name as the Client that it will backup. This permits easy identification of
jobs.
When the job actually runs, the unique Job Name will consist of the name you specify here followed by the
date and time the job was scheduled for execution. This directive is required.
-
Next Pool = <resource-name>
-
A Next Pool override used for Migration/Copy and Virtual Backup Jobs.
-
Plugin Options = <string-list>
-
Please note! This directive is deprecated.
This directive is an alias.
-
Pool = <resource-name>
- (required)
The Pool directive defines the pool of Volumes where your data can be backed up. Many Bareos installations
will use only the Default pool. However, if you want to specify a different set of Volumes for different Clients
or different Jobs, you will probably want to use Pools. For additional details, see the Pool Resource of this
chapter. This directive is required.
In case of a Copy or Migration job, this setting determines what Pool will be examined for finding JobIds to
migrate. The exception to this is when Selection Type Dir
Job = SQLQuery, and although a Pool directive must
still be specified, no Pool is used, unless you specifically include it in the SQL query. Note, in any case, the
Pool resource defined by the Pool directive must contain a Next Pool Dir
Pool = ... directive to define the Pool to
which the data will be migrated.
-
Prefer Mounted Volumes = <yes|no>
- (default: yes)
If the Prefer Mounted Volumes directive is set to yes, the Storage daemon is requested to select either an
Autochanger or a drive with a valid Volume already mounted in preference to a drive that is not ready. This
means that all jobs will attempt to append to the same Volume (providing the Volume is appropriate – right
Pool, ... for that job), unless you are using multiple pools. If no drive with a suitable Volume is available, it
will select the first available drive. Note, any Volume that has been requested to be mounted, will be
considered valid as a mounted volume by another job. This if multiple jobs start at the same time and they all
prefer mounted volumes, the first job will request the mount, and the other jobs will use the same
volume.
If the directive is set to no, the Storage daemon will prefer finding an unused drive, otherwise, each job started
will append to the same Volume (assuming the Pool is the same for all jobs). Setting Prefer
Mounted Volumes to no can be useful for those sites with multiple drive autochangers that prefer
to maximize backup throughput at the expense of using additional drives and Volumes. This
means that the job will prefer to use an unused drive rather than use a drive that is already in
use.
Despite the above, we recommend against setting this directive to no since it tends to add a lot of swapping of
Volumes between the different drives and can easily lead to deadlock situations in the Storage daemon. We will
accept bug reports against it, but we cannot guarantee that we will be able to fix the problem in a reasonable
time.
A better alternative for using multiple drives is to use multiple pools so that Bareos will be forced to mount
Volumes from those Pools on different drives.
-
Prefix Links = <yes|no>
- (default: no)
If a Where path prefix is specified for a recovery job, apply it to absolute links as well. The default is No.
When set to Yes then while restoring files to an alternate directory, any absolute soft links will also be
modified to point to the new alternate directory. Normally this is what is desired – i.e. everything is self
consistent. However, if you wish to later move the files to their original locations, all files linked with absolute
names will be broken.
-
Priority = <positive-integer>
- (default: 10)
This directive permits you to control the order in which your jobs will be run by specifying a positive non-zero
number. The higher the number, the lower the job priority. Assuming you are not running concurrent jobs, all
queued jobs of priority 1 will run before queued jobs of priority 2 and so on, regardless of the original
scheduling order.
The priority only affects waiting jobs that are queued to run, not jobs that are already running. If one or more
jobs of priority 2 are already running, and a new job is scheduled with priority 1, the currently running
priority 2 jobs must complete before the priority 1 job is run, unless Allow Mixed Priority is
set.
If you want to run concurrent jobs you should keep these points in mind:
- See Concurrent Jobs on how to setup concurrent jobs.
- Bareos concurrently runs jobs of only one priority at a time. It will not simultaneously run a
priority 1 and a priority 2 job.
- If Bareos is running a priority 2 job and a new priority 1 job is scheduled, it will wait until the
running priority 2 job terminates even if the Maximum Concurrent Jobs settings would otherwise
allow two jobs to run simultaneously.
- Suppose that bareos is running a priority 2 job and a new priority 1 job is scheduled and queued
waiting for the running priority 2 job to terminate. If you then start a second priority 2 job,
the waiting priority 1 job will prevent the new priority 2 job from running concurrently with the
running priority 2 job. That is: as long as there is a higher priority job waiting to run, no new
lower priority jobs will start even if the Maximum Concurrent Jobs settings would normally allow
them to run. This ensures that higher priority jobs will be run as soon as possible.
If you have several jobs of different priority, it may not best to start them at exactly the same time,
because Bareos must examine them one at a time. If by Bareos starts a lower priority job first,
then it will run before your high priority jobs. If you experience this problem, you may avoid it
by starting any higher priority jobs a few seconds before lower priority ones. This insures that
Bareos will examine the jobs in the correct order, and that your priority scheme will be respected.
-
Protocol = <job protocol>
- (default: Native)
The backup protocol to use to run the Job. See job protocol.
-
Prune Files = <yes|no>
- (default: no)
Normally, pruning of Files from the Catalog is specified on a Client by Client basis in Auto Prune Dir
Client. If this
directive is specified and the value is yes, it will override the value specified in the Client resource.
-
Prune Jobs = <yes|no>
- (default: no)
Normally, pruning of Jobs from the Catalog is specified on a Client by Client basis in Auto Prune Dir
Client. If this
directive is specified and the value is yes, it will override the value specified in the Client resource.
-
Prune Volumes = <yes|no>
- (default: no)
Normally, pruning of Volumes from the Catalog is specified on a Pool by Pool basis in Auto Prune Dir
Pool
directive. Note, this is different from File and Job pruning which is done on a Client by Client basis. If this
directive is specified and the value is yes, it will override the value specified in the Pool resource.
-
Purge Migration Job = <yes|no>
- (default: no)
This directive may be added to the Migration Job definition in the Director configuration file to purge the job
migrated at the end of a migration.
-
Regex Where = <string>
-
This directive applies only to a Restore job and specifies a regex filename manipulation of all files being
restored. This will use File Relocation feature.
For more informations about how use this option, see RegexWhere Format.
-
Replace = <ReplaceOption>
- (default: Always)
This directive applies only to a Restore job and specifies what happens when Bareos wants to restore a file or
directory that already exists. You have the following options for replace-option:
-
always
- when the file to be restored already exists, it is deleted and then replaced by the copy that
was backed up. This is the default value.
-
ifnewer
- if the backed up file (on tape) is newer than the existing file, the existing file is deleted and
replaced by the back up.
-
ifolder
- if the backed up file (on tape) is older than the existing file, the existing file is deleted and
replaced by the back up.
-
never
- if the backed up file already exists, Bareos skips restoring this file.
-
Rerun Failed Levels = <yes|no>
- (default: no)
If this directive is set to yes (default no), and Bareos detects that a previous job at a higher level (i.e.
Full or Differential) has failed, the current job level will be upgraded to the higher level. This is
particularly useful for Laptops where they may often be unreachable, and if a prior Full save has
failed, you wish the very next backup to be a Full save rather than whatever level it is started
as.
There are several points that must be taken into account when using this directive: first, a failed job is defined
as one that has not terminated normally, which includes any running job of the same name (you need to
ensure that two jobs of the same name do not run simultaneously); secondly, the Ignore File Set Changes Dir
FileSet
directive is not considered when checking for failed levels, which means that any FileSet change will trigger a
rerun.
-
Reschedule Interval = <time>
- (default: 1800)
If you have specified Reschedule On Error = yes and the job terminates in error, it will be rescheduled
after the interval of time specified by time-specification. See the time specification formats in the Configure
chapter for details of time specifications. If no interval is specified, the job will not be rescheduled on error.
-
Reschedule On Error = <yes|no>
- (default: no)
If this directive is enabled, and the job terminates in error, the job will be rescheduled as determined by the
Reschedule Interval Dir
Job and Reschedule Times Dir
Job directives. If you cancel the job, it will not be
rescheduled.
This specification can be useful for portables, laptops, or other machines that are not always connected to the
network or switched on.
-
Reschedule Times = <positive-integer>
- (default: 5)
This directive specifies the maximum number of times to reschedule the job. If it is set to zero (the default)
the job will be rescheduled an indefinite number of times.
-
Run = <string-list>
-
The Run directive (not to be confused with the Run option in a Schedule) allows you to start other jobs or to
clone the current jobs.
The part after the equal sign must be enclosed in double quotes, and can contain any string or set of options
(overrides) that you can specify when entering the run command from the console. For example
storage=DDS-4 .... In addition, there are two special keywords that permit you to clone the current job.
They are level=%l and since=%s. The %l in the level keyword permits entering the actual level of the
current job and the %s in the since keyword permits putting the same time for comparison as used
on the current job. Note, in the case of the since keyword, the %s must be enclosed in double
quotes, and thus they must be preceded by a backslash since they are already inside quotes. For
example:
A cloned job will not start additional clones, so it is not possible to recurse.
Jobs started by Run Dir
Job are submitted for running before the original job (while it is being initialized). This
means that any clone job will actually start before the original job, and may even block the original job from
starting. It evens ignores Priority Dir
Job.
If you are trying to prioritize jobs, you will find it much easier to do using a Run Script Dir
Job resource or a Run
Before Job Dir
Job directive.
-
Run After Failed Job = <RunscriptShort>
-
This is a shortcut for the Run Script Dir
Job resource, that runs a command after a failed job.
If the exit code of the program run is non-zero, Bareos will print a warning message.
-
Run After Job = <RunscriptShort>
-
This is a shortcut for the Run Script Dir
Job resource, that runs a command after a successful job (without error or
without being canceled).
If the exit code of the program run is non-zero, Bareos will print a warning message.
-
Run Before Job = <RunscriptShort>
-
This is a shortcut for the Run Script Dir
Job resource, that runs a command before a job.
If the exit code of the program run is non-zero, the current Bareos job will be canceled.
is equivalent to:
-
Run Script = <Runscript>
-
The RunScript directive behaves like a resource in that it requires opening and closing braces around a
number of directives that make up the body of the runscript.
The specified Command (see below for details) is run as an external program prior or after
the current Job. This is optional. By default, the program is executed on the Client side like in
ClientRunXXXJob.
Console options are special commands that are sent to the director instead of the OS. At this time, console
command outputs are redirected to log with the jobid 0.
You can use following console command: delete, disable, enable, estimate, list, llist, memory, prune,
purge, reload, status, setdebug, show, time, trace, update, version, .client, .jobs, .pool, .storage.
See Bareos Console for more information. You need to specify needed information on command line, nothing
will be prompted. Example:
You can specify more than one Command/Console option per RunScript.
You can use following options may be specified in the body of the runscript:
|
|
|
Options | Value | Information |
|
|
|
|
|
|
Runs On Success | Yes | No | run if JobStatus is successful |
|
|
|
Runs On Failure | Yes | No | run if JobStatus isn’t successful |
|
|
|
Runs On Client | Yes | No | run command on client |
|
|
|
Runs When | Never | Before |
After | Always |
AfterVSS | When to run |
|
|
|
Fail Job On Error | Yes | No | Fail job if script returns something different
from 0 |
|
|
|
Command | | External command |
|
|
|
Console | | Console command |
|
|
|
| |
Any output sent by the command to standard output will be included in the Bareos job report. The command
string must be a valid program name or name of a shell script.
Please note! The command string is parsed then fed to the OS, which means that the path will be searched to
execute your specified command, but there is no shell interpretation. As a consequence, if you invoke
complicated commands or want any shell features such as redirection or piping, you must call a shell script and
do it inside that script. Alternatively, it is possible to use sh -c ’...’ in the command definition to force
shell interpretation, see example below.
Before executing the specified command, Bareos performs character substitution of the following
characters:
| %% | % |
| %b | Job Bytes |
| %B | Job Bytes in human readable format |
| %c | Client’s name |
| %d | Daemon’s name (Such as host-dir or host-fd) |
| %D | Director’s name (Also valid on file daemon) |
| %e | Job Exit Status |
| %f | Job FileSet (Only on director side) |
| %F | Job Files |
| %h | Client address |
| %i | Job Id |
| %j | Unique Job Id |
| %l | Job Level |
| %n | Job name |
| %p | Pool name (Only on director side) |
| %P | Daemon PID |
| %s | Since time |
| %t | Job type (Backup, ...) |
| %v | Read Volume name(s) (Only on director side) |
| %V | Write Volume name(s) (Only on director side) |
| |
|
| %w | Storage name (Only on director side) |
| %x | Spooling enabled? (”yes” or ”no”) |
| |
| |
| |
| |
| |
Some character substitutions are not available in all situations. The Job Exit Status code %e edits the
following values:
- OK
- Error
- Fatal Error
- Canceled
- Differences
- Unknown term code
Thus if you edit it on a command line, you will need to enclose it within some sort of quotes.
You can use these following shortcuts:
Examples:
Special Windows Considerations
You can run scripts just after snapshots initializations with AfterVSS keyword.
In addition, for a Windows client, please take note that you must ensure a correct path to your script.
The script or program can be a .com, .exe or a .bat file. If you just put the program name in
then Bareos will search using the same rules that cmd.exe uses (current directory, Bareos bin
directory, and PATH). It will even try the different extensions in the same order as cmd.exe.
The command can be anything that cmd.exe or command.com will recognize as an executable
file.
However, if you have slashes in the program name then Bareos figures you are fully specifying the name, so
you must also explicitly add the three character extension.
The command is run in a Win32 environment, so Unix like commands will not work unless you have installed
and properly configured Cygwin in addition to and separately from Bareos.
The System %Path% will be searched for the command. (under the environment variable dialog you have have
both System Environment and User Environment, we believe that only the System environment will be
available to bareos-fd, if it is running as a service.)
System environment variables can be referenced with %var% and used as either part of the command name or
arguments.
So if you have a script in the Bareos
bin directory then the following lines should work fine:
The outer set of quotes is removed when the configuration file is parsed. You need to escape the inner quotes
so that they are there when the code that parses the command line for execution runs so it can tell what the
program name is.
The special characters &<>()@| will need to be quoted, if they are part of a filename or argument.
If someone is logged in, a blank ”command” window running the commands will be present during the
execution of the command.
Some Suggestions from Phil Stracchino for running on Win32 machines with the native Win32 File
daemon:
- You might want the ClientRunBeforeJob directive to specify a .bat file which runs the actual
client-side commands, rather than trying to run (for example) regedit /e directly.
- The batch file should explicitly ’exit 0’ on successful completion.
- The path to the batch file should be specified in Unix form:
Client Run Before Job = "c:/bareos/bin/systemstate.bat"
rather than DOS/Windows form:
INCORRECT: Client Run Before Job = "c:\bareos \bin \systemstate .bat"
For Win32, please note that there are certain limitations:
Client Run Before Job = "C:/Program Files/Bareos/bin/pre-exec.bat"
Lines like the above do not work because there are limitations of cmd.exe that is used to execute the
command. Bareos prefixes the string you supply with cmd.exe /c. To test that your command works you
should type cmd /c "C:/Program Files/test.exe" at a cmd prompt and see what happens.
Once the command is correct insert a backslash (∖) before each double quote (”), and then put
quotes around the whole thing when putting it in the director’s .conf file. You either need to have
only one set of quotes or else use the short name and don’t put quotes around the command
path.
Below is the output from cmd’s help as it relates to the command line passed to the /c option.
If /C or /K is specified, then the remainder of the command line after the switch is processed as a command
line, where the following logic is used to process quote (”) characters:
- If all of the following conditions are met, then quote characters on the command line are
preserved:
- no /S switch.
- exactly two quote characters.
- no special characters between the two quote characters, where special is one of: &<>()@|
- there are one or more whitespace characters between the the two quote characters.
- the string between the two quote characters is the name of an executable file.
- Otherwise, old behavior is to see if the first character is a quote character and if so, strip the leading
character and remove the last quote character on the command line, preserving any text after the last
quote character.
-
Save File History = <yes|no>
- (default: yes)
Allow disabling storing the file history, as this causes problems problems with some implementations of NDMP
(out-of-order metadata).
With File History Size Dir
Job the maximum number of files and directories inside a NDMP job can be
configured.
Please note! The File History is required to do a single file restore from NDMP backups. With this disabled,
only full restores are possible.
Version >= 14.2.0
-
Schedule = <resource-name>
-
The Schedule directive defines what schedule is to be used for the Job. The schedule in turn determines when
the Job will be automatically started and what Job level (i.e. Full, Incremental, ...) is to be run. This directive
is optional, and if left out, the Job can only be started manually using the Console program. Although you
may specify only a single Schedule resource for any one job, the Schedule resource may contain multiple Run
directives, which allow you to run the Job at many different times, and each run directive permits
overriding the default Job Level Pool, Storage, and Messages resources. This gives considerable
flexibility in what can be done with a single Job. For additional details, see Schedule Resource.
-
SD Plugin Options = <string-list>
-
These settings are plugin specific, see Storage Daemon Plugins.
-
Selection Pattern = <string>
-
Selection Patterns is only used for Copy and Migration jobs, see Migration and Copy. The interpretation of its
value depends on the selected Selection Type Dir
Job.
For the OldestVolume and SmallestVolume, this Selection pattern is not used (ignored).
For the Client, Volume, and Job keywords, this pattern must be a valid regular expression that will filter the
appropriate item names found in the Pool.
For the SQLQuery keyword, this pattern must be a valid SELECT SQL statement that returns JobIds.
-
Selection Type = <MigrationType>
-
Selection Type is only used for Copy and Migration jobs, see Migration and Copy. It determines how a
migration job will go about selecting what JobIds to migrate. In most cases, it is used in conjunction with a
Selection Pattern Dir
Job to give you fine control over exactly what JobIds are selected. The possible values
are:
-
SmallestVolume
- This selection keyword selects the volume with the fewest bytes from the Pool to
be migrated. The Pool to be migrated is the Pool defined in the Migration Job resource. The
migration control job will then start and run one migration backup job for each of the Jobs found
on this Volume. The Selection Pattern, if specified, is not used.
-
OldestVolume
- This selection keyword selects the volume with the oldest last write time in the Pool
to be migrated. The Pool to be migrated is the Pool defined in the Migration Job resource. The
migration control job will then start and run one migration backup job for each of the Jobs found
on this Volume. The Selection Pattern, if specified, is not used.
-
Client
- The Client selection type, first selects all the Clients that have been backed up in the Pool
specified by the Migration Job resource, then it applies the Selection Pattern Dir
Job as a regular
expression to the list of Client names, giving a filtered Client name list. All jobs that were backed
up for those filtered (regexed) Clients will be migrated. The migration control job will then start
and run one migration backup job for each of the JobIds found for those filtered Clients.
-
Volume
- The Volume selection type, first selects all the Volumes that have been backed up in the
Pool specified by the Migration Job resource, then it applies the Selection Pattern Dir
Job as a regular
expression to the list of Volume names, giving a filtered Volume list. All JobIds that were backed
up for those filtered (regexed) Volumes will be migrated. The migration control job will then start
and run one migration backup job for each of the JobIds found on those filtered Volumes.
-
Job
- The Job selection type, first selects all the Jobs (as defined on the Name Dir
Job directive in a Job
resource) that have been backed up in the Pool specified by the Migration Job resource, then it
applies the Selection Pattern Dir
Job as a regular expression to the list of Job names, giving a filtered
Job name list. All JobIds that were run for those filtered (regexed) Job names will be migrated.
Note, for a given Job named, they can be many jobs (JobIds) that ran. The migration control job
will then start and run one migration backup job for each of the Jobs found.
-
SQLQuery
- The SQLQuery selection type, used the Selection Pattern Dir
Job as an SQL query to obtain
the JobIds to be migrated. The Selection Pattern must be a valid SELECT SQL statement for
your SQL engine, and it must return the JobId as the first field of the SELECT.
-
PoolOccupancy
- This selection type will cause the Migration job to compute the total size of the
specified pool for all Media Types combined. If it exceeds the Migration High Bytes Dir
Pool defined
in the Pool, the Migration job will migrate all JobIds beginning with the oldest Volume in the
pool (determined by Last Write time) until the Pool bytes drop below the Migration Low Bytes
Dir
Pool defined in the Pool. This calculation should be consider rather approximative because it is
made once by the Migration job before migration is begun, and thus does not take into account
additional data written into the Pool during the migration. In addition, the calculation of the
total Pool byte size is based on the Volume bytes saved in the Volume (Media) database entries.
The bytes calculate for Migration is based on the value stored in the Job records of the Jobs to
be migrated. These do not include the Storage daemon overhead as is in the total Pool size. As a
consequence, normally, the migration will migrate more bytes than strictly necessary.
-
PoolTime
- The PoolTime selection type will cause the Migration job to look at the time each JobId
has been in the Pool since the job ended. All Jobs in the Pool longer than the time specified on
Migration Time Dir
Pool directive in the Pool resource will be migrated.
-
PoolUncopiedJobs
- This selection which copies all jobs from a pool to an other pool which were not
copied before is available only for copy Jobs.
-
Spool Attributes = <yes|no>
- (default: no)
Is Spool Attributes is disabled, the File attributes are sent by the Storage daemon to the Director as they are
stored on tape. However, if you want to avoid the possibility that database updates will slow down writing to
the tape, you may want to set the value to yes, in which case the Storage daemon will buffer the File
attributes and Storage coordinates to a temporary file in the Working Directory, then when writing the
Job data to the tape is completed, the attributes and storage coordinates will be sent to the
Director.
NOTE: When Spool Data Dir
Job is set to yes, Spool Attributes is also automatically set to yes.
For details, see Data Spooling.
-
Spool Data = <yes|no>
- (default: no)
If this directive is set to yes, the Storage daemon will be requested to spool the data for this Job to disk
rather than write it directly to the Volume (normally a tape).
Thus the data is written in large blocks to the Volume rather than small blocks. This directive
is particularly useful when running multiple simultaneous backups to tape. Once all the data
arrives or the spool files’ maximum sizes are reached, the data will be despooled and written to
tape.
Spooling data prevents interleaving data from several job and reduces or eliminates tape drive stop and start
commonly known as ”shoe-shine”.
We don’t recommend using this option if you are writing to a disk file using this option will probably just slow
down the backup jobs.
NOTE: When this directive is set to yes, Spool Attributes Dir
Job is also automatically set to yes.
For details, see Data Spooling.
-
Spool Size = <Size64>
-
This specifies the maximum spool size for this job. The default is taken from Maximum Spool Size Sd
Device limit.
-
Storage = <ResourceList>
-
The Storage directive defines the name of the storage services where you want to backup the
FileSet data. For additional details, see the Storage Resource of this manual. The Storage resource
may also be specified in the Job’s Pool resource, in which case the value in the Pool resource
overrides any value in the Job. This Storage resource definition is not required by either the Job
resource or in the Pool, but it must be specified in one or the other, if not an error will result.
-
Strip Prefix = <string>
-
This directive applies only to a Restore job and specifies a prefix to remove from the directory name of all files
being restored. This will use the File Relocation feature.
Using Strip Prefix=/etc, /etc/passwd will be restored to /passwd
Under Windows, if you want to restore c:/files to d:/files, you can use:
-
Type = <JobType>
- (required)
The Type directive specifies the Job type, which is one of the following:
-
Backup
-
Run a backup Job. Normally you will have at least one Backup job for each client you want to save.
Normally, unless you turn off cataloging, most all the important statistics and data concerning
files backed up will be placed in the catalog.
-
Restore
-
Run a restore Job. Normally, you will specify only one Restore job which acts as a sort of
prototype that you will modify using the console program in order to perform restores. Although
certain basic information from a Restore job is saved in the catalog, it is very minimal compared
to the information stored for a Backup job – for example, no File database entries are generated
since no Files are saved.
Restore jobs cannot be automatically started by the scheduler as is the case for Backup, Verify
and Admin jobs. To restore files, you must use the restore command in the console.
-
Verify
-
Run a verify Job. In general, verify jobs permit you to compare the contents of the catalog to
the file system, or to what was backed up. In addition, to verifying that a tape that was written
can be read, you can also use verify as a sort of tripwire intrusion detection.
-
Admin
-
Run an admin Job. An Admin job can be used to periodically run catalog pruning, if you do not
want to do it at the end of each Backup Job. Although an Admin job is recorded in the catalog,
very little data is saved.
-
Migrate
- defines the job that is run as being a Migration Job. A Migration Job is a sort of control
job and does not have any Files associated with it, and in that sense they are more or less like an
Admin job. Migration jobs simply check to see if there is anything to Migrate then possibly start
and control new Backup jobs to migrate the data from the specified Pool to another Pool. Note,
any original JobId that is migrated will be marked as having been migrated, and the original
JobId can nolonger be used for restores; all restores will be done from the new migrated Job.
-
Copy
- defines the job that is run as being a Copy Job. A Copy Job is a sort of control job and does
not have any Files associated with it, and in that sense they are more or less like an Admin job.
Copy jobs simply check to see if there is anything to Copy then possibly start and control new
Backup jobs to copy the data from the specified Pool to another Pool. Note that when a copy
is made, the original JobIds are left unchanged. The new copies can not be used for restoration
unless you specifically choose them by JobId. If you subsequently delete a JobId that has a copy,
the copy will be automatically upgraded to a Backup rather than a Copy, and it will subsequently
be used for restoration.
-
Consolidate
- is used to consolidate Always Incremental Backups jobs, see Always Incremental Backup
Scheme. It has been introduced in Bareos Version >= 16.2.4.
Within a particular Job Type, there are also Levels, see Level Dir
Job.
-
Verify Job = <resource-name>
-
This directive is an alias.
If you run a verify job without this directive, the last job run will be compared with the catalog, which means
that you must immediately follow a backup by a verify command. If you specify a Verify Job Bareos will find
the last job with that name that ran. This permits you to run all your backups, then run Verify jobs on those
that you wish to be verified (most often a VolumeToCatalog) so that the tape just written is re-read.
-
Virtual Full Backup Pool = <resource-name>
-
-
Where = <path>
-
This directive applies only to a Restore job and specifies a prefix to the directory name of all files being
restored. This permits files to be restored in a different location from which they were saved. If Where is not
specified or is set to backslash (/), the files will be restored to their original location. By default, we have set
Where in the example configuration files to be /tmp/bareos-restores. This is to prevent accidental
overwriting of your files.
Please note! To use Where on NDMP backups, please read Restore files to different path.
-
Write Bootstrap = <path>
-
The writebootstrap directive specifies a file name where Bareos will write a bootstrap file for each Backup
job run. This directive applies only to Backup Jobs. If the Backup job is a Full save, Bareos will erase
any current contents of the specified file before writing the bootstrap records. If the Job is an
Incremental or Differential save, Bareos will append the current bootstrap record to the end of the
file.
Using this feature, permits you to constantly have a bootstrap file that can recover the current state of your
system. Normally, the file specified should be a mounted drive on another machine, so that if your hard
disk is lost, you will immediately have a bootstrap record available. Alternatively, you should
copy the bootstrap file to another machine after it is updated. Note, it is a good idea to write a
separate bootstrap file for each Job backed up including the job that backs up your catalog
database.
If the bootstrap-file-specification begins with a vertical bar (|), Bareos will use the specification as the
name of a program to which it will pipe the bootstrap record. It could for example be a shell script that emails
you the bootstrap record.
Before opening the file or executing the specified command, Bareos performs character substitution like in
RunScript directive. To automatically manage your bootstrap files, you can use this in your JobDefs
resources:
For more details on using this file, please see chapter The Bootstrap File.
-
Write Part After Job = <yes|no>
-
Please note! This directive is deprecated.
-
Write Verify List = <path>
-
The following is an example of a valid Job resource definition:
Job {
Name = "Minou"
Type = Backup
Level = Incremental # default
Client = Minou
FileSet="Minou Full Set"
Storage = DLTDrive
Pool = Default
Schedule = "MinouWeeklyCycle"
Messages = Standard
}
Configuration 9.2:
Job Resource Example
#
The JobDefs resource permits all the same directives that can appear in a Job resource. However, a JobDefs
resource does not create a Job, rather it can be referenced within a Job to provide defaults for that
Job. This permits you to concisely define several nearly identical Jobs, each one referencing a JobDefs
resource which contains the defaults. Only the changes from the defaults need to be mentioned in each
Job.
#
The Schedule resource provides a means of automatically scheduling a Job as well as the ability to override the
default Level, Pool, Storage and Messages resources. If a Schedule resource is not referenced in a Job, the Job can
only be run manually. In general, you specify an action to be taken and when.
-
Description = <string>
-
-
Enabled = <yes|no>
- (default: yes)
En- or disable this resource.
-
Name = <name>
- (required)
The name of the resource.
The name of the schedule being defined.
-
Run = <job-overrides> <date-time-specification>
-
The Run directive defines when a Job is to be run, and what overrides if any to apply. You may specify
multiple run directives within a Schedule resource. If you do, they will all be applied (i.e. multiple
schedules). If you have two Run directives that start at the same time, two Jobs will start at the same
time (well, within one second of each other).
The Job-overrides permit overriding the Level, the Storage, the Messages, and the Pool specifications
provided in the Job resource. In addition, the FullPool, the IncrementalPool, and the DifferentialPool
specifications permit overriding the Pool specification according to what backup Job Level is in effect.
By the use of overrides, you may customize a particular Job. For example, you may specify a Messages
override for your Incremental backups that outputs messages to a log file, but for your weekly or
monthly Full backups, you may send the output by email by using a different Messages override.
Job-overrides are specified as: keyword=value where the keyword is Level, Storage, Messages,
Pool, FullPool, DifferentialPool, or IncrementalPool, and the value is as defined on the respective
directive formats for the Job resource. You may specify multiple Job-overrides on one Run directive
by separating them with one or more spaces or by separating them with a trailing comma. For example:
-
Level=Full
- is all files in the FileSet whether or not they have changed.
-
Level=Incremental
- is all files that have changed since the last backup.
-
Pool=Weekly
- specifies to use the Pool named Weekly.
-
Storage=DLT_Drive
- specifies to use DLT_Drive for the storage device.
-
Messages=Verbose
- specifies to use the Verbose message resource for the Job.
-
FullPool=Full
- specifies to use the Pool named Full if the job is a full backup, or is upgraded from
another type to a full backup.
-
DifferentialPool=Differential
- specifies to use the Pool named Differential if the job is a
differential backup.
-
IncrementalPool=Incremental
- specifies to use the Pool named Incremental if the job is an
incremental backup.
-
Accurate=yes|no
- tells Bareos to use or not the Accurate code for the specific job. It can allow you
to save memory and and CPU resources on the catalog server in some cases.
-
SpoolData=yes|no
- tells Bareos to use or not to use spooling for the specific job.
Date-time-specification determines when the Job is to be run. The specification is a repetition, and as a
default Bareos is set to run a job at the beginning of the hour of every hour of every day of every week of
every month of every year. This is not normally what you want, so you must specify or limit when you want
the job to run. Any specification given is assumed to be repetitive in nature and will serve to override or limit
the default repetition. This is done by specifying masks or times for the hour, day of the month, day of
the week, week of the month, week of the year, and month when you want the job to run. By
specifying one or more of the above, you can define a schedule to repeat at almost any frequency you
want.
Basically, you must supply a month, day, hour, and minute the Job is to be run. Of these four items to be
specified, day is special in that you may either specify a day of the month such as 1, 2, ... 31, or you may
specify a day of the week such as Monday, Tuesday, ... Sunday. Finally, you may also specify
a week qualifier to restrict the schedule to the first, second, third, fourth, or fifth week of the
month.
For example, if you specify only a day of the week, such as Tuesday the Job will be run every hour of every
Tuesday of every Month. That is the month and hour remain set to the defaults of every month and all
hours.
Note, by default with no other specification, your job will run at the beginning of every hour. If you wish your
job to run more than once in any given hour, you will need to specify multiple run specifications each with a
different minute.
The date/time to run the Job can be specified in the following way in pseudo-BNF:
| <week-keyword> ::= |
1st | 2nd | 3rd | 4th | 5th | first | second | third
| fourth | fifth | last |
| <wday-keyword> ::= |
sun | mon | tue | wed | thu | fri | sat | sunday
| monday | tuesday | wednesday | thursday | friday
| saturday |
| <week-of-year-keyword> ::= |
w00 | w01 | ... w52 | w53 |
| <month-keyword> ::= |
jan | feb | mar | apr | may | jun | jul | aug | sep
| oct | nov | dec | january | february | ... | december |
| <digit> ::= |
1 | 2 | 3 | 4 | 5 | 6 | 7 | 8 | 9 | 0 |
| <number> ::= |
<digit> | <digit><number> |
| <12hour> ::= |
0 | 1 | 2 | ... 12 |
| <hour> ::= |
0 | 1 | 2 | ... 23 |
| <minute> ::= |
0 | 1 | 2 | ... 59 |
| <day> ::= |
1 | 2 | ... 31 |
| <time> ::= |
<hour>:<minute> | <12hour>:<minute>am
| <12hour>:<minute>pm |
| <time-spec> ::= |
at <time> | hourly |
| <day-range> ::= |
<day>-<day> |
| <month-range> ::= |
<month-keyword>-<month-keyword> |
| <wday-range> ::= |
<wday-keyword>-<wday-keyword> |
| <range> ::= |
<day-range> | <month-range> | <wday-range> |
| <modulo> ::= |
<day>/<day>
| <week-of-year-keyword>/<week-of-year-keyword> |
| <date> ::= |
<date-keyword> | <day> | <range> |
| <date-spec> ::= |
<date> | <date-spec> |
| <day-spec> ::= |
<day> | <wday-keyword> | <day>
| <wday-range> | <week-keyword>
<wday-keyword> | <week-keyword> <wday-range>
| daily |
| |
|
| <month-spec> ::= |
<month-keyword> | <month-range> | monthly |
| <date-time-spec> ::= |
<month-spec> <day-spec> <time-spec> |
| ::= |
| ::= |
| ::= |
| ::= |
| ::= |
Note, the Week of Year specification wnn follows the ISO standard definition of the week of the year, where Week 1
is the week in which the first Thursday of the year occurs, or alternatively, the week which contains the 4th of
January. Weeks are numbered w01 to w53. w00 for Bareos is the week that precedes the first ISO week (i.e. has the
first few days of the year if any occur before Thursday). w00 is not defined by the ISO specification. A week starts
with Monday and ends with Sunday.
According to the NIST (US National Institute of Standards and Technology), 12am and 12pm are ambiguous and
can be defined to anything. However, 12:01am is the same as 00:01 and 12:01pm is the same as 12:01, so Bareos
defines 12am as 00:00 (midnight) and 12pm as 12:00 (noon). You can avoid this abiguity (confusion) by using 24
hour time specifications (i.e. no am/pm).
An example schedule resource that is named WeeklyCycle and runs a job with level full each Sunday at 2:05am
and an incremental job Monday through Saturday at 2:05am is:
Schedule {
Name = "WeeklyCycle"
Run = Level=Full sun at 2:05
Run = Level=Incremental mon-sat at 2:05
}
Configuration 9.3:
Schedule Example
An example of a possible monthly cycle is as follows:
Schedule {
Name = "MonthlyCycle"
Run = Level=Full Pool=Monthly 1st sun at 2:05
Run = Level=Differential 2nd-5th sun at 2:05
Run = Level=Incremental Pool=Daily mon-sat at 2:05
}
Configuration 9.4:
The first of every month:
Schedule {
Name = "First"
Run = Level=Full on 1 at 2:05
Run = Level=Incremental on 2-31 at 2:05
}
Configuration 9.5:
The last friday of the month (i.e. the last friday in the last week of the month)
Schedule {
Name = "Last Friday"
Run = Level=Full last fri at 21:00
}
Configuration 9.6:
Every 10 minutes:
Schedule {
Name = "TenMinutes"
Run = Level=Full hourly at 0:05
Run = Level=Full hourly at 0:15
Run = Level=Full hourly at 0:25
Run = Level=Full hourly at 0:35
Run = Level=Full hourly at 0:45
Run = Level=Full hourly at 0:55
}
Configuration 9.7:
The modulo scheduler makes it easy to specify schedules like odd or even days/weeks, or more
generally every n days or weeks. It is called modulo scheduler because it uses the modulo to determine if
the schedule must be run or not. The second variable behind the slash lets you determine in which
cycle of days/weeks a job should be run. The first part determines on which day/week the job should
be run first. E.g. if you want to run a backup in a 5-week-cycle, starting on week 3, you set it up as
w03/w05.
Schedule {
Name = "Odd Days"
Run = 1/2 at 23:10
}
Schedule {
Name = "Even Days"
Run = 2/2 at 23:10
}
Schedule {
Name = "On the 3rd week in a 5-week-cycle"
Run = w03/w05 at 23:10
}
Schedule {
Name = "Odd Weeks"
Run = w01/w02 at 23:10
}
Schedule {
Name = "Even Weeks"
Run = w02/w02 at 23:10
}
Configuration 9.8:
Schedule Examples: modulo
#
Internally Bareos keeps a schedule as a bit mask. There are six masks and a minute field to each schedule. The
masks are hour, day of the month (mday), month, day of the week (wday), week of the month (wom), and week of
the year (woy). The schedule is initialized to have the bits of each of these masks set, which means
that at the beginning of every hour, the job will run. When you specify a month for the first time,
the mask will be cleared and the bit corresponding to your selected month will be selected. If you
specify a second month, the bit corresponding to it will also be added to the mask. Thus when Bareos
checks the masks to see if the bits are set corresponding to the current time, your job will run only
in the two months you have set. Likewise, if you set a time (hour), the hour mask will be cleared,
and the hour you specify will be set in the bit mask and the minutes will be stored in the minute
field.
For any schedule you have defined, you can see how these bits are set by doing a show schedules command in the
Console program. Please note that the bit mask is zero based, and Sunday is the first day of the week (bit
zero).
#
The FileSet resource defines what files are to be included or excluded in a backup job. A FileSet resource is
required for each backup Job. It consists of a list of files or directories to be included, a list of files or directories to
be excluded and the various backup options such as compression, encryption, and signatures that are to be applied
to each file.
Any change to the list of the included files will cause Bareos to automatically create a new FileSet (defined by the
name and an MD5 checksum of the Include/Exclude contents). Each time a new FileSet is created, Bareos will
ensure that the next backup is always a Full save.
-
Description = <string>
-
Information only.
-
Enable VSS = <yes|no>
- (default: yes)
If this directive is set to yes the File daemon will be notified that the user wants to use a Volume
Shadow Copy Service (VSS) backup for this job. This directive is effective only on the Windows File
Daemon. It permits a consistent copy of open files to be made for cooperating writer applications, and
for applications that are not VSS away, Bareos can at least copy open files. The Volume Shadow Copy
will only be done on Windows drives where the drive (e.g. C:, D:, ...) is explicitly mentioned in a File
directive. For more information, please see the Windows chapter of this manual.
-
Exclude = <IncludeExcludeItem>
-
Describe the files, that should get excluded from a backup, see section about the FileSet Exclude
Ressource.
-
Ignore File Set Changes = <yes|no>
- (default: no)
Normally, if you modify the FileSet Include or Exclude lists, the next backup will be forced to a Full
so that Bareos can guarantee that any additions or deletions are properly saved.
We strongly recommend against setting this directive to yes, since doing so may cause you to have an
incomplete set of backups.
If this directive is set to yes, any changes you make to the FileSet Include or Exclude lists, will not
force a Full during subsequent backups.
-
Include = <IncludeExcludeItem>
-
Describe the files, that should get included to a backup, see section about the FileSet Include Ressource.
-
Name = <name>
- (required)
The name of the resource.
The name of the FileSet resource.
#
The Include resource must contain a list of directories and/or files to be processed in the backup job.
Normally, all files found in all subdirectories of any directory in the Include File list will be backed up.
Note, see below for the definition of <file-list>. The Include resource may also contain one or more
Options resources that specify options such as compression to be applied to all or any subset of the files
found when processing the file-list for backup. Please see below for more details concerning Options
resources.
There can be any number of Include resources within the FileSet, each having its own list of directories or files to
be backed up and the backup options defined by one or more Options resources.
Please take note of the following items in the FileSet syntax:
- There is no equal sign (=) after the Include and before the opening brace ({). The same is true for the
Exclude.
- Each directory (or filename) to be included or excluded is preceded by a File =. Previously they were
simply listed on separate lines.
- The Exclude resource does not accept Options.
- When using wild-cards or regular expressions, directory names are always terminated with a slash (/)
and filenames have no trailing slash.
-
File = < filename | dirname | |command | ∖<includefile-client | <includefile-server >
-
The file list consists of one file or directory name per line. Directory names should be specified without
a trailing slash with Unix path notation.
Windows users, please take note to specify directories (even c:/...) in Unix path notation. If you use
Windows conventions, you will most likely not be able to restore your files due to the fact that the
Windows path separator was defined as an escape character long before Windows existed, and Bareos
adheres to that convention (i.e. means the next character appears as itself).
You should always specify a full path for every directory and file that you list in the FileSet. In addition,
on Windows machines, you should always prefix the directory or filename with the drive specification
(e.g. c:/xxx) using Unix directory name separators (forward slash). The drive letter itself can be upper
or lower case (e.g. c:/xxx or C:/xxx).
Bareos’s default for processing directories is to recursively descend in the directory saving all files and
subdirectories. Bareos will not by default cross filesystems (or mount points in Unix parlance). This
means that if you specify the root partition (e.g. /), Bareos will save only the root partition and not
any of the other mounted filesystems. Similarly on Windows systems, you must explicitly specify each
of the drives you want saved (e.g. c:/ and d:/ ...). In addition, at least for Windows systems, you will
most likely want to enclose each specification within double quotes particularly if the directory (or file)
name contains spaces. The df command on Unix systems will show you which mount points you must
specify to save everything. See below for an example.
Take special care not to include a directory twice or Bareos will backup the same files two times wasting
a lot of space on your archive device. Including a directory twice is very easy to do. For example:
Include {
Options {
compression=GZIP
}
File = /
File = /usr
}
Configuration 9.9:
File Set
on a Unix system where /usr is a subdirectory (rather than a mounted filesystem) will cause /usr to be backed
up twice.
<file-list> is a list of directory and/or filename names specified with a File = directive. To include names
containing spaces, enclose the name between double-quotes. Wild-cards are not interpreted in file-lists. They
can only be specified in Options resources.
There are a number of special cases when specifying directories and files in a file-list. They
are:
- Any name preceded by an at-sign (@) is assumed to be the name of a file, which contains a list
of files each preceded by a ”File =”. The named file is read once when the configuration file is
parsed during the Director startup. Note, that the file is read on the Director’s machine and not
on the Client’s. In fact, the @filename can appear anywhere within a configuration file where a
token would be read, and the contents of the named file will be logically inserted in the place of
the @filename. What must be in the file depends on the location the @filename is specified in the
conf file. For example:
Include {
Options {
compression=GZIP
}
@/home/files/my-files
}
Configuration 9.10:
File Set with Include File
- Any name beginning with a vertical bar (|) is assumed to be the name of a program. This program will be
executed on the Director’s machine at the time the Job starts (not when the Director reads the
configuration file), and any output from that program will be assumed to be a list of files or directories,
one per line, to be included. Before submitting the specified command Bareos will performe character
substitution.
This allows you to have a job that, for example, includes all the local partitions even if you change the
partitioning by adding a disk. The examples below show you how to do this. However, please note two
things:
1. if you want the local filesystems, you probably should be using the fstype directive and set onefs=no.
2. the exact syntax of the command needed in the examples below is very system dependent. For
example, on recent Linux systems, you may need to add the -P option, on FreeBSD systems, the options
will be different as well.
In general, you will need to prefix your command or commands with a sh -c so that they are
invoked by a shell. This will not be the case if you are invoking a script as in the second
example below. Also, you must take care to escape (precede with a ∖) wild-cards, shell
character, and to ensure that any spaces in your command are escaped as well. If you use a
single quotes (’) within a double quote (”), Bareos will treat everything between the single
quotes as one field so it will not be necessary to escape the spaces. In general, getting all
the quotes and escapes correct is a real pain as you can see by the next example. As a
consequence, it is often easier to put everything in a file and simply use the file name within
Bareos. In that case the sh -c will not be necessary providing the first line of the file is
#!/bin/sh.
As an example:
Include {
Options {
signature = SHA1
}
File = "|sh -c ’df -l | grep \"^/dev/hd[ab]\" | grep -v \".*/tmp\" | awk \"{print \\$6}\"’"
}
Configuration 9.11:
File Set with inline script
will produce a list of all the local partitions on a Linux system. Quoting is a real problem because you
must quote for Bareos which consists of preceding every ∖ and every ” with a ∖, and you must also
quote for the shell command. In the end, it is probably easier just to execute a script file
with:
Include {
Options {
signature=MD5
}
File = "|my_partitions"
}
Configuration 9.12:
File Set with external script
where my_partitions has:
#!/bin/sh
df -l | grep "^/dev/hd[ab]" | grep -v ".*/tmp" \
| awk "{print \$6}"
If the vertical bar (|) in front of my_partitions is preceded by a backslash as in ∖|, the program
will be executed on the Client’s machine instead of on the Director’s machine. Please note
that if the filename is given within quotes, you will need to use two slashes. An example,
provided by John Donagher, that backs up all the local UFS partitions on a remote system
is:
FileSet {
Name = "All local partitions"
Include {
Options {
signature=SHA1
onefs=yes
}
File = "\\|bash -c \"df -klF ufs | tail +2 | awk ’{print \$6}’\""
}
}
Configuration 9.13:
File Set with inline script in quotes
The above requires two backslash characters after the double quote (one preserves the next one). If you
are a Linux user, just change the ufs to ext3 (or your preferred filesystem type), and you will be in
business.
If you know what filesystems you have mounted on your system, e.g. for Linux only using ext2, ext3 or
ext4, you can backup all local filesystems using something like:
Include {
Options {
signature = SHA1
onfs=no
fstype=ext2
}
File = /
}
Configuration 9.14:
File Set to backup all extfs partions
- Any file-list item preceded by a less-than sign (<) will be taken to be a file. This file will be read on the
Director’s machine (see below for doing it on the Client machine) at the time the Job starts, and
the data will be assumed to be a list of directories or files, one per line, to be included.
The names should start in column 1 and should not be quoted even if they contain spaces.
This feature allows you to modify the external file and change what will be saved without
stopping and restarting Bareos as would be necessary if using the @ modifier noted above. For
example:
Include {
Options {
signature = SHA1
}
File = "</home/files/local-filelist"
}
If you precede the less-than sign (<) with a backslash as in ∖<, the file-list will be read on the Client
machine instead of on the Director’s machine. Please note that if the filename is given within quotes, you
will need to use two slashes.
Include {
Options {
signature = SHA1
}
File = "\\</home/xxx/filelist-on-client"
}
- If you explicitly specify a block device such as /dev/hda1, then Bareos will assume that this is a raw
partition to be backed up. In this case, you are strongly urged to specify a sparse=yes include option,
otherwise, you will save the whole partition rather than just the actual data that the partition contains.
For example:
Include {
Options {
signature=MD5
sparse=yes
}
File = /dev/hd6
}
Configuration 9.15:
Backup Raw Partitions
will backup the data in device /dev/hd6. Note, the bf /dev/hd6 must be the raw partition itself. Bareos
will not back it up as a raw device if you specify a symbolic link to a raw device such as my be created by
the LVM Snapshot utilities.
- A file-list may not contain wild-cards. Use directives in the Options resource if you wish to specify
wild-cards or regular expression matching.
-
Exclude Dir Containing = <filename>
-
This directive can be added to the Include section of the FileSet resource. If the specified filename
(filename-string) is found on the Client in any directory to be backed up, the whole directory will be ignored
(not backed up). We recommend to use the filename .nobackup, as it is a hidden file on unix systems, and
explains what is the purpose of the file.
For example:
# List of files to be backed up
FileSet {
Name = "MyFileSet"
Include {
Options {
signature = MD5
}
File = /home
Exclude Dir Containing = .nobackup
}
}
Configuration 9.16:
Exlude Directories containing the file .nobackup
But in /home, there may be hundreds of directories of users and some people want to indicate that they don’t
want to have certain directories backed up. For example, with the above FileSet, if the user or sysadmin
creates a file named .nobackup in specific directories, such as
/home/user/www/cache/.nobackup
/home/user/temp/.nobackup
then Bareos will not backup the two directories named:
/home/user/www/cache
/home/user/temp
NOTE: subdirectories will not be backed up. That is, the directive applies to the two directories in question
and any children (be they files, directories, etc).
-
Plugin = <plugin-name:plugin-parameter1:plugin-parameter2:…>
-
Instead of only specifying files, a file set can also use plugins. Plugins are additional libraries that handle
specific requirements. The purpose of plugins is to provide an interface to any system program
for backup and restore. That allows you, for example, to do database backups without a local
dump.
The syntax and semantics of the Plugin directive require the first part of the string up to the colon to be the
name of the plugin. Everything after the first colon is ignored by the File daemon but is passed
to the plugin. Thus the plugin writer may define the meaning of the rest of the string as he
wishes.
For more information, see File Daemon Plugins.
The program bpluginfo can be used, to retrieve information about a specific plugin.
Note: It is also possible to define more than one plugin directive in a FileSet to do several database dumps at
once.
-
Options = <…>
-
See the FileSet Options Ressource section.
The Options resource is optional, but when specified, it will contain a list of keyword=value options to be applied
to the file-list. See below for the definition of file-list. Multiple Options resources may be specified one after another.
As the files are found in the specified directories, the Options will applied to the filenames to determine if and how
the file should be backed up. The wildcard and regular expression pattern matching parts of the Options resources
are checked in the order they are specified in the FileSet until the first one that matches. Once one
matches, the compression and other flags within the Options specification will apply to the pattern
matched.
A key point is that in the absence of an Option or no other Option is matched, every file is accepted for backing up.
This means that if you want to exclude something, you must explicitly specify an Option with an exclude = yes
and some pattern matching.
Once Bareos determines that the Options resource matches the file under consideration, that file will be saved
without looking at any other Options resources that may be present. This means that any wild cards must appear
before an Options resource without wild cards.
If for some reason, Bareos checks all the Options resources to a file under consideration for backup, but
there are no matches (generally because of wild cards that don’t match), Bareos as a default will then
backup the file. This is quite logical if you consider the case of no Options clause is specified, where you
want everything to be backed up, and it is important to keep in mind when excluding as mentioned
above.
However, one additional point is that in the case that no match was found, Bareos will use the options found in the
last Options resource. As a consequence, if you want a particular set of ”default” options, you should put them in an
Options resource after any other Options.
It is a good idea to put all your wild-card and regex expressions inside double quotes to prevent conf file scanning
problems.
This is perhaps a bit overwhelming, so there are a number of examples included below to illustrate how this
works.
You find yourself using a lot of Regex statements, which will cost quite a lot of CPU time, we recommend
you simplify them if you can, or better yet convert them to Wild statements which are much more
efficient.
The directives within an Options resource may be one of the following:
-
AutoExclude = <yes|no>
- (default: yes)
Automatically exclude files not intended for backup. Currently only used for Windows, to exclude
files defined in the registry key HKEY_LOCAL_MACHINE\SYSTEM \CurrentControlSet \Control \
BackupRestore \FilesNotToBackup , see section FilesNotToBackup Registry Key.
Version >= 14.2.2
-
compression=<GZIP|GZIP1|...|GZIP9|LZO|LZFAST|LZ4|LZ4HC>
-
Configures the software compression to be used by the File Daemon. The compression is done on a file
by file basis.
Software compression gets important if you are writing to a device that does not support compression
by itself (e.g. hard disks). Otherwise, all modern tape drive do support hardware compression. Software
compression can also be helpful to reduce the required network bandwidth, as compression is done
on the File Daemon. However, using Bareos software compression and device hardware compression
together is not advised, as trying to compress precompressed data is a very CPU-intense task and
probably end up in even larger data.
You can overwrite this option per Storage resource using the Allow Compression Dir
Storage = no option.
-
compression=GZIP
-
All files saved will be software compressed using the GNU ZIP compression format.
Specifying GZIP uses the default compression level 6 (i.e. GZIP is identical to GZIP6). If
you want a different compression level (1 through 9), you can specify it by appending the level
number with no intervening spaces to GZIP. Thus compression=GZIP1 would give minimum
compression but the fastest algorithm, and compression=GZIP9 would give the highest level of
compression, but requires more computation. According to the GZIP documentation, compression
levels greater than six generally give very little extra compression and are rather CPU intensive.
-
compression=LZO
-
All files saved will be software compressed using the LZO compression format. The compression
is done on a file by file basis by the File daemon. Everything else about GZIP is true for LZO.
LZO provides much faster compression and decompression speed but lower compression ratio than
GZIP. If your CPU is fast enough you should be able to compress your data without making the
backup duration longer.
Note that Bareos only use one compression level LZO1X-1 specified by LZO.
-
compression=LZFAST
-
All files saved will be software compressed using the LZFAST compression format. The
compression is done on a file by file basis by the File daemon. Everything else about GZIP is true
for LZFAST.
LZFAST provides much faster compression and decompression speed but lower compression ratio
than GZIP. If your CPU is fast enough you should be able to compress your data without making
the backup duration longer.
-
compression=LZ4
-
All files saved will be software compressed using the LZ4 compression format. The compression is
done on a file by file basis by the File daemon. Everything else about GZIP is true for LZ4.
LZ4 provides much faster compression and decompression speed but lower compression ratio than
GZIP. If your CPU is fast enough you should be able to compress your data without making the
backup duration longer.
Both LZ4 and LZ4HC have the same decompression speed which is about twice the speed of the
LZO compression. So for a restore both LZ4 and LZ4HC are good candidates.
Please note! As LZ4 compression is not supported by Bacula, make sure Compatible Fd
Client = no.
-
compression=LZ4HC
-
All files saved will be software compressed using the LZ4HC compression format. The compression
is done on a file by file basis by the File daemon. Everything else about GZIP is true for LZ4.
LZ4HC is the High Compression version of the LZ4 compression. It has a higher compression ratio
than LZ4 and is more comparable to GZIP-6 in both compression rate and cpu usage.
Both LZ4 and LZ4HC have the same decompression speed which is about twice the speed of the
LZO compression. So for a restore both LZ4 and LZ4HC are good candidates.
Please note! As LZ4 compression is not supported by Bacula, make sure Compatible Fd
Client = no.
-
signature=<MD5|SHA1|SHA256|SHA512>
-
It is strongly recommend to use signatures for your backups. Note, only one type of signature can be computed
per file.
-
signature=MD5
-
An MD5 signature will be computed for each files saved. Adding this option generates about 5%
extra overhead for each file saved. In addition to the additional CPU time, the MD5 signature
adds 16 more bytes per file to your catalog.
-
signature=SHA1
-
An SHA1 signature will be computed for each files saved. The SHA1 algorithm is purported to
be some what slower than the MD5 algorithm, but at the same time is significantly better from
a cryptographic point of view (i.e. much fewer collisions). The SHA1 signature requires adds 20
bytes per file to your catalog.
-
signature=SHA256
-
-
signature=SHA512
-
-
basejob=<options>
-
The options letters specified are used when running a Backup Level=Full with BaseJobs. The options
letters are the same than in the verify= option below.
-
accurate=<options>
- The options letters specified are used when running a Backup
Level=Incremental/Differential in Accurate mode. The options letters are the same than in the verify=
option below.
-
verify=<options>
-
The options letters specified are used when running a Verify Level=Catalog as well as the
DiskToCatalog level job. The options letters may be any combination of the following:
-
- i compare the inodes
-
- p compare the permission bits
-
- n compare the number of links
-
- u compare the user id
-
- g compare the group id
-
- s compare the size
-
- a compare the access time
-
- m compare the modification time (st_mtime)
-
- c compare the change time (st_ctime)
-
- d report file size decreases
-
- 5 compare the MD5 signature
-
- 1 compare the SHA1 signature
-
- A Only for Accurate option, it allows to always backup the file
A useful set of general options on the Level=Catalog or Level=DiskToCatalog verify is pins5 i.e.
compare permission bits, inodes, number of links, size, and MD5 changes.
-
onefs=yes|no
-
If set to yes (the default), Bareos will remain on a single file system. That is it will not backup file systems
that are mounted on a subdirectory. If you are using a *nix system, you may not even be aware that there are
several different filesystems as they are often automatically mounted by the OS (e.g. /dev, /net, /sys, /proc,
...). Bareos will inform you when it decides not to traverse into another filesystem. This can be very useful if
you forgot to backup a particular partition. An example of the informational message in the job report
is:
rufus-fd: /misc is a different filesystem. Will not descend from / into /misc
rufus-fd: /net is a different filesystem. Will not descend from / into /net
rufus-fd: /var/lib/nfs/rpc_pipefs is a different filesystem. Will not descend from /var/lib/nfs into /var/lib/nfs/rpc_pipefs
rufus-fd: /selinux is a different filesystem. Will not descend from / into /selinux
rufus-fd: /sys is a different filesystem. Will not descend from / into /sys
rufus-fd: /dev is a different filesystem. Will not descend from / into /dev
rufus-fd: /home is a different filesystem. Will not descend from / into /home
If you wish to backup multiple filesystems, you can explicitly list each filesystem you want saved. Otherwise, if
you set the onefs option to no, Bareos will backup all mounted file systems (i.e. traverse mount points) that
are found within the FileSet. Thus if you have NFS or Samba file systems mounted on a directory listed in
your FileSet, they will also be backed up. Normally, it is preferable to set onefs=yes and to
explicitly name each filesystem you want backed up. Explicitly naming the filesystems you want
backed up avoids the possibility of getting into a infinite loop recursing filesystems. Another
possibility is to use onefs=no and to set fstype=ext2, .... See the example below for more
details.
If you think that Bareos should be backing up a particular directory and it is not, and you have onefs=no
set, before you complain, please do:
stat /
stat <filesystem>
where you replace filesystem with the one in question. If the Device: number is different for / and for your
filesystem, then they are on different filesystems. E.g.
stat /
File: ‘/’
Size: 4096 Blocks: 16 IO Block: 4096 directory
Device: 302h/770d Inode: 2 Links: 26
Access: (0755/drwxr-xr-x) Uid: ( 0/ root) Gid: ( 0/ root)
Access: 2005-11-10 12:28:01.000000000 +0100
Modify: 2005-09-27 17:52:32.000000000 +0200
Change: 2005-09-27 17:52:32.000000000 +0200
stat /net
File: ‘/home’
Size: 4096 Blocks: 16 IO Block: 4096 directory
Device: 308h/776d Inode: 2 Links: 7
Access: (0755/drwxr-xr-x) Uid: ( 0/ root) Gid: ( 0/ root)
Access: 2005-11-10 12:28:02.000000000 +0100
Modify: 2005-11-06 12:36:48.000000000 +0100
Change: 2005-11-06 12:36:48.000000000 +0100
Also be aware that even if you include /home in your list of files to backup, as you most likely should,
you will get the informational message that ”/home is a different filesystem” when Bareos is
processing the / directory. This message does not indicate an error. This message means that while
examining the File = referred to in the second part of the message, Bareos will not descend
into the directory mentioned in the first part of the message. However, it is possible that the
separate filesystem will be backed up despite the message. For example, consider the following
FileSet:
File = /
File = /var
where /var is a separate filesystem. In this example, you will get a message saying that Bareos will not decend
from / into /var. But it is important to realise that Bareos will descend into /var from the second File
directive shown above. In effect, the warning is bogus, but it is supplied to alert you to possible omissions from
your FileSet. In this example, /var will be backed up. If you changed the FileSet such that it did not specify
/var, then /var will not be backed up.
-
honor nodump flag=<yes|no>
-
If your file system supports the nodump flag (e. g. most BSD-derived systems) Bareos will honor the setting
of the flag when this option is set to yes. Files having this flag set will not be included in the backup and will
not show up in the catalog. For directories with the nodump flag set recursion is turned off and the directory
will be listed in the catalog. If the honor nodump flag option is not defined or set to no every file and
directory will be eligible for backup.
-
portable=yes|no
-
If set to yes (default is no), the Bareos File daemon will backup Win32 files in a portable format, but not
all Win32 file attributes will be saved and restored. By default, this option is set to no, which means that on
Win32 systems, the data will be backed up using Windows API calls and on WinNT/2K/XP,
all the security and ownership attributes will be properly backed up (and restored). However
this format is not portable to other systems – e.g. Unix, Win95/98/Me. When backing up Unix
systems, this option is ignored, and unless you have a specific need to have portable backups, we
recommend accept the default (no) so that the maximum information concerning your files is
saved.
-
recurse=yes|no
-
If set to yes (the default), Bareos will recurse (or descend) into all subdirectories found unless the
directory is explicitly excluded using an exclude definition. If you set recurse=no, Bareos
will save the subdirectory entries, but not descend into the subdirectories, and thus will not
save the files or directories contained in the subdirectories. Normally, you will want the default
(yes).
-
sparse=yes|no
-
Enable special code that checks for sparse files such as created by ndbm. The default is no, so no checks are
made for sparse files. You may specify sparse=yes even on files that are not sparse file. No harm will be done,
but there will be a small additional overhead to check for buffers of all zero, and if there is a 32K block of all
zeros (see below), that block will become a hole in the file, which may not be desirable if the original file was
not a sparse file.
Restrictions: Bareos reads files in 32K buffers. If the whole buffer is zero, it will be treated as a sparse block
and not written to tape. However, if any part of the buffer is non-zero, the whole buffer will be
written to tape, possibly including some disk sectors (generally 4098 bytes) that are all zero. As a
consequence, Bareos’s detection of sparse blocks is in 32K increments rather than the system block
size. If anyone considers this to be a real problem, please send in a request for change with the
reason.
If you are not familiar with sparse files, an example is say a file where you wrote 512 bytes at
address zero, then 512 bytes at address 1 million. The operating system will allocate only two
blocks, and the empty space or hole will have nothing allocated. However, when you read the
sparse file and read the addresses where nothing was written, the OS will return all zeros as
if the space were allocated, and if you backup such a file, a lot of space will be used to write
zeros to the volume. Worse yet, when you restore the file, all the previously empty space will
now be allocated using much more disk space. By turning on the sparse option, Bareos will
specifically look for empty space in the file, and any empty space will not be written to the
Volume, nor will it be restored. The price to pay for this is that Bareos must search each block
it reads before writing it. On a slow system, this may be important. If you suspect you have
sparse files, you should benchmark the difference or set sparse for only those files that are really
sparse.
You probably should not use this option on files or raw disk devices that are not really sparse files (i.e. have
holes in them).
-
readfifo=yes|no
-
If enabled, tells the Client to read the data on a backup and write the data on a restore to any FIFO (pipe)
that is explicitly mentioned in the FileSet. In this case, you must have a program already running that writes
into the FIFO for a backup or reads from the FIFO on a restore. This can be accomplished with the
RunBeforeJob directive. If this is not the case, Bareos will hang indefinitely on reading/writing the
FIFO. When this is not enabled (default), the Client simply saves the directory entry for the
FIFO.
Normally, when Bareos runs a RunBeforeJob, it waits until that script terminates, and if the script accesses
the FIFO to write into it, the Bareos job will block and everything will stall. However, Vladimir Stavrinov as
supplied tip that allows this feature to work correctly. He simply adds the following to the beginning of the
RunBeforeJob script:
exec > /dev/null
Include {
Options {
signature=SHA1
readfifo=yes
}
File = /home/abc/fifo
}
Configuration 9.17:
FileSet with Fifo
This feature can be used to do a ”hot” database backup. You can use the RunBeforeJob to create the fifo
and to start a program that dynamically reads your database and writes it to the fifo. Bareos will then write it
to the Volume.
During the restore operation, the inverse is true, after Bareos creates the fifo if there was any data stored with
it (no need to explicitly list it or add any options), that data will be written back to the fifo. As a consequence,
if any such FIFOs exist in the fileset to be restored, you must ensure that there is a reader program or Bareos
will block, and after one minute, Bareos will time out the write to the fifo and move on to the next
file.
If you are planing to use a Fifo for backup, better take a look to the bpipe Plugin section.
-
noatime=yes|no
-
If enabled, and if your Operating System supports the O_NOATIME file open flag, Bareos will open all files
to be backed up with this option. It makes it possible to read a file without updating the inode atime (and also
without the inode ctime update which happens if you try to set the atime back to its previous value). It also
prevents a race condition when two programs are reading the same file, but only one does not want to change
the atime. It’s most useful for backup programs and file integrity checkers (and Bareos can fit on both
categories).
This option is particularly useful for sites where users are sensitive to their MailBox file access
time. It replaces both the keepatime option without the inconveniences of that option (see
below).
If your Operating System does not support this option, it will be silently ignored by Bareos.
-
mtimeonly=yes|no
-
If enabled, tells the Client that the selection of files during Incremental and Differential backups should based
only on the st_mtime value in the stat() packet. The default is no which means that the selection of files to be
backed up will be based on both the st_mtime and the st_ctime values. In general, it is not recommended to
use this option.
-
keepatime=yes|no
-
The default is no. When enabled, Bareos will reset the st_atime (access time) field of files that it backs up to
their value prior to the backup. This option is not generally recommended as there are very few programs that
use st_atime, and the backup overhead is increased because of the additional system call necessary to reset the
times. However, for some files, such as mailboxes, when Bareos backs up the file, the user will notice that
someone (Bareos) has accessed the file. In this, case keepatime can be useful. (I’m not sure this works on
Win32).
Note, if you use this feature, when Bareos resets the access time, the change time (st_ctime) will automatically
be modified by the system, so on the next incremental job, the file will be backed up even if it has not
changed. As a consequence, you will probably also want to use mtimeonly = yes as well as keepatime
(thanks to Rudolf Cejka for this tip).
-
checkfilechanges=yes|no
-
If enabled, the Client will check size, age of each file after their backup to see if they have changed during
backup. If time or size mismatch, an error will raise.
zog-fd: Client1.2007-03-31_09.46.21 Error: /tmp/test mtime changed during backup.
In general, it is recommended to use this option.
-
hardlinks=yes|no
-
When enabled (default), this directive will cause hard links to be backed up. However, the File daemon keeps
track of hard linked files and will backup the data only once. The process of keeping track of the hard links
can be quite expensive if you have lots of them (tens of thousands or more). This doesn’t occur on normal
Unix systems, but if you use a program like BackupPC, it can create hundreds of thousands, or even millions
of hard links. Backups become very long and the File daemon will consume a lot of CPU power checking hard
links. In such a case, set hardlinks=no and hard links will not be backed up. Note, using this option will
most likely backup more data and on a restore the file system will not be restored identically to the
original.
-
wild=<string>
-
Specifies a wild-card string to be applied to the filenames and directory names. Note, if Exclude is not
enabled, the wild-card will select which files are to be included. If Exclude=yes is specified, the wild-card
will select which files are to be excluded. Multiple wild-card directives may be specified, and they will be
applied in turn until the first one that matches. Note, if you exclude a directory, no files or directories below it
will be matched.
You may want to test your expressions prior to running your backup by using the bwild program. You can also
test your full FileSet definition by using the estimate command. It is recommended to enclose the string in
double quotes.
-
wilddir=<string>
-
Specifies a wild-card string to be applied to directory names only. No filenames will be matched by this
directive. Note, if Exclude is not enabled, the wild-card will select directories to be included. If
Exclude=yes is specified, the wild-card will select which directories are to be excluded. Multiple wild-card
directives may be specified, and they will be applied in turn until the first one that matches. Note, if you
exclude a directory, no files or directories below it will be matched.
It is recommended to enclose the string in double quotes.
You may want to test your expressions prior to running your backup by using the bwild program. You can also
test your full FileSet definition by using the estimate command.
-
wildfile=<string>
-
Specifies a wild-card string to be applied to non-directories. That is no directory entries will
be matched by this directive. However, note that the match is done against the full path and
filename, so your wild-card string must take into account that filenames are preceded by the
full path. If Exclude is not enabled, the wild-card will select which files are to be included.
If Exclude=yes is specified, the wild-card will select which files are to be excluded. Multiple
wild-card directives may be specified, and they will be applied in turn until the first one that
matches.
It is recommended to enclose the string in double quotes.
You may want to test your expressions prior to running your backup by using the bwild program. You can also
test your full FileSet definition by using the estimate command. An example of excluding with the WildFile
option on Win32 machines is presented below.
-
regex=<string>
-
Specifies a POSIX extended regular expression to be applied to the filenames and directory names, which
include the full path. If Exclude is not enabled, the regex will select which files are to be included. If
Exclude=yes is specified, the regex will select which files are to be excluded. Multiple regex
directives may be specified within an Options resource, and they will be applied in turn until the
first one that matches. Note, if you exclude a directory, no files or directories below it will be
matched.
It is recommended to enclose the string in double quotes.
The regex libraries differ from one operating system to another, and in addition, regular expressions
are complicated, so you may want to test your expressions prior to running your backup by
using the bregex program. You can also test your full FileSet definition by using the estimate
command.
You find yourself using a lot of Regex statements, which will cost quite a lot of CPU time, we recommend you
simplify them if you can, or better yet convert them to Wild statements which are much more
efficient.
-
regexfile=<string>
-
Specifies a POSIX extended regular expression to be applied to non-directories. No directories will be
matched by this directive. However, note that the match is done against the full path and filename, so your
regex string must take into account that filenames are preceded by the full path. If Exclude is not enabled,
the regex will select which files are to be included. If Exclude=yes is specified, the regex will select which
files are to be excluded. Multiple regex directives may be specified, and they will be applied in turn until the
first one that matches.
It is recommended to enclose the string in double quotes.
The regex libraries differ from one operating system to another, and in addition, regular expressions are
complicated, so you may want to test your expressions prior to running your backup by using the bregex
program.
-
regexdir=<string>
-
Specifies a POSIX extended regular expression to be applied to directory names only. No filenames will
be matched by this directive. Note, if Exclude is not enabled, the regex will select directories
files are to be included. If Exclude=yes is specified, the regex will select which files are to be
excluded. Multiple regex directives may be specified, and they will be applied in turn until the
first one that matches. Note, if you exclude a directory, no files or directories below it will be
matched.
It is recommended to enclose the string in double quotes.
The regex libraries differ from one operating system to another, and in addition, regular expressions are
complicated, so you may want to test your expressions prior to running your backup by using the bregex
program.
-
Exclude = <yes|no>
- (default: no)
When enabled, any files matched within the Options will be excluded from the backup.
-
aclsupport=yes|no
-
The default is no. If this option is set to yes, and you have the POSIX libacl installed on your Linux
system, Bareos will backup the file and directory Unix Access Control Lists (ACL) as defined in IEEE Std
1003.1e draft 17 and ”POSIX.1e” (abandoned). This feature is available on Unix systems only and requires the
Linux ACL library. Bareos is automatically compiled with ACL support if the libacl library is installed on
your Linux system (shown in config.out). While restoring the files Bareos will try to restore the ACLs, if there
is no ACL support available on the system, Bareos restores the files and directories but not the ACL
information. Please note, if you backup an EXT3 or XFS filesystem with ACLs, then you restore
them to a different filesystem (perhaps reiserfs) that does not have ACLs, the ACLs will be
ignored.
For other operating systems there is support for either POSIX ACLs or the more extensible NFSv4
ACLs.
The ACL stream format between Operation Systems is not compatible so for example an ACL saved on Linux
cannot be restored on Solaris.
The following Operating Systems are currently supported:
- AIX (pre-5.3 (POSIX) and post 5.3 (POSIX and NFSv4) ACLs)
- Darwin
- FreeBSD (POSIX and NFSv4/ZFS ACLs)
- HPUX
- IRIX
- Linux
- Solaris (POSIX and NFSv4/ZFS ACLs)
- Tru64
-
xattrsupport=yes|no
-
The default is no. If this option is set to yes, and your operating system support either so called
Extended Attributes or Extensible Attributes Bareos will backup the file and directory XATTR data.
This feature is available on UNIX only and depends on support of some specific library calls in
libc.
The XATTR stream format between Operating Systems is not compatible so an XATTR saved on Linux
cannot for example be restored on Solaris.
On some operating systems ACLs are also stored as Extended Attributes (Linux, Darwin, FreeBSD) Bareos
checks if you have the aclsupport option enabled and if so will not save the same info when saving extended
attribute information. Thus ACLs are only saved once.
The following Operating Systems are currently supported:
- AIX (Extended Attributes)
- Darwin (Extended Attributes)
- FreeBSD (Extended Attributes)
- IRIX (Extended Attributes)
- Linux (Extended Attributes)
- NetBSD (Extended Attributes)
- Solaris (Extended Attributes and Extensible Attributes)
- Tru64 (Extended Attributes)
-
ignore case=yes|no
-
The default is no. On Windows systems, you will almost surely want to set this to yes. When this directive is
set to yes all the case of character will be ignored in wild-card and regex comparisons. That is an uppercase A
will match a lowercase a.
-
fstype=filesystem-type
-
This option allows you to select files and directories by the filesystem type. The permitted filesystem-type
names are:
ext2, jfs, ntfs, proc, reiserfs, xfs, usbdevfs, sysfs, smbfs, iso9660.
You may have multiple Fstype directives, and thus permit matching of multiple filesystem types within a
single Options resource. If the type specified on the fstype directive does not match the filesystem for a
particular directive, that directory will not be backed up. This directive can be used to prevent backing up
non-local filesystems. Normally, when you use this directive, you would also set onefs=no so that Bareos will
traverse filesystems.
This option is not implemented in Win32 systems.
-
DriveType=Windows-drive-type
-
This option is effective only on Windows machines and is somewhat similar to the Unix/Linux fstype
described above, except that it allows you to select what Windows drive types you want to allow. By default
all drive types are accepted.
The permitted drivetype names are:
removable, fixed, remote, cdrom, ramdisk
You may have multiple Driveype directives, and thus permit matching of multiple drive types within a single
Options resource. If the type specified on the drivetype directive does not match the filesystem for a particular
directive, that directory will not be backed up. This directive can be used to prevent backing up non-local
filesystems. Normally, when you use this directive, you would also set onefs=no so that Bareos will traverse
filesystems.
This option is not implemented in Unix/Linux systems.
-
hfsplussupport=yes|no
-
This option allows you to turn on support for Mac OSX HFS plus finder information.
-
strippath=<integer>
-
This option will cause integer paths to be stripped from the front of the full path/filename being backed up.
This can be useful if you are migrating data from another vendor or if you have taken a snapshot into some
subdirectory. This directive can cause your filenames to be overlayed with regular backup data, so should be
used only by experts and with great care.
-
size=sizeoption
-
This option will allow you to select files by their actual size. You can select either files smaller than a certain
size or bigger then a certain size, files of a size in a certain range or files of a size which is within 1 % of its
actual size.
The following settings can be used:
- <size>-<size> - Select file in range size - size.
- <size - Select files smaller than size.
- >size - Select files bigger than size.
- size - Select files which are within 1 % of size.
-
shadowing=none|localwarn|localremove|globalwarn|globalremove
-
The default is none. This option performs a check within the fileset for any file-list entries which are
shadowing each other. Lets say you specify / and /usr but /usr is not a separate filesystem. Then in the
normal situation both / and /usr would lead to data being backed up twice.
The following settings can be used:
- none - Do NO shadowing check
- localwarn - Do shadowing check within one include block and warn
- localremove - Do shadowing check within one include block and remove duplicates
- globalwarn - Do shadowing check between all include blocks and warn
- globalremove - Do shadowing check between all include blocks and remove duplicates
The local and global part of the setting relate to the fact if the check should be performed only within one
include block (local) or between multiple include blocks of the same fileset (global). The warn and remove part
of the keyword sets the action e.g. warn the user about shadowing or remove the entry shadowing the
other.
Example for a fileset resource with fileset shadow warning enabled:
FileSet {
Name = "Test Set"
Include {
Options {
signature = MD5
shadowing = localwarn
}
File = /
File = /usr
}
}
Configuration 9.18:
FileSet resource with fileset shadow warning enabled
-
meta=tag
-
This option will add a meta tag to a fileset. These meta tags are used by the Native NDMP protocol to pass
NDMP backup or restore environment variables via the Data Management Agent (DMA) in Bareos to the
remote NDMP Data Agent. You can have zero or more metatags which are all passed to the remote NDMP
Data Agent.
#
FileSet Exclude-Ressources very similar to Include-Ressources, except that they only allow following
directives:
-
File = < filename | directory | |command | ∖<includefile-client | <includefile-server >
-
Files to exclude are descripted in the same way as at the FileSet Include Ressource.
For example:
FileSet {
Name = Exclusion_example
Include {
Options {
Signature = SHA1
}
File = /
File = /boot
File = /home
File = /rescue
File = /usr
}
Exclude {
File = /proc
File = /tmp # Don’t add trailing /
File = .journal
File = .autofsck
}
}
Configuration 9.19:
FileSet using Exclude
Another way to exclude files and directories is to use the Exclude option from the Include section.
#
The following is an example of a valid FileSet resource definition. Note, the first Include pulls in the contents of the
file /etc/backup.list when Bareos is started (i.e. the @), and that file must have each filename to be backed up
preceded by a File = and on a separate line.
FileSet {
Name = "Full Set"
Include {
Options {
Compression=GZIP
signature=SHA1
Sparse = yes
}
@/etc/backup.list
}
Include {
Options {
wildfile = "*.o"
wildfile = "*.exe"
Exclude = yes
}
File = /root/myfile
File = /usr/lib/another_file
}
}
Configuration 9.20:
FileSet using import
In the above example, all the files contained in /etc/backup.list will be compressed with GZIP compression,
an SHA1 signature will be computed on the file’s contents (its data), and sparse file handling will
apply.
The two directories /root/myfile and /usr/lib/another_file will also be saved without any options, but all files
in those directories with the extensions .o and .exe will be excluded.
Let’s say that you now want to exclude the directory /tmp. The simplest way to do so is to add an exclude directive
that lists /tmp. The example above would then become:
FileSet {
Name = "Full Set"
Include {
Options {
Compression=GZIP
signature=SHA1
Sparse = yes
}
@/etc/backup.list
}
Include {
Options {
wildfile = "*.o"
wildfile = "*.exe"
Exclude = yes
}
File = /root/myfile
File = /usr/lib/another_file
}
Exclude {
File = /tmp # don’t add trailing /
}
}
Configuration 9.21:
extended FileSet excluding /tmp
You can add wild-cards to the File directives listed in the Exclude directory, but you need to take care because if
you exclude a directory, it and all files and directories below it will also be excluded.
Now lets take a slight variation on the above and suppose you want to save all your whole filesystem except /tmp.
The problem that comes up is that Bareos will not normally cross from one filesystem to another. Doing a df
command, you get the following output:
root@linux:~#
df
Filesystem 1k-blocks Used Available Use% Mounted on
/dev/hda5 5044156 439232 4348692 10% /
/dev/hda1 62193 4935 54047 9% /boot
/dev/hda9 20161172 5524660 13612372 29% /home
/dev/hda2 62217 6843 52161 12% /rescue
/dev/hda8 5044156 42548 4745376 1% /tmp
/dev/hda6 5044156 2613132 2174792 55% /usr
none 127708 0 127708 0% /dev/shm
//minimatou/c$ 14099200 9895424 4203776 71% /mnt/mmatou
lmatou:/ 1554264 215884 1258056 15% /mnt/matou
lmatou:/home 2478140 1589952 760072 68% /mnt/matou/home
lmatou:/usr 1981000 1199960 678628 64% /mnt/matou/usr
lpmatou:/ 995116 484112 459596 52% /mnt/pmatou
lpmatou:/home 19222656 2787880 15458228 16% /mnt/pmatou/home
lpmatou:/usr 2478140 2038764 311260 87% /mnt/pmatou/usr
deuter:/ 4806936 97684 4465064 3% /mnt/deuter
deuter:/home 4806904 280100 4282620 7% /mnt/deuter/home
deuter:/files 44133352 27652876 14238608 67% /mnt/deuter/files
Commands 9.22:
df
And we see that there are a number of separate filesystems (/ /boot /home /rescue /tmp and /usr not to mention
mounted systems). If you specify only / in your Include list, Bareos will only save the Filesystem /dev/hda5. To
save all filesystems except /tmp with out including any of the Samba or NFS mounted systems, and explicitly
excluding a /tmp, /proc, .journal, and .autofsck, which you will not want to be saved and restored, you can use the
following:
FileSet {
Name = Include_example
Include {
Options {
wilddir = /proc
wilddir = /tmp
wildfile = "/.journal"
wildfile = "/.autofsck"
exclude = yes
}
File = /
File = /boot
File = /home
File = /rescue
File = /usr
}
}
Configuration 9.23:
FileSet mount points
Since /tmp is on its own filesystem and it was not explicitly named in the Include list, it is not really needed in the
exclude list. It is better to list it in the Exclude list for clarity, and in case the disks are changed so that it is no
longer in its own partition.
Now, lets assume you only want to backup .Z and .gz files and nothing else. This is a bit trickier because Bareos by
default will select everything to backup, so we must exclude everything but .Z and .gz files. If we take the first
example above and make the obvious modifications to it, we might come up with a FileSet that looks like
this:
FileSet {
Name = "Full Set"
Include { !!!!!!!!!!!!
Options { This
wildfile = "*.Z" example
wildfile = "*.gz" doesn’t
work
} !!!!!!!!!!!!
File = /myfile
}
}
Configuration 9.24:
Non-working example
The *.Z and *.gz files will indeed be backed up, but all other files that are not matched by the Options directives
will automatically be backed up too (i.e. that is the default rule).
To accomplish what we want, we must explicitly exclude all other files. We do this with the following:
FileSet {
Name = "Full Set"
Include {
Options {
wildfile = "*.Z"
wildfile = "*.gz"
}
Options {
Exclude = yes
RegexFile = ".*"
}
File = /myfile
}
}
Configuration 9.25:
Exclude all except specific wildcards
The ”trick” here was to add a RegexFile expression that matches all files. It does not match directory names, so all
directories in /myfile will be backed up (the directory entry) and any *.Z and *.gz files contained in them. If you
know that certain directories do not contain any *.Z or *.gz files and you do not want the directory entries backed
up, you will need to explicitly exclude those directories. Backing up a directory entries is not very
expensive.
Bareos uses the system regex library and some of them are different on different OSes. The above has been reported
not to work on FreeBSD. This can be tested by using the estimate job=job-name listing command in the
console and adapting the RegexFile expression appropriately.
Please be aware that allowing Bareos to traverse or change file systems can be very dangerous. For example, with
the following:
FileSet {
Name = "Bad example"
Include {
Options {
onefs=no
}
File = /mnt/matou
}
}
Configuration 9.26:
backup all filesystem below /mnt/matou (use with care)
you will be backing up an NFS mounted partition (/mnt/matou), and since onefs is set to no, Bareos will
traverse file systems. Now if /mnt/matou has the current machine’s file systems mounted, as is often the case, you
will get yourself into a recursive loop and the backup will never end.
As a final example, let’s say that you have only one or two subdirectories of /home that you want to backup. For
example, you want to backup only subdirectories beginning with the letter a and the letter b – i.e. /home/a* and
/home/b*. Now, you might first try:
FileSet {
Name = "Full Set"
Include {
Options {
wilddir = "/home/a*"
wilddir = "/home/b*"
}
File = /home
}
}
Configuration 9.27:
Non-working example
The problem is that the above will include everything in /home. To get things to work correctly, you need to start
with the idea of exclusion instead of inclusion. So, you could simply exclude all directories except the two you want
to use:
FileSet {
Name = "Full Set"
Include {
Options {
RegexDir = "^/home/[c-z]"
exclude = yes
}
File = /home
}
}
Configuration 9.28:
Exclude by regex
And assuming that all subdirectories start with a lowercase letter, this would work.
An alternative would be to include the two subdirectories desired and exclude everything else:
FileSet {
Name = "Full Set"
Include {
Options {
wilddir = "/home/a*"
wilddir = "/home/b*"
}
Options {
RegexDir = ".*"
exclude = yes
}
File = /home
}
}
Configuration 9.29:
Include and Exclude
The following example shows how to back up only the My Pictures directory inside the My Documents directory for
all users in C:/Documents and Settings, i.e. everything matching the pattern:
C:/Documents and Settings/*/My Documents/My Pictures/*
To understand how this can be achieved, there are two important points to remember:
Firstly, Bareos walks over the filesystem depth-first starting from the File = lines. It stops descending when a
directory is excluded, so you must include all ancestor directories of each directory containing files to be
included.
Secondly, each directory and file is compared to the Options clauses in the order they appear in the FileSet.
When a match is found, no further clauses are compared and the directory or file is either included or
excluded.
The FileSet resource definition below implements this by including specifc directories and files and excluding
everything else.
FileSet {
Name = "AllPictures"
Include {
File = "C:/Documents and Settings"
Options {
signature = SHA1
verify = s1
IgnoreCase = yes
# Include all users’ directories so we reach the inner ones. Unlike a
# WildDir pattern ending in *, this RegExDir only matches the top-level
# directories and not any inner ones.
RegExDir = "^C:/Documents and Settings/[^/]+$"
# Ditto all users’ My Documents directories.
WildDir = "C:/Documents and Settings/*/My Documents"
# Ditto all users’ My Documents/My Pictures directories.
WildDir = "C:/Documents and Settings/*/My Documents/My Pictures"
# Include the contents of the My Documents/My Pictures directories and
# any subdirectories.
Wild = "C:/Documents and Settings/*/My Documents/My Pictures/*"
}
Options {
Exclude = yes
IgnoreCase = yes
# Exclude everything else, in particular any files at the top level and
# any other directories or files in the users’ directories.
Wild = "C:/Documents and Settings/*"
}
}
}
Configuration 9.30:
Include/Exclude example
#
If you are entering Windows file names, the directory path may be preceded by the drive and a colon (as in c:).
However, the path separators must be specified in Unix convention (i.e. forward slash (/)). If you wish to include a
quote in a file name, precede the quote with a backslash (∖). For example you might use the following for a Windows
machine to backup the ”My Documents” directory:
FileSet {
Name = "Windows Set"
Include {
Options {
WildFile = "*.obj"
WildFile = "*.exe"
exclude = yes
}
File = "c:/My Documents"
}
}
Configuration 9.31:
Windows FileSet
For exclude lists to work correctly on Windows, you must observe the following rules:
- Filenames are case sensitive, so you must use the correct case.
- To exclude a directory, you must not have a trailing slash on the directory name.
- If you have spaces in your filename, you must enclose the entire name in double-quote characters (”).
Trying to use a backslash before the space will not work.
- If you are using the old Exclude syntax (noted below), you may not specify a drive letter in the exclude.
The new syntax noted above should work fine including driver letters.
Thanks to Thiago Lima for summarizing the above items for us. If you are having difficulties getting includes or
excludes to work, you might want to try using the estimate job=xxx listing command documented in the
Console chapter of this manual.
On Win32 systems, if you move a directory or file or rename a file into the set of files being backed up, and a Full
backup has already been made, Bareos will not know there are new files to be saved during an Incremental or
Differential backup (blame Microsoft, not us). To avoid this problem, please copy any new directory or files into the
backup area. If you do not have enough disk to copy the directory or files, move them, but then initiate a Full
backup.
Example Fileset for Windows
The following example demostrates a Windows FileSet. It backups all data from all fixed drives and only excludes
some Windows temporary data.
FileSet {
Name = "Windows All Drives"
Enable VSS = yes
Include {
Options {
Signature = MD5
Drive Type = fixed
IgnoreCase = yes
WildFile = "[A-Z]:/pagefile.sys"
WildDir = "[A-Z]:/RECYCLER"
WildDir = "[A-Z]:/$RECYCLE.BIN"
WildDir = "[A-Z]:/System Volume Information"
Exclude = yes
}
File = /
}
}
Configuration 9.32:
Windows All Drives FileSet
File = / includes all Windows drives. Using Drive Type = fixed excludes drives like USB-Stick or CD-ROM
Drive. Using WildDir = "[A-Z]:/RECYCLER" excludes the backup of the directory RECYCLER from all
drives.
#
If you wish to get an idea of what your FileSet will really backup or if your exclusion rules will work correctly, you
can test it by using the estimate command.
As an example, suppose you add the following test FileSet:
FileSet {
Name = Test
Include {
File = /home/xxx/test
Options {
regex = ".*\\.c$"
}
}
}
Configuration 9.33:
FileSet for all *.c files
You could then add some test files to the directory /home/xxx/test and use the following command in the
console:
estimate job=<any-job-name> listing client=<desired-client> fileset=Test
bconsole 9.34:
estimate
to give you a listing of all files that match. In the above example, it should be only files with names ending in
.c.
#
The Client (or FileDaemon) resource defines the attributes of the Clients that are served by this Director; that is
the machines that are to be backed up. You will need one Client resource definition for each machine to be backed
up.
-
Address = <string>
- (required)
Where the address is a host name, a fully qualified domain name, or a network address in dotted quad
notation for a Bareos File server daemon. This directive is required.
-
Allow Client Connect = <yes|no>
-
Please note! This directive is deprecated.
Alias of ”Connection From Client To Director”.
-
Auth Type = <None|Clear|MD5>
- (default: None)
Specifies the authentication type that must be supplied when connecting to a backup protocol that
uses a specific authentication type.
-
Auto Prune = <yes|no>
- (default: no)
If set to yes, Bareos will automatically apply the File Retention Dir
Client period and the Job Retention
Dir
Client period for the client at the end of the job.
Pruning affects only information in the catalog and not data stored in the backup archives (on Volumes),
but if pruning deletes all data referring to a certain volume, the volume is regarded as empty and will
possibly be overwritten before the volume retention has expired.
-
Catalog = <resource-name>
-
This specifies the name of the catalog resource to be used for this Client. If none is specified the first
defined catalog is used.
-
Connection From Client To Director = <yes|no>
- (default: no)
The Director will accept incoming network connection from this Client.
For details, see Client Initiated Connection.
Version >= 16.2.2
-
Connection From Director To Client = <yes|no>
- (default: yes)
Let the Director initiate the network connection to the Client.
Version >= 16.2.2
-
Description = <string>
-
-
Enabled = <yes|no>
- (default: yes)
En- or disable this resource.
-
FD Address = <string>
-
Alias for Address.
-
FD Password = <password>
-
This directive is an alias.
-
FD Port = <positive-integer>
- (default: 9102)
This directive is an alias.
Where the port is a port number at which the Bareos File Daemon can be contacted. The default is
9102. For NDMP backups set this to 10000.
-
File Retention = <time>
- (default: 5184000)
The File Retention directive defines the length of time that Bareos will keep File records in the Catalog
database after the End time of the Job corresponding to the File records. When this time period expires
and Auto Prune Dir
Client = yes, Bareos will prune (remove) File records that are older than the specified
File Retention period. Note, this affects only records in the catalog database. It does not affect your
archive backups.
File records may actually be retained for a shorter period than you specify on this directive if you
specify either a shorter Job Retention Dir
Client or a shorter Volume Retention Dir
Pool period. The shortest
retention period of the three takes precedence.
The default is 60 days.
-
Hard Quota = <Size64>
- (default: 0)
The amount of data determined by the Hard Quota directive sets the hard limit of backup space that
cannot be exceeded. This is the maximum amount this client can back up before any backup job will
be aborted.
If the Hard Quota is exceeded, the running job is terminated:
-
Heartbeat Interval = <time>
- (default: 0)
This directive is optional and if specified will cause the Director to set a keepalive interval (heartbeat)
in seconds on each of the sockets it opens for the Storage resource. If set, this value overrides Heartbeat
Interval Dir
Director.
-
Job Retention = <time>
- (default: 15552000)
The Job Retention directive defines the length of time that Bareos will keep Job records in the Catalog
database after the Job End time. When this time period expires and Auto Prune Dir
Client = yes Bareos
will prune (remove) Job records that are older than the specified File Retention period. As with the
other retention periods, this affects only records in the catalog and not data in your archive backup.
If a Job record is selected for pruning, all associated File and JobMedia records will also be pruned
regardless of the File Retention period set. As a consequence, you normally will set the File retention
period to be less than the Job retention period. The Job retention period can actually be less than
the value you specify here if you set the Volume Retention Dir
Pool directive to a smaller duration. This is
because the Job retention period and the Volume retention period are independently applied, so the
smaller of the two takes precedence.
The default is 180 days.
-
Lan Address = <string>
-
Sets additional address used for connections between Client and Storage Daemon inside separate
network.
This directive might be useful in network setups where the Bareos Director and Bareos Storage Daemon
need different addresses to communicate with the Bareos File Daemon.
For details, see Using different IP Adresses for SD – FD Communication.
This directive corresponds to Lan Address Dir
Storage.
Version >= 16.2.6
-
Maximum Bandwidth Per Job = <speed>
-
The speed parameter specifies the maximum allowed bandwidth that a job may use when started for
this Client.
-
Maximum Concurrent Jobs = <positive-integer>
- (default: 1)
This directive specifies the maximum number of Jobs with the current Client that can run concurrently.
Note, this directive limits only Jobs for Clients with the same name as the resource in which it appears.
Any other restrictions on the maximum concurrent jobs such as in the Director, Job or Storage resources
will also apply in addition to any limit specified here.
-
Name = <name>
- (required)
The name of the resource.
The client name which will be used in the Job resource directive or in the console run command.
-
NDMP Block Size = <Size32>
- (default: 64512)
This directive sets the default NDMP blocksize for this client.
-
NDMP Log Level = <positive-integer>
- (default: 4)
This directive sets the loglevel for the NDMP protocol library.
-
NDMP Use LMDB = <yes|no>
- (default: yes)
-
Passive = <yes|no>
- (default: no)
If enabled, the Storage Daemon will initiate the network connection to the Client. If disabled, the
Client will initiate the network connection to the Storage Daemon.
The normal way of initializing the data channel (the channel where the backup data itself is transported)
is done by the file daemon (client) that connects to the storage daemon.
By using the client passive mode, the initialization of the datachannel is reversed, so that the storage
daemon connects to the filedaemon.
See chapter Passive Client.
Version >= 13.2.0
-
Password = <password>
- (required)
This is the password to be used when establishing a connection with the File services, so the Client
configuration file on the machine to be backed up must have the same password defined for this Director.
The password is plain text.
-
Port = <positive-integer>
- (default: 9102)
-
Protocol = <Native|NDMP>
- (default: Native)
The backup protocol to use to run the Job.
Currently the director understands the following protocols:
- Native - The native Bareos protocol
- NDMP - The NDMP protocol
Version >= 13.2.0
-
Quota Include Failed Jobs = <yes|no>
- (default: yes)
When calculating the amount a client used take into consideration any failed Jobs.
-
Soft Quota = <Size64>
- (default: 0)
This is the amount after which there will be a warning issued that a client is over his softquota. A client can
keep doing backups until it hits the hard quota or when the Soft Quota Grace Period Dir
Client is expired.
-
Soft Quota Grace Period = <time>
- (default: 0)
Time allowed for a client to be over its Soft Quota Dir
Client before it will be enforced.
When the amount of data backed up by the client outruns the value specified by the Soft Quota directive, the
next start of a backup job will start the soft quota grace time period. This is written to the job
log:
In the Job Overview, the value of Grace Expiry Date: will then change from Soft Quota was never exceeded to
the date when the grace time expires, e.g. 11-Dec-2012 04:09:05.
During that period, it is possible to do backups even if the total amount of stored data exceeds the limit
specified by soft quota.
If in this state, the job log will write:
After the grace time expires, in the next backup job of the client, the value for Burst Quota will be set to the
value that the client has stored at this point in time. Also, the job will be terminated. The following
information in the job log shows what happened:
At this point, it is not possible to do any backup of the client. To be able to do more backups, the amount of
stored data for this client has to fall under the burst quota value.
-
Strict Quotas = <yes|no>
- (default: no)
The directive Strict Quotas determines whether, after the Grace Time Period is over, to enforce the Burst
Limit (Strict Quotas = No) or the Soft Limit (Strict Quotas = Yes).
The Job Log shows either
or
-
TLS Allowed CN = <string-list>
-
”Common Name”s (CNs) of the allowed peer certificates.
-
TLS Authenticate = <yes|no>
- (default: no)
Use TLS only to authenticate, not for encryption.
-
TLS CA Certificate Dir = <path>
-
Path of a TLS CA certificate directory.
-
TLS CA Certificate File = <path>
-
Path of a PEM encoded TLS CA certificate(s) file.
-
TLS Certificate = <path>
-
Path of a PEM encoded TLS certificate.
-
TLS Certificate Revocation List = <path>
-
Path of a Certificate Revocation List file.
-
TLS Cipher List = <string>
-
List of valid TLS Ciphers.
-
TLS DH File = <path>
-
Path to PEM encoded Diffie-Hellman parameter file. If this directive is specified, DH key exchange will be
used for the ephemeral keying, allowing for forward secrecy of communications.
-
TLS Enable = <yes|no>
- (default: no)
Enable TLS support.
Bareos can be configured to encrypt all its network traffic. See chapter TLS Configuration Directives
to see, how the Bareos Director (and the other components) must be configured to use TLS.
-
TLS Key = <path>
-
Path of a PEM encoded private key. It must correspond to the specified ”TLS Certificate”.
-
TLS Psk Enable = <yes|no>
- (default: yes)
Enable TLS-PSK support.
-
TLS Psk Require = <yes|no>
- (default: no)
Without setting this to yes, Bareos can fall back to use unencryption connections. Enabling this implicitly sets
”TLS-PSK Enable = yes”.
-
TLS Require = <yes|no>
- (default: no)
Without setting this to yes, Bareos can fall back to use unencrypted connections. Enabling this implicitly sets
”TLS Enable = yes”.
-
TLS Verify Peer = <yes|no>
- (default: no)
If disabled, all certificates signed by a known CA will be accepted. If enabled, the CN of a certificate must the
Address or in the ”TLS Allowed CN” list.
-
Username = <string>
-
Specifies the username that must be supplied when authenticating. Only used for the non Native protocols at
the moment.
The following is an example of a valid Client resource definition:
Client {
Name = client1-fd
Address = client1.example.com
Password = "secret"
}
Configuration 9.35:
Minimal client resource definition in bareos-dir.conf
The following is an example of a Quota Configuration in Client resource:
Client {
Name = client1-fd
Address = client1.example.com
Password = "secret"
# Quota
Soft Quota = 50 mb
Soft Quota Grace Period = 2 days
Strict Quotas = Yes
Hard Quota = 150 mb
Quota Include Failed Jobs = yes
}
Configuration 9.36:
Quota Configuration in Client resource
#
The Storage resource defines which Storage daemons are available for use by the Director.
-
Address = <string>
- (required)
Where the address is a host name, a fully qualified domain name, or an IP address. Please note
that the <address> as specified here will be transmitted to the File daemon who will then use it to
contact the Storage daemon. Hence, it is not, a good idea to use localhost as the name but rather a
fully qualified machine name or an IP address. This directive is required.
-
Allow Compression = <yes|no>
- (default: yes)
This directive is optional, and if you specify No, it will cause backups jobs running on this storage
resource to run without client File Daemon compression. This effectively overrides compression options
in FileSets used by jobs which use this storage resource.
-
Auth Type = <None|Clear|MD5>
- (default: None)
Specifies the authentication type that must be supplied when connecting to a backup protocol that
uses a specific authentication type.
-
Auto Changer = <yes|no>
- (default: no)
When Device Dir
Storage refers to an Auto Changer (Autochanger Sd
Device), this directive must be set to yes.
If you specify yes,
- Volume management command like label or add will request a Autochanger Slot number.
- Bareos will prefer Volumes, that are in a Auto Changer slot. If none of theses volumes can be
used, even after recycling, pruning, ..., Bareos will search for any volume of the same Media Type
Dir
Storage whether or not in the magazine.
Please consult the Autochanger Support chapter for details.
-
Cache Status Interval = <time>
- (default: 30)
-
Collect Statistics = <yes|no>
- (default: no)
Collect statistic information. These information will be collected by the Director (see Statistics Collect Interval
Dir
Director) and stored in the Catalog.
-
Description = <string>
-
Information.
-
Device = <Device>
- (required)
If Protocol Dir
Job is not NDMP_NATIVE (default is Protocol Dir
Job = Native), this directive refers to one or multiple
Name Sd
Device or a single Name Sd
Autochanger.
If an Autochanger should be used, it had to refer to a configured Name Sd
Autochanger. In this case, also set Auto
Changer Dir
Storage = yes.
Otherwise it refers to one or more configured Name Sd
Device, see Using Multiple Storage Devices.
This name is not the physical device name, but the logical device name as defined in the Bareos Storage
Daemon resource.
If Protocol Dir
Job = NDMP_NATIVE, it refers to tape devices on the NDMP Tape Agent, see NDMP_NATIVE.
-
Enabled = <yes|no>
- (default: yes)
En- or disable this resource.
-
Heartbeat Interval = <time>
- (default: 0)
This directive is optional and if specified will cause the Director to set a keepalive interval (heartbeat) in
seconds on each of the sockets it opens for the Storage resource. This value will override any specified at
the Director level. It is implemented only on systems (Linux, ...) that provide the setsockopt
TCP_KEEPIDLE function. The default value is zero, which means no change is made to the socket.
-
Lan Address = <string>
-
Sets additional address used for connections between Client and Storage Daemon inside separate
network.
This directive might be useful in network setups where the Bareos Director and Bareos File Daemon need
different addresses to communicate with the Bareos Storage Daemon.
For details, see Using different IP Adresses for SD – FD Communication.
This directive corresponds to Lan Address Dir
Client.
Version >= 16.2.6
-
Maximum Bandwidth Per Job = <speed>
-
-
Maximum Concurrent Jobs = <positive-integer>
- (default: 1)
This directive specifies the maximum number of Jobs with the current Storage resource that can run
concurrently. Note, this directive limits only Jobs for Jobs using this Storage daemon. Any other restrictions
on the maximum concurrent jobs such as in the Director, Job or Client resources will also apply in addition to
any limit specified here.
If you set the Storage daemon’s number of concurrent jobs greater than one, we recommend
that you read Concurrent Jobs and/or turn data spooling on as documented in Data Spooling.
-
Maximum Concurrent Read Jobs = <positive-integer>
- (default: 0)
This directive specifies the maximum number of Jobs with the current Storage resource that can read
concurrently.
-
Media Type = <strname>
- (required)
This directive specifies the Media Type to be used to store the data. This is an arbitrary string of
characters up to 127 maximum that you define. It can be anything you want. However, it is
best to make it descriptive of the storage media (e.g. File, DAT, ”HP DLT8000”, 8mm, ...). In
addition, it is essential that you make the Media Type specification unique for each storage media
type. If you have two DDS-4 drives that have incompatible formats, or if you have a DDS-4
drive and a DDS-4 autochanger, you almost certainly should specify different Media Types.
During a restore, assuming a DDS-4 Media Type is associated with the Job, Bareos can decide to
use any Storage daemon that supports Media Type DDS-4 and on any drive that supports
it.
If you are writing to disk Volumes, you must make doubly sure that each Device resource defined in the
Storage daemon (and hence in the Director’s conf file) has a unique media type. Otherwise Bareos may
assume, these Volumes can be mounted and read by any Storage daemon File device.
Currently Bareos permits only a single Media Type per Storage Device definition. Consequently,
if you have a drive that supports more than one Media Type, you can give a unique string to
Volumes with different intrinsic Media Type (Media Type = DDS-3-4 for DDS-3 and DDS-4
types), but then those volumes will only be mounted on drives indicated with the dual type
(DDS-3-4).
If you want to tie Bareos to using a single Storage daemon or drive, you must specify a unique Media Type for
that drive. This is an important point that should be carefully understood. Note, this applies equally to Disk
Volumes. If you define more than one disk Device resource in your Storage daemon’s conf file, the Volumes on
those two devices are in fact incompatible because one can not be mounted on the other device since
they are found in different directories. For this reason, you probably should use two different
Media Types for your two disk Devices (even though you might think of them as both being
File types). You can find more on this subject in the Basic Volume Management chapter of this
manual.
The MediaType specified in the Director’s Storage resource, must correspond to the Media Type specified
in the Device resource of the Storage daemon configuration file. This directive is required, and it is used by
the Director and the Storage daemon to ensure that a Volume automatically selected from the Pool
corresponds to the physical device. If a Storage daemon handles multiple devices (e.g. will write to
various file Volumes on different partitions), this directive allows you to specify exactly which
device.
As mentioned above, the value specified in the Director’s Storage resource must agree with the value specified
in the Device resource in the Storage daemon’s configuration file. It is also an additional check so that you
don’t try to write data for a DLT onto an 8mm device.
-
Name = <name>
- (required)
The name of the resource.
The name of the storage resource. This name appears on the Storage directive specified in the Job resource
and is required.
-
NDMP Changer Device = <strname>
-
Allows direct control of a Storage Daemon Auto Changer device by the Director. Only used in
NDMP_NATIVE environments.
Version >= 16.2.4
-
Paired Storage = <resource-name>
-
For NDMP backups this points to the definition of the Native Storage that is accesses via the NDMP protocol.
For now we only support NDMP backups and restores to access Native Storage Daemons via the NDMP
protocol. In the future we might allow to use Native NDMP storage which is not bound to a Bareos Storage
Daemon.
-
Password = <password>
- (required)
This is the password to be used when establishing a connection with the Storage services. This same password
also must appear in the Director resource of the Storage daemon’s configuration file. This directive is
required.
The password is plain text.
-
Port = <positive-integer>
- (default: 9103)
Where port is the port to use to contact the storage daemon for information and to start jobs. This same
port number must appear in the Storage resource of the Storage daemon’s configuration file.
-
Protocol = <AuthProtocolType>
- (default: Native)
-
SD Address = <string>
-
Alias for Address.
-
SD Password = <password>
-
Alias for Password.
-
SD Port = <positive-integer>
- (default: 9103)
Alias for Port.
-
Sdd Port = <positive-integer>
-
Please note! This directive is deprecated.
-
TLS Allowed CN = <string-list>
-
”Common Name”s (CNs) of the allowed peer certificates.
-
TLS Authenticate = <yes|no>
- (default: no)
Use TLS only to authenticate, not for encryption.
-
TLS CA Certificate Dir = <path>
-
Path of a TLS CA certificate directory.
-
TLS CA Certificate File = <path>
-
Path of a PEM encoded TLS CA certificate(s) file.
-
TLS Certificate = <path>
-
Path of a PEM encoded TLS certificate.
-
TLS Certificate Revocation List = <path>
-
Path of a Certificate Revocation List file.
-
TLS Cipher List = <string>
-
List of valid TLS Ciphers.
-
TLS DH File = <path>
-
Path to PEM encoded Diffie-Hellman parameter file. If this directive is specified, DH key exchange will be
used for the ephemeral keying, allowing for forward secrecy of communications.
-
TLS Enable = <yes|no>
- (default: no)
Enable TLS support.
Bareos can be configured to encrypt all its network traffic. For details, refer to chapter TLS Configuration
Directives.
-
TLS Key = <path>
-
Path of a PEM encoded private key. It must correspond to the specified ”TLS Certificate”.
-
TLS Psk Enable = <yes|no>
- (default: yes)
Enable TLS-PSK support.
-
TLS Psk Require = <yes|no>
- (default: no)
Without setting this to yes, Bareos can fall back to use unencryption connections. Enabling this implicitly sets
”TLS-PSK Enable = yes”.
-
TLS Require = <yes|no>
- (default: no)
Without setting this to yes, Bareos can fall back to use unencrypted connections. Enabling this implicitly sets
”TLS Enable = yes”.
-
TLS Verify Peer = <yes|no>
- (default: no)
If disabled, all certificates signed by a known CA will be accepted. If enabled, the CN of a certificate must the
Address or in the ”TLS Allowed CN” list.
-
Username = <string>
-
The following is an example of a valid Storage resource definition:
Storage {
Name = DLTDrive
Address = lpmatou
Password = storage\_password # password for Storage daemon
Device = "HP DLT 80" # same as Device in Storage daemon
Media Type = DLT8000 # same as MediaType in Storage daemon
}
Configuration 9.37:
Storage resource (tape) example
#
The Pool resource defines the set of storage Volumes (tapes or files) to be used by Bareos to write the data. By
configuring different Pools, you can determine which set of Volumes (media) receives the backup data. This permits,
for example, to store all full backup data on one set of Volumes and all incremental backups on another set of
Volumes. Alternatively, you could assign a different set of Volumes to each machine that you backup. This is most
easily done by defining multiple Pools.
Another important aspect of a Pool is that it contains the default attributes (Maximum Jobs, Retention Period,
Recycle flag, ...) that will be given to a Volume when it is created. This avoids the need for you to answer a large
number of questions when labeling a new Volume. Each of these attributes can later be changed on a Volume
by Volume basis using the update command in the console program. Note that you must explicitly
specify which Pool Bareos is to use with each Job. Bareos will not automatically search for the correct
Pool.
To use a Pool, there are three distinct steps. First the Pool must be defined in the Director’s configuration. Then the
Pool must be written to the Catalog database. This is done automatically by the Director each time that it starts.
Finally, if you change the Pool definition in the Director’s configuration file and restart Bareos, the pool will be
updated alternatively you can use the update pool console command to refresh the database image. It is this
database image rather than the Director’s resource image that is used for the default Volume attributes.
Note, for the pool to be automatically created or updated, it must be explicitly referenced by a Job
resource.
If automatic labeling is not enabled (see Automatic Volume Labeling) the physical media must be manually
labeled. The labeling can either be done with the label command in the console program or using
the btape program. The preferred method is to use the label command in the console program.
Generally, automatic labeling is enabled for Device Type Sd
Device = File and disabled for Device Type Sd
Device
= Tape.
Finally, you must add Volume names (and their attributes) to the Pool. For Volumes to be used by Bareos they
must be of the same Media Type Sd
Device as the archive device specified for the job (i.e. if you are going to
back up to a DLT device, the Pool must have DLT volumes defined since 8mm volumes cannot be
mounted on a DLT drive). The Media Type has particular importance if you are backing up to files.
When running a Job, you must explicitly specify which Pool to use. Bareos will then automatically
select the next Volume to use from the Pool, but it will ensure that the Media Type of any Volume
selected from the Pool is identical to that required by the Storage resource you have specified for the
Job.
If you use the label command in the console program to label the Volumes, they will automatically be added to
the Pool, so this last step is not normally required.
It is also possible to add Volumes to the database without explicitly labeling the physical volume. This is done with
the add console command.
As previously mentioned, each time Bareos starts, it scans all the Pools associated with each Catalog, and if the
database record does not already exist, it will be created from the Pool Resource definition. If you change the Pool
definition, you manually have to call update pool command in the console program to propagate the changes to
existing volumes.
The Pool Resource defined in the Director’s configuration may contain the following directives:
-
Action On Purge = <ActionOnPurge>
-
The directive Action On Purge=Truncate instructs Bareos to truncate the volume when it is purged
with the purge volume action=truncate command. It is useful to prevent disk based volumes from
consuming too much space.
-
Auto Prune = <yes|no>
- (default: yes)
If Auto Prune=yes, the Volume Retention Dir
Pool period is automatically applied when a new Volume is
needed and no appendable Volumes exist in the Pool. Volume pruning causes expired Jobs (older than
the Volume Retention Dir
Pool period) to be deleted from the Catalog and permits possible recycling of the
Volume.
-
Catalog = <resource-name>
-
This specifies the name of the catalog resource to be used for this Pool. When a catalog is defined in a
Pool it will override the definition in the client (and the Catalog definition in a Job since Version >=
13.4.0). e.g. this catalog setting takes precedence over any other definition.
-
Catalog Files = <yes|no>
- (default: yes)
This directive defines whether or not you want the names of the files that were saved to be put into
the catalog. If disabled, the Catalog database will be significantly smaller. The disadvantage is that
you will not be able to produce a Catalog listing of the files backed up for each Job (this is often
called Browsing). Also, without the File entries in the catalog, you will not be able to use the Console
restore command nor any other command that references File entries.
-
Cleaning Prefix = <strname>
- (default: CLN)
This directive defines a prefix string, which if it matches the beginning of a Volume name during
labeling of a Volume, the Volume will be defined with the VolStatus set to Cleaning and thus Bareos
will never attempt to use this tape. This is primarily for use with autochangers that accept barcodes
where the convention is that barcodes beginning with CLN are treated as cleaning tapes.
The default value for this directive is consequently set to CLN, so that in most cases the cleaning
tapes are automatically recognized without configuration. If you use another prefix for your cleaning
tapes, you can set this directive accordingly.
-
Description = <string>
-
-
File Retention = <time>
-
The File Retention directive defines the length of time that Bareos will keep File records in the Catalog
database after the End time of the Job corresponding to the File records.
This directive takes precedence over Client directives of the same name. For example, you can decide
to increase Retention times for Archive or OffSite Pool.
Note, this affects only records in the catalog database. It does not affect your archive backups.
For more information see Client documentation about File Retention Dir
Client
-
Job Retention = <time>
-
The Job Retention directive defines the length of time that Bareos will keep Job records in the Catalog
database after the Job End time. As with the other retention periods, this affects only records in the
catalog and not data in your archive backup.
This directive takes precedence over Client directives of the same name. For example, you can decide
to increase Retention times for Archive or OffSite Pool.
For more information see Client side documentation Job Retention Dir
Client
-
Label Format = <strname>
-
This directive specifies the format of the labels contained in this pool. The format directive is used as
a sort of template to create new Volume names during automatic Volume labeling.
The format should be specified in double quotes ("), and consists of letters, numbers and the special
characters hyphen (-), underscore (_), colon (:), and period (.), which are the legal characters for a
Volume name.
In addition, the format may contain a number of variable expansion characters which will be expanded
by a complex algorithm allowing you to create Volume names of many different formats. In all cases,
the expansion process must resolve to the set of characters noted above that are legal Volume names.
Generally, these variable expansion characters begin with a dollar sign ($) or a left bracket ([). For
more details on variable expansion, please see Variable Expansion on Volume Labels.
If no variable expansion characters are found in the string, the Volume name will be formed from the
format string appended with the a unique number that increases. If you do not remove volumes from
the pool, this number should be the number of volumes plus one, but this is not guaranteed. The unique
number will be edited as four digits with leading zeros. For example, with a Label Format = "File-",
the first volumes will be named File-0001, File-0002, ...
In almost all cases, you should enclose the format specification (part after the equal sign) in double
quotes (").
-
Label Type = <ANSI|IBM|Bareos>
-
This directive is implemented in the Director Pool resource and in the SD Device resource (Label Type
Sd
Device). If it is specified in the SD Device resource, it will take precedence over the value passed from
the Director to the SD.
-
Maximum Block Size = <Size32>
-
The Maximum Block Size can be defined here to define different block sizes per volume or statically
for all volumes at Maximum Block Size Sd
Device. If not defined, its default is 63 KB. Increasing this value
could improve the throughput of writing to tapes.
Please note! However make sure to read the Setting Block Sizes chapter carefully before applying any
changes.
Version >= 14.2.0
-
Maximum Volume Bytes = <Size64>
-
This directive specifies the maximum number of bytes that can be written to the Volume. If you specify
zero (the default), there is no limit except the physical size of the Volume. Otherwise, when the number
of bytes written to the Volume equals size the Volume will be marked Used. When the Volume is
marked Used it can no longer be used for appending Jobs, much like the Full status but it can be
recycled if recycling is enabled, and thus the Volume can be re-used after recycling. This value is
checked and the Used status set while the job is writing to the particular volume.
This directive is particularly useful for restricting the size of disk volumes, and will work correctly even
in the case of multiple simultaneous jobs writing to the volume.
The value defined by this directive in the bareos-dir.conf file is the default value used when a Volume
is created. Once the volume is created, changing the value in the bareos-dir.conf file will not change
what is stored for the Volume. To change the value for an existing Volume you must use the update
command in the Console.
-
Maximum Volume Files = <positive-integer>
-
This directive specifies the maximum number of files that can be written to the Volume. If you specify
zero (the default), there is no limit. Otherwise, when the number of files written to the Volume equals
positive-integer the Volume will be marked Used. When the Volume is marked Used it can no
longer be used for appending Jobs, much like the Full status but it can be recycled if recycling is
enabled and thus used again. This value is checked and the Used status is set only at the end of a job
that writes to the particular volume.
The value defined by this directive in the bareos-dir.conf file is the default value used when a Volume
is created. Once the volume is created, changing the value in the bareos-dir.conf file will not change
what is stored for the Volume. To change the value for an existing Volume you must use the update
command in the Console.
-
Maximum Volume Jobs = <positive-integer>
-
This directive specifies the maximum number of Jobs that can be written to the Volume. If you specify
zero (the default), there is no limit. Otherwise, when the number of Jobs backed up to the Volume
equals positive-integer the Volume will be marked Used. When the Volume is marked Used it can
no longer be used for appending Jobs, much like the Full status but it can be recycled if recycling is
enabled, and thus used again. By setting MaximumVolumeJobs to one, you get the same effect as
setting UseVolumeOnce = yes.
The value defined by this directive in the bareos-dir.conf file is the default value used when a Volume
is created. Once the volume is created, changing the value in the bareos-dir.conf file will not change
what is stored for the Volume. To change the value for an existing Volume you must use the update
command in the Console.
If you are running multiple simultaneous jobs, this directive may not work correctly because when a
drive is reserved for a job, this directive is not taken into account, so multiple jobs may try to start
writing to the Volume. At some point, when the Media record is updated, multiple simultaneous jobs
may fail since the Volume can no longer be written.
-
Maximum Volumes = <positive-integer>
-
This directive specifies the maximum number of volumes (tapes or files) contained in the pool. This
directive is optional, if omitted or set to zero, any number of volumes will be permitted. In general,
this directive is useful for Autochangers where there is a fixed number of Volumes, or for File storage
where you wish to ensure that the backups made to disk files do not become too numerous or consume
too much space.
-
Migration High Bytes = <Size64>
-
This directive specifies the number of bytes in the Pool which will trigger a migration if Selection Type
Dir
Job = PoolOccupancy has been specified. The fact that the Pool usage goes above this level does not
automatically trigger a migration job. However, if a migration job runs and has the PoolOccupancy
selection type set, the Migration High Bytes will be applied. Bareos does not currently restrict a pool
to have only a single Media Type Dir
Storage, so you must keep in mind that if you mix Media Types in a
Pool, the results may not be what you want, as the Pool count of all bytes will be for all Media Types
combined.
-
Migration Low Bytes = <Size64>
-
This directive specifies the number of bytes in the Pool which will stop a migration if Selection Type
Dir
Job = PoolOccupancy has been specified and triggered by more than Migration High Bytes Dir
Pool being
in the pool. In other words, once a migration job is started with PoolOccupancy migration selection
and it determines that there are more than Migration High Bytes, the migration job will continue to
run jobs until the number of bytes in the Pool drop to or below Migration Low Bytes.
-
Migration Time = <time>
-
If Selection Type Dir
Job = PoolTime, the time specified here will be used. If the previous Backup Job or
Jobs selected have been in the Pool longer than the specified time, then they will be migrated.
-
Minimum Block Size = <Size32>
-
The Minimum Block Size can be defined here to define different block sizes per volume or statically
for all volumes at Minimum Block Size Sd
Device. For details, see chapter Setting Block Sizes.
-
Name = <name>
- (required)
The name of the resource.
The name of the pool.
-
Next Pool = <resource-name>
-
This directive specifies the pool a Migration or Copy Job and a Virtual Backup Job will write their
data too. This directive is required to define the Pool into which the data will be migrated. Without
this directive, the migration job will terminate in error.
-
Pool Type = <Pooltype>
- (default: Backup)
This directive defines the pool type, which corresponds to the type of Job being run. It is required and
may be one of the following:
-
Backup
-
-
*Archive
-
-
*Cloned
-
-
*Migration
-
-
*Copy
-
-
*Save
Note, only Backup is currently implemented.
-
Purge Oldest Volume = <yes|no>
- (default: no)
This directive instructs the Director to search for the oldest used Volume in the Pool when another Volume is
requested by the Storage daemon and none are available. The catalog is then purged irrespective of retention
periods of all Files and Jobs written to this Volume. The Volume is then recycled and will be used as the next
Volume to be written. This directive overrides any Job, File, or Volume retention periods that you may have
specified.
This directive can be useful if you have a fixed number of Volumes in the Pool and you want to cycle
through them and reusing the oldest one when all Volumes are full, but you don’t want to worry
about setting proper retention periods. However, by using this option you risk losing valuable
data.
In most cases, you should use Recycle Oldest Volume Dir
Pool instead.
Please note! Be aware that Purge Oldest Volume disregards all retention periods. If you have only a
single Volume defined and you turn this variable on, that Volume will always be immediately
overwritten when it fills! So at a minimum, ensure that you have a decent number of Volumes
in your Pool before running any jobs. If you want retention periods to apply do not use this
directive.
We highly recommend against using this directive, because it is sure that some day, Bareos will purge a
Volume that contains current data.
-
Recycle = <yes|no>
- (default: yes)
This directive specifies whether or not Purged Volumes may be recycled. If it is set to yes and Bareos needs a
volume but finds none that are appendable, it will search for and recycle (reuse) Purged Volumes (i.e. volumes
with all the Jobs and Files expired and thus deleted from the Catalog). If the Volume is recycled, all previous
data written to that Volume will be overwritten. If Recycle is set to no, the Volume will not be recycled, and
hence, the data will remain valid. If you want to reuse (re-write) the Volume, and the recycle flag is no (0
in the catalog), you may manually set the recycle flag (update command) for a Volume to be
reused.
Please note that the value defined by this directive in the configuration file is the default value used when a
Volume is created. Once the volume is created, changing the value in the configuration file will not change
what is stored for the Volume. To change the value for an existing Volume you must use the update volume
command.
When all Job and File records have been pruned or purged from the catalog for a particular Volume, if that
Volume is marked as Append, Full, Used, or Error, it will then be marked as Purged. Only Volumes marked as
Purged will be considered to be converted to the Recycled state if the Recycle directive is set to yes.
-
Recycle Current Volume = <yes|no>
- (default: no)
If Bareos needs a new Volume, this directive instructs Bareos to Prune the volume respecting the Job and File
retention periods. If all Jobs are pruned (i.e. the volume is Purged), then the Volume is recycled and will be
used as the next Volume to be written. This directive respects any Job, File, or Volume retention periods that
you may have specified.
This directive can be useful if you have: a fixed number of Volumes in the Pool, you want to cycle through
them, and you have specified retention periods that prune Volumes before you have cycled through the Volume
in the Pool.
However, if you use this directive and have only one Volume in the Pool, you will immediately recycle your
Volume if you fill it and Bareos needs another one. Thus your backup will be totally invalid. Please use this
directive with care.
-
Recycle Oldest Volume = <yes|no>
- (default: no)
This directive instructs the Director to search for the oldest used Volume in the Pool when another Volume is
requested by the Storage daemon and none are available. The catalog is then pruned respecting
the retention periods of all Files and Jobs written to this Volume. If all Jobs are pruned (i.e.
the volume is Purged), then the Volume is recycled and will be used as the next Volume to be
written. This directive respects any Job, File, or Volume retention periods that you may have
specified.
This directive can be useful if you have a fixed number of Volumes in the Pool and you want to cycle through
them and you have specified the correct retention periods.
However, if you use this directive and have only one Volume in the Pool, you will immediately recycle your
Volume if you fill it and Bareos needs another one. Thus your backup will be totally invalid. Please use this
directive with care.
-
Recycle Pool = <resource-name>
-
This directive defines to which pool the Volume will be placed (moved) when it is recycled. Without this
directive, a Volume will remain in the same pool when it is recycled. With this directive, it can be moved
automatically to any existing pool during a recycle. This directive is probably most useful when defined in the
Scratch pool, so that volumes will be recycled back into the Scratch pool. For more on the see the Scratch
Pool section of this manual.
Although this directive is called RecyclePool, the Volume in question is actually moved from its current pool
to the one you specify on this directive when Bareos prunes the Volume and discovers that there are no
records left in the catalog and hence marks it as Purged.
-
Scratch Pool = <resource-name>
-
This directive permits to specify a dedicate Scratch for the current pool. This pool will replace the special pool
named Scrach for volume selection. For more information about Scratch see Scratch Pool section of this
manual. This is useful when using multiple storage sharing the same mediatype or when you want to dedicate
volumes to a particular set of pool.
-
Storage = <ResourceList>
-
The Storage directive defines the name of the storage services where you want to backup the FileSet data. For
additional details, see the Storage Resource of this manual. The Storage resource may also be specified in the
Job resource, but the value, if any, in the Pool resource overrides any value in the Job. This Storage resource
definition is not required by either the Job resource or in the Pool, but it must be specified in one or the other.
If not configuration error will result. We highly recommend that you define the Storage resource to be used in
the Pool rather than elsewhere (job, schedule run, ...). Be aware that you theoretically can give a list of
storages here but only the first item from the list is actually used for backup and restore jobs.
-
Use Catalog = <yes|no>
- (default: yes)
Store information into Catalog. In all pratical use cases, leave this value to its defaults.
-
Use Volume Once = <yes|no>
-
Please note! This directive is deprecated.
Use Maximum Volume Jobs Dir
Pool = 1 instead.
-
Volume Retention = <time>
- (default: 31536000)
The Volume Retention directive defines the length of time that Bareos will keep records associated with the
Volume in the Catalog database after the End time of each Job written to the Volume. When this time period
expires, and if AutoPrune is set to yes Bareos may prune (remove) Job records that are older than the
specified Volume Retention period if it is necessary to free up a Volume. Recycling will not occur until it is
absolutely necessary to free up a volume (i.e. no other writable volume exists). All File records associated with
pruned Jobs are also pruned. The time may be specified as seconds, minutes, hours, days, weeks, months,
quarters, or years. The Volume Retention is applied independently of the Job Retention and the File
Retention periods defined in the Client resource. This means that all the retentions periods are
applied in turn and that the shorter period is the one that effectively takes precedence. Note, that
when the Volume Retention period has been reached, and it is necessary to obtain a new
volume, Bareos will prune both the Job and the File records. This pruning could also occur
during a status dir command because it uses similar algorithms for finding the next available
Volume.
It is important to know that when the Volume Retention period expires, Bareos does not automatically recycle
a Volume. It attempts to keep the Volume data intact as long as possible before over writing the
Volume.
By defining multiple Pools with different Volume Retention periods, you may effectively have a set of tapes
that is recycled weekly, another Pool of tapes that is recycled monthly and so on. However, one must keep in
mind that if your Volume Retention period is too short, it may prune the last valid Full backup, and hence
until the next Full backup is done, you will not have a complete backup of your system, and in addition, the
next Incremental or Differential backup will be promoted to a Full backup. As a consequence, the minimum
Volume Retention period should be at twice the interval of your Full backups. This means that
if you do a Full backup once a month, the minimum Volume retention period should be two
months.
The default Volume retention period is 365 days, and either the default or the value defined by this directive in
the bareos-dir.conf file is the default value used when a Volume is created. Once the volume is created,
changing the value in the bareos-dir.conf file will not change what is stored for the Volume. To
change the value for an existing Volume you must use the update command in the Console.
-
Volume Use Duration = <time>
-
The Volume Use Duration directive defines the time period that the Volume can be written beginning from
the time of first data write to the Volume. If the time-period specified is zero (the default), the Volume can be
written indefinitely. Otherwise, the next time a job runs that wants to access this Volume, and the time period
from the first write to the volume (the first Job written) exceeds the time-period-specification, the Volume
will be marked Used, which means that no more Jobs can be appended to the Volume, but it
may be recycled if recycling is enabled. Once the Volume is recycled, it will be available for use
again.
You might use this directive, for example, if you have a Volume used for Incremental backups, and
Volumes used for Weekly Full backups. Once the Full backup is done, you will want to use a
different Incremental Volume. This can be accomplished by setting the Volume Use Duration
for the Incremental Volume to six days. I.e. it will be used for the 6 days following a Full save,
then a different Incremental volume will be used. Be careful about setting the duration to short
periods such as 23 hours, or you might experience problems of Bareos waiting for a tape over
the weekend only to complete the backups Monday morning when an operator mounts a new
tape.
Please note that the value defined by this directive in the bareos-dir.conf file is the default value used when a
Volume is created. Once the volume is created, changing the value in the bareos-dir.conf file will not change
what is stored for the Volume. To change the value for an existing Volume you must use the update volume
command in the Console.
The following is an example of a valid Pool resource definition:
Pool {
Name = Default
Pool Type = Backup
}
Configuration 9.38:
Pool resource example
#
In general, you can give your Pools any name you wish, but there is one important restriction: the
Pool named Scratch, if it exists behaves like a scratch pool of Volumes in that when Bareos needs
a new Volume for writing and it cannot find one, it will look in the Scratch pool, and if it finds an
available Volume, it will move it out of the Scratch pool into the Pool currently being used by the
job.
#
The Catalog Resource defines what catalog to use for the current job. Currently, Bareos can only handle a single
database server (SQLite, MySQL, PostgreSQL) that is defined when configuring Bareos. However, there may be as
many Catalogs (databases) defined as you wish. For example, you may want each Client to have its own Catalog
database, or you may want backup jobs to use one database and verify or restore jobs to use another
database.
Since SQLite is compiled in, it always runs on the same machine as the Director and the database must be directly
accessible (mounted) from the Director. However, since both MySQL and PostgreSQL are networked databases,
they may reside either on the same machine as the Director or on a different machine on the network. See below for
more details.
-
Address = <string>
-
This directive is an alias.
Alias for DB Address Dir
Catalog.
-
DB Address = <string>
-
This is the host address of the database server. Normally, you would specify this instead of DB Socket
Dir
Catalog if the database server is on another machine. In that case, you will also specify DB Port Dir
Catalog.
This directive is used only by MySQL and PostgreSQL and is ignored by SQLite if provided.
-
DB Driver = <postgresql | mysql | sqlite>
- (required)
Selects the database type to use.
-
DB Name = <string>
- (required)
This specifies the name of the database.
-
DB Password = <password>
-
This specifies the password to use when login into the database.
-
DB Port = <positive-integer>
-
This defines the port to be used in conjunction with DB Address Dir
Catalog to access the database if it is
on another machine. This directive is used only by MySQL and PostgreSQL and is ignored by SQLite
if provided.
-
DB Socket = <string>
-
This is the name of a socket to use on the local host to connect to the database. This directive is used
only by MySQL and is ignored by SQLite. Normally, if neither DB Socket Dir
Catalog or DB Address Dir
Catalog
are specified, MySQL will use the default socket. If the DB Socket is specified, the MySQL server must
reside on the same machine as the Director.
-
DB User = <string>
-
This specifies what user name to use to log into the database.
-
Description = <string>
-
-
Disable Batch Insert = <yes|no>
- (default: no)
This directive allows you to override at runtime if the Batch insert should be enabled or disabled.
Normally this is determined by querying the database library if it is thread-safe. If you think that
disabling Batch insert will make your backup run faster you may disable it using this option and set
it to Yes.
-
Exit On Fatal = <yes|no>
- (default: no)
Make any fatal error in the connection to the database exit the program
Version >= 15.1.0
-
Idle Timeout = <positive-integer>
- (default: 30)
This directive is used by the experimental database pooling functionality. Only use this for non
production sites. This sets the idle time after which a database pool should be shrinked.
This directive is used by the experimental database pooling functionality. Only use this for non
production sites. This sets the idle time after which a database pool should be shrinked.
-
Inc Connections = <positive-integer>
- (default: 1)
This directive is used by the experimental database pooling functionality. Only use this for non
production sites. This sets the number of connections to add to a database pool when not enough
connections are available on the pool anymore.
This directive is used by the experimental database pooling functionality. Only use this for non
production sites. This sets the number of connections to add to a database pool when not enough
connections are available on the pool anymore.
-
Max Connections = <positive-integer>
- (default: 5)
This directive is used by the experimental database pooling functionality. Only use this for non
production sites. This sets the maximum number of connections to a database to keep in this database
pool.
This directive is used by the experimental database pooling functionality. Only use this for non
production sites. This sets the maximum number of connections to a database to keep in this database
pool.
-
Min Connections = <positive-integer>
- (default: 1)
This directive is used by the experimental database pooling functionality. Only use this for non
production sites. This sets the minimum number of connections to a database to keep in this database
pool.
This directive is used by the experimental database pooling functionality. Only use this for non
production sites. This sets the minimum number of connections to a database to keep in this database
pool.
-
Multiple Connections = <yes|no>
-
Not yet implemented.
-
Name = <name>
- (required)
The name of the resource.
The name of the Catalog. No necessary relation to the database server name. This name will be specified
in the Client resource directive indicating that all catalog data for that Client is maintained in this
Catalog.
-
Password = <password>
-
This directive is an alias.
Alias for DB Password Dir
Catalog.
-
Reconnect = <yes|no>
- (default: no)
Try to reconnect a database connection when its dropped
Version >= 15.1.0
-
User = <string>
-
This directive is an alias.
Alias for DB User Dir
Catalog.
-
Validate Timeout = <positive-integer>
- (default: 120)
This directive is used by the experimental database pooling functionality. Only use this for non
production sites. This sets the validation timeout after which the database connection is polled to see
if its still alive.
This directive is used by the experimental database pooling functionality. Only use this for non
production sites. This sets the validation timeout after which the database connection is polled to see
if its still alive.
The following is an example of a valid Catalog resource definition:
Catalog
{
Name = SQLite
DB Driver = sqlite
DB Name = bareos;
DB User = bareos;
DB Password = ""
}
Configuration 9.39:
Catalog Resource for Sqlite
or for a Catalog on another machine:
Catalog
{
Name = MySQL
DB Driver = mysql
DB Name = bareos
DB User = bareos
DB Password = "secret"
DB Address = remote.example.com
DB Port = 1234
}
Configuration 9.40:
Catalog Resource for remote MySQL
#
For the details of the Messages Resource, please see the Messages Resource of this manual.
#
There are three different kinds of consoles, which the administrator or user can use to interact with the Director.
These three kinds of consoles comprise three different security levels.
-
Default Console
- the first console type is an “anonymous” or “default” console, which has full privileges.
There is no console resource necessary for this type since the password is specified in the Director’s
resource and consequently such consoles do not have a name as defined on a Name directive. Typically
you would use it only for administrators.
-
Named Console
- the second type of console, is a “named” console (also called “Restricted Console”)
defined within a Console resource in both the Director’s configuration file and in the Console’s
configuration file. Both the names and the passwords in these two entries must match much as is the
case for Client programs.
This second type of console begins with absolutely no privileges except those explicitly specified in the
Director’s Console resource. Thus you can have multiple Consoles with different names and passwords,
sort of like multiple users, each with different privileges. As a default, these consoles can do absolutely
nothing – no commands whatsoever. You give them privileges or rather access to commands and
resources by specifying access control lists in the Director’s Console resource. The ACLs are specified
by a directive followed by a list of access names. Examples of this are shown below.
- The third type of console is similar to the above mentioned one in that it requires a Console
resource definition in both the Director and the Console. In addition, if the console name, provided
on the Name Dir
Console directive, is the same as a Client name, that console is permitted to use the
SetIP command to change the Address directive in the Director’s client resource to the IP address
of the Console. This permits portables or other machines using DHCP (non-fixed IP addresses)
to ”notify” the Director of their current IP address.
The Console resource is optional and need not be specified. The following directives are permitted within these
resources:
-
Catalog ACL = <acl>
-
This directive is used to specify a list of Catalog resource names that can be accessed by the console.
-
Client ACL = <acl>
-
This directive is used to specify a list of Client resource names that can be accessed by the console.
-
Command ACL = <acl>
-
This directive is used to specify a list of of console commands that can be executed by the console. See
examples at Data Types.
-
Description = <string>
-
-
File Set ACL = <acl>
-
This directive is used to specify a list of FileSet resource names that can be accessed by the console.
-
Job ACL = <acl>
-
This directive is used to specify a list of Job resource names that can be accessed by the console.
Without this directive, the console cannot access any of the Director’s Job resources. Multiple Job
resource names may be specified by separating them with commas, and/or by specifying multiple
Job ACL directives. For example, the directive may be specified as:
With the above specification, the console can access the Director’s resources for the jobs named on the
Job ACL directives, but for no others.
-
Name = <name>
- (required)
The name of the console. This name must match the name specified at the Console client.
-
Password = <password>
- (required)
Specifies the password that must be supplied for a named Bareos Console to be authorized.
-
Plugin Options ACL = <acl>
-
Use this directive to specify the list of allowed Plugin Options.
-
Pool ACL = <acl>
-
This directive is used to specify a list of Pool resource names that can be accessed by the console.
-
Profile = <ResourceList>
-
Profiles can be assigned to a Console. ACL are checked until either a deny ACL is found or an allow
ACL. First the console ACL is checked then any profile the console is linked to.
One or more Profile names can be assigned to a Console. If an ACL is not defined in the Console, the
profiles of the Console will be checked in the order as specified here. The first found ACL will be used.
See Profile Resource.
Version >= 14.2.3
-
Run ACL = <acl>
-
-
Schedule ACL = <acl>
-
This directive is used to specify a list of Schedule resource names that can be accessed by the console.
-
Storage ACL = <acl>
-
This directive is used to specify a list of Storage resource names that can be accessed by the console.
-
TLS Allowed CN = <string-list>
-
”Common Name”s (CNs) of the allowed peer certificates.
-
TLS Authenticate = <yes|no>
- (default: no)
Use TLS only to authenticate, not for encryption.
-
TLS CA Certificate Dir = <path>
-
Path of a TLS CA certificate directory.
-
TLS CA Certificate File = <path>
-
Path of a PEM encoded TLS CA certificate(s) file.
-
TLS Certificate = <path>
-
Path of a PEM encoded TLS certificate.
-
TLS Certificate Revocation List = <path>
-
Path of a Certificate Revocation List file.
-
TLS Cipher List = <string>
-
List of valid TLS Ciphers.
-
TLS DH File = <path>
-
Path to PEM encoded Diffie-Hellman parameter file. If this directive is specified, DH key exchange will
be used for the ephemeral keying, allowing for forward secrecy of communications.
-
TLS Enable = <yes|no>
- (default: no)
Enable TLS support.
Bareos can be configured to encrypt all its network traffic. See chapter TLS Configuration Directives
to see, how the Bareos Director (and the other components) must be configured to use TLS.
-
TLS Key = <path>
-
Path of a PEM encoded private key. It must correspond to the specified ”TLS Certificate”.
-
TLS Psk Enable = <yes|no>
- (default: yes)
Enable TLS-PSK support.
-
TLS Psk Require = <yes|no>
- (default: no)
Without setting this to yes, Bareos can fall back to use unencryption connections. Enabling this
implicitly sets ”TLS-PSK Enable = yes”.
-
TLS Require = <yes|no>
- (default: no)
Without setting this to yes, Bareos can fall back to use unencrypted connections. Enabling this
implicitly sets ”TLS Enable = yes”.
-
TLS Verify Peer = <yes|no>
- (default: no)
If disabled, all certificates signed by a known CA will be accepted. If enabled, the CN of a certificate
must the Address or in the ”TLS Allowed CN” list.
-
Where ACL = <acl>
-
This directive permits you to specify where a restricted console can restore files. If this directive is not
specified, only the default restore location is permitted (normally /tmp/bareos-restores. If *all* is
specified any path the user enters will be accepted. Any other value specified (there may be multiple
Where ACL directives) will restrict the user to use that path. For example, on a Unix system, if you
specify ”/”, the file will be restored to the original location.
The example at Using Named Consoles shows how to use a console resource for a connection from a client like
bconsole.
#
The Profile Resource defines a set of ACLs. Console Resources can be tight to one or more profiles (Profile Dir
Console),
making it easier to use a common set of ACLs.
-
Catalog ACL = <acl>
-
Lists the Catalog resources, this resource has access to. The special keyword *all* allows access to all
Catalog resources.
-
Client ACL = <acl>
-
Lists the Client resources, this resource has access to. The special keyword *all* allows access to all
Client resources.
-
Command ACL = <acl>
-
Lists the commands, this resource has access to. The special keyword *all* allows using commands.
-
Description = <string>
-
Additional information about the resource. Only used for UIs.
-
File Set ACL = <acl>
-
Lists the File Set resources, this resource has access to. The special keyword *all* allows access to all
File Set resources.
-
Job ACL = <acl>
-
Lists the Job resources, this resource has access to. The special keyword *all* allows access to all Job
resources.
-
Name = <name>
- (required)
The name of the resource.
-
Plugin Options ACL = <acl>
-
Specifies the allowed plugin options. An empty strings allows all Plugin Options.
-
Pool ACL = <acl>
-
Lists the Pool resources, this resource has access to. The special keyword *all* allows access to all Pool
resources.
-
Schedule ACL = <acl>
-
Lists the Schedule resources, this resource has access to. The special keyword *all* allows access to all
Schedule resources.
-
Storage ACL = <acl>
-
Lists the Storage resources, this resource has access to. The special keyword *all* allows access to all
Storage resources.
-
Where ACL = <acl>
-
Specifies the base directories, where files could be restored. An empty string allows restores to all
directories.
#
The Counter Resource defines a counter variable that can be accessed by variable expansion used for creating
Volume labels with the Label Format Dir
Pool directive.
-
Catalog = <resource-name>
-
If this directive is specified, the counter and its values will be saved in the specified catalog. If this
directive is not present, the counter will be redefined each time that Bareos is started.
-
Description = <string>
-
-
Maximum = <positive-integer>
- (default: 2147483647)
This is the maximum value value that the counter can have. If not specified or set to zero, the counter
can have a maximum value of 2,147,483,648 (2 to the 31 power). When the counter is incremented past
this value, it is reset to the Minimum.
-
Minimum = <Int32>
- (default: 0)
This specifies the minimum value that the counter can have. It also becomes the default. If not supplied,
zero is assumed.
-
Name = <name>
- (required)
The name of the resource.
The name of the Counter. This is the name you will use in the variable expansion to reference the
counter value.
-
Wrap Counter = <resource-name>
-
If this value is specified, when the counter is incremented past the maximum and thus reset to the
minimum, the counter specified on the Wrap Counter Dir
Counter is incremented. (This is currently not
implemented).
#
See below an example of a full Director configuration file:
#
The Bareos Storage Daemon configuration file has relatively few resource definitions. However, due
to the great variation in backup media and system capabilities, the storage daemon must be highly
configurable. As a consequence, there are quite a large number of directives in the Device Resource
definition that allow you to define all the characteristics of your Storage device (normally a tape drive).
Fortunately, with modern storage devices, the defaults are sufficient, and very few directives are actually
needed.
For a general discussion of configuration file and resources including the data types recognized by Bareos, please
see the Configuration chapter of this manual. The following Storage Resource definitions must be
defined:
- Storage – to define the name of the Storage daemon.
- Director – to define the Director’s name and his access password.
- Device – to define the characteristics of your storage device (tape drive).
- Messages – to define where error and information messages are to be sent.
Following resources are optional:
#
In general, the properties specified under the Storage resource define global properties of the Storage daemon. Each
Storage daemon configuration file must have one and only one Storage resource definition.
-
Absolute Job Timeout = <positive-integer>
-
-
Allow Bandwidth Bursting = <yes|no>
- (default: no)
-
Auto XFlate On Replication = <yes|no>
- (default: no)
This directive controls the autoxflate-sd plugin plugin when replicating data inside one or
between two storage daemons (Migration/Copy Jobs). Normally the storage daemon will use the
autoinflate/autodeflate setting of the device when reading and writing data to it which could mean
that while reading it inflates the compressed data and the while writing the other deflates it again. If
you just want the data to be exactly the same e.g. don’t perform any on the fly uncompression and
compression while doing the replication of data you can set this option to no and it will override any
setting on the device for doing auto inflation/deflation when doing data replication. This will not have
any impact on any normal backup or restore jobs.
Version >= 13.4.0
-
Backend Directory = <DirectoryList>
- (default: /usr/lib/bareos/backends (platform specific))
-
Client Connect Wait = <time>
- (default: 1800)
This directive defines an interval of time in seconds that the Storage daemon will wait for a Client (the
File daemon) to connect. Be aware that the longer the Storage daemon waits for a Client, the more
resources will be tied up.
-
Collect Device Statistics = <yes|no>
- (default: no)
-
Collect Job Statistics = <yes|no>
- (default: no)
-
Compatible = <yes|no>
- (default: no)
This directive enables the compatible mode of the storage daemon. In this mode the storage daemon
will try to write the storage data in a compatible way with Bacula of which Bareos is a fork. This
only works for the data streams both share and not for any new datastreams which are Bareos specific.
Which may be read when used by a Bareos storage daemon but might not be understood by any of
the Bacula components (dir/sd/fd).
The default setting of this directive was changed to no since Bareos Version >= 15.2.0.
-
Description = <string>
-
-
Device Reserve By Media Type = <yes|no>
- (default: no)
-
FD Connect Timeout = <time>
- (default: 1800)
-
File Device Concurrent Read = <yes|no>
- (default: no)
-
Heartbeat Interval = <time>
- (default: 0)
This directive defines an interval of time in seconds. When the Storage daemon is waiting for the
operator to mount a tape, each time interval, it will send a heartbeat signal to the File daemon. The
default interval is zero which disables the heartbeat. This feature is particularly useful if you have a
router that does not follow Internet standards and times out an valid connection after a short duration
despite the fact that keepalive is set. This usually results in a broken pipe error message.
-
Log Timestamp Format = <string>
-
Version >= 15.2.3
-
Maximum Bandwidth Per Job = <speed>
-
-
Maximum Concurrent Jobs = <positive-integer>
- (default: 20)
This directive specifies the maximum number of Jobs that may run concurrently. Each contact from
the Director (e.g. status request, job start request) is considered as a Job, so if you want to be able
to do a status request in the console at the same time as a Job is running, you will need to set this
value greater than 1. To run simultaneous Jobs, you will need to set a number of other directives in
the Director’s configuration file. Which ones you set depend on what you want, but you will almost
certainly need to set the Maximum Concurrent Jobs Dir
Storage. Please refer to the Concurrent Jobs chapter.
-
Maximum Connections = <positive-integer>
- (default: 42)
Version >= 15.2.3
-
Maximum Network Buffer Size = <positive-integer>
-
-
Messages = <resource-name>
-
-
Name = <name>
- (required)
Specifies the Name of the Storage daemon.
-
NDMP Address = <net-address>
- (default: 10000)
This directive is optional, and if it is specified, it will cause the Storage daemon server (for NDMP
Tape Server connections) to bind to the specified IP-Address, which is either a domain name or an
IP address specified as a dotted quadruple. If this directive is not specified, the Storage daemon will
bind to any available address (the default).
-
NDMP Addresses = <net-addresses>
- (default: 10000)
Specify the ports and addresses on which the Storage daemon will listen for NDMP Tape Server
connections. Normally, the default is sufficient and you do not need to specify this directive.
-
NDMP Enable = <yes|no>
- (default: no)
This directive enables the Native NDMP Tape Agent.
-
NDMP Log Level = <positive-integer>
- (default: 4)
This directive sets the loglevel for the NDMP protocol library.
-
NDMP Port = <net-port>
- (default: 10000)
Specifies port number on which the Storage daemon listens for NDMP Tape Server connections.
-
NDMP Snooping = <yes|no>
- (default: no)
This directive enables the Snooping and pretty printing of NDMP protocol information in debugging
mode.
-
Pid Directory = <path>
- (default: /var/lib/bareos (platform specific))
This directive specifies a directory in which the Storage Daemon may put its process Id file files. The
process Id file is used to shutdown Bareos and to prevent multiple copies of Bareos from running
simultaneously. Standard shell expansion of the directory is done when the configuration file is read
so that values such as $HOME will be properly expanded.
-
Plugin Directory = <path>
-
This directive specifies a directory in which the Storage Daemon searches for plugins with the name
<pluginname>-sd.so which it will load at startup.
-
Plugin Names = <PluginNames>
-
If a Plugin Directory Sd
Storage is specified Plugin Names defines, which Storage Daemon Plugins get
loaded.
If Plugin Names is not defined, all plugins get loaded, otherwise the defined ones.
-
Scripts Directory = <path>
-
This directive is currently unused.
-
SD Address = <net-address>
- (default: 9103)
This directive is optional, and if it is specified, it will cause the Storage daemon server (for Director
and File daemon connections) to bind to the specified IP-Address, which is either a domain name or
an IP address specified as a dotted quadruple. If this and the SD Addresses Sd
Storage directives are not
specified, the Storage daemon will bind to any available address (the default).
-
SD Addresses = <net-addresses>
- (default: 9103)
Specify the ports and addresses on which the Storage daemon will listen for Director connections. Using
this directive, you can replace both the SD Port Sd
Storage and SD Address Sd
Storage directives.
-
SD Connect Timeout = <time>
- (default: 1800)
-
SD Port = <net-port>
- (default: 9103)
Specifies port number on which the Storage daemon listens for Director connections.
-
SD Source Address = <net-address>
- (default: 0)
-
Secure Erase Command = <string>
-
Specify command that will be called when bareos unlinks files.
When files are no longer needed, Bareos will delete (unlink) them. With this directive, it will call the
specified command to delete these files. See Secure Erase Command for details.
Version >= 15.2.1
-
Statistics Collect Interval = <positive-integer>
- (default: 30)
-
Sub Sys Directory = <path>
-
-
TLS Allowed CN = <string-list>
-
”Common Name”s (CNs) of the allowed peer certificates.
-
TLS Authenticate = <yes|no>
- (default: no)
Use TLS only to authenticate, not for encryption.
-
TLS CA Certificate Dir = <path>
-
Path of a TLS CA certificate directory.
-
TLS CA Certificate File = <path>
-
Path of a PEM encoded TLS CA certificate(s) file.
-
TLS Certificate = <path>
-
Path of a PEM encoded TLS certificate.
-
TLS Certificate Revocation List = <path>
-
Path of a Certificate Revocation List file.
-
TLS Cipher List = <string>
-
List of valid TLS Ciphers.
-
TLS DH File = <path>
-
Path to PEM encoded Diffie-Hellman parameter file. If this directive is specified, DH key exchange will
be used for the ephemeral keying, allowing for forward secrecy of communications.
-
TLS Enable = <yes|no>
- (default: no)
Enable TLS support.
Bareos can be configured to encrypt all its network traffic. Chapter TLS Configuration Directives
explains how the Bareos components must be configured to use TLS.
-
TLS Key = <path>
-
Path of a PEM encoded private key. It must correspond to the specified ”TLS Certificate”.
-
TLS Psk Enable = <yes|no>
- (default: yes)
Enable TLS-PSK support.
-
TLS Psk Require = <yes|no>
- (default: no)
Without setting this to yes, Bareos can fall back to use unencryption connections. Enabling this
implicitly sets ”TLS-PSK Enable = yes”.
-
TLS Require = <yes|no>
- (default: no)
Without setting this to yes, Bareos can fall back to use unencrypted connections. Enabling this
implicitly sets ”TLS Enable = yes”.
-
TLS Verify Peer = <yes|no>
- (default: no)
If disabled, all certificates signed by a known CA will be accepted. If enabled, the CN of a certificate
must the Address or in the ”TLS Allowed CN” list.
-
Ver Id = <string>
-
-
Working Directory = <path>
- (default: /var/lib/bareos (platform specific))
This directive specifies a directory in which the Storage daemon may put its status files. This directory
should be used only by Bareos, but may be shared by other Bareos daemons provided the names given
to each daemon are unique.
The following is a typical Storage daemon storage resource definition.
#
# "Global" Storage daemon configuration specifications appear
# under the Storage resource.
#
Storage {
Name = "Storage daemon"
Address = localhost
}
Configuration 10.1:
Storage daemon storage definition
#
The Director resource specifies the Name of the Director which is permitted to use the services of the Storage
daemon. There may be multiple Director resources. The Director Name and Password must match the
corresponding values in the Director’s configuration file.
-
Description = <string>
-
-
Key Encryption Key = <password>
-
This key is used to encrypt the Security Key that is exchanged between the Director and the Storage
Daemon for supporting Application Managed Encryption (AME). For security reasons each Director
should have a different Key Encryption Key.
-
Maximum Bandwidth Per Job = <speed>
-
-
Monitor = <yes|no>
-
If Monitor is set to no (default), this director will have full access to this Storage daemon. If Monitor
is set to yes, this director will only be able to fetch the current status of this Storage daemon.
Please note that if this director is being used by a Monitor, we highly recommend to set this directive
to yes to avoid serious security problems.
-
Name = <name>
- (required)
Specifies the Name of the Director allowed to connect to the Storage daemon. This directive is required.
-
Password = <password>
- (required)
Specifies the password that must be supplied by the above named Director. This directive is required.
-
TLS Allowed CN = <string-list>
-
”Common Name”s (CNs) of the allowed peer certificates.
-
TLS Authenticate = <yes|no>
- (default: no)
Use TLS only to authenticate, not for encryption.
-
TLS CA Certificate Dir = <path>
-
Path of a TLS CA certificate directory.
-
TLS CA Certificate File = <path>
-
Path of a PEM encoded TLS CA certificate(s) file.
-
TLS Certificate = <path>
-
Path of a PEM encoded TLS certificate.
-
TLS Certificate Revocation List = <path>
-
Path of a Certificate Revocation List file.
-
TLS Cipher List = <string>
-
List of valid TLS Ciphers.
-
TLS DH File = <path>
-
Path to PEM encoded Diffie-Hellman parameter file. If this directive is specified, DH key exchange will
be used for the ephemeral keying, allowing for forward secrecy of communications.
-
TLS Enable = <yes|no>
- (default: no)
Enable TLS support.
Bareos can be configured to encrypt all its network traffic. Chapter TLS Configuration Directives
explains how the Bareos components must be configured to use TLS.
-
TLS Key = <path>
-
Path of a PEM encoded private key. It must correspond to the specified ”TLS Certificate”.
-
TLS Psk Enable = <yes|no>
- (default: yes)
Enable TLS-PSK support.
-
TLS Psk Require = <yes|no>
- (default: no)
Without setting this to yes, Bareos can fall back to use unencryption connections. Enabling this
implicitly sets ”TLS-PSK Enable = yes”.
-
TLS Require = <yes|no>
- (default: no)
Without setting this to yes, Bareos can fall back to use unencrypted connections. Enabling this
implicitly sets ”TLS Enable = yes”.
-
TLS Verify Peer = <yes|no>
- (default: no)
If disabled, all certificates signed by a known CA will be accepted. If enabled, the CN of a certificate
must the Address or in the ”TLS Allowed CN” list.
The following is an example of a valid Director resource definition:
Director {
Name = MainDirector
Password = my\_secret\_password
}
Configuration 10.2:
Storage daemon Director definition
#
The NDMP Resource specifies the authentication details of each NDMP client. There may be multiple NDMP
resources for a single Storage daemon. In general, the properties specified within the NDMP resource are specific to
one client.
-
Auth Type = <None|Clear|MD5>
- (default: None)
Specifies the authentication type that must be supplied by the above named NDMP Client. This
directive is required.
The following values are allowed:
- None - Use no password
- Clear - Use clear text password
- MD5 - Use MD5 hashing
-
Description = <string>
-
-
Log Level = <positive-integer>
- (default: 4)
Specifies the NDMP Loglevel which overrides the global NDMP loglevel for this client.
-
Name = <name>
- (required)
Specifies the name of the NDMP Client allowed to connect to the Storage daemon. This directive is required.
-
Password = <password>
- (required)
Specifies the password that must be supplied by the above named NDMP Client. This directive is required.
-
Username = <string>
- (required)
Specifies the username that must be supplied by the above named NDMP Client. This directive is required.
#
The Device Resource specifies the details of each device (normally a tape drive) that can be used by the Storage
daemon. There may be multiple Device resources for a single Storage daemon. In general, the properties specified
within the Device resource are specific to the Device.
-
Alert Command = <strname>
-
This specifies an external program to be called at the completion of each Job after the device is released.
The purpose of this command is to check for Tape Alerts, which are present when something is wrong
with your tape drive (at least for most modern tape drives). The same substitution characters that
may be specified in the Changer Command may also be used in this string. For more information, see
the Autochanger Support chapter.
Note, it is not necessary to have an autochanger to use this command. The example below uses the
tapeinfo program that comes with the mtx package, but it can be used on any tape drive. However,
you will need to specify a Changer Device Sd
Device directive so that the generic SCSI device name can be
edited into the command (with the %c).
An example of the use of this command to print Tape Alerts in the Job report is:
and an example output when there is a problem could be:
-
Always Open = <yes|no>
- (default: yes)
If Yes, Bareos will always keep the device open unless specifically unmounted by the Console program.
This permits Bareos to ensure that the tape drive is always available, and properly positioned. If you
set AlwaysOpen to no Bareos will only open the drive when necessary, and at the end of the Job if
no other Jobs are using the drive, it will be freed. The next time Bareos wants to append to a tape on
a drive that was freed, Bareos will rewind the tape and position it to the end. To avoid unnecessary
tape positioning and to minimize unnecessary operator intervention, it is highly recommended that
Always Open = yes. This also ensures that the drive is available when Bareos needs it.
If you have Always Open = yes (recommended) and you want to use the drive for something else,
simply use the unmount command in the Console program to release the drive. However, don’t forget
to remount the drive with mount when the drive is available or the next Bareos job will block.
For File storage, this directive is ignored. For a FIFO storage device, you must set this to No.
Please note that if you set this directive to No Bareos will release the tape drive between each job,
and thus the next job will rewind the tape and position it to the end of the data. This can be a very
time consuming operation. In addition, with this directive set to no, certain multiple drive autochanger
operations will fail. We strongly recommend to keep Always Open set to Yes
-
Archive Device = <strname>
- (required)
Specifies where to read and write the backup data. The type of the Archive Device can be specified by
the Device Type Sd
Device directive. If Device Type is not specified, Bareos tries to guess the Device Type
accordingly to the type of the specified Archive Device file type.
There are different types that are supported:
-
device
- Usually the device file name of a removable storage device (tape drive), for example /dev/nst0
or /dev/rmt/0mbn, preferably in the ”non-rewind” variant. In addition, on systems such as Sun,
which have multiple tape access methods, you must be sure to specify to use Berkeley I/O
conventions with the device. The b in the Solaris (Sun) archive specification /dev/rmt/0mbn is
what is needed in this case. Bareos does not support SysV tape drive behavior.
-
directory
- If a directory is specified, it is used as file storage. The directory must be existing and
be specified as absolute path. Bareos will write to file storage in the specified directory and the
filename used will be the Volume name as specified in the Catalog. If you want to write into more
than one directory (i.e. to spread the load to different disk drives), you will need to define two
Device resources, each containing an Archive Device with a different directory.
-
fifo
- A FIFO is a special kind of file that connects two programs via kernel memory. If a FIFO device
is specified for a backup operation, you must have a program that reads what Bareos writes into
the FIFO. When the Storage daemon starts the job, it will wait for Maximum Open Wait Sd
Device
seconds for the read program to start reading, and then time it out and terminate the job. As a
consequence, it is best to start the read program at the beginning of the job perhaps with the
Run Before Job Dir
Job directive. For this kind of device, you always want to specify Always Open
Sd
Device = no, because you want the Storage daemon to open it only when a job starts. Since a FIFO
is a one way device, Bareos will not attempt to read a label of a FIFO device, but will simply
write on it. To create a FIFO Volume in the catalog, use the add command rather than the label
command to avoid attempting to write a label.
During a restore operation, if the Archive Device is a FIFO, Bareos will attempt to read from
the FIFO, so you must have an external program that writes into the FIFO. Bareos will wait
Maximum Open Wait Sd
Device seconds for the program to begin writing and will then time it out
and terminate the job. As noted above, you may use the Run Before Job Dir
Job to start the writer
program at the beginning of the job.
A FIFO device can also be used to test your configuration, see the Howto section.
-
GlusterFS Storage
- don’t use this directive, but only Device Type Sd
Device and Device Options Sd
Device
(this behavior have changed with Version >= 15.2.0).
-
Ceph Object Store
- don’t use this directive, but only Device Type Sd
Device and Device Options Sd
Device.
(this behavior have changed with Version >= 15.2.0).
-
Auto Deflate = <IoDirection>
-
This is a parameter used by autoxflate-sd which allow you to transform a non compressed piece of data into a
compressed piece of data on the storage daemon. e.g. Storage Daemon compression. You can either enable
compression on the client and use the CPU cyclces there to compress your data with one of the supported
compression algorithms. The value of this parameter specifies a so called io-direction currently you can use the
following io-directions:
- in - compress data streams while reading the data from a device.
- out - compress data streams while writing the data to a device.
- both - compress data streams both when reading and writing to a device.
Currently only plain data streams are compressed (so things that are already compressed or encrypted will not
be considered for compression.) Also meta-data streams are not compressed. The compression is done in a way
that the stream is transformed into a native compressed data stream. So if you enable this and send the data
to a filedaemon it will know its a compressed stream and will do the decompression itself. This also means that
you can turn this option on and off at any time without having any problems with data already
written.
This option could be used if your clients doesn’t have enough power to do the compression/decompression
itself and you have enough network bandwidth. Or when your filesystem doesn’t have the option to
transparently compress data you write to it but you want the data to be compressed when written.
Version >= 13.4.0
-
Auto Deflate Algorithm = <CompressionAlgorithm>
-
This option specifies the compression algorithm used for the autodeflate option which is performed by the
autoxflate-sd plugin. The algorithms supported are:
- GZIP - gzip level 1–9
- LZO
- LZFAST
- LZ4
- LZ4HC
Version >= 13.4.0
-
Auto Deflate Level = <Pint16>
- (default: 6)
This option specifies the level to be used when compressing when you select a compression algorithm that has
different levels.
Version >= 13.4.0
-
Auto Inflate = <IoDirection>
-
This is a parameter used by autoxflate-sd which allow you to transform a compressed piece of data into a non
compressed piece of data on the storage daemon. e.g. Storage Daemon decompression. You can either enable
decompression on the client and use the CPU cyclces there to decompress your data with one of the supported
compression algorithms. The value of this parameter specifies a so called io-direction currently you can use the
following io-directions:
- in - decompress data streams while reading the data from a device.
- out - decompress data streams while writing the data to a device.
- both - decompress data streams both when reading and writing to a device.
This option allows you to write uncompressed data to for instance a tape drive that has hardware compression
even when you compress your data on the client with for instance a low cpu load compression method
(LZ4 for instance) to transfer less data over the network. It also allows you to restore data in a
compression format that the client might not support but the storage daemon does. This only
works on normal compressed datastreams not on encrypted datastreams or meta data streams.
Version >= 13.4.0
-
Auto Select = <yes|no>
- (default: yes)
If this directive is set to yes, and the Device belongs to an autochanger, then when the Autochanger is
referenced by the Director, this device can automatically be selected. If this directive is set to no, then the
Device can only be referenced by directly using the Device name in the Director. This is useful for
reserving a drive for something special such as a high priority backup or restore operations.
-
Autochanger = <yes|no>
- (default: no)
If set to yes, this device belongs to an automatic tape changer, and you must specify an Autochanger
resource that points to this Device resource.
If set to no, the volume must be manually changed.
In the Bareos Director, the directive Auto Changer Dir
Storage should be set in correspondence.
-
Automatic Mount = <yes|no>
- (default: no)
If yes, permits the daemon to examine the device to determine if it contains a Bareos labeled volume. This is
done initially when the daemon is started, and then at the beginning of each job. This directive is particularly
important if you have set Always Open Sd
Device = no because it permits Bareos to attempt to read the device
before asking the system operator to mount a tape. However, please note that the tape must be mounted
before the job begins.
-
Backward Space File = <yes|no>
- (default: yes)
If Yes, the archive device supports the MTBSF and MTBSF ioctls to backspace over an end of file mark
and to the start of a file. If No, these calls are not used and the device must be rewound and advanced
forward to the desired position.
-
Backward Space Record = <yes|no>
- (default: yes)
If Yes, the archive device supports the MTBSR ioctl to backspace records. If No, this call is not used and the
device must be rewound and advanced forward to the desired position. This function if enabled is used
at the end of a Volume after writing the end of file and any ANSI/IBM labels to determine
whether or not the last block was written correctly. If you turn this function off, the test will
not be done. This causes no harm as the re-read process is precautionary rather than required.
-
Block Checksum = <yes|no>
- (default: yes)
You may turn off the Block Checksum (CRC32) code that Bareos uses when writing blocks to a Volume.
Doing so can reduce the Storage daemon CPU usage slightly. It will also permit Bareos to read a Volume that
has corrupted data.
It is not recommend to turn this off, particularly on older tape drives or for disk Volumes where doing so may
allow corrupted data to go undetected.
-
Block Positioning = <yes|no>
- (default: yes)
This directive tells Bareos not to use block positioning when doing restores. Turning this directive off can
cause Bareos to be extremely slow when restoring files. You might use this directive if you wrote your
tapes with Bareos in variable block mode (the default), but your drive was in fixed block mode.
-
Bsf At Eom = <yes|no>
- (default: no)
If no, no special action is taken by Bareos with the End of Medium (end of tape) is reached because the tape
will be positioned after the last EOF tape mark, and Bareos can append to the tape as desired. However, on
some systems, such as FreeBSD, when Bareos reads the End of Medium (end of tape), the tape will be
positioned after the second EOF tape mark (two successive EOF marks indicated End of Medium). If Bareos
appends from that point, all the appended data will be lost. The solution for such systems is to specify Bsf At
Eom Sd
Device = yes which causes Bareos to backspace over the second EOF mark. Determination of
whether or not you need this directive is done using the test command in the btape program.
-
Changer Command = <strname>
-
This directive can be specified if this device is used with an autochanger and you want to overwrite the default
Changer Command Sd
Autochanger. Normally, this directive will be specified only in the Autochanger Resource,
which is then used for all devices. However, you may also specify the different Changer Command in each
Device resource.
-
Changer Device = <strname>
-
This directive should be specified if
The specified device must be a generic SCSI device.
For details, see the Autochanger Support chapter.
-
Check Labels = <yes|no>
- (default: no)
If you intend to read ANSI or IBM labels, this must be set. Even if the volume is not ANSI labeled, you can
set this to yes, and Bareos will check the label type. Without this directive set to yes, Bareos will
assume that labels are of Bareos type and will not check for ANSI or IBM labels. In other words,
if there is a possibility of Bareos encountering an ANSI/IBM label, you must set this to yes.
-
Close On Poll = <yes|no>
- (default: no)
If Yes, Bareos close the device (equivalent to an unmount except no mount is required) and
reopen it at each poll. Normally this is not too useful unless you have the Offline on Unmount
directive set, in which case the drive will be taken offline preventing wear on the tape during
any future polling. Once the operator inserts a new tape, Bareos will recognize the drive on
the next poll and automatically continue with the backup. Please see above for more details.
-
Collect Statistics = <yes|no>
- (default: yes)
-
Description = <string>
-
The Description directive provides easier human recognition, but is not used by Bareos directly.
-
Device Options = <string>
-
Some Device Type Sd
Device require additional configuration. This can be specified in this directive, e.g.
for
-
Droplet Storage Backend
-
-
GFAPI Storage Backend
-
-
Rados Storage Backend
Before the Device Options directive have been introduced, these options have to be configured in the Archive
Device Sd
Device directive. This behavior have changed with Version >= 15.2.0.
Version >= 15.2.0
-
Device Type = <DeviceType>
-
The Device Type specification allows you to explicitly define the kind of device you want to use. It may be one
of the following:
-
Tape
- is used to access tape device and thus has sequential access. Tape devices are controlled using
ioctl() calls.
-
File
- tells Bareos that the device is a file. It may either be a file defined on fixed medium or a removable
filesystem such as USB. All files must be random access devices.
-
Fifo
- is a first-in-first-out sequential access read-only or write-only device.
-
GFAPI (GlusterFS)
- is used to access a GlusterFS storage. It must be configured using Device Options
Sd
Device. For details, refer to GFAPI Storage Backend.
Version >= 14.2.2
-
Rados (Ceph Object Store)
- is used to access a Ceph object store. It must be configured using Device
Options Sd
Device. For details, refer to Rados Storage Backend.
Version >= 14.2.2
-
Droplet
- is used to access an object store supported by libdroplet, most notably S3. For details, refer
to Droplet Storage Backend.
Version >= 17.2.7
The Device Type directive is not required in all cases. If it is not specified, Bareos will attempt to guess what
kind of device has been specified using the Archive Device Sd
Device specification supplied. There are several
advantages to explicitly specifying the Device Type. First, on some systems, block and character devices have
the same type. Secondly, if you explicitly specify the Device Type, the mount point need not be defined until
the device is opened. This is the case with most removable devices such as USB. If the Device Type
is not explicitly specified, then the mount point must exist when the Storage daemon starts.
-
Diagnostic Device = <strname>
-
-
Drive Crypto Enabled = <yes|no>
-
The default for this directive is No. If Yes the storage daemon can perform so called Application Managed
Encryption (AME) using a special Storage Daemon plugin which loads and clears the Encryption key using
the SCSI SPIN/SPOUT protocol.
-
Drive Index = <Pint16>
-
The Drive Index that you specify is passed to the Changer Command Sd
Device. By default, the Drive Index is
zero, so if you have only one drive in your autochanger, everything will work normally. However, if you have
multiple drives, you must specify multiple Bareos Device resources (one for each drive). The first
Device should have the Drive Index set to 0, and the second Device Resource should contain a
Drive Index set to 1, and so on. This will then permit you to use two or more drives in your
autochanger.
For details, refer to Multiple Devices.
-
Drive Tape Alert Enabled = <yes|no>
-
-
Fast Forward Space File = <yes|no>
- (default: yes)
If No, the archive device is not required to support keeping track of the file number (MTIOCGET ioctl)
during forward space file. If Yes, the archive device must support the ioctl MTFSF call, which virtually all
drivers support, but in addition, your SCSI driver must keep track of the file number on the tape and report it
back correctly by the MTIOCGET ioctl. Note, some SCSI drivers will correctly forward space, but
they do not keep track of the file number or more seriously, they do not report end of medium.
-
Forward Space File = <yes|no>
- (default: yes)
If Yes, the archive device must support the MTFSF ioctl to forward space by file marks. If No, data must be
read to advance the position on the device.
-
Forward Space Record = <yes|no>
- (default: yes)
If Yes, the archive device must support the MTFSR ioctl to forward space over records. If No, data must be
read in order to advance the position on the device.
-
Free Space Command = <strname>
-
Please note! This directive is deprecated.
-
Hardware End Of File = <yes|no>
- (default: yes)
-
Hardware End Of Medium = <yes|no>
- (default: yes)
All modern (after 1998) tape drives should support this feature. In doubt, use the btape program to test your
drive to see whether or not it supports this function. If the archive device does not support the end of medium
ioctl request MTEOM, set this parameter to No. The storage daemon will then use the forward space file
function to find the end of the recorded data. In addition, your SCSI driver must keep track of the file number
on the tape and report it back correctly by the MTIOCGET ioctl. Note, some SCSI drivers will correctly
forward space to the end of the recorded data, but they do not keep track of the file number. On Linux
machines, the SCSI driver has a fast-eod option, which if set will cause the driver to lose track of
the file number. You should ensure that this option is always turned off using the mt program.
-
Label Block Size = <64512>
- (default: 64512)
The storage daemon will write the label blocks with the size configured here. Usually, you will not need to
change this directive.
For more information on this directive, please see Tapespeed and blocksizes.
Version >= 14.2.0
-
Label Media = <yes|no>
- (default: no)
If Yes, permits this device to automatically label blank media without an explicit operator command. It does
so by using an internal algorithm as defined on the Label Format Dir
Pool record in each Pool resource. If this is
No as by default, Bareos will label tapes only by specific operator command (label in the Console) or when
the tape has been recycled. The automatic labeling feature is most useful when writing to disk rather than
tape volumes.
-
Label Type = <Label>
-
Defines the label type to use, see section Tape Labels: ANSI or IBM. This directive is implemented in the
Director Pool resource (Label Type Dir
Pool) and in the SD Device resource. If it is specified in the the SD Device
resource, it will take precedence over the value passed from the Director to the SD. If it is set to a non-default
value, make sure to also enable Check Labels Sd
Device.
-
Maximum Block Size = <64512>
-
The Storage daemon will always attempt to write blocks of the specified size (in-bytes) to the archive device.
As a consequence, this statement specifies both the default block size and the maximum block size. The size
written never exceed the given size. If adding data to a block would cause it to exceed the given
maximum size, the block will be written to the archive device, and the new data will begin a new
block.
If no value is specified or zero is specified, the Storage daemon will use a default block size of 64,512 bytes (126
* 512).
Please note! If your are using LTO drives, changing the block size after labeling the tape will result into
unreadable tapes.
Please read chapter Tapespeed and blocksizes, to see how to tune this value in a safe manner.
-
Maximum Changer Wait = <time>
- (default: 300)
This directive specifies the maximum amount of time that Bareos will wait for the changer to respond to a
command (e.g. load). If you have a slow autoloader you may want to set it longer.
If the autoloader program fails to respond in this time, Bareos will invalidate the volume slot number stored in
the catalog and try again. If no additional changer volumes exist, Bareos will ask the operator to intervene.
-
Maximum Concurrent Jobs = <positive-integer>
-
This directive specifies the maximum number of Jobs that can run concurrently on a specified Device. Using
this directive, it is possible to have different Jobs using multiple drives, because when the Maximum
Concurrent Jobs limit is reached, the Storage Daemon will start new Jobs on any other available compatible
drive. This facilitates writing to multiple drives with multiple Jobs that all use the same Pool.
-
Maximum File Size = <Size64>
- (default: 1000000000)
No more than size bytes will be written into a given logical file on the volume. Once this size is reached, an
end of file mark is written on the volume and subsequent data are written into the next file. Breaking long
sequences of data blocks with file marks permits quicker positioning to the start of a given stream of data and
can improve recovery from read errors on the volume. The default is one Gigabyte. This directive creates EOF
marks only on tape media. However, regardless of the medium type (tape, disk, USB ...) each time a the
Maximum File Size is exceeded, a record is put into the catalog database that permits seeking to
that position on the medium for restore operations. If you set this to a small value (e.g. 1MB),
you will generate lots of database records (JobMedia) and may significantly increase CPU/disk
overhead.
If you are configuring an modern drive like LTO-4 or newer, you probably will want to set the Maximum
File Size to 20GB or bigger to avoid making the drive stop to write an EOF mark.
For more info regarding this parameter, read Tapespeed and blocksizes.
Note, this directive does not limit the size of Volumes that Bareos will create regardless of whether they are
tape or disk volumes. It changes only the number of EOF marks on a tape and the number of block
positioning records that are generated. If you want to limit the size of all Volumes for a particular device, use
the use the Maximum Volume Bytes Dir
Pool directive.
-
Maximum Job Spool Size = <Size64>
-
where the bytes specify the maximum spool size for any one job that is running. The default is no limit.
-
Maximum Network Buffer Size = <positive-integer>
-
where bytes specifies the initial network buffer size to use with the File daemon. This size will be adjusted
down if it is too large until it is accepted by the OS. Please use care in setting this value since if it is too large,
it will be trimmed by 512 bytes until the OS is happy, which may require a large number of system calls. The
default value is 32,768 bytes.
The default size was chosen to be relatively large but not too big in the case that you are transmitting data
over Internet. It is clear that on a high speed local network, you can increase this number and improve
performance. For example, some users have found that if you use a value of 65,536 bytes they get five to ten
times the throughput. Larger values for most users don’t seem to improve performance. If you are
interested in improving your backup speeds, this is definitely a place to experiment. You will
probably also want to make the corresponding change in each of your File daemons conf files.
-
Maximum Open Volumes = <positive-integer>
- (default: 1)
-
Maximum Open Wait = <time>
- (default: 300)
This directive specifies the maximum amount of time that Bareos will wait for a device that is busy. If the
device cannot be obtained, the current Job will be terminated in error. Bareos will re-attempt to open the
drive the next time a Job starts that needs the the drive.
-
Maximum Part Size = <Size64>
-
Please note! This directive is deprecated.
-
Maximum Rewind Wait = <time>
- (default: 300)
This directive specifies the maximum time in seconds for Bareos to wait for a rewind before timing out. If this
time is exceeded, Bareos will cancel the job.
-
Maximum Spool Size = <Size64>
-
where the bytes specify the maximum spool size for all jobs that are running. The default is no limit.
-
Maximum Volume Size = <Size64>
-
Please note! This directive is deprecated.
Normally, Maximum Volume Bytes Dir
Pool should be used instead. Limit the number of bytes that will be written
onto a given volume on the archive device. This directive is used mainly in testing Bareos to simulate a small
Volume.
-
Media Type = <strname>
- (required)
The specified value names the type of media supported by this device, for example, ”DLT7000”. Media
type names are arbitrary in that you set them to anything you want, but they must be known
to the volume database to keep track of which storage daemons can read which volumes. In
general, each different storage type should have a unique Media Type associated with it. The same
name-string must appear in the appropriate Storage resource definition in the Director’s configuration
file.
Even though the names you assign are arbitrary (i.e. you choose the name you want), you should take care in
specifying them because the Media Type is used to determine which storage device Bareos will select
during restore. Thus you should probably use the same Media Type specification for all drives
where the Media can be freely interchanged. This is not generally an issue if you have a single
Storage daemon, but it is with multiple Storage daemons, especially if they have incompatible
media.
For example, if you specify a Media Type of ”DDS-4” then during the restore, Bareos will be
able to choose any Storage Daemon that handles ”DDS-4”. If you have an autochanger, you
might want to name the Media Type in a way that is unique to the autochanger, unless you
wish to possibly use the Volumes in other drives. You should also ensure to have unique Media
Type names if the Media is not compatible between drives. This specification is required for all
devices.
In addition, if you are using disk storage, each Device resource will generally have a different mount point or
directory. In order for Bareos to select the correct Device resource, each one must have a unique Media Type.
-
Minimum Block Size = <positive-integer>
-
This statement applies only to non-random access devices (e.g. tape drives). Blocks written by the storage
daemon to a non-random archive device will never be smaller than the given size. The Storage daemon will
attempt to efficiently fill blocks with data received from active sessions but will, if necessary, add padding to a
block to achieve the required minimum size.
To force the block size to be fixed, as is the case for some non-random access devices (tape drives), set
the Minimum block size and the Maximum block size to the same value. The default is
that both the minimum and maximum block size are zero and the default block size is 64,512
bytes.
For example, suppose you want a fixed block size of 100K bytes, then you would specify:
Please note that if you specify a fixed block size as shown above, the tape drive must either be in variable
block size mode, or if it is in fixed block size mode, the block size (generally defined by mt) must be identical
to the size specified in Bareos – otherwise when you attempt to re-read your Volumes, you will get an
error.
If you want the block size to be variable but with a 63K minimum and 200K maximum (and default as well),
you would specify:
-
Mount Command = <strname>
-
This directive specifies the command that must be executed to mount devices such as many USB devices.
Before the command is executed, %a is replaced with the Archive Device, and %m with the Mount
Point.
See the Edit Codes for Mount and Unmount Directives section below for more details of the editing codes that
can be used in this directive.
If you need to specify multiple commands, create a shell script.
-
Mount Point = <strname>
-
Directory where the device can be mounted. This directive is used only for devices that have Requires
Mount enabled such as USB file devices.
-
Name = <name>
- (required)
Unique identifier of the resource.
Specifies the Name that the Director will use when asking to backup or restore to or from to this device. This
is the logical Device name, and may be any string up to 127 characters in length. It is generally a
good idea to make it correspond to the English name of the backup device. The physical name
of the device is specified on the Archive Device Sd
Device directive. The name you specify here is
also used in your Director’s configuration file on the Storage Resource in its Storage resource.
-
No Rewind On Close = <yes|no>
- (default: yes)
If Yes the storage daemon will not try to rewind the device on closing the device e.g. when
shutting down the Storage daemon. This allows you to do an emergency shutdown of the Daemon
without the need to wait for the device to rewind. On restarting and opening the device it will
get a rewind anyhow and this way services don’t have to wait forever for a tape to spool back.
-
Offline On Unmount = <yes|no>
- (default: no)
If Yes the archive device must support the MTOFFL ioctl to rewind and take the volume offline. In this
case, Bareos will issue the offline (eject) request before closing the device during the unmount
command. If No Bareos will not attempt to offline the device before unmounting it. After an offline is
issued, the cassette will be ejected thus requiring operator intervention to continue, and on
some systems require an explicit load command to be issued (mt -f /dev/xxx load) before
the system will recognize the tape. If you are using an autochanger, some devices require an
offline to be issued prior to changing the volume. However, most devices do not and may get very
confused.
If you are using a Linux 2.6 kernel or other OSes such as FreeBSD or Solaris, the Offline On Unmount will
leave the drive with no tape, and Bareos will not be able to properly open the drive and may fail the job.
-
Query Crypto Status = <yes|no>
-
The default for this directive is No. If Yes the storage daemon may query the tape device for it
security status. This only makes sense when Drive Crypto Enabled is also set to yes as the actual
query is performed by the same Storage Daemon plugin and using the same SCSI SPIN protocol.
-
Random Access = <yes|no>
- (default: no)
If Yes, the archive device is assumed to be a random access medium which supports the lseek (or lseek64 if
Largefile is enabled during configuration) facility. This should be set to Yes for all file systems such as USB,
and fixed files. It should be set to No for non-random access devices such as tapes and named pipes.
-
Removable Media = <yes|no>
- (default: yes)
If Yes, this device supports removable media (for example tapes). If No, media cannot be removed (for
example, an intermediate backup area on a hard disk). If Removable media is enabled on a File device (as
opposed to a tape) the Storage daemon will assume that device may be something like a USB device that can
be removed or a simply a removable harddisk. When attempting to open such a device, if the
Volume is not found (for File devices, the Volume name is the same as the Filename), then the
Storage daemon will search the entire device looking for likely Volume names, and for each one
found, it will ask the Director if the Volume can be used. If so, the Storage daemon will use
the first such Volume found. Thus it acts somewhat like a tape drive – if the correct Volume
is not found, it looks at what actually is found, and if it is an appendable Volume, it will use
it.
If the removable medium is not automatically mounted (e.g. udev), then you might consider using additional
Storage daemon device directives such as Requires Mount, Mount Point, Mount Command,
and Unmount Command, all of which can be used in conjunction with Removable Media.
-
Requires Mount = <yes|no>
- (default: no)
When this directive is enabled, the Storage daemon will submit a Mount Command before attempting to
open the device. You must set this directive to yes for removable file systems such as USB devices that are not
automatically mounted by the operating system when plugged in or opened by Bareos. It should be set to
no for all other devices such as tapes and fixed filesystems. It should also be set to no for any
removable device that is automatically mounted by the operating system when opened (e.g.
USB devices mounted by udev or hotplug). This directive indicates if the device requires to be
mounted using the Mount Command. To be able to write devices need a mount, the following
directives must also be defined: Mount Point, Mount Command, and Unmount Command.
-
Spool Directory = <path>
-
specifies the name of the directory to be used to store the spool files for this device. This directory is also used
to store temporary part files when writing to a device that requires mount (USB). The default is to use the
working directory.
-
Two Eof = <yes|no>
- (default: no)
If Yes, Bareos will write two end of file marks when terminating a tape – i.e. after the last job or
at the end of the medium. If No, Bareos will only write one end of file to terminate the tape.
-
Unmount Command = <strname>
-
This directive specifies the command that must be executed to unmount devices such as many USB devices.
Before the command is executed, %a is replaced with the Archive Device, and %m with the Mount
Point.
Most frequently, you will define it as follows:
See the Edit Codes for Mount and Unmount Directives section below for more details of the editing codes that
can be used in this directive.
If you need to specify multiple commands, create a shell script.
-
Use Mtiocget = <yes|no>
- (default: yes)
If No, the operating system is not required to support keeping track of the file number and
reporting it in the (MTIOCGET ioctl). If you must set this to No, Bareos will do the proper
file position determination, but it is very unfortunate because it means that tape movement is
very inefficient. Fortunately, this operation system deficiency seems to be the case only on a few
*BSD systems. Operating systems known to work correctly are Solaris, Linux and FreeBSD.
-
Volume Capacity = <Size64>
-
-
Volume Poll Interval = <time>
- (default: 300)
If the time specified on this directive is non-zero, Bareos will periodically poll (or read) the drive at the
specified interval to see if a new volume has been mounted. If the time interval is zero, no polling will occur.
This directive can be useful if you want to avoid operator intervention via the console. Instead, the operator
can simply remove the old volume and insert the requested one, and Bareos on the next poll will recognize the
new tape and continue. Please be aware that if you set this interval too small, you may excessively
wear your tape drive if the old tape remains in the drive, since Bareos will read it on each poll.
-
Write Part Command = <strname>
-
Please note! This directive is deprecated.
#
Before submitting the Mount Command, or Unmount Command directives to the operating system, Bareos
performs character substitution of the following characters:
%% = %
%a = Archive device name
%e = erase (set if cannot mount and first part)
%n = part number
%m = mount point
%v = last part name (i.e. filename)
#
-
- Requires Mount Sd
Device You must set this directive to yes for removable devices such as USB unless they
are automounted, and to no for all other devices (tapes/files). This directive indicates if the device
requires to be mounted to be read, and if it must be written in a special way. If it set, Mount Point
Sd
Device, Mount Command Sd
Device and Unmount Command Sd
Device directives must also be defined.
-
- Mount Point Sd
Device Directory where the device can be mounted.
-
- Mount Command Sd
Device Command that must be executed to mount the device. Before the command is
executed, %a is replaced with the Archive Device, and %m with the Mount Point.
Most frequently, you will define it as follows:
Mount Command = "/bin/mount -t iso9660 -o ro %a %m"
Configuration 10.3:
For some media, you may need multiple commands. If so, it is recommended that you use a shell script instead
of putting them all into the Mount Command. For example, instead of this:
Mount Command = "/usr/local/bin/mymount"
Configuration 10.4:
Where that script contains:
#!/bin/sh
ndasadmin enable -s 1 -o w
sleep 2
mount /dev/ndas-00323794-0p1 /backup
Commands 10.5:
Similar consideration should be given to all other Command parameters.
-
- Unmount Command Sd
Device Command that must be executed to unmount the device. Before the command is
executed, %a is replaced with the Archive Device, and %m with the Mount Point.
Most frequently, you will define it as follows:
Unmount Command = "/bin/umount %m"
Configuration 10.6:
If you need to specify multiple commands, create a shell script.
#
The Autochanger resource supports single or multiple drive autochangers by grouping one or more Device resources
into one unit called an autochanger in Bareos (often referred to as a ”tape library” by autochanger
manufacturers).
-
Changer Command = <strname>
- (required)
This command specifies an external program and parameter to be called that will automatically change
volumes as required by Bareos. This command is invoked each time that Bareos wishes to manipulate
the autochanger.
Most frequently, you will specify the Bareos supplied mtx-changer script.
The following substitutions are made in the command before it is sent to the operating system for
execution:
-
%%
- %
-
%a
- archive device name
-
%c
- changer device name
-
%d
- changer drive index base 0
-
%f
- Client’s name
-
%j
- Job name
-
%o
- command (loaded, load, or unload)
-
%s
- Slot base 0
-
%S
- Slot base 1
-
%v
- Volume name
A typical setting for this is Changer Command Sd
Autochanger = "/usr/lib/bareos/scripts/mtx-changer \%c \%o \%S \%a \%d".
Details of the three commands currently used by Bareos (loaded, load, unload) as well as the output expected
by Bareos are given in the Bareos Autochanger Interface section.
If it is specified here, it needs not to be specified in the Device resource. If it is also specified in
the Device resource, it will take precedence over the one specified in the Autochanger resource.
-
Changer Device = <strname>
- (required)
The specified device must be the generic SCSI device of the autochanger.
The changer device is additional to the the Archive Device Sd
Device. This is because most autochangers are
controlled through a different device than is used for reading and writing the tapes. For example, on Linux,
one normally uses the generic SCSI interface for controlling the autochanger, but the standard SCSI interface
for reading and writing the tapes.
On Linux, for the Archive Device Sd
Device = /dev/nst0, you would typically have Changer Device Sd
Device
= /dev/sg0.
On FreeBSD systems, the changer device will typically be on /dev/pass0 through /dev/passN.
On Solaris, the changer device will typically be some file under /dev/rdsk.
Please ensure that your Storage daemon has permission to access this device.
It can be overwritten per device using the Changer Device Sd
Device directive.
-
Description = <string>
-
-
Device = <ResourceList>
- (required)
Specifies the names of the Device resource or resources that correspond to the autochanger drive. If you have a
multiple drive autochanger, you must specify multiple Device names, each one referring to a separate Device
resource that contains a Drive Index specification that corresponds to the drive number base zero. You may
specify multiple device names on a single line separated by commas, and/or you may specify multiple Device
directives.
-
Name = <name>
- (required)
Specifies the Name of the Autochanger. This name is used in the Director’s Storage definition to refer to the
autochanger.
The following is an example of a valid Autochanger resource definition:
Autochanger {
Name = "DDS-4-changer"
Device = DDS-4-1, DDS-4-2, DDS-4-3
Changer Device = /dev/sg0
Changer Command = "/usr/lib/bareos/scripts/mtx-changer %c %o %S %a %d"
}
Device {
Name = "DDS-4-1"
Drive Index = 0
Autochanger = yes
...
}
Device {
Name = "DDS-4-2"
Drive Index = 1
Autochanger = yes
...
Device {
Name = "DDS-4-3"
Drive Index = 2
Autochanger = yes
Autoselect = no
...
}
Configuration 10.7:
Autochanger Configuration Example
Please note that it is important to include the Autochanger Sd
Device = yes directive in each device definition that
belongs to an Autochanger. A device definition should not belong to more than one Autochanger
resource.
Also, your Device Dir
Storage must refer to the Autochanger’s resource name rather than a name of one of the
Devices.
For details refer to the Autochanger Support chapter.
#
For a description of the Messages Resource, please see the Messages Resource chapter of this manual.
#
A example Storage Daemon configuration file might be the following:
#
The Client (or File Daemon) Configuration is one of the simpler ones to specify. Generally, other than changing the
Client name so that error messages are easily identified, you will not need to modify the default Client configuration
file.
For a general discussion of configuration file and resources including the data types recognized by Bareos,
please see the Configuration chapter of this manual. The following Client Resource definitions must be
defined:
- Client – to define what Clients are to be backed up.
- Director – to define the Director’s name and its access password.
- Messages – to define where error and information messages are to be sent.
#
The Client Resource (or FileDaemon) resource defines the name of the Client (as used by the Director) as well as
the port on which the Client listens for Director connections.
Start of the Client records. There must be one and only one Client resource in the configuration file, since it defines
the properties of the current client program.
-
Absolute Job Timeout = <positive-integer>
-
-
Allow Bandwidth Bursting = <yes|no>
- (default: no)
This option sets if there is Bandwidth Limiting in effect if the limiting code can use bursting e.g. when
from a certain timeslice not all bandwidth is used this bandwidth can be used in a next timeslice.
Which mean you will get a smoother limiting which will be much closer to the actual limit set but it
also means that sometimes the bandwidth will be above the setting here.
-
Allowed Job Command = <string-list>
-
This directive filters what type of jobs the filedaemon should allow. Until now we had the -b (backup
only) and -r (restore only) flags which could be specified at the startup of the filedaemon.
Allowed Job Command can be defined globally for all directors by adding it to the global filedaemon
resource or for a specific director when added to the director resource.
You specify all commands you want to be executed by the filedaemon. When you don’t specify the
option it will be empty which means all commands are allowed.
The following example shows how to use this functionality:
All commands that are allowed are specified each on a new line with the Allowed Job Command
keyword.
The following job commands are recognized:
-
backup
- allow backups to be made
-
restore
- allow restores to be done
-
verify
- allow verify jobs to be done
-
estimate
- allow estimate cmds to be executed
-
runscript
- allow runscripts to run
Only the important commands the filedaemon can perform are filtered, as some commands are part
of the above protocols and by disallowing the action the other commands are not invoked at
all.
If runscripts are not needed it would be recommended as a security measure to disable running those or only
allow the commands that you really want to be used.
Runscripts are particularly a problem as they allow the Bareos File Daemon to run arbitrary commands. You
may also look into the Allowed Script Dir Fd
Client keyword to limit the impact of the runscript command.
-
Allowed Script Dir = <DirectoryList>
-
This directive limits the impact of the runscript command of the filedaemon.
It can be specified either for all directors by adding it to the global filedaemon resource or for a specific
director when added to the director resource.
All directories in which the scripts or commands are located that you allow to be run by the runscript
command of the filedaemon. Any program not in one of these paths (or subpaths) cannot be
used. The implementation checks if the full path of the script starts with one of the specified
paths.
The following example shows how to use this functionality:
-
Always Use LMDB = <yes|no>
- (default: no)
-
Compatible = <yes|no>
- (default: no)
This directive enables the compatible mode of the file daemon. In this mode the file daemon will try to be as
compatible to a native Bacula file daemon as possible. Enabling this option means that certain new options
available in Bareos cannot be used as they would lead to data not being able to be restored by a Native Bareos
file daemon.
The default value for this directive was changed from yes to no since Bareos Version >= 15.2.0.
When you want to use bareos-only features, the value of compatible must be no.
-
Description = <string>
-
-
FD Address = <net-address>
- (default: 9102)
This record is optional, and if it is specified, it will cause the File daemon server (for Director connections) to
bind to the specified IP-Address, which is either a domain name or an IP address specified as a dotted
quadruple.
-
FD Addresses = <net-addresses>
- (default: 9102)
Specify the ports and addresses on which the File daemon listens for Director connections. Probably the
simplest way to explain is to show an example:
where ip, ip4, ip6, addr, and port are all keywords. Note, that the address can be specified as either a dotted
quadruple, or IPv6 colon notation, or as a symbolic name (only in the ip specification). Also, the port can be
specified as a number or as the mnemonic value from the /etc/services file. If a port is not specified, the
default will be used. If an ip section is specified, the resolution can be made either by IPv4 or
IPv6. If ip4 is specified, then only IPv4 resolutions will be permitted, and likewise with ip6.
-
FD Port = <net-port>
- (default: 9102)
This specifies the port number on which the Client listens for Director connections. It must agree with the
FDPort specified in the Client resource of the Director’s configuration file.
-
FD Source Address = <net-address>
- (default: 0)
If specified, the Bareos File Daemon will bind to the specified address when creating outbound connections. If
this record is not specified, the kernel will choose the best address according to the routing table (the default).
-
Heartbeat Interval = <time>
- (default: 0)
This record defines an interval of time in seconds. For each heartbeat that the File daemon receives from the
Storage daemon, it will forward it to the Director. In addition, if no heartbeat has been received from the
Storage daemon and thus forwarded the File daemon will send a heartbeat signal to the Director and to the
Storage daemon to keep the channels active. Setting the interval to 0 (zero) disables the heartbeat. This
feature is particularly useful if you have a router that does not follow Internet standards and times out a valid
connection after a short duration despite the fact that keepalive is set. This usually results in a broken pipe
error message.
-
LMDB Threshold = <positive-integer>
-
-
Log Timestamp Format = <string>
-
Version >= 15.2.3
-
Maximum Bandwidth Per Job = <speed>
-
The speed parameter specifies the maximum allowed bandwidth that a job may use.
-
Maximum Concurrent Jobs = <positive-integer>
- (default: 20)
This directive specifies the maximum number of Jobs that should run concurrently. Each contact from the
Director (e.g. status request, job start request) is considered as a Job, so if you want to be able to do a status
request in the console at the same time as a Job is running, you will need to set this value greater than 1.
-
Maximum Connections = <positive-integer>
- (default: 42)
Version >= 15.2.3
-
Maximum Network Buffer Size = <positive-integer>
-
This directive specifies the initial network buffer size to use. This size will be adjusted down if it is too large
until it is accepted by the OS. Please use care in setting this value since if it is too large, it will be trimmed by
512 bytes until the OS is happy, which may require a large number of system calls. The default value is 65,536
bytes.
Note, on certain Windows machines, there are reports that the transfer rates are very slow and this seems to
be related to the default 65,536 size. On systems where the transfer rates seem abnormally slow compared to
other systems, you might try setting the Maximum Network Buffer Size to 32,768 in both the File daemon and
in the Storage daemon.
-
Messages = <resource-name>
-
-
Name = <name>
- (required)
The name of this resource. It is used to reference to it.
The client name that must be used by the Director when connecting. Generally, it is a good idea to use a name
related to the machine so that error messages can be easily identified if you have multiple Clients. This
directive is required.
-
Pid Directory = <path>
- (default: /var/lib/bareos (platform specific))
This directive specifies a directory in which the File Daemon may put its process Id file files. The
process Id file is used to shutdown Bareos and to prevent multiple copies of Bareos from running
simultaneously.
The Bareos file daemon uses a platform specific default value, that is defined at compile time. Typically on
Linux systems, it is set to /var/lib/bareos/ or /var/run/.
-
Pki Cipher = <EncryptionCipher>
- (default: aes128)
PKI Cipher used for data encryption.
See the Data Encryption chapter of this manual.
Depending on the openssl library version different ciphers are available. To choose the desired cipher, you can
use the PKI Cipher option in the filedaemon configuration. Note that you have to set Compatible Fd
Client =
no:
The available options (and ciphers) are:
- aes128
- aes192
- aes256
- camellia128
- camellia192
- camellia256
- aes128hmacsha1
- aes256hmacsha1
- blowfish
They depend on the version of the openssl library installed.
For decryption of encrypted data, the right decompression algorithm should be automatically
chosen.
-
Pki Encryption = <yes|no>
- (default: no)
Enable Data Encryption.
See Data Encryption.
-
Pki Key Pair = <path>
-
File with public and private key to sign, encrypt (backup) and decrypt (restore) the data.
See Data Encryption.
-
Pki Master Key = <DirectoryList>
-
List of public key files. Data will be decryptable via the corresponding private keys.
See Data Encryption.
-
Pki Signatures = <yes|no>
- (default: no)
Enable Data Signing.
See Data Encryption.
-
Pki Signer = <DirectoryList>
-
Additional public/private key files to sign or verify the data.
See Data Encryption.
-
Plugin Directory = <path>
-
This directive specifies a directory in which the File Daemon searches for plugins with the name
<pluginname>-fd.so which it will load at startup. Typically on Linux systems, plugins are installed to
/usr/lib/bareos/plugins/ or /usr/lib64/bareos/plugins/.
-
Plugin Names = <PluginNames>
-
If a Plugin Directory Fd
Client is specified Plugin Names defines, which File Daemon Plugins get
loaded.
If Plugin Names is not defined, all plugins get loaded, otherwise the defined ones.
-
Scripts Directory = <path>
-
-
SD Connect Timeout = <time>
- (default: 1800)
This record defines an interval of time that the File daemon will try to connect to the Storage
daemon. If no connection is made in the specified time interval, the File daemon cancels the Job.
-
Secure Erase Command = <string>
-
Specify command that will be called when bareos unlinks files.
When files are no longer needed, Bareos will delete (unlink) them. With this directive, it will call the specified
command to delete these files. See Secure Erase Command for details.
Version >= 15.2.1
-
Sub Sys Directory = <path>
-
Please note! This directive is deprecated.
-
TLS Allowed CN = <string-list>
-
”Common Name”s (CNs) of the allowed peer certificates.
-
TLS Authenticate = <yes|no>
- (default: no)
Use TLS only to authenticate, not for encryption.
-
TLS CA Certificate Dir = <path>
-
Path of a TLS CA certificate directory.
-
TLS CA Certificate File = <path>
-
Path of a PEM encoded TLS CA certificate(s) file.
-
TLS Certificate = <path>
-
Path of a PEM encoded TLS certificate.
-
TLS Certificate Revocation List = <path>
-
Path of a Certificate Revocation List file.
-
TLS Cipher List = <string>
-
List of valid TLS Ciphers.
-
TLS DH File = <path>
-
Path to PEM encoded Diffie-Hellman parameter file. If this directive is specified, DH key exchange will be
used for the ephemeral keying, allowing for forward secrecy of communications.
-
TLS Enable = <yes|no>
- (default: no)
Enable TLS support.
Bareos can be configured to encrypt all its network traffic. See chapter TLS Configuration Directives to
see how the Bareos Director (and the other components) have to be configured to use TLS.
-
TLS Key = <path>
-
Path of a PEM encoded private key. It must correspond to the specified ”TLS Certificate”.
-
TLS Psk Enable = <yes|no>
- (default: yes)
Enable TLS-PSK support.
-
TLS Psk Require = <yes|no>
- (default: no)
Without setting this to yes, Bareos can fall back to use unencryption connections. Enabling this implicitly sets
”TLS-PSK Enable = yes”.
-
TLS Require = <yes|no>
- (default: no)
Without setting this to yes, Bareos can fall back to use unencrypted connections. Enabling this implicitly sets
”TLS Enable = yes”.
-
TLS Verify Peer = <yes|no>
- (default: no)
If disabled, all certificates signed by a known CA will be accepted. If enabled, the CN of a certificate must the
Address or in the ”TLS Allowed CN” list.
-
Ver Id = <string>
-
-
Working Directory = <path>
- (default: /var/lib/bareos (platform specific))
This directive is optional and specifies a directory in which the File daemon may put its status
files.
On Win32 systems, in some circumstances you may need to specify a drive letter in the specified
working directory path. Also, please be sure that this directory is writable by the SYSTEM
user otherwise restores may fail (the bootstrap file that is transferred to the File daemon from
the Director is temporarily put in this directory before being passed to the Storage daemon).
The following is an example of a valid Client resource definition:
Client { # this is me
Name = rufus-fd
}
#
The Director resource defines the name and password of the Directors that are permitted to contact this
Client.
-
Address = <string>
-
Director Network Address. Only required if ”Connection From Client To Director” is enabled.
-
Allowed Job Command = <string-list>
-
see Allowed Job Command Fd
Client
-
Allowed Script Dir = <DirectoryList>
-
see Allowed Script Dir Fd
Client
-
Connection From Client To Director = <yes|no>
- (default: no)
Let the Filedaemon initiate network connections to the Director.
For details, see Client Initiated Connection.
Version >= 16.2.2
-
Connection From Director To Client = <yes|no>
- (default: yes)
This Client will accept incoming network connection from this Director.
Version >= 16.2.2
-
Description = <string>
-
-
Maximum Bandwidth Per Job = <speed>
-
The speed parameter specifies the maximum allowed bandwidth that a job may use when started from
this Director. The speed parameter should be specified in k/s, Kb/s, m/s or Mb/s.
-
Monitor = <yes|no>
- (default: no)
If Monitor is set to no, this director will have full access to this Client. If Monitor is set to yes, this
director will only be able to fetch the current status of this Client.
Please note that if this director is being used by a Monitor, we highly recommend to set this directive
to yes to avoid serious security problems.
-
Name = <name>
- (required)
The name of the Director that may contact this Client. This name must be the same as the name
specified on the Director resource in the Director’s configuration file. Note, the case (upper/lower) of
the characters in the name are significant (i.e. S is not the same as s). This directive is required.
-
Password = <Md5password>
- (required)
Specifies the password that must be supplied for a Director to be authorized. This password must
be the same as the password specified in the Client resource in the Director’s configuration file. This
directive is required.
-
Port = <positive-integer>
- (default: 9101)
Director Network Port. Only used if ”Connection From Client To Director” is enabled.
Version >= 16.2.2
-
TLS Allowed CN = <string-list>
-
”Common Name”s (CNs) of the allowed peer certificates.
-
TLS Authenticate = <yes|no>
- (default: no)
Use TLS only to authenticate, not for encryption.
-
TLS CA Certificate Dir = <path>
-
Path of a TLS CA certificate directory.
-
TLS CA Certificate File = <path>
-
Path of a PEM encoded TLS CA certificate(s) file.
-
TLS Certificate = <path>
-
Path of a PEM encoded TLS certificate.
-
TLS Certificate Revocation List = <path>
-
Path of a Certificate Revocation List file.
-
TLS Cipher List = <string>
-
List of valid TLS Ciphers.
-
TLS DH File = <path>
-
Path to PEM encoded Diffie-Hellman parameter file. If this directive is specified, DH key exchange will
be used for the ephemeral keying, allowing for forward secrecy of communications.
-
TLS Enable = <yes|no>
- (default: no)
Enable TLS support.
Bareos can be configured to encrypt all its network traffic. See chapter TLS Configuration Directives
to see how the Bareos Director (and the other components) have to be configured to use TLS.
-
TLS Key = <path>
-
Path of a PEM encoded private key. It must correspond to the specified ”TLS Certificate”.
-
TLS Psk Enable = <yes|no>
- (default: yes)
Enable TLS-PSK support.
-
TLS Psk Require = <yes|no>
- (default: no)
Without setting this to yes, Bareos can fall back to use unencryption connections. Enabling this
implicitly sets ”TLS-PSK Enable = yes”.
-
TLS Require = <yes|no>
- (default: no)
Without setting this to yes, Bareos can fall back to use unencrypted connections. Enabling this
implicitly sets ”TLS Enable = yes”.
-
TLS Verify Peer = <yes|no>
- (default: no)
If disabled, all certificates signed by a known CA will be accepted. If enabled, the CN of a certificate
must the Address or in the ”TLS Allowed CN” list.
Thus multiple Directors may be authorized to use this Client’s services. Each Director will have a different name,
and normally a different password as well.
The following is an example of a valid Director resource definition:
#
# List Directors who are permitted to contact the File daemon
#
Director {
Name = HeadMan
Password = very_good # password HeadMan must supply
}
Director {
Name = Worker
Password = not_as_good
Monitor = Yes
}
#
Please see the Messages Resource Chapter of this manual for the details of the Messages Resource.
There must be at least one Message resource in the Client configuration file.
#
An example File Daemon configuration file might be the following:
#
# Default Bareos File Daemon Configuration file
#
# For Bareos release 12.4.4 (12 June 2013)
#
# There is not much to change here except perhaps the
# File daemon Name to
#
#
# List Directors who are permitted to contact this File daemon
#
Director {
Name = bareos-dir
Password = "aEODFz89JgUbWpuG6hP4OTuAoMvfM1PaJwO+ShXGqXsP"
}
#
# Restricted Director, used by tray-monitor to get the
# status of the file daemon
#
Director {
Name = client1-mon
Password = "8BoVwTju2TQlafdHFExRIJmUcHUMoIyIqPJjbvcSO61P"
Monitor = yes
}
#
# "Global" File daemon configuration specifications
#
FileDaemon { # this is me
Name = client1-fd
Maximum Concurrent Jobs = 20
# remove comment in next line to load plugins from specified directory
# Plugin Directory = /usr/lib64/bareos/plugins
}
# Send all messages except skipped files back to Director
Messages {
Name = Standard
director = client1-dir = all, !skipped, !restored
}
#
The Messages resource defines how messages are to be handled and destinations to which they should be
sent.
Even though each daemon has a full message handler, within the Bareos File Daemon and the Bareos Storage
Daemon, you will normally choose to send all the appropriate messages back to the Bareos Director. This permits
all the messages associated with a single Job to be combined in the Director and sent as a single email message to
the user, or logged together in a single file.
Each message that Bareos generates (i.e. that each daemon generates) has an associated type such as INFO,
WARNING, ERROR, FATAL, etc. Using the message resource, you can specify which message types you wish to see
and where they should be sent. In addition, a message may be sent to multiple destinations. For example, you may
want all error messages both logged as well as sent to you in an email. By defining multiple messages resources,
you can have different message handling for each type of Job (e.g. Full backups versus Incremental
backups).
In general, messages are attached to a Job and are included in the Job report. There are some rare cases, where this
is not possible, e.g. when no job is running, or if a communications error occurs between a daemon and the director.
In those cases, the message may remain in the system, and should be flushed at the end of the next
Job.
The records contained in a Messages resource consist of a destination specification followed by a list of
message-types in the format:
-
destination = message-type1, message-type2, message-type3, ...
or for those destinations that need and address specification (e.g. email):
-
destination = address = message-type1, message-type2, message-type3, ...
-
where
-
destination
- is one of a predefined set of keywords that define where the message is to be sent (Append
Dir
Messages, Console Dir
Messages, File Dir
Messages, Mail Dir
Messages, ...),
-
address
- varies according to the destination keyword, but is typically an email address or a filename,
-
message-type
- is one of a predefined set of keywords that define the type of message generated by
Bareos: ERROR, WARNING, FATAL, ...
|
|
|
|
configuration directive name | type of data | default value | remark
|
|
|
|
|
| Append | = [ address = ] message-type [ , message-type ]* | | |
| Catalog | = [ address = ] message-type [ , message-type ]* | | |
| Console | = [ address = ] message-type [ , message-type ]* | | |
| Description | = string | | |
| Director | = [ address = ] message-type [ , message-type ]* | | |
| File | = [ address = ] message-type [ , message-type ]* | | |
| Mail | = [ address = ] message-type [ , message-type ]* | | |
| Mail Command | = string | | |
| Mail On Error | = [ address = ] message-type [ , message-type ]* | | |
| Mail On Success | = [ address = ] message-type [ , message-type ]* | | |
| Name | = name | | |
| Operator | = [ address = ] message-type [ , message-type ]* | | |
| Operator Command | = string | | |
| Stderr | = [ address = ] message-type [ , message-type ]* | | |
| Stdout | = [ address = ] message-type [ , message-type ]* | | |
| Syslog | = [ address = ] message-type [ , message-type ]* | | |
| Timestamp Format | = string | | |
|
|
|
|
| |
| |
| |
| |
| | | | |
-
Append = <[ address = ] message-type [ , message-type ]* >
-
Append the message to the filename given in the address field. If the file already exists, it will be
appended to. If the file does not exist, it will be created.
-
Catalog = <[ address = ] message-type [ , message-type ]* >
-
Send the message to the Catalog database. The message will be written to the table named Log and
a timestamp field will also be added. This permits Job Reports and other messages to be recorded
in the Catalog so that they can be accessed by reporting software. Bareos will prune the Log records
associated with a Job when the Job records are pruned. Otherwise, Bareos never uses these records
internally, so this destination is only used for special purpose programs (e.g. frontend programs).
-
Console = <[ address = ] message-type [ , message-type ]* >
-
Send the message to the Bareos console. These messages are held until the console program connects
to the Director.
-
Description = <string>
-
-
Director = <[ address = ] message-type [ , message-type ]* >
-
Send the message to the Director whose name is given in the address field. Note, in the current
implementation, the Director Name is ignored, and the message is sent to the Director that started
the Job.
-
File = <[ address = ] message-type [ , message-type ]* >
-
Send the message to the filename given in the address field. If the file already exists, it will be
overwritten.
-
Mail = <[ address = ] message-type [ , message-type ]* >
-
Send the message to the email addresses that are given as a comma separated list in the address field.
Mail messages are grouped together during a job and then sent as a single email message when the
job terminates. The advantage of this destination is that you are notified about every Job that runs.
However, if you backup mutliple machines every night, the number of email messages can be annoying.
Some users use filter programs such as procmail to automatically file this email based on the Job
termination code (see Mail Command Dir
Messages).
-
Mail Command = <string>
-
In the absence of this resource, Bareos will send all mail using the following command:
/usr/lib/sendmail -F BAREOS <recipients>
In many cases, depending on your machine, this command may not work. However, by using the
Mail Command, you can specify exactly how to send the mail. During the processing of the command
part, normally specified as a quoted string, the following substitutions will be used:
- %% = %
- %c = Client’s name
- %d = Director’s name
- %e = Job Exit code (OK, Error, ...)
- %h = Client address
- %i = Job Id
- %j = Unique Job name
- %l = Job level
- %n = Job name
- %r = Recipients
- %s = Since time
- %t = Job type (e.g. Backup, ...)
- %v = Read Volume name (Only on director side)
- %V = Write Volume name (Only on director side)
Please note: any Mail Command directive must be specified in the Messages resource before the desired Mail
Dir
Messages, Mail On Success Dir
Messages or Mail On Error Dir
Messages directive. In fact, each of those directives may be
preceded by a different Mail Command.
A default installation will use the program bsmtp as Mail Command. The program bsmtp is provided by
Bareos and unifies the usage of a mail client to a certain degree:
The bsmtp program is provided as part of Bareos. For additional details, please see the bsmtp section. Please
test any Mail Command that you use to ensure that your smtp gateway accepts the addressing form that you
use. Certain programs such as Exim can be very selective as to what forms are permitted particularly in the
from part.
-
Mail On Error = <[ address = ] message-type [ , message-type ]* >
-
Send the message to the email addresses that are given as a comma separated list in the address field if the
Job terminates with an error condition. Mail On Error messages are grouped together during a job and then
sent as a single email message when the job terminates. This destination differs from the mail
destination in that if the Job terminates normally, the message is totally discarded (for this
destination). If the Job terminates in error, it is emailed. By using other destinations such as
append you can ensure that even if the Job terminates normally, the output information is saved.
-
Mail On Success = <[ address = ] message-type [ , message-type ]* >
-
Send the message to the email addresses that are given as a comma separated list in the address field if the
Job terminates normally (no error condition). Mail On Success messages are grouped together during a job
and then sent as a single email message when the job terminates. This destination differs from the mail
destination in that if the Job terminates abnormally, the message is totally discarded (for this destination). If
the Job terminates normally, it is emailed.
-
Name = <name>
-
The name of the Messages resource. The name you specify here will be used to tie this Messages resource to a
Job and/or to the daemon.
-
Operator = <[ address = ] message-type [ , message-type ]* >
-
Send the message to the email addresses that are specified as a comma separated list in the address field.
This is similar to mail above, except that each message is sent as received. Thus there is one email per
message. This is most useful for mount messages (see below).
-
Operator Command = <string>
-
This resource specification is similar to the Mail Command Dir
Messages except that it is used for Operator
messages. The substitutions performed for the Mail Command Dir
Messages are also done for this command.
Normally, you will set this command to the same value as specified for the Mail Command Dir
Messages. The
Operator Command directive must appear in the Messages resource before the Operator Dir
Messages directive.
-
Stderr = <[ address = ] message-type [ , message-type ]* >
-
Send the message to the standard error output (normally not used).
-
Stdout = <[ address = ] message-type [ , message-type ]* >
-
Send the message to the standard output (normally not used).
-
Syslog = <[ address = ] message-type [ , message-type ]* >
-
Send the message to the system log (syslog).
Since Version >= 14.4.0 the facility can be specified in the address field and the loglevel correspond to the
Bareos Message Types. The defaults are DAEMON and LOG_ERR.
Although the syslog destination is not used in the default Bareos config files, in certain cases where Bareos
encounters errors in trying to deliver a message, as a last resort, it will send it to the system syslog to
prevent loss of the message, so you might occassionally check the syslog for Bareos output.
-
Timestamp Format = <string>
-
#
For any destination, the message-type field is a comma separated list of the following types or classes of
messages:
-
info
-
General information messages.
-
warning
-
Warning messages. Generally this is some unusual condition but not expected to be serious.
-
error
-
Non-fatal error messages. The job continues running. Any error message should be investigated as it
means that something went wrong.
-
fatal
-
Fatal error messages. Fatal errors cause the job to terminate.
-
terminate
-
Message generated when the daemon shuts down.
-
notsaved
-
Files not saved because of some error. Usually because the file cannot be accessed (i.e. it does not
exist or is not mounted).
-
skipped
-
Files that were skipped because of a user supplied option such as an incremental backup or a file that
matches an exclusion pattern. This is not considered an error condition such as the files listed for the
notsaved type because the configuration file explicitly requests these types of files to be skipped. For
example, any unchanged file during an incremental backup, or any subdirectory if the no recursion
option is specified.
-
mount
-
Volume mount or intervention requests from the Storage daemon. These requests require a specific
operator intervention for the job to continue.
-
restored
-
The ls style listing generated for each file restored is sent to this message class.
-
all
-
All message types.
-
security
-
Security info/warning messages principally from unauthorized connection attempts.
-
alert
-
Alert messages. These are messages generated by tape alerts.
-
volmgmt
-
Volume management messages. Currently there are no volume management messages generated.
-
audit
-
Audit messages. Interacting with the Bareos Director will be audited. Can be configured with in
resource Auditing Dir
Director.
The following is an example of a valid Messages resource definition, where all messages except files explicitly skipped
or daemon termination messages are sent by email to backupoperator@example.com. In addition all mount messages
are sent to the operator (i.e. emailed to backupoperator@example.com). Finally all messages other than explicitly
skipped files and files saved are sent to the console:
Messages {
Name = Standard
Mail = backupoperator@example.com = all, !skipped, !terminate
Operator = backupoperator@example.com = mount
Console = all, !skipped, !saved
}
Configuration 12.1:
Message resource
With the exception of the email address, an example Director’s Messages resource is as follows:
Messages {
Name = Standard
Mail Command = "/usr/sbin/bsmtp -h mail.example.com -f \"\(Bareos\) %r\" -s \"Bareos: %t %e of %c %l\" %r"
Operator Command = "/usr/sbin/bsmtp -h mail.example.com -f \"\(Bareos\) %r\" -s \"Bareos: Intervention needed for %j\" %r"
Mail On Error = backupoperator@example.com = all, !skipped, !terminate
Append = "/var/log/bareos/bareos.log" = all, !skipped, !terminate
Operator = backupoperator@example.com = mount
Console = all, !skipped, !saved
}
Configuration 12.2:
Message resource
#
The Console configuration file is the simplest of all the configuration files, and in general, you should not need to
change it except for the password. It simply contains the information necessary to contact the Director or
Directors.
For a general discussion of the syntax of configuration files and their resources including the data types recognized
by Bareos, please see the Configuration chapter of this manual.
The following Console Resource definition must be defined:
#
The Director resource defines the attributes of the Director running on the network. You may have multiple Director
resource specifications in a single Console configuration file. If you have more than one, you will be prompted to
choose one when you start the Console program.
-
Address = <string>
-
Where the address is a host name, a fully qualified domain name, or a network address used to connect
to the Director.
-
Description = <string>
-
-
Dir Port = <positive-integer>
- (default: 9101)
This port must be identical to the Dir Port Dir
Director specified in the Director Configuration file.
-
Heartbeat Interval = <time>
- (default: 0)
-
Name = <name>
- (required)
The director name used to select among different Directors, otherwise, this name is not used.
-
Password = <Md5password>
- (required)
This password is used to authenticate when connecting to the Bareos Director as default console. It
must correspond to Password Dir
Director.
-
TLS Allowed CN = <string-list>
-
”Common Name”s (CNs) of the allowed peer certificates.
-
TLS Authenticate = <yes|no>
- (default: no)
Use TLS only to authenticate, not for encryption.
-
TLS CA Certificate Dir = <path>
-
Path of a TLS CA certificate directory.
-
TLS CA Certificate File = <path>
-
Path of a PEM encoded TLS CA certificate(s) file.
-
TLS Certificate = <path>
-
Path of a PEM encoded TLS certificate.
-
TLS Certificate Revocation List = <path>
-
Path of a Certificate Revocation List file.
-
TLS Cipher List = <string>
-
List of valid TLS Ciphers.
-
TLS DH File = <path>
-
Path to PEM encoded Diffie-Hellman parameter file. If this directive is specified, DH key exchange will
be used for the ephemeral keying, allowing for forward secrecy of communications.
-
TLS Enable = <yes|no>
- (default: no)
Enable TLS support.
Bareos can be configured to encrypt all its network traffic. See chapter TLS Configuration Directives
to see how the Bareos Director (and the other components) have to be configured to use TLS.
-
TLS Key = <path>
-
Path of a PEM encoded private key. It must correspond to the specified ”TLS Certificate”.
-
TLS Psk Enable = <yes|no>
- (default: yes)
Enable TLS-PSK support.
-
TLS Psk Require = <yes|no>
- (default: no)
Without setting this to yes, Bareos can fall back to use unencryption connections. Enabling this
implicitly sets ”TLS-PSK Enable = yes”.
-
TLS Require = <yes|no>
- (default: no)
Without setting this to yes, Bareos can fall back to use unencrypted connections. Enabling this
implicitly sets ”TLS Enable = yes”.
-
TLS Verify Peer = <yes|no>
- (default: no)
If disabled, all certificates signed by a known CA will be accepted. If enabled, the CN of a certificate
must the Address or in the ”TLS Allowed CN” list.
-
Use Pam Authentication = <yes|no>
- (default: no)
An actual example might be:
Director {
Name = HeadMan
address = rufus.cats.com
password = xyz1erploit
}
#
There are three different kinds of consoles, which the administrator or user can use to interact with the Director.
These three kinds of consoles comprise three different security levels.
- The first console type is an admin or anonymous or default console, which has full privileges. There
is no console resource necessary for this type since the password is specified in the Director resource.
Typically you would use this console only for administrators.
- The second type of console is a ”named” or ”restricted” console defined within a Console resource in
both the Director’s configuration file and in the Console’s configuration file. Both the names and the
passwords in these two entries must match much as is the case for Client programs.
This second type of console begins with absolutely no privileges except those explicitly specified in the
Director’s Console resource. Note, the definition of what these restricted consoles can do is determined
by the Director’s conf file.
Thus you may define within the Director’s conf file multiple Consoles with different names and
passwords, sort of like multiple users, each with different privileges. As a default, these consoles can
do absolutely nothing – no commands what so ever. You give them privileges or rather access to
commands and resources by specifying access control lists in the Director’s Console resource. This gives
the administrator fine grained control over what particular consoles (or users) can do.
- The third type of console is similar to the above mentioned restricted console in that it requires a
Console resource definition in both the Director and the Console. In addition, if the console name,
provided on the Name = directive, is the same as a Client name, the user of that console is permitted
to use the SetIP command to change the Address directive in the Director’s client resource to the IP
address of the Console. This permits portables or other machines using DHCP (non-fixed IP addresses)
to ”notify” the Director of their current IP address.
The Console resource is optional and need not be specified. However, if it is specified, you can use ACLs (Access
Control Lists) in the Director’s configuration file to restrict the particular console (or user) to see only information
pertaining to his jobs or client machine.
You may specify as many Console resources in the console’s conf file. If you do so, generally the first Console
resource will be used. However, if you have multiple Director resources (i.e. you want to connect to different
directors), you can bind one of your Console resources to a particular Director resource, and thus when you choose a
particular Director, the appropriate Console configuration resource will be used. See the ”Director” directive in the
Console resource described below for more information.
Note, the Console resource is optional, but can be useful for restricted consoles as noted above.
-
Description = <string>
-
-
Director = <string>
-
If this directive is specified, this Console resource will be used by bconsole when that particular director
is selected when first starting bconsole. I.e. it binds a particular console resource with its name and
password to a particular director.
-
Heartbeat Interval = <time>
- (default: 0)
This directive is optional and if specified will cause the Console to set a keepalive interval (heartbeat)
in seconds on each of the sockets to communicate with the Director. It is implemented only on systems
(Linux, ...) that provide the setsockopt TCP_KEEPIDLE function. If the value is set to 0 (zero), no
change is made to the socket.
-
History File = <path>
-
If this directive is specified and the console is compiled with readline support, it will use the given
filename as history file. If not specified, the history file will be named ~/.bconsole_history
-
History Length = <positive-integer>
- (default: 100)
If this directive is specified the history file will be truncated after HistoryLength entries.
-
Name = <name>
- (required)
The name of this resource.
The Console name used to allow a restricted console to change its IP address using the SetIP command.
The SetIP command must also be defined in the Director’s conf CommandACL list.
-
Password = <Md5password>
- (required)
If this password is supplied, then the password specified in the Director resource of you Console conf
will be ignored. See below for more details.
-
Rc File = <path>
-
-
TLS Allowed CN = <string-list>
-
”Common Name”s (CNs) of the allowed peer certificates.
-
TLS Authenticate = <yes|no>
- (default: no)
Use TLS only to authenticate, not for encryption.
-
TLS CA Certificate Dir = <path>
-
Path of a TLS CA certificate directory.
-
TLS CA Certificate File = <path>
-
Path of a PEM encoded TLS CA certificate(s) file.
-
TLS Certificate = <path>
-
Path of a PEM encoded TLS certificate.
-
TLS Certificate Revocation List = <path>
-
Path of a Certificate Revocation List file.
-
TLS Cipher List = <string>
-
List of valid TLS Ciphers.
-
TLS DH File = <path>
-
Path to PEM encoded Diffie-Hellman parameter file. If this directive is specified, DH key exchange will
be used for the ephemeral keying, allowing for forward secrecy of communications.
-
TLS Enable = <yes|no>
- (default: no)
Enable TLS support.
Bareos can be configured to encrypt all its network traffic. See chapter TLS Configuration Directives
to see how the Bareos Director (and the other components) have to be configured to use TLS.
-
TLS Key = <path>
-
Path of a PEM encoded private key. It must correspond to the specified ”TLS Certificate”.
-
TLS Psk Enable = <yes|no>
- (default: yes)
Enable TLS-PSK support.
-
TLS Psk Require = <yes|no>
- (default: no)
Without setting this to yes, Bareos can fall back to use unencryption connections. Enabling this
implicitly sets ”TLS-PSK Enable = yes”.
-
TLS Require = <yes|no>
- (default: no)
Without setting this to yes, Bareos can fall back to use unencrypted connections. Enabling this
implicitly sets ”TLS Enable = yes”.
-
TLS Verify Peer = <yes|no>
- (default: no)
If disabled, all certificates signed by a known CA will be accepted. If enabled, the CN of a certificate
must the Address or in the ”TLS Allowed CN” list.
#
A Console configuration file might look like this:
Director {
Name = "bareos.example.com-dir"
address = "bareos.example.com"
Password = "PASSWORD"
}
Configuration 13.1:
bconsole configuration
With this configuration, the console program (e.g. bconsole) will try to connect to a Bareos Director named
bareos.example.com-dir at the network address bareos.example.com and authenticate to the admin console
using the password PASSWORD.
#
The following configuration files were supplied by Phil Stracchino.
To use named consoles from bconsole, use a bconsole.conf configuration file like this:
Director {
Name = bareos-dir
Address = myserver
Password = "XXXXXXXXXXX"
}
Console {
Name = restricted-user
Password = "RUPASSWORD"
}
Configuration 13.2:
bconsole: restricted-user
Where the Password in the Director section is deliberately incorrect and the Console resource is given a name, in
this case restricted-user. Then in the Director configuration (not directly accessible by the user), we
define:
Console {
Name = restricted-user
Password = "RUPASSWORD"
JobACL = "Restricted Client Save"
ClientACL = restricted-client
StorageACL = main-storage
ScheduleACL = *all*
PoolACL = *all*
FileSetACL = "Restricted Client’s FileSet"
CatalogACL = MyCatalog
CommandACL = run
}
Resource 13.3:
bareos-dir.d/console/restricted-user.conf
The user login into the Director from his Console will get logged in as restricted-userDir
Console and he will only be
able to see or access a Job with the name Restricted Client Save, a Client with the name restricted-client, a
storage device main-storage, any Schedule or Pool, a FileSet named Restricted Client’s FileSet, a Catalog
named MyCatalog and the only command he can use in the Console is the run command. In other words, this user
is rather limited in what he can see and do with Bareos. For details how to configure ACLs, see the acl data type
description.
The following is an example of a bconsole.conf file that can access several Directors and has different Consoles
depending on the Director:
Director {
Name = bareos-dir
Address = myserver
Password = "XXXXXXXXXXX" # no, really. this is not obfuscation.
}
Director {
Name = SecondDirector
Address = secondserver
Password = "XXXXXXXXXXX" # no, really. this is not obfuscation.
}
Console {
Name = restricted-user
Password = "RUPASSWORD"
Director = MyDirector
}
Console {
Name = restricted-user2
Password = "OTHERPASSWORD"
Director = SecondDirector
}
Configuration 13.4:
bconsole: multiple consoles
The second Director referenced at secondserverDir
Director might look like the following:
Console {
Name = restricted-user2
Password = "OTHERPASSWORD"
JobACL = "Restricted Client Save"
ClientACL = restricted-client
StorageACL = second-storage
ScheduleACL = *all*
PoolACL = *all*
FileSetACL = "Restricted Client’s FileSet"
CatalogACL = RestrictedCatalog
CommandACL = run, restore
WhereACL = "/"
}
Resource 13.5:
bareos-dir.d/console/restricted-user2.conf
#
The Monitor configuration file is a stripped down version of the Director configuration file, mixed with a Console
configuration file. It simply contains the information necessary to contact Directors, Clients, and Storage daemons
you want to monitor.
For a general discussion of configuration file and resources including the data types recognized by Bareos, please see
the Configuration chapter of this manual.
The following Monitor Resource definition must be defined:
- Monitor – to define the Monitor’s name used to connect to all the daemons and the password used to
connect to the Directors. Note, you must not define more than one Monitor resource in the Monitor
configuration file.
- At least one Client, Storage or Director resource, to define the daemons to monitor.
#
The Monitor resource defines the attributes of the Monitor running on the network. The parameters you define here
must be configured as a Director resource in Clients and Storages configuration files, and as a Console resource in
Directors configuration files.
-
Description = <string>
-
-
Dir Connect Timeout = <time>
- (default: 10)
-
FD Connect Timeout = <time>
- (default: 10)
-
Name = <name>
- (required)
Specifies the Director name used to connect to Client and Storage, and the Console name used to
connect to Director. This record is required.
-
Password = <Md5password>
- (required)
Where the password is needed for Directors to accept the Console connection. This password must be
identical to the Password specified in the Console resource of the Director’s configuration file. This
record is required if you wish to monitor Directors.
-
Refresh Interval = <time>
- (default: 60)
Specifies the time to wait between status requests to each daemon. It can’t be set to less than 1 second
or more than 10 minutes.
-
SD Connect Timeout = <time>
- (default: 10)
-
TLS Allowed CN = <string-list>
-
”Common Name”s (CNs) of the allowed peer certificates.
-
TLS Authenticate = <yes|no>
- (default: no)
Use TLS only to authenticate, not for encryption.
-
TLS CA Certificate Dir = <path>
-
Path of a TLS CA certificate directory.
-
TLS CA Certificate File = <path>
-
Path of a PEM encoded TLS CA certificate(s) file.
-
TLS Certificate = <path>
-
Path of a PEM encoded TLS certificate.
-
TLS Certificate Revocation List = <path>
-
Path of a Certificate Revocation List file.
-
TLS Cipher List = <string>
-
List of valid TLS Ciphers.
-
TLS DH File = <path>
-
Path to PEM encoded Diffie-Hellman parameter file. If this directive is specified, DH key exchange will
be used for the ephemeral keying, allowing for forward secrecy of communications.
-
TLS Enable = <yes|no>
- (default: no)
Enable TLS support.
-
TLS Key = <path>
-
Path of a PEM encoded private key. It must correspond to the specified ”TLS Certificate”.
-
TLS Psk Enable = <yes|no>
- (default: yes)
Enable TLS-PSK support.
-
TLS Psk Require = <yes|no>
- (default: no)
Without setting this to yes, Bareos can fall back to use unencryption connections. Enabling this
implicitly sets ”TLS-PSK Enable = yes”.
-
TLS Require = <yes|no>
- (default: no)
Without setting this to yes, Bareos can fall back to use unencrypted connections. Enabling this
implicitly sets ”TLS Enable = yes”.
-
TLS Verify Peer = <yes|no>
- (default: no)
If disabled, all certificates signed by a known CA will be accepted. If enabled, the CN of a certificate
must the Address or in the ”TLS Allowed CN” list.
#
The Director resource defines the attributes of the Directors that are monitored by this Monitor.
As you are not permitted to define a Password in this resource, to avoid obtaining full Director privileges, you must
create a Console resource in the Director’s configuration file, using the Console Name and Password defined in the
Monitor resource. To avoid security problems, you should configure this Console resource to allow access to
no other daemons, and permit the use of only two commands: status and .status (see below for an
example).
You may have multiple Director resource specifications in a single Monitor configuration file.
-
Address = <string>
- (required)
Where the address is a host name, a fully qualified domain name, or a network address used to connect
to the Director. This record is required.
-
Description = <string>
-
-
Dir Port = <positive-integer>
- (default: 9101)
Specifies the port to use to connect to the Director. This port must be identical to the DIRport
specified in the Director resource of the Director Configuration file.
-
Name = <name>
- (required)
The Director name used to identify the Director in the list of monitored daemons. It is not required
to be the same as the one defined in the Director’s configuration file. This record is required.
-
TLS Allowed CN = <string-list>
-
”Common Name”s (CNs) of the allowed peer certificates.
-
TLS Authenticate = <yes|no>
- (default: no)
Use TLS only to authenticate, not for encryption.
-
TLS CA Certificate Dir = <path>
-
Path of a TLS CA certificate directory.
-
TLS CA Certificate File = <path>
-
Path of a PEM encoded TLS CA certificate(s) file.
-
TLS Certificate = <path>
-
Path of a PEM encoded TLS certificate.
-
TLS Certificate Revocation List = <path>
-
Path of a Certificate Revocation List file.
-
TLS Cipher List = <string>
-
List of valid TLS Ciphers.
-
TLS DH File = <path>
-
Path to PEM encoded Diffie-Hellman parameter file. If this directive is specified, DH key exchange will
be used for the ephemeral keying, allowing for forward secrecy of communications.
-
TLS Enable = <yes|no>
- (default: no)
Enable TLS support.
Bareos can be configured to encrypt all its network traffic. See chapter TLS Configuration Directives
to see how the Bareos Director (and the other components) have to be configured to use TLS.
-
TLS Key = <path>
-
Path of a PEM encoded private key. It must correspond to the specified ”TLS Certificate”.
-
TLS Psk Enable = <yes|no>
- (default: yes)
Enable TLS-PSK support.
-
TLS Psk Require = <yes|no>
- (default: no)
Without setting this to yes, Bareos can fall back to use unencryption connections. Enabling this
implicitly sets ”TLS-PSK Enable = yes”.
-
TLS Require = <yes|no>
- (default: no)
Without setting this to yes, Bareos can fall back to use unencrypted connections. Enabling this
implicitly sets ”TLS Enable = yes”.
-
TLS Verify Peer = <yes|no>
- (default: no)
If disabled, all certificates signed by a known CA will be accepted. If enabled, the CN of a certificate
must the Address or in the ”TLS Allowed CN” list.
#
The Client resource defines the attributes of the Clients that are monitored by this Monitor.
You must create a Director resource in the Client’s configuration file, using the Director Name defined in the
Monitor resource. To avoid security problems, you should set the Monitor directive to Yes in this Director
resource.
You may have multiple Director resource specifications in a single Monitor configuration file.
-
Address = <string>
- (required)
Where the address is a host name, a fully qualified domain name, or a network address in dotted quad
notation for a Bareos File daemon. This record is required.
-
Description = <string>
-
-
FD Port = <positive-integer>
- (default: 9102)
Where the port is a port number at which the Bareos File daemon can be contacted.
-
Name = <name>
- (required)
The Client name used to identify the Director in the list of monitored daemons. It is not required to
be the same as the one defined in the Client’s configuration file. This record is required.
-
Password = <Md5password>
- (required)
This is the password to be used when establishing a connection with the File services, so the Client
configuration file on the machine to be backed up must have the same password defined for this Director.
This record is required.
-
TLS Allowed CN = <string-list>
-
”Common Name”s (CNs) of the allowed peer certificates.
-
TLS Authenticate = <yes|no>
- (default: no)
Use TLS only to authenticate, not for encryption.
-
TLS CA Certificate Dir = <path>
-
Path of a TLS CA certificate directory.
-
TLS CA Certificate File = <path>
-
Path of a PEM encoded TLS CA certificate(s) file.
-
TLS Certificate = <path>
-
Path of a PEM encoded TLS certificate.
-
TLS Certificate Revocation List = <path>
-
Path of a Certificate Revocation List file.
-
TLS Cipher List = <string>
-
List of valid TLS Ciphers.
-
TLS DH File = <path>
-
Path to PEM encoded Diffie-Hellman parameter file. If this directive is specified, DH key exchange will
be used for the ephemeral keying, allowing for forward secrecy of communications.
-
TLS Enable = <yes|no>
- (default: no)
Enable TLS support.
-
TLS Key = <path>
-
Path of a PEM encoded private key. It must correspond to the specified ”TLS Certificate”.
-
TLS Psk Enable = <yes|no>
- (default: yes)
Enable TLS-PSK support.
-
TLS Psk Require = <yes|no>
- (default: no)
Without setting this to yes, Bareos can fall back to use unencryption connections. Enabling this
implicitly sets ”TLS-PSK Enable = yes”.
-
TLS Require = <yes|no>
- (default: no)
Without setting this to yes, Bareos can fall back to use unencrypted connections. Enabling this
implicitly sets ”TLS Enable = yes”.
-
TLS Verify Peer = <yes|no>
- (default: no)
If disabled, all certificates signed by a known CA will be accepted. If enabled, the CN of a certificate
must the Address or in the ”TLS Allowed CN” list.
#
The Storage resource defines the attributes of the Storages that are monitored by this Monitor.
You must create a Director resource in the Storage’s configuration file, using the Director Name defined in the
Monitor resource. To avoid security problems, you should set the Monitor directive to Yes in this Director
resource.
You may have multiple Director resource specifications in a single Monitor configuration file.
-
Address = <string>
- (required)
Where the address is a host name, a fully qualified domain name, or a network address in dotted quad
notation for a Bareos Storage daemon. This record is required.
-
Description = <string>
-
-
Name = <name>
- (required)
The Storage name used to identify the Director in the list of monitored daemons. It is not required to
be the same as the one defined in the Storage’s configuration file. This record is required.
-
Password = <Md5password>
- (required)
This is the password to be used when establishing a connection with the Storage services. This same
password also must appear in the Director resource of the Storage daemon’s configuration file. This
record is required.
-
SD Address = <string>
-
-
SD Password = <Md5password>
-
-
SD Port = <positive-integer>
- (default: 9103)
Where port is the port to use to contact the storage daemon for information and to start jobs. This
same port number must appear in the Storage resource of the Storage daemon’s configuration file.
-
TLS Allowed CN = <string-list>
-
”Common Name”s (CNs) of the allowed peer certificates.
-
TLS Authenticate = <yes|no>
- (default: no)
Use TLS only to authenticate, not for encryption.
-
TLS CA Certificate Dir = <path>
-
Path of a TLS CA certificate directory.
-
TLS CA Certificate File = <path>
-
Path of a PEM encoded TLS CA certificate(s) file.
-
TLS Certificate = <path>
-
Path of a PEM encoded TLS certificate.
-
TLS Certificate Revocation List = <path>
-
Path of a Certificate Revocation List file.
-
TLS Cipher List = <string>
-
List of valid TLS Ciphers.
-
TLS DH File = <path>
-
Path to PEM encoded Diffie-Hellman parameter file. If this directive is specified, DH key exchange will
be used for the ephemeral keying, allowing for forward secrecy of communications.
-
TLS Enable = <yes|no>
- (default: no)
Enable TLS support.
-
TLS Key = <path>
-
Path of a PEM encoded private key. It must correspond to the specified ”TLS Certificate”.
-
TLS Psk Enable = <yes|no>
- (default: yes)
Enable TLS-PSK support.
-
TLS Psk Require = <yes|no>
- (default: no)
Without setting this to yes, Bareos can fall back to use unencryption connections. Enabling this
implicitly sets ”TLS-PSK Enable = yes”.
-
TLS Require = <yes|no>
- (default: no)
Without setting this to yes, Bareos can fall back to use unencrypted connections. Enabling this
implicitly sets ”TLS Enable = yes”.
-
TLS Verify Peer = <yes|no>
- (default: no)
If disabled, all certificates signed by a known CA will be accepted. If enabled, the CN of a certificate
must the Address or in the ”TLS Allowed CN” list.
#
There is no security problem in relaxing the permissions on tray-monitor.conf as long as FD, SD and DIR are
configured properly, so the passwords contained in this file only gives access to the status of the daemons. It could
be a security problem if you consider the status information as potentially dangerous (most people consider this as
not being dangerous).
Concerning Director’s configuration:
In tray-monitor.conf, the password in the Monitor resource must point to a restricted console in bareos-dir.conf (see
the documentation). So, if you use this password with bconsole, you’ll only have access to the status of the director
(commands status and .status). It could be a security problem if there is a bug in the ACL code of the
director.
Concerning File and Storage Daemons’ configuration:
In tray-monitor.conf, the Name in the Monitor resource must point to a Director resource in bareos-fd/sd.conf, with
the Monitor directive set to Yes (see the documentation). It could be a security problem if there is a bug in
the code which check if a command is valid for a Monitor (this is very unlikely as the code is pretty
simple).
An example Tray Monitor configuration file might be the following:
#
# Bareos Tray Monitor Configuration File
#
Monitor {
Name = rufus-mon # password for Directors
Password = "GN0uRo7PTUmlMbqrJ2Gr1p0fk0HQJTxwnFyE4WSST3MWZseR"
RefreshInterval = 10 seconds
}
Client {
Name = rufus-fd
Address = rufus
FDPort = 9102 # password for FileDaemon
Password = "FYpq4yyI1y562EMS35bA0J0QC0M2L3t5cZObxT3XQxgxppTn"
}
Storage {
Name = rufus-sd
Address = rufus
SDPort = 9103 # password for StorageDaemon
Password = "9usxgc307dMbe7jbD16v0PXlhD64UVasIDD0DH2WAujcDsc6"
}
Director {
Name = rufus-dir
DIRport = 9101
address = rufus
}
Configuration 14.1:
Example tray-monitor.conf
#
# Restricted Director, used by tray-monitor to get the
# status of the file daemon
#
Director {
Name = rufus-mon
Password = "FYpq4yyI1y562EMS35bA0J0QC0M2L3t5cZObxT3XQxgxppTn"
Monitor = yes
}
Configuration 14.2:
Example Monitor resource
A full example can be found at Example Client Configuration File.
#
# Restricted Director, used by tray-monitor to get the
# status of the storage daemon
#
Director {
Name = rufus-mon
Password = "9usxgc307dMbe7jbD16v0PXlhD64UVasIDD0DH2WAujcDsc6"
Monitor = yes
}
Configuration 14.3:
Example Monitor resource
A full example can be found at Example Storage Daemon Configuration File.
#
# Restricted console used by tray-monitor to get the status of the director
#
Console {
Name = Monitor
Password = "GN0uRo7PTUmlMbqrJ2Gr1p0fk0HQJTxwnFyE4WSST3MWZseR"
CommandACL = status, .status
}
Configuration 14.4:
Example Monitor resource
A full example can be found at Example Director Configuration File.
#
The Bareos Console (bconsole) is a program that allows the user or the System Administrator, to interact with
the Bareos Director daemon while the daemon is running.
The current Bareos Console comes as a shell interface (TTY style). It permit the administrator or authorized users
to interact with Bareos. You can determine the status of a particular job, examine the contents of the Catalog as
well as perform certain tape manipulations with the Console program.
Since the Console program interacts with the Director through the network, your Console and Director programs do
not necessarily need to run on the same machine.
In fact, a certain minimal knowledge of the Console program is needed in order for Bareos to be able to write on
more than one tape, because when Bareos requests a new tape, it waits until the user, via the Console program,
indicates that the new tape is mounted.
#
When the Console starts, it reads a standard Bareos configuration file named bconsole.conf unless you specify the
-c command line option (see below). This file allows default configuration of the Console, and at the current time,
the only Resource Record defined is the Director resource, which gives the Console the name and address of the
Director. For more information on configuration of the Console program, please see the Console Configuration
chapter of this document.
#
The console program can be run with the following options:
root@linux:~# bconsole -?
Usage: bconsole [-s] [-c config_file] [-d debug_level]
-D <dir> select a Director
-l list Directors defined
-c <file> set configuration file to file
-d <nn> set debug level to <nn>
-dt print timestamp in debug output
-n no conio
-s no signals
-u <nn> set command execution timeout to <nn> seconds
-t test - read configuration and exit
-? print this message.
Command 1: bconsole command line options
After launching the Console program (bconsole), it will prompt you for the next command with an asterisk (*).
Generally, for all commands, you can simply enter the command name and the Console program will prompt you for
the necessary arguments. Alternatively, in most cases, you may enter the command followed by arguments. The
general format is:
<command> <keyword1>[=<argument1>] <keyword2>[=<argument2>] ...
where command is one of the commands listed below; keyword is one of the keywords listed below (usually
followed by an argument); and argument is the value. The command may be abbreviated to the shortest unique
form. If two commands have the same starting letters, the one that will be selected is the one that appears first in
the help listing. If you want the second command, simply spell out the full command. None of the keywords
following the command may be abbreviated.
For example:
list files jobid=23
will list all files saved for JobId 23. Or:
show pools
will display all the Pool resource records.
The maximum command line length is limited to 511 characters, so if you are scripting the console, you may need to
take some care to limit the line length.
#
Normally, you simply enter quit or exit and the Console program will terminate. However, it waits until the
Director acknowledges the command. If the Director is already doing a lengthy command (e.g. prune), it
may take some time. If you want to immediately terminate the Console program, enter the .quit
command.
There is currently no way to interrupt a Console command once issued (i.e. Ctrl-C does not work). However, if you
are at a prompt that is asking you to select one of several possibilities and you would like to abort the command,
you can enter a period (.), and in most cases, you will either be returned to the main command prompt or if
appropriate the previous prompt (in the case of nested prompts). In a few places such as where it is asking for a
Volume name, the period will be taken to be the Volume name. In that case, you will most likely be able to cancel
at the next prompt.
#
You can automate many Console tasks by running the console program from a shell script. For example, if you have
created a file containing the following commands:
bconsole -c ./bconsole.conf <<END_OF_DATA
unmount storage=DDS-4
quit
END_OF_DATA
when that file is executed, it will unmount the current DDS-4 storage device. You might want to run this command
during a Job by using the RunBeforeJob or RunAfterJob records.
It is also possible to run the Console program from file input where the file contains the commands as
follows:
bconsole -c ./bconsole.conf <filename
where the file named filename contains any set of console commands.
As a real example, the following script is part of the Bareos regression tests. It labels a volume (a disk volume), runs
a backup, then does a restore of the files saved.
bconsole <<END_OF_DATA
@output /dev/null
messages
@output /tmp/log1.out
label volume=TestVolume001
run job=Client1 yes
wait
messages
@#
@# now do a restore
@#
@output /tmp/log2.out
restore current all
yes
wait
messages
@output
quit
END_OF_DATA
The output from the backup is directed to /tmp/log1.out and the output from the restore is directed
to /tmp/log2.out. To ensure that the backup and restore ran correctly, the output files are checked
with:
grep "^ *Termination: *Backup OK" /tmp/log1.out
backupstat=$?
grep "^ *Termination: *Restore OK" /tmp/log2.out
restorestat=$?
#
Unless otherwise specified, each of the following keywords takes an argument, which is specified after the keyword
following an equal sign. For example:
jobid=536
-
all
- Permitted on the status and show commands to specify all components or resources respectively.
-
allfrompool
- Permitted on the update command to specify that all Volumes in the pool (specified on the
command line) should be updated.
-
allfrompools
- Permitted on the update command to specify that all Volumes in all pools should be updated.
-
before
- Used in the restore command.
-
bootstrap
- Used in the restore command.
-
catalog
- Allowed in the use command to specify the catalog name to be used.
-
catalogs
- Used in the show command. Takes no arguments.
-
client | fd
-
-
clients
- Used in the show, list, and llist commands. Takes no arguments.
-
counters
- Used in the show command. Takes no arguments.
-
current
- Used in the restore command. Takes no argument.
-
days
- Used to define the number of days the list nextvol command should consider when looking for jobs
to be run. The days keyword can also be used on the status dir command so that it will display jobs
scheduled for the number of days you want. It can also be used on the rerun command, where it will
automatically select all failed jobids in the last number of days for rerunning.
-
devices
- Used in the show command. Takes no arguments.
-
director | dir
-
-
directors
- Used in the show command. Takes no arguments.
-
directory
- Used in the restore command. Its argument specifies the directory to be restored.
-
enabled
- This keyword can appear on the update volume as well as the update slots commands, and can
allows one of the following arguments: yes, true, no, false, archived, 0, 1, 2. Where 0 corresponds to
no or false, 1 corresponds to yes or true, and 2 corresponds to archived. Archived volumes will not be
used, nor will the Media record in the catalog be pruned. Volumes that are not enabled, will not be
used for backup or restore.
-
done
- Used in the restore command. Takes no argument.
-
file
- Used in the restore command.
-
files
- Used in the list and llist commands. Takes no arguments.
-
fileset
-
-
filesets
- Used in the show command. Takes no arguments.
-
help
- Used in the show command. Takes no arguments.
-
hours
- Used on the rerun command to select all failed jobids in the last number of hours for rerunning.
-
jobs
- Used in the show, list and llist commands. Takes no arguments.
-
jobmedia
- Used in the list and llist commands. Takes no arguments.
-
jobtotals
- Used in the list and llist commands. Takes no arguments.
-
jobid
- The JobId is the numeric jobid that is printed in the Job Report output. It is the index of the database
record for the given job. While it is unique for all the existing Job records in the catalog database,
the same JobId can be reused once a Job is removed from the catalog. Probably you will refer specific
Jobs that ran using their numeric JobId.
JobId can be used on the rerun command to select all jobs failed after and including the given jobid
for rerunning.
-
job | jobname
- The Job or Jobname keyword refers to the name you specified in the Job resource, and
hence it refers to any number of Jobs that ran. It is typically useful if you want to list all jobs of a
particular name.
-
level
-
-
listing
- Permitted on the estimate command. Takes no argument.
-
limit
-
-
messages
- Used in the show command. Takes no arguments.
-
media
- Used in the list and llist commands. Takes no arguments.
-
nextvolume | nextvol
- Used in the list and llist commands. Takes no arguments.
-
on
- Takes no keyword.
-
off
- Takes no keyword.
-
pool
-
-
pools
- Used in the show, list, and llist commands. Takes no arguments.
-
select
- Used in the restore command. Takes no argument.
-
limit
- Used in the setbandwidth command. Takes integer in KB/s unit.
-
schedules
- Used in the show command. Takes no arguments.
-
storage | store | sd
-
-
storages
- Used in the show command. Takes no arguments.
-
ujobid
- The ujobid is a unique job identification that is printed in the Job Report output. At the current
time, it consists of the Job name (from the Name directive for the job) appended with the date and
time the job was run. This keyword is useful if you want to completely identify the Job instance run.
-
volume
-
-
volumes
- Used in the list and llist commands. Takes no arguments.
-
where
- Used in the restore command.
-
yes
- Used in the restore command. Takes no argument.
#
The following commands are currently implemented:
-
add
- This command is used to add Volumes to an existing Pool. That is, it creates the Volume name in the
catalog and inserts into the Pool in the catalog, but does not attempt to access the physical Volume.
Once added, Bareos expects that Volume to exist and to be labeled. This command is not normally
used since Bareos will automatically do the equivalent when Volumes are labeled. However, there may
be times when you have removed a Volume from the catalog and want to later add it back.
The full form of this command is:
add [pool=<pool-name>] [storage=<storage>] [jobid=<JobId>]
bconsole 15.1:
add
Normally, the label command is used rather than this command because the label command labels the
physical media (tape, disk,, ...) and does the equivalent of the add command. The add command affects only
the Catalog and not the physical media (data on Volumes). The physical media must exist and be labeled
before use (usually with the label command). This command can, however, be useful if you wish to add a
number of Volumes to the Pool that will be physically labeled at a later time. It can also be useful if you are
importing a tape from another site. Please see the label command for the list of legal characters in a Volume
name.
-
autodisplay
- This command accepts on or off as an argument, and turns auto-display of messages on or off
respectively. The default for the console program is off, which means that you will be notified when there are
console messages pending, but they will not automatically be displayed.
When autodisplay is turned off, you must explicitly retrieve the messages with the messages
command. When autodisplay is turned on, the messages will be displayed on the console as they are
received.
-
automount
- This command accepts on or off as the argument, and turns auto-mounting of the Volume after a
label command on or off respectively. The default is on. If automount is turned off, you must explicitly
mount tape Volumes after a label command to use it.
-
cancel
- This command is used to cancel a job and accepts jobid=nnn or job=xxx as an argument where nnn is
replaced by the JobId and xxx is replaced by the job name. If you do not specify a keyword, the
Console program will prompt you with the names of all the active jobs allowing you to choose
one.
The full form of this command is:
cancel [jobid=<number> job=<job-name> ujobid=<unique-jobid>]
bconsole 15.2:
cancel
Once a Job is marked to be cancelled, it may take a bit of time (generally within a minute but up to two
hours) before the Job actually terminates, depending on what operations it is doing. Don’t be surprised that
you receive a Job not found message. That just means that one of the three daemons had already canceled the
job. Messages numbered in the 1000’s are from the Director, 2000’s are from the File daemon and 3000’s from
the Storage daemon.
It is possible to cancel multiple jobs at once. Therefore, the following extra options are available for the
job-selection:
- all jobs
- all jobs with a created state
- all jobs with a blocked state
- all jobs with a waiting state
- all jobs with a running state
Usage:
cancel all
cancel all state=<created|blocked|waiting|running>
bconsole 15.3:
cancel all
Sometimes the Director already removed the job from its running queue, but the storage daemon still
thinks it is doing a backup (or another job) - so you cannot cancel the job from within a console
anymore. Therefore it is possible to cancel a job by JobId on the storage daemon. It might be
helpful to execute a status storage on the Storage Daemon to make sure what job you want to
cancel.
Usage:
cancel storage=<Storage Daemon> Jobid=<JobId>
bconsole 15.4:
cancel on Storage Daemon
This way you can also remove a job that blocks any other jobs from running without the need to restart the
whole storage daemon.
-
create
- This command is not normally used as the Pool records are automatically created by the
Director when it starts based on what it finds in the configuration. If needed, this command
can be used, to create a Pool record in the database using the Pool resource record defined in
the Director’s configuration file. So in a sense, this command simply transfers the information
from the Pool resource in the configuration file into the Catalog. Normally this command is
done automatically for you when the Director starts providing the Pool is referenced within a
Job resource. If you use this command on an existing Pool, it will automatically update the
Catalog to have the same information as the Pool resource. After creating a Pool, you will most
likely use the label command to label one or more volumes and add their names to the Media
database.
The full form of this command is:
create [pool=<pool-name>]
bconsole 15.5:
create
When starting a Job, if Bareos determines that there is no Pool record in the database, but there is a Pool
resource of the appropriate name, it will create it for you. If you want the Pool record to appear in the
database immediately, simply use this command to force it to be created.
-
configure
-
Configures director resources during runtime. The first configure subcommands are configure add and
configure export. Other subcommands may follow in later releases.
-
configure add
-
This command allows to add resources during runtime. Usage:
configure add <resourcetype> name=<resourcename> <directive1>=<value1> <directive2>=<value2> ...
bconsole 15.6:
configure add usage
Values that must be quoted in the resulting configuration must be added as:
configure add <resourcetype> name=<resourcename> <directive1>="\"<value containing spaces>\"" ...
bconsole 15.7:
configure add usage with values containing spaces
The command generates and loads a new valid resource. As the new resource is also stored
at
<CONFIGDIR>/bareos-dir.d/<resourcetype>/<resourcename>.conf
(see Resource file conventions) it is persistent upon reload and restart.
This feature requires Subdirectory Configuration Scheme.
All kinds of resources can be added. When adding a client resource, the Director Resource for the Bareos
File Daemon is also created and stored at:
<CONFIGDIR>/bareos-dir-export/client/<clientname>/bareos-fd.d/director/<clientname>.conf
*configure add client name=client2-fd address=192.168.0.2 password=secret
Created resource config file "/etc/bareos/bareos-dir.d/client/client2-fd.conf":
Client {
Name = client2-fd
Address = 192.168.0.2
Password = secret
}
*configure add job name=client2-job client=client2-fd jobdefs=DefaultJob
Created resource config file "/etc/bareos/bareos-dir.d/job/client2-job.conf":
Job {
Name = client2-job
Client = client2-fd
JobDefs = DefaultJob
}
bconsole 15.8:
Example: adding a client and a job resource during runtime
These two commands create three resource configuration files:
- /etc/bareos/bareos-dir.d/client/client2-fd.conf
- /etc/bareos/bareos-dir-export/client/
client2-fd/bareos-fd.d/director/bareos-dir.conf (assuming your director resource is
named bareos-dir)
- /etc/bareos/bareos-dir.d/job/client2-job.conf
The files in bareos-dir-export/client/ directory are not used by the Bareos Director. However, they
can be copied to new clients to configure these clients for the Bareos Director.
Please note! Don’t be confused by the extensive output of help configure. As configure add allows
configuring arbitrary resources, the output of help configure lists all the resources, each with all valid
directives. The same data is also used for bconsole command line completion.
Available since Bareos Version >= 16.2.4.
-
configure export
-
This command allows to export the DirectorFd resource for clients already configured in the Bareos
Director.
Usage:
configure export client=bareos-fd
Exported resource file "/etc/bareos/bareos-dir-export/client/bareos-fd/bareos-fd.d/director/bareos-dir.conf":
Director {
Name = bareos-dir
Password = "[md5]932d1d3ef3c298047809119510f4bee6"
}
bconsole 15.9:
Export the bareos-fd Director resource for the client bareos-fd
To use it, copy the DirectorFd resource file to the client machine (on Linux: to
/etc/bareos/bareos-fd.d/director/) and restart the Bareos File Daemon.
Available since Bareos Version >= 16.2.4.
-
delete
- The delete command is used to delete a Volume, Pool or Job record from the Catalog as well as
all associated catalog Volume records that were created. This command operates only on the
Catalog database and has no effect on the actual data written to a Volume. This command can be
dangerous and we strongly recommend that you do not use it unless you know what you are
doing.
If the keyword Volume appears on the command line, the named Volume will be deleted from the catalog, if
the keyword Pool appears on the command line, a Pool will be deleted, and if the keyword Job appears on
the command line, a Job and all its associated records (File and JobMedia) will be deleted from the
catalog.
The full form of this command is:
delete pool=<pool-name>
delete volume=<volume-name> pool=<pool-name>
delete JobId=<job-id> JobId=<job-id2> ...
delete Job JobId=n,m,o-r,t ...
bconsole 15.10:
delete
The first form deletes a Pool record from the catalog database. The second form deletes a Volume record from
the specified pool in the catalog database. The third form deletes the specified Job record from the catalog
database. The last form deletes JobId records for JobIds n, m, o, p, q, r, and t. Where each
one of the n,m,... is, of course, a number. That is a ”delete jobid” accepts lists and ranges of
jobids.
-
disable
- This command permits you to disable a Job for automatic scheduling. The job may have been previously
enabled with the Job resource Enabled directive or using the console enable command. The next time the
Director is reloaded or restarted, the Enable/Disable state will be set to the value in the Job resource (default
enabled) as defined in the Bareos Director configuration.
The full form of this command is:
disable job=<job-name>
bconsole 15.11:
disable
-
enable
- This command permits you to enable a Job for automatic scheduling. The job may have been previously
disabled with the Job resource Enabled directive or using the console disable command. The next time the
Director is reloaded or restarted, the Enable/Disable state will be set to the value in the Job resource (default
enabled) as defined in the Bareos Director configuration.
The full form of this command is:
enable job=<job-name>
bconsole 15.12:
enable
-
estimate
- Using this command, you can get an idea how many files will be backed up, or if you are
unsure about your Include statements in your FileSet, you can test them without doing an actual
backup. The default is to assume a Full backup. However, you can override this by specifying a
level=Incremental or level=Differential on the command line. A Job name must be specified or you will
be prompted for one, and optionally a Client and FileSet may be specified on the command line. It then
contacts the client which computes the number of files and bytes that would be backed up. Please
note that this is an estimate calculated from the number of blocks in the file rather than by
reading the actual bytes. As such, the estimated backup size will generally be larger than an actual
backup.
The estimate command can use the accurate code to detect changes and give a better estimation. You can set
the accurate behavior on command line using accurate=yes/no or use the Job setting as default
value.
Optionally you may specify the keyword listing in which case, all the files to be backed up will be
listed. Note, it could take quite some time to display them if the backup is large. The full form
is:
The full form of this command is:
estimate job=<job-name> listing client=<client-name> accurate=<yes|no> fileset=<fileset-name> level=<level-name>
bconsole 15.13:
estimate
Specification of the job is sufficient, but you can also override the client, fileset, accurate and/or level by
specifying them on the estimate command line.
As an example, you might do:
@output /tmp/listing
estimate job=NightlySave listing level=Incremental
@output
bconsole 15.14:
estimate: redirected output
which will do a full listing of all files to be backed up for the Job NightlySave during an Incremental save
and put it in the file /tmp/listing. Note, the byte estimate provided by this command is based on the file size
contained in the directory item. This can give wildly incorrect estimates of the actual storage used if there are
sparse files on your systems. Sparse files are often found on 64 bit systems for certain system files. The size
that is returned is the size Bareos will backup if the sparse option is not specified in the FileSet. There is
currently no way to get an estimate of the real file size that would be found should the sparse option be
enabled.
-
exit
- This command terminates the console program.
-
export
- The export command is used to export tapes from an autochanger. Most Automatic Tapechangers offer
special slots for importing new tape cartridges or exporting written tape cartridges. This can happen without
having to set the device offline.
The full form of this command is:
export storage=<storage-name> srcslots=<slot-selection> [dstslots=<slot-selection> volume=<volume-name> scan]
bconsole 15.15:
export
The export command does exactly the opposite of the import command. You can specify which slots should be
transferred to import/export slots. The most useful application of the export command is the possibility to
automatically transfer the volumes of a certain backup into the import/export slots for external
storage.
To be able to to this, the export command also accepts a list of volume names to be exported.
Example:
export volume=A00020L4|A00007L4|A00005L4
bconsole 15.16:
export volume
Instead of exporting volumes by names you can also select a number of slots via the srcslots keyword and
export those to the slots you specify in dstslots. The export command will check if the slots have content (e.g.
otherwise there is not much to export) and if there are enough export slots and if those are really
import/export slots.
Example:
export srcslots=1-2 dstslots=37-38
bconsole 15.17:
export slots
To automatically export the Volumes used by a certain backup job, you can use the following RunScript in
that job:
RunScript {
Console = "export storage=TandbergT40 volume=%V"
RunsWhen = After
RunsOnClient = no
}
bconsole 15.18:
automatic export
To send an e-mail notification via the Messages resource regarding export tapes you can use the Variable %V
substitution in the Messages resource, which is implemented in Bareos 13.2. However, it does also work in
earlier releases inside the job resources. So in versions prior to Bareos 13.2 the following workaround can be
used:
RunAfterJob = "/bin/bash -c \"/bin/echo Remove Tape %V | \
/usr/sbin/bsmtp -h localhost -f root@localhost -s ’Remove Tape %V’ root@localhost \""
bconsole 15.19:
e-mail notification via messages resource regarding export tapes
-
gui
- Invoke the non-interactive gui mode. This command is only used when bconsole is commanded by an external
program.
-
help
- This command displays the list of commands available.
-
import
- The import command is used to import tapes into an autochanger. Most Automatic Tapechangers offer
special slots for importing new tape cartridges or exporting written tape cartridges. This can happen without
having to set the device offline.
The full form of this command is:
import storage=<storage-name> [srcslots=<slot-selection> dstslots=<slot-selection> volume=<volume-name> scan]
bconsole 15.20:
import
To import new tapes into the autochanger, you only have to load the new tapes into the import/export slots
and call import from the cmdline.
The import command will automatically transfer the new tapes into free slots of the autochanger. The slots
are filled in order of the slot numbers. To import all tapes, there have to be enough free slots to load all
tapes.
Example with a Library with 36 Slots and 3 Import/Export Slots:
*import storage=TandbergT40
Connecting to Storage daemon TandbergT40 at bareos:9103 ...
3306 Issuing autochanger "slots" command.
Device "Drive-1" has 39 slots.
Connecting to Storage daemon TandbergT40 at bareos:9103 ...
3306 Issuing autochanger "listall" command.
Connecting to Storage daemon TandbergT40 at bareos:9103 ...
3306 Issuing autochanger transfer command.
3308 Successfully transfered volume from slot 37 to 20.
Connecting to Storage daemon TandbergT40 at bareos:9103 ...
3306 Issuing autochanger transfer command.
3308 Successfully transfered volume from slot 38 to 21.
Connecting to Storage daemon TandbergT40 at bareos:9103 ...
3306 Issuing autochanger transfer command.
3308 Successfully transfered volume from slot 39 to 25.
bconsole 15.21:
import example
You can also import certain slots when you don’t have enough free slots in your autochanger to put all the
import/export slots in.
Example with a Library with 36 Slots and 3 Import/Export Slots importing one slot:
*import storage=TandbergT40 srcslots=37 dstslots=20
Connecting to Storage daemon TandbergT40 at bareos:9103 ...
3306 Issuing autochanger "slots" command.
Device "Drive-1" has 39 slots.
Connecting to Storage daemon TandbergT40 at bareos:9103 ...
3306 Issuing autochanger "listall" command.
Connecting to Storage daemon TandbergT40 at bareos:9103 ...
3306 Issuing autochanger transfer command.
3308 Successfully transfered volume from slot 37 to 20.
bconsole 15.22:
import example
-
label
- This command is used to label physical volumes. The full form of this command is:
label storage=<storage-name> volume=<volume-name> slot=<slot>
bconsole 15.23:
label
If you leave out any part, you will be prompted for it. The media type is automatically taken from the Storage
resource definition that you supply. Once the necessary information is obtained, the Console
program contacts the specified Storage daemon and requests that the Volume be labeled. If the
Volume labeling is successful, the Console program will create a Volume record in the appropriate
Pool.
The Volume name is restricted to letters, numbers, and the special characters hyphen (-), underscore (_),
colon (:), and period (.). All other characters including a space are invalid. This restriction is to ensure good
readability of Volume names to reduce operator errors.
Please note, when labeling a blank tape, Bareos will get read I/O error when it attempts to ensure that the
tape is not already labeled. If you wish to avoid getting these messages, please write an EOF mark on your
tape before attempting to label it:
mt rewind
mt weof
The label command can fail for a number of reasons:
- The Volume name you specify is already in the Volume database.
- The Storage daemon has a tape or other Volume already mounted on the device, in which case
you must unmount the device, insert a blank tape, then do the label command.
- The Volume in the device is already a Bareos labeled Volume. (Bareos will never relabel a Bareos
labeled Volume unless it is recycled and you use the relabel command).
- There is no Volume in the drive.
There are two ways to relabel a volume that already has a Bareos label. The brute force method
is to write an end of file mark on the tape using the system mt program, something like the
following:
mt -f /dev/st0 rewind
mt -f /dev/st0 weof
For a disk volume, you would manually delete the Volume.
Then you use the label command to add a new label. However, this could leave traces of the old volume in the
catalog.
The preferable method to relabel a Volume is to first purge the volume, either automatically, or explicitly with
the purge command, then use the relabel command described below.
If your autochanger has barcode labels, you can label all the Volumes in your autochanger one after another
by using the label barcodes command. For each tape in the changer containing a barcode, Bareos will mount
the tape and then label it with the same name as the barcode. An appropriate Media record will also be
created in the catalog. Any barcode that begins with the same characters as specified on the
”CleaningPrefix=xxx” (default is ”CLN”) directive in the Director’s Pool resource, will be treated as a
cleaning tape, and will not be labeled. However, an entry for the cleaning tape will be created in the catalog.
For example with:
Pool {
Name ...
Cleaning Prefix = "CLN"
}
Configuration 15.24:
Cleaning Tape
Any slot containing a barcode of CLNxxxx will be treated as a cleaning tape and will not be mounted. Note,
the full form of the command is:
label storage=xxx pool=yyy slots=1-5,10 barcodes
bconsole 15.25:
label
-
list
- The list command lists the requested contents of the Catalog. The various fields of each record are listed on a
single line. The various forms of the list command are:
list jobs
list jobid=<id> (list jobid id)
list ujobid=<unique job name> (list job with unique name)
list job=<job-name> (list all jobs with "job-name")
list jobname=<job-name> (same as above)
In the above, you can add "limit=nn" to limit the output to nn jobs.
list joblog jobid=<id> (list job output if recorded in the catalog)
list jobmedia
list jobmedia jobid=<id>
list jobmedia job=<job-name>
list files jobid=<id>
list files job=<job-name>
list pools
list clients
list jobtotals
list volumes
list volumes jobid=<id>
list volumes pool=<pool-name>
list volumes job=<job-name>
list volume=<volume-name>
list nextvolume job=<job-name>
list nextvol job=<job-name>
list nextvol job=<job-name> days=nnn
bconsole 15.26:
list
What most of the above commands do should be more or less obvious. In general if you do not specify all the
command line arguments, the command will prompt you for what is needed.
The list nextvol command will print the Volume name to be used by the specified job. You should be
aware that exactly what Volume will be used depends on a lot of factors including the time and
what a prior job will do. It may fill a tape that is not full when you issue this command. As a
consequence, this command will give you a good estimate of what Volume will be used but not a
definitive answer. In addition, this command may have certain side effect because it runs through
the same algorithm as a job, which means it may automatically purge or recycle a Volume. By
default, the job specified must run within the next two days or no volume will be found. You can,
however, use the days=nnn specification to specify up to 50 days. For example, if on Friday,
you want to see what Volume will be needed on Monday, for job MyJob, you would use list
nextvol job=MyJob days=3.
If you wish to add specialized commands that list the contents of the catalog, you can do so by adding them to
the query.sql file. However, this takes some knowledge of programming SQL. Please see the query command
below for additional information. See below for listing the full contents of a catalog record with the llist
command.
As an example, the command list pools might produce the following output:
*list pools
+------+---------+---------+---------+----------+-------------+
| PoId | Name | NumVols | MaxVols | PoolType | LabelFormat |
+------+---------+---------+---------+----------+-------------+
| 1 | Default | 0 | 0 | Backup | * |
| 2 | Recycle | 0 | 8 | Backup | File |
+------+---------+---------+---------+----------+-------------+
bconsole 15.27:
list pools
As mentioned above, the list command lists what is in the database. Some things are put into the database
immediately when Bareos starts up, but in general, most things are put in only when they are first used, which
is the case for a Client as with Job records, etc.
Bareos should create a client record in the database the first time you run a job for that client. Doing a status
will not cause a database record to be created. The client database record will be created whether or not the
job fails, but it must at least start. When the Client is actually contacted, additional info from the client will
be added to the client record (a ”uname -a” output).
If you want to see what Client resources you have available in your conf file, you use the Console command
show clients.
-
llist
- The llist or ”long list” command takes all the same arguments that the list command described above does.
The difference is that the llist command list the full contents of each database record selected. It does so by
listing the various fields of the record vertically, with one field per line. It is possible to produce a very large
number of output lines with this command.
If instead of the list pools as in the example above, you enter llist pools you might get the following
output:
*llist pools
PoolId: 1
Name: Default
NumVols: 0
MaxVols: 0
UseOnce: 0
UseCatalog: 1
AcceptAnyVolume: 1
VolRetention: 1,296,000
VolUseDuration: 86,400
MaxVolJobs: 0
MaxVolBytes: 0
AutoPrune: 0
Recycle: 1
PoolType: Backup
LabelFormat: *
PoolId: 2
Name: Recycle
NumVols: 0
MaxVols: 8
UseOnce: 0
UseCatalog: 1
AcceptAnyVolume: 1
VolRetention: 3,600
VolUseDuration: 3,600
MaxVolJobs: 1
MaxVolBytes: 0
AutoPrune: 0
Recycle: 1
PoolType: Backup
LabelFormat: File
bconsole 15.28:
llist pools
-
messages
- This command causes any pending console messages to be immediately displayed.
-
memory
- Print current memory usage.
-
mount
- The mount command is used to get Bareos to read a volume on a physical device. It is a way to tell Bareos
that you have mounted a tape and that Bareos should examine the tape. This command is normally used only
after there was no Volume in a drive and Bareos requests you to mount a new Volume or when you have
specifically unmounted a Volume with the unmount console command, which causes Bareos to close
the drive. If you have an autoloader, the mount command will not cause Bareos to operate the
autoloader unless you specify a slot and possibly a drive. The various forms of the mount command
are:
mount storage=<storage-name> [slot=<num>] [drive=<num>]
mount [jobid=<id> | job=<job-name>]
bconsole 15.29:
mount
If you have specified Automatic Mount Sd
Device = yes, under most circumstances, Bareos will automatically
access the Volume unless you have explicitly unmount ed it in the Console program.
-
move
- The move command allows to move volumes between slots in an autochanger without having to leave the
bconsole.
To move a volume from slot 32 to slots 33, use:
*move storage=TandbergT40 srcslots=32 dstslots=33
Connecting to Storage daemon TandbergT40 at bareos:9103 ...
3306 Issuing autochanger "slots" command.
Device "Drive-1" has 39 slots.
Connecting to Storage daemon TandbergT40 at bareos:9103 ...
3306 Issuing autochanger "listall" command.
Connecting to Storage daemon TandbergT40 at bareos:9103 ...
3306 Issuing autochanger transfer command.
3308 Successfully transfered volume from slot 32 to 33.
bconsole 15.30:
move
-
prune
- The Prune command allows you to safely remove expired database records from Jobs,
Volumes and Statistics. This command works only on the Catalog database and does not affect
data written to Volumes. In all cases, the Prune command applies a retention period to the
specified records. You can Prune expired File entries from Job records; you can Prune expired Job
records from the database, and you can Prune both expired Job and File records from specified
Volumes.
prune files [client=<client>] [pool=<pool>] [yes] |
jobs [client=<client>] [pool=<pool>] [jobtype=<jobtype>] [yes] |
volume [=volume] [pool=<pool>] [yes] |
stats [yes]
bconsole 15.31:
prune
For a Volume to be pruned, the volume status must be Full, Used or Append otherwise the pruning will not
take place.
-
purge
- The Purge command will delete associated catalog database records from Jobs and Volumes without
considering the retention period. This command can be dangerous because you can delete catalog records
associated with current backups of files, and we recommend that you do not use it unless you know what you
are doing. The permitted forms of purge are:
purge [files [job=<job> | jobid=<jobid> | client=<client> | volume=<volume>]] |
[jobs [client=<client> | volume=<volume>]] |
[volume [=<volume>] [storage=<storage>] [pool=<pool>] [devicetype=<type>] [drive=<drivenum>] [action=<action>]] |
[quota [client=<client>]]
bconsole 15.32:
purge
For the purge command to work on volume catalog database records the volume status must be Append,
Full, Used or Error.
The actual data written to the Volume will be unaffected by this command unless you are using the Action On
Purge Dir
Pool = Truncate option.
To ask Bareos to truncate your Purged volumes, you need to use the following command in interactive
mode:
*purge volume action=truncate storage=File pool=Full
bconsole 15.33:
purge example
However, normally you should use the purge command only to purge a volume from the catalog and use the
truncate command to truncate the volume on the Bareos Storage Daemon.
-
resolve
- In the configuration files, Addresses can (and normally should) be specified as DNS names. As the
different components of Bareos will establish network connections to other Bareos components, it is important
that DNS name resolution works on involved components and delivers the same results. The resolve
command can be used to test DNS resolution of a given hostname on director, storage daemon or
client.
*resolve www.bareos.com
bareos-dir resolves www.bareos.com to host[ipv4:84.44.166.242]
*resolve client=client1-fd www.bareos.com
client1-fd resolves www.bareos.com to host[ipv4:84.44.166.242]
*resolve storage=File www.bareos.com
bareos-sd resolves www.bareos.com to host[ipv4:84.44.166.242]
bconsole 15.34:
resolve example
-
query
- This command reads a predefined SQL query from the query file (the name and location of the query file
is defined with the QueryFile resource record in the Director’s configuration file). You are prompted to select a
query from the file, and possibly enter one or more parameters, then the command is submitted to the Catalog
database SQL engine.
-
quit
- This command terminates the console program. The console program sends the quit request to the Director
and waits for acknowledgment. If the Director is busy doing a previous command for you that has not
terminated, it may take some time. You may quit immediately by issuing the .quit command (i.e. quit
preceded by a period).
-
relabel
- This command is used to label physical volumes.
The full form of this command is:
relabel storage=<storage-name> oldvolume=<old-volume-name> volume=<new-volume-name> pool=<pool-name> [encrypt]
bconsole 15.35:
relabel
If you leave out any part, you will be prompted for it. In order for the Volume (old-volume-name) to be
relabeled, it must be in the catalog, and the volume status must be marked Purged or Recycle. This happens
automatically as a result of applying retention periods or you may explicitly purge the volume using the purge
command.
Once the volume is physically relabeled, the old data previously written on the Volume is lost and cannot be
recovered.
-
release
- This command is used to cause the Storage daemon to release (and rewind) the current tape in the drive,
and to re-read the Volume label the next time the tape is used.
release storage=<storage-name>
bconsole 15.36:
release
After a release command, the device is still kept open by Bareos (unless Always Open Sd
Device = no) so it cannot
be used by another program. However, with some tape drives, the operator can remove the current tape and to
insert a different one, and when the next Job starts, Bareos will know to re-read the tape label to
find out what tape is mounted. If you want to be able to use the drive with another program
(e.g. mt), you must use the unmount command to cause Bareos to completely release (close) the
device.
-
reload
- The reload command causes the Director to re-read its configuration file and apply the new values. The
new values will take effect immediately for all new jobs. However, if you change schedules, be aware that the
scheduler pre-schedules jobs up to two hours in advance, so any changes that are to take place during the next
two hours may be delayed. Jobs that have already been scheduled to run (i.e. surpassed their requested start
time) will continue with the old values. New jobs will use the new values. Each time you issue a reload
command while jobs are running, the prior config values will queued until all jobs that were running before
issuing the reload terminate, at which time the old config values will be released from memory.
The Directory permits keeping up to ten prior set of configurations before it will refuse a reload
command. Once at least one old set of config values has been released it will again accept new reload
commands.
While it is possible to reload the Director’s configuration on the fly, even while jobs are executing, this is a
complex operation and not without side effects. Accordingly, if you have to reload the Director’s
configuration while Bareos is running, it is advisable to restart the Director at the next convenient
opportunity.
-
rerun
- The rerun command allows you to re-run a Job with exactly the same setting as the original
Job. In Bareos, the job configuration is often altered by job overrides. These overrides alter the
configuration of the job just for one job run. If because of any reason, a job with overrides fails, it is
not easy to restart a new job that is exactly configured as the job that failed. The whole job
configuration is automatically set to the defaults and it is hard to configure everything like it
was.
By using the rerun command, it is much easier to rerun a job exactly as it was configured. You only have to
specify the JobId of the failed job.
rerun jobid=<jobid> since_jobid=<jobid> days=<nr_days> hours=<nr_hours> yes
bconsole 15.37:
rerun
You can select the jobid(s) to rerun by using one of the selection criteria. Using jobid= will automatically
select all jobs failed after and including the given jobid for rerunning. By using days= or hours=,
you can select all failed jobids in the last number of days or number of hours respectively for
rerunning.
-
restore
- The restore command allows you to select one or more Jobs (JobIds) to be restored using various
methods. Once the JobIds are selected, the File records for those Jobs are placed in an internal Bareos
directory tree, and the restore enters a file selection mode that allows you to interactively walk up and down
the file tree selecting individual files to be restored. This mode is somewhat similar to the standard Unix
restore program’s interactive file selection mode.
restore storage=<storage-name> client=<backup-client-name>
where=<path> pool=<pool-name> fileset=<fileset-name>
restoreclient=<restore-client-name>
restorejob=<job-name>
select current all done
bconsole 15.38:
restore
Where current, if specified, tells the restore command to automatically select a restore to the most current
backup. If not specified, you will be prompted. The all specification tells the restore command to restore all
files. If it is not specified, you will be prompted for the files to restore. For details of the restore command,
please see the Restore Chapter of this manual.
The client keyword initially specifies the client from which the backup was made and the client to which the
restore will be make. However, if the restoreclient keyword is specified, then the restore is written to that
client.
The restore job rarely needs to be specified, as bareos installations commonly only have a single restore job
configured. However, for certain cases, such as a varying list of RunScript specifications, multiple
restore jobs may be configured. The restorejob argument allows the selection of one of these
jobs.
For more details, see the Restore chapter.
-
run
- This command allows you to schedule jobs to be run immediately.
The full form of the command is:
run job=<job-name> client=<client-name> fileset=<fileset-name>
level=<level> storage=<storage-name> where=<directory-prefix>
when=<universal-time-specification> pool=<pool-name>
pluginoptions=<plugin-options-string> accurate=<yes|no>
comment=<text> spooldata=<yes|no> priority=<number>
jobid=<jobid> catalog=<catalog> migrationjob=<job-name> backupclient=<client-name>
backupformat=<format> nextpool=<pool-name> since=<universal-time-specification>
verifyjob=<job-name> verifylist=<verify-list> migrationjob=<complete_name>
yes
bconsole 15.39:
run
Any information that is needed but not specified will be listed for selection, and before starting the job, you
will be prompted to accept, reject, or modify the parameters of the job to be run, unless you have specified
yes, in which case the job will be immediately sent to the scheduler.
If you wish to start a job at a later time, you can do so by setting the When time. Use the mod
option and select When (no. 6). Then enter the desired start time in YYYY-MM-DD HH:MM:SS
format.
The spooldata argument of the run command cannot be modified through the menu and is only accessible by
setting its value on the intial command line. If no spooldata flag is set, the job, storage or schedule flag is
used.
-
setbandwidth
- This command (Version >= 12.4.1) is used to limit the bandwidth of a running job or a
client.
setbandwidth limit=<nb> [jobid=<id> | client=<cli>]
bconsole 15.40:
setbandwidth
-
setdebug
- This command is used to set the debug level in each daemon. The form of this command
is:
setdebug level=nnn [trace=0/1 client=<client-name> | dir | director | storage=<storage-name> | all]
bconsole 15.41:
setdebug
Each of the daemons normally has debug compiled into the program, but disabled. There are two ways to
enable the debug output.
One is to add the -d nnn option on the command line when starting the daemon. The nnn is the debug level,
and generally anything between 50 and 200 is reasonable. The higher the number, the more output is
produced. The output is written to standard output.
The second way of getting debug output is to dynamically turn it on using the Console using the
setdebug level=nnn command. If none of the options are given, the command will prompt you. You can
selectively turn on/off debugging in any or all the daemons (i.e. it is not necessary to specify all the
components of the above command).
If trace=1 is set, then tracing will be enabled, and the daemon will be placed in trace mode, which means that
all debug output as set by the debug level will be directed to his trace file in the current directory of the
daemon. When tracing, each debug output message is appended to the trace file. You must explicitly delete
the file when you are done.
*setdebug level=100 trace=1 dir
level=100 trace=1 hangup=0 timestamp=0 tracefilename=/var/lib/bareos/bareos-dir.example.com.trace
bconsole 15.42:
set Director debug level to 100 and get messages written to his trace file
-
setip
- Sets new client address – if authorized.
A console is authorized to use the SetIP command only if it has a Console resource definition in both the
Director and the Console. In addition, if the console name, provided on the Name = directive, must be the
same as a Client name, the user of that console is permitted to use the SetIP command to change the Address
directive in the Director’s client resource to the IP address of the Console. This permits portables or
other machines using DHCP (non-fixed IP addresses) to ”notify” the Director of their current IP
address.
-
show
- The show command will list the Director’s resource records as defined in the Director’s configuration. This
command is used mainly for debugging purposes by developers. The following keywords are accepted on the
show command line: catalogs, clients, counters, devices, directors, filesets, jobs, messages, pools, schedules,
storages, all, help. Please don’t confuse this command with the list, which displays the contents of the
catalog.
-
sqlquery
- The sqlquery command puts the Console program into SQL query mode where each line you enter is
concatenated to the previous line until a semicolon (;) is seen. The semicolon terminates the command, which
is then passed directly to the SQL database engine. When the output from the SQL engine is displayed, the
formation of a new SQL command begins. To terminate SQL query mode and return to the Console command
prompt, you enter a period (.) in column 1.
Using this command, you can query the SQL catalog database directly. Note you should really know what you
are doing otherwise you could damage the catalog database. See the query command below for simpler and
safer way of entering SQL queries.
Depending on what database engine you are using (MySQL, PostgreSQL or SQLite), you will have somewhat
different SQL commands available. For more detailed information, please refer to the MySQL, PostgreSQL or
SQLite documentation.
-
status
-
This command will display the status of all components. For the director, it will display the next jobs that
are scheduled during the next 24 hours as well as the status of currently running jobs. For the
Storage Daemon, you will have drive status or autochanger content. The File Daemon will give you
information about current jobs like average speed or file accounting. The full form of this command
is:
status [all | dir=<dir-name> | director | scheduler | schedule=<schedule-name> |
client=<client-name> | storage=<storage-name> slots | subscriptions]
bconsole 15.43:
status
If you do a status dir, the console will list any currently running jobs, a summary of all jobs scheduled to be
run in the next 24 hours, and a listing of the last ten terminated jobs with their statuses. The scheduled jobs
summary will include the Volume name to be used. You should be aware of two things: 1. to obtain
the volume name, the code goes through the same code that will be used when the job runs,
but it does not do pruning nor recycling of Volumes; 2. The Volume listed is at best a guess.
The Volume actually used may be different because of the time difference (more durations may
expire when the job runs) and another job could completely fill the Volume requiring a new
one.
In the Running Jobs listing, you may find the following types of information:
2507 Catalog MatouVerify.2004-03-13_05.05.02 is waiting execution
5349 Full CatalogBackup.2004-03-13_01.10.00 is waiting for higher
priority jobs to finish
5348 Differe Minou.2004-03-13_01.05.09 is waiting on max Storage jobs
5343 Full Rufus.2004-03-13_01.05.04 is running
bconsole 15.44:
Looking at the above listing from bottom to top, obviously JobId 5343 (Rufus) is running. JobId 5348 (Minou)
is waiting for JobId 5343 to finish because it is using the Storage resource, hence the ”waiting on max Storage
jobs”. JobId 5349 has a lower priority than all the other jobs so it is waiting for higher priority jobs to finish,
and finally, JobId 2507 (MatouVerify) is waiting because only one job can run at a time, hence it is simply
”waiting execution”
If you do a status dir, it will by default list the first occurrence of all jobs that are scheduled today and
tomorrow. If you wish to see the jobs that are scheduled in the next three days (e.g. on Friday you want to see
the first occurrence of what tapes are scheduled to be used on Friday, the weekend, and Monday), you can add
the days=3 option. Note, a days=0 shows the first occurrence of jobs scheduled today only. If you have
multiple run statements, the first occurrence of each run statement for the job will be displayed for the period
specified.
If your job seems to be blocked, you can get a general idea of the problem by doing a status dir, but you can
most often get a much more specific indication of the problem by doing a status storage=xxx. For example,
on an idle test system, when I do status storage=File, I get:
*status storage=File
Connecting to Storage daemon File at 192.168.68.112:8103
rufus-sd Version: 1.39.6 (24 March 2006) i686-pc-linux-gnu redhat (Stentz)
Daemon started 26-Mar-06 11:06, 0 Jobs run since started.
Running Jobs:
No Jobs running.
====
Jobs waiting to reserve a drive:
====
Terminated Jobs:
JobId Level Files Bytes Status Finished Name
======================================================================
59 Full 234 4,417,599 OK 15-Jan-06 11:54 usersave
====
Device status:
Autochanger "DDS-4-changer" with devices:
"DDS-4" (/dev/nst0)
Device "DDS-4" (/dev/nst0) is mounted with Volume="TestVolume002"
Pool="*unknown*"
Slot 2 is loaded in drive 0.
Total Bytes Read=0 Blocks Read=0 Bytes/block=0
Positioned at File=0 Block=0
Device "File" (/tmp) is not open.
====
In Use Volume status:
====
bconsole 15.45:
status storage
Now, what this tells me is that no jobs are running and that none of the devices are in use. Now, if I
unmount the autochanger, which will not be used in this example, and then start a Job that uses the File
device, the job will block. When I re-issue the status storage command, I get for the Device
status:
*status storage=File
...
Device status:
Autochanger "DDS-4-changer" with devices:
"DDS-4" (/dev/nst0)
Device "DDS-4" (/dev/nst0) is not open.
Device is BLOCKED. User unmounted.
Drive 0 is not loaded.
Device "File" (/tmp) is not open.
Device is BLOCKED waiting for media.
====
...
bconsole 15.46:
status storage
Now, here it should be clear that if a job were running that wanted to use the Autochanger (with two devices),
it would block because the user unmounted the device. The real problem for the Job I started using the
”File” device is that the device is blocked waiting for media – that is Bareos needs you to label a
Volume.
The command status scheduler (Version >= 12.4.4) can be used to check when a certain schedule will
trigger. This gives more information than status director .
Called without parameters, status scheduler shows a preview for all schedules for the next 14
days. It first shows a list of the known schedules and the jobs that will be triggered by these
jobs, and next, a table with date (including weekday), schedule name and applied overrides is
displayed:
*status scheduler
Scheduler Jobs:
Schedule Jobs Triggered
===========================================================
WeeklyCycle
BackupClient1
WeeklyCycleAfterBackup
BackupCatalog
====
Scheduler Preview for 14 days:
Date Schedule Overrides
==============================================================
Di 04-Jun-2013 21:00 WeeklyCycle Level=Incremental
Di 04-Jun-2013 21:10 WeeklyCycleAfterBackup Level=Full
Mi 05-Jun-2013 21:00 WeeklyCycle Level=Incremental
Mi 05-Jun-2013 21:10 WeeklyCycleAfterBackup Level=Full
Do 06-Jun-2013 21:00 WeeklyCycle Level=Incremental
Do 06-Jun-2013 21:10 WeeklyCycleAfterBackup Level=Full
Fr 07-Jun-2013 21:00 WeeklyCycle Level=Incremental
Fr 07-Jun-2013 21:10 WeeklyCycleAfterBackup Level=Full
Sa 08-Jun-2013 21:00 WeeklyCycle Level=Differential
Mo 10-Jun-2013 21:00 WeeklyCycle Level=Incremental
Mo 10-Jun-2013 21:10 WeeklyCycleAfterBackup Level=Full
Di 11-Jun-2013 21:00 WeeklyCycle Level=Incremental
Di 11-Jun-2013 21:10 WeeklyCycleAfterBackup Level=Full
Mi 12-Jun-2013 21:00 WeeklyCycle Level=Incremental
Mi 12-Jun-2013 21:10 WeeklyCycleAfterBackup Level=Full
Do 13-Jun-2013 21:00 WeeklyCycle Level=Incremental
Do 13-Jun-2013 21:10 WeeklyCycleAfterBackup Level=Full
Fr 14-Jun-2013 21:00 WeeklyCycle Level=Incremental
Fr 14-Jun-2013 21:10 WeeklyCycleAfterBackup Level=Full
Sa 15-Jun-2013 21:00 WeeklyCycle Level=Differential
Mo 17-Jun-2013 21:00 WeeklyCycle Level=Incremental
Mo 17-Jun-2013 21:10 WeeklyCycleAfterBackup Level=Full
====
bconsole 15.47:
status scheduler
status scheduler accepts the following parameters:
-
client=clientname
- shows only the schedules that affect the given client.
-
job=jobname
- shows only the schedules that affect the given job.
-
schedule=schedulename
- shows only the given schedule.
-
days=number
- of days shows only the number of days in the scheduler preview. Positive numbers
show the future, negative numbers show the past. days can be combined with the other selection
criteria. days= can be combined with the other selection criteria.
In case you are running a maintained version of Bareos, the command status subscriptions (Version >=
12.4.4) can help you to keep the overview over the subscriptions that are used.
To enable this functionality, just add the configuration Subscriptions Dir
Director directive and specify the number
of subscribed clients, for example:
Director {
...
Subscriptions = 50
}
Configuration 15.48:
enable subscription check
Using the console command status subscriptions, the status of the subscriptions can be checked any time
interactively:
*status subscriptions
Ok: available subscriptions: 8 (42/50) (used/total)
bconsole 15.49:
status subscriptions
Also, the number of subscriptions is checked after every job. If the number of clients is bigger than the
configured limit, a Job warning is created a message like this:
JobId 7: Warning: Subscriptions exceeded: (used/total) (51/50)
bconsole 15.50:
subscriptions warning
Please note: Nothing else than the warning is issued, no enforcement on backup, restore or any other operation
will happen.
Setting the value for Subscriptions Dir
Director = 0 disables this functionality:
Director {
...
Subscriptions = 0
}
Configuration 15.51:
disable subscription check
Not configuring the directive at all also disables it, as the default value for the Subscriptions directive is
zero.
-
time
- The time command shows the current date, time and weekday.
-
trace
- Turn on/off trace to file.
-
truncate
-
If the status of a volume is Purged, it normally still contains data, even so it can not easily be
accessed.
truncate volstatus=Purged [storage=<storage>] [pool=<pool>] [volume=<volume>] [yes]
bconsole 15.52:
truncate
When using a disk volume (and other volume types also) the volume file still resides on the Bareos
Storage Daemon. If you want to reclaim disk space, you can use the truncate volstatus=Purged
command. When used on a volume, it rewrites the header and by this frees the rest of the disk
space.
If the volume you want to get rid of has not the Purged status, you first have to use the prune volume or even
the purge volume command to free the volume from all remaining jobs.
This command is available since Bareos Version >= 16.2.5.
-
umount
- Alias for unmount .
-
unmount
- This command causes the indicated Bareos Storage daemon to unmount the specified device. The forms
of the command are the same as the mount command:
unmount storage=<storage-name> [drive=<num>]
unmount [jobid=<id> | job=<job-name>]
bconsole 15.53:
unmount
Once you unmount a storage device, Bareos will no longer be able to use it until you issue a mount command
for that device. If Bareos needs to access that device, it will block and issue mount requests periodically to the
operator.
If the device you are unmounting is an autochanger, it will unload the drive you have specified on the
command line. If no drive is specified, it will assume drive 1.
In most cases, it is preferable to use the release instead.
-
update
- This command will update the catalog for either a specific Pool record, a Volume record, or the Slots in
an autochanger with barcode capability. In the case of updating a Pool record, the new information will be
automatically taken from the corresponding Director’s configuration resource record. It can be used to increase
the maximum number of volumes permitted or to set a maximum number of volumes. The following main
keywords may be specified:
- volume
- pool
- slots
- iobid
- stats
In the case of updating a Volume (update volume), you will be prompted for which value you wish to change.
The following Volume parameters may be changed:
Volume Status
Volume Retention Period
Volume Use Duration
Maximum Volume Jobs
Maximum Volume Files
Maximum Volume Bytes
Recycle Flag
Recycle Pool
Slot
InChanger Flag
Pool
Volume Files
Volume from Pool
All Volumes from Pool
All Volumes from all Pools
For slots update slots, Bareos will obtain a list of slots and their barcodes from the Storage daemon, and for
each barcode found, it will automatically update the slot in the catalog Media record to correspond to the new
value. This is very useful if you have moved cassettes in the magazine, or if you have removed the magazine
and inserted a different one. As the slot of each Volume is updated, the InChanger flag for that Volume will
also be set, and any other Volumes in the Pool that were last mounted on the same Storage device will have
their InChanger flag turned off. This permits Bareos to know what magazine (tape holder) is currently in the
autochanger.
If you do not have barcodes, you can accomplish the same thing by using the update slots scan command.
The scan keyword tells Bareos to physically mount each tape and to read its VolumeName.
For Pool update pool, Bareos will move the Volume record from its existing pool to the pool
specified.
For Volume from Pool, All Volumes from Pool and All Volumes from all Pools, the following values
are updated from the Pool record: Recycle, RecyclePool, VolRetention, VolUseDuration, MaxVolJobs,
MaxVolFiles, and MaxVolBytes.
For updating the statistics, use updates stats, see Job Statistics.
The full form of the update command with all command line arguments is:
update volume=<volume-name> [volstatus=<status>]
[volretention=<time-def>] [pool=<pool-name>]
[recycle=<yes/no>] [slot=<number>] [inchanger=<yes/no>] |
pool=<pool-name> [maxvolbytes=<size>] [maxvolfiles=<nb>]
[maxvoljobs=<nb>][enabled=<yes/no>] [recyclepool=<pool-name>]
[actiononpurge=<action>] |
slots [storage=<storage-name>] [scan] |
jobid=<jobid> [jobname=<name>] [starttime=<time-def>]
[client=<client-name>] [filesetid=<fileset-id>]
[jobtype=<job-type>] |
stats [days=<number>]
bconsole 15.54:
update
-
use
- This command allows you to specify which Catalog database to use. Normally, you will be using only one
database so this will be done automatically. In the case that you are using more than one database, you can
use this command to switch from one to another.
use [catalog=<catalog>]
bconsole 15.55:
use
-
var
- This command takes a string or quoted string and does variable expansion on it mostly the same way
variable expansion is done on the Label Format Dir
Pool string. The difference between the var command and the
actual Label Format Dir
Pool process is that during the var command, no job is running so dummy values are used
in place of Job specific variables.
-
version
- The command prints the Director’s version.
-
wait
- The wait command causes the Director to pause until there are no jobs running. This command is useful in a
batch situation such as regression testing where you wish to start a job and wait until that job completes
before continuing. This command now has the following options:
wait [jobid=<jobid>] [jobuid=<unique id>] [job=<job name>]
bconsole 15.56:
wait
If specified with a specific JobId, ... the wait command will wait for that particular job to terminate before
continuing.
#
There is a list of commands that are prefixed with a period (.). These commands are intended to be used either by
batch programs or graphical user interface front-ends. They are not normally used by interactive users. For details,
see Bareos Developer Guide (dot-commands) .
#
Normally, all commands entered to the Console program are immediately forwarded to the Director, which may be
on another machine, to be executed. However, there is a small list of at commands, all beginning with an at
character (@), that will not be sent to the Director, but rather interpreted by the Console program directly. Note,
these commands are implemented only in the TTY console program and not in the Bat Console. These commands
are:
-
@input <filename>
- Read and execute the commands contained in the file specified.
-
@output <filename> <w|a>
- Send all following output to the filename specified either overwriting the
file (w) or appending to the file (a). To redirect the output to the terminal, simply enter @output
without a filename specification. WARNING: be careful not to overwrite a valid file. A typical example
during a regression test might be:
@output /dev/null
commands ...
@output
-
@tee <filename> <w|a>
- Send all subsequent output to both the specified file and the terminal. It is turned off
by specifying @tee or @output without a filename.
-
@sleep <seconds>
- Sleep the specified number of seconds.
-
@time
- Print the current time and date.
-
@version
- Print the console’s version.
-
@quit
- quit
-
@exit
- quit
-
@# anything
- Comment
-
@help
- Get the list of every special @ commands.
-
@separator <char>
- When using bconsole with readline, you can set the command separator to one of those
characters to write commands who require multiple input on one line, or to put multiple commands on a single
line.
!$%&’()*+,-/:;<>?[]^‘{|}~
Note, if you use a semicolon (;) as a separator character, which is common, you will not be able to use the sql
command, which requires each command to be terminated by a semicolon.
#
TODO: move to another chapter
If you have used the label command to label a Volume, it will be automatically added to the Pool, and you will not
need to add any media to the pool.
Alternatively, you may choose to add a number of Volumes to the pool without labeling them. At a later time when
the Volume is requested by Bareos you will need to label it.
Before adding a volume, you must know the following information:
- The name of the Pool (normally ”Default”)
- The Media Type as specified in the Storage Resource in the Director’s configuration file (e.g.
”DLT8000”)
- The number and names of the Volumes you wish to create.
For example, to add media to a Pool, you would issue the following commands to the console program:
*add
Enter name of Pool to add Volumes to: Default
Enter the Media Type: DLT8000
Enter number of Media volumes to create. Max=1000: 10
Enter base volume name: Save
Enter the starting number: 1
10 Volumes created in pool Default
*
To see what you have added, enter:
*list media pool=Default
+-------+----------+---------+---------+-------+------------------+
| MedId | VolumeNa | MediaTyp| VolStat | Bytes | LastWritten |
+-------+----------+---------+---------+-------+------------------+
| 11 | Save0001 | DLT8000 | Append | 0 | 0000-00-00 00:00 |
| 12 | Save0002 | DLT8000 | Append | 0 | 0000-00-00 00:00 |
| 13 | Save0003 | DLT8000 | Append | 0 | 0000-00-00 00:00 |
| 14 | Save0004 | DLT8000 | Append | 0 | 0000-00-00 00:00 |
| 15 | Save0005 | DLT8000 | Append | 0 | 0000-00-00 00:00 |
| 16 | Save0006 | DLT8000 | Append | 0 | 0000-00-00 00:00 |
| 17 | Save0007 | DLT8000 | Append | 0 | 0000-00-00 00:00 |
| 18 | Save0008 | DLT8000 | Append | 0 | 0000-00-00 00:00 |
| 19 | Save0009 | DLT8000 | Append | 0 | 0000-00-00 00:00 |
| 20 | Save0010 | DLT8000 | Append | 0 | 0000-00-00 00:00 |
+-------+----------+---------+---------+-------+------------------+
*
Notice that the console program automatically appended a number to the base Volume name that you specify (Save
in this case). If you don’t want it to append a number, you can simply answer 0 (zero) to the question ”Enter
number of Media volumes to create. Max=1000:”, and in this case, it will create a single Volume with the exact
name you specify.
#
#
Below, we will discuss restoring files with the Console restore command, which is the recommended way of doing
restoring files. It is not possible to restore files by automatically starting a job as you do with Backup, Verify, ...
jobs. However, in addition to the console restore command, there is a standalone program named bextract, which
also permits restoring files. For more information on this program, please see the Bareos Utility Programs chapter of
this manual. We don’t particularly recommend the bextract program because it lacks many of the features of the
normal Bareos restore, such as the ability to restore Win32 files to Unix systems, and the ability to restore access
control lists (ACL). As a consequence, we recommend, wherever possible to use Bareos itself for restores as
described below.
You may also want to look at the bls program in the same chapter, which allows you to list the contents of
your Volumes. Finally, if you have an old Volume that is no longer in the catalog, you can restore the
catalog entries using the program named bscan, documented in the same Bareos Utility Programs
chapter.
In general, to restore a file or a set of files, you must run a restore job. That is a job with Type = Restore. As a
consequence, you will need a predefined restore job in your bareos-dir.conf (Director’s config) file. The
exact parameters (Client, FileSet, ...) that you define are not important as you can either modify them
manually before running the job or if you use the restore command, explained below, Bareos will
automatically set them for you. In fact, you can no longer simply run a restore job. You must use the restore
command.
Since Bareos is a network backup program, you must be aware that when you restore files, it is up to you to ensure
that you or Bareos have selected the correct Client and the correct hard disk location for restoring those files.
Bareos will quite willingly backup client A, and restore it by sending the files to a different directory on client B.
Normally, you will want to avoid this, but assuming the operating systems are not too different in their file
structures, this should work perfectly well, if so desired. By default, Bareos will restore data to the
same Client that was backed up, and those data will be restored not to the original places but to
/tmp/bareos-restores. This is configured in the default restore command resource in bareos-dir.conf. You may
modify any of these defaults when the restore command prompts you to run the job by selecting the mod
option.
#
Since Bareos maintains a catalog of your files and on which Volumes (disk or tape), they are stored, it can do most
of the bookkeeping work, allowing you simply to specify what kind of restore you want (current, before a particular
date), and what files to restore. Bareos will then do the rest.
This is accomplished using the restore command in the Console. First you select the kind of restore you want, then
the JobIds are selected, the File records for those Jobs are placed in an internal Bareos directory tree, and the
restore enters a file selection mode that allows you to interactively walk up and down the file tree selecting
individual files to be restored. This mode is somewhat similar to the standard Unix restore program’s interactive
file selection mode.
If a Job’s file records have been pruned from the catalog, the restore command will be unable to find any files to
restore. Bareos will ask if you want to restore all of them or if you want to use a regular expression
to restore only a selection while reading media. See FileRegex option and below for more details on
this.
Within the Console program, after entering the restore command, you are presented with the following selection
prompt:
* restore
First you select one or more JobIds that contain files
to be restored. You will be presented several methods
of specifying the JobIds. Then you will be allowed to
select which files from those JobIds are to be restored.
To select the JobIds, you have the following choices:
1: List last 20 Jobs run
2: List Jobs where a given File is saved
3: Enter list of comma separated JobIds to select
4: Enter SQL list command
5: Select the most recent backup for a client
6: Select backup for a client before a specified time
7: Enter a list of files to restore
8: Enter a list of files to restore before a specified time
9: Find the JobIds of the most recent backup for a client
10: Find the JobIds for a backup for a client before a specified time
11: Enter a list of directories to restore for found JobIds
12: Select full restore to a specified Job date
13: Cancel
Select item: (1-13):
bconsole 16.1:
restore
There are a lot of options, and as a point of reference, most people will want to select item 5 (the most recent
backup for a client). The details of the above options are:
- Item 1 will list the last 20 jobs run. If you find the Job you want, you can then select item 3 and enter
its JobId(s).
- Item 2 will list all the Jobs where a specified file is saved. If you find the Job you want, you can then
select item 3 and enter the JobId.
- Item 3 allows you the enter a list of comma separated JobIds whose files will be put into the directory
tree. You may then select which files from those JobIds to restore. Normally, you would use this option
if you have a particular version of a file that you want to restore and you know its JobId. The most
common options (5 and 6) will not select a job that did not terminate normally, so if you know a file
is backed up by a Job that failed (possibly because of a system crash), you can access it through this
option by specifying the JobId.
- Item 4 allows you to enter any arbitrary SQL command. This is probably the most primitive way of
finding the desired JobIds, but at the same time, the most flexible. Once you have found the JobId(s),
you can select item 3 and enter them.
- Item 5 will automatically select the most recent Full backup and all subsequent incremental and
differential backups for a specified Client. These are the Jobs and Files which, if reloaded, will restore
your system to the most current saved state. It automatically enters the JobIds found into the directory
tree in an optimal way such that only the most recent copy of any particular file found in the set of
Jobs will be restored. This is probably the most convenient of all the above options to use if you wish
to restore a selected Client to its most recent state.
There are two important things to note. First, this automatic selection will never select a job that
failed (terminated with an error status). If you have such a job and want to recover one or more files
from it, you will need to explicitly enter the JobId in item 3, then choose the files to restore.
If some of the Jobs that are needed to do the restore have had their File records pruned, the restore
will be incomplete. Bareos currently does not correctly detect this condition. You can however, check
for this by looking carefully at the list of Jobs that Bareos selects and prints. If you find Jobs with the
JobFiles column set to zero, when files should have been backed up, then you should expect problems.
If all the File records have been pruned, Bareos will realize that there are no file records in any of the
JobIds chosen and will inform you. It will then propose doing a full restore (non-selective) of those
JobIds. This is possible because Bareos still knows where the beginning of the Job data is on the
Volumes, even if it does not know where particular files are located or what their names are.
- Item 6 allows you to specify a date and time, after which Bareos will automatically select the most
recent Full backup and all subsequent incremental and differential backups that started before the
specified date and time.
- Item 7 allows you to specify one or more filenames (complete path required) to be restored. Each
filename is entered one at a time or if you prefix a filename with the less-than symbol (<) Bareos
will read that file and assume it is a list of filenames to be restored. If you prefix the filename with a
question mark (?), then the filename will be interpreted as an SQL table name, and Bareos will include
the rows of that table in the list to be restored. The table must contain the JobId in the first column
and the FileIndex in the second column. This table feature is intended for external programs that want
to build their own list of files to be restored. The filename entry mode is terminated by entering a
blank line.
- Item 8 allows you to specify a date and time before entering the filenames. See Item 7 above for more
details.
- Item 9 allows you find the JobIds of the most recent backup for a client. This is much like option 5
(it uses the same code), but those JobIds are retained internally as if you had entered them manually.
You may then select item 11 (see below) to restore one or more directories.
- Item 10 is the same as item 9, except that it allows you to enter a before date (as with item 6). These
JobIds will then be retained internally.
- Item 11 allows you to enter a list of JobIds from which you can select directories to be restored. The
list of JobIds can have been previously created by using either item 9 or 10 on the menu. You may
then enter a full path to a directory name or a filename preceded by a less than sign (<). The filename
should contain a list of directories to be restored. All files in those directories will be restored, but if
the directory contains subdirectories, nothing will be restored in the subdirectory unless you explicitly
enter its name.
- Item 12 is a full restore to a specified job date.
- Item 13 allows you to cancel the restore command.
As an example, suppose that we select item 5 (restore to most recent state). If you have not specified a client=xxx
on the command line, it it will then ask for the desired Client, which on my system, will print all the Clients found
in the database as follows:
Select item: (1-13): 5
Defined clients:
1: Rufus
2: Matou
3: Polymatou
4: Minimatou
5: Minou
6: MatouVerify
7: PmatouVerify
8: RufusVerify
9: Watchdog
Select Client (File daemon) resource (1-9): 1
bconsole 16.2:
restore: select client
The listed clients are only examples, yours will look differently. If you have only one Client, it will be automatically
selected. In this example, I enter 1 for Rufus to select the Client. Then Bareos needs to know what FileSet is to be
restored, so it prompts with:
The defined FileSet resources are:
1: Full Set
2: Other Files
Select FileSet resource (1-2):
If you have only one FileSet defined for the Client, it will be selected automatically. I choose item 1, which is my full
backup. Normally, you will only have a single FileSet for each Job, and if your machines are similar (all Linux) you
may only have one FileSet for all your Clients.
At this point, Bareos has all the information it needs to find the most recent set of backups. It will then query the
database, which may take a bit of time, and it will come up with something like the following. Note, some of the
columns are truncated here for presentation:
+-------+------+----------+-------------+-------------+------+-------+------------+
| JobId | Levl | JobFiles | StartTime | VolumeName | File | SesId |VolSesTime |
+-------+------+----------+-------------+-------------+------+-------+------------+
| 1,792 | F | 128,374 | 08-03 01:58 | DLT-19Jul02 | 67 | 18 | 1028042998 |
| 1,792 | F | 128,374 | 08-03 01:58 | DLT-04Aug02 | 0 | 18 | 1028042998 |
| 1,797 | I | 254 | 08-04 13:53 | DLT-04Aug02 | 5 | 23 | 1028042998 |
| 1,798 | I | 15 | 08-05 01:05 | DLT-04Aug02 | 6 | 24 | 1028042998 |
+-------+------+----------+-------------+-------------+------+-------+------------+
You have selected the following JobId: 1792,1792,1797
Building directory tree for JobId 1792 ...
Building directory tree for JobId 1797 ...
Building directory tree for JobId 1798 ...
cwd is: /
$
Depending on the number of JobFiles for each JobId, the “Building directory tree ...” can take a bit of time.
If you notice ath all the JobFiles are zero, your Files have probably been pruned and you will not be able to select
any individual files – it will be restore everything or nothing.
In our example, Bareos found four Jobs that comprise the most recent backup of the specified Client
and FileSet. Two of the Jobs have the same JobId because that Job wrote on two different Volumes.
The third Job was an incremental backup to the previous Full backup, and it only saved 254 Files
compared to 128,374 for the Full backup. The fourth Job was also an incremental backup that saved 15
files.
Next Bareos entered those Jobs into the directory tree, with no files marked to be restored as a default, tells you
how many files are in the tree, and tells you that the current working directory (cwd) is /. Finally, Bareos prompts
with the dollar sign ($) to indicate that you may enter commands to move around the directory tree and to select
files.
If you want all the files to automatically be marked when the directory tree is built, you could have entered the
command restore all, or at the $ prompt, you can simply enter mark *.
Instead of choosing item 5 on the first menu (Select the most recent backup for a client), if we had chosen item 3
(Enter list of JobIds to select) and we had entered the JobIds 1792,1797,1798 we would have arrived at the same
point.
One point to note, if you are manually entering JobIds, is that you must enter them in the order they
were run (generally in increasing JobId order). If you enter them out of order and the same file was
saved in two or more of the Jobs, you may end up with an old version of that file (i.e. not the most
recent).
Directly entering the JobIds can also permit you to recover data from a Job that wrote files to tape but that
terminated with an error status.
While in file selection mode, you can enter help or a question mark (?) to produce a summary of the available
commands:
Command Description
======= ===========
cd change current directory
count count marked files in and below the cd
dir long list current directory, wildcards allowed
done leave file selection mode
estimate estimate restore size
exit same as done command
find find files, wildcards allowed
help print help
ls list current directory, wildcards allowed
lsmark list the marked files in and below the cd
mark mark dir/file to be restored recursively in dirs
markdir mark directory name to be restored (no files)
pwd print current working directory
unmark unmark dir/file to be restored recursively in dir
unmarkdir unmark directory name only no recursion
quit quit and do not do restore
? print help
As a default no files have been selected for restore (unless you added all to the command line. If you want to restore
everything, at this point, you should enter mark *, and then done and Bareos will write the bootstrap records to a
file and request your approval to start a restore job.
If you do not enter the above mentioned mark * command, you will start with an empty state. Now you can simply
start looking at the tree and mark particular files or directories you want restored. It is easy to make a mistake in
specifying a file to mark or unmark, and Bareos’s error handling is not perfect, so please check your work by using
the ls or dir commands to see what files are actually selected. Any selected file has its name preceded by an
asterisk.
To check what is marked or not marked, enter the count command, which displays:
128401 total files. 128401 marked to be restored.
Each of the above commands will be described in more detail in the next section. We continue with the above
example, having accepted to restore all files as Bareos set by default. On entering the done command, Bareos
prints:
Run Restore job
JobName: RestoreFiles
Bootstrap: /var/lib/bareos/client1.restore.3.bsr
Where: /tmp/bareos-restores
Replace: Always
FileSet: Full Set
Backup Client: client1
Restore Client: client1
Format: Native
Storage: File
When: 2013-06-28 13:30:08
Catalog: MyCatalog
Priority: 10
Plugin Options: *None*
OK to run? (yes/mod/no):
Please examine each of the items very carefully to make sure that they are correct. In particular, look at Where,
which tells you where in the directory structure the files will be restored, and Client, which tells you which client
will receive the files. Note that by default the Client which will receive the files is the Client that was backed up.
These items will not always be completed with the correct values depending on which of the restore
options you chose. You can change any of these default items by entering mod and responding to the
prompts.
The above assumes that you have defined a Restore Job resource in your Director’s configuration file. Normally,
you will only need one Restore Job resource definition because by its nature, restoring is a manual
operation, and using the Console interface, you will be able to modify the Restore Job to do what you
want.
An example Restore Job resource definition is given below.
Returning to the above example, you should verify that the Client name is correct before running the Job. However,
you may want to modify some of the parameters of the restore job. For example, in addition to checking the Client
it is wise to check that the Storage device chosen by Bareos is indeed correct. Although the FileSet is shown, it will
be ignored in restore. The restore will choose the files to be restored either by reading the Bootstrap file, or if not
specified, it will restore all files associated with the specified backup JobId (i.e. the JobId of the Job that originally
backed up the files).
Finally before running the job, please note that the default location for restoring files is not their original locations,
but rather the directory /tmp/bareos-restores. You can change this default by modifying your bareos-dir.conf
file, or you can modify it using the mod option. If you want to restore the files to their original location, you must
have Where set to nothing or to the root, i.e. /.
If you now enter yes, Bareos will run the restore Job.
#
If you have a small number of files to restore, and you know the filenames, you can either put the list of filenames in
a file to be read by Bareos, or you can enter the names one at a time. The filenames must include the full path and
filename. No wild cards are used.
To enter the files, after the restore, you select item number 7 from the prompt list:
* restore
First you select one or more JobIds that contain files
to be restored. You will be presented several methods
of specifying the JobIds. Then you will be allowed to
select which files from those JobIds are to be restored.
To select the JobIds, you have the following choices:
1: List last 20 Jobs run
2: List Jobs where a given File is saved
3: Enter list of comma separated JobIds to select
4: Enter SQL list command
5: Select the most recent backup for a client
6: Select backup for a client before a specified time
7: Enter a list of files to restore
8: Enter a list of files to restore before a specified time
9: Find the JobIds of the most recent backup for a client
10: Find the JobIds for a backup for a client before a specified time
11: Enter a list of directories to restore for found JobIds
12: Select full restore to a specified Job date
13: Cancel
Select item: (1-13): 7
bconsole 16.3:
restore list of files
which then prompts you for the client name:
Defined Clients:
1: client1
2: Tibs
3: Rufus
Select the Client (1-3): 3
Of course, your client list will be different, and if you have only one client, it will be automatically selected. And
finally, Bareos requests you to enter a filename:
Enter filename:
At this point, you can enter the full path and filename
Enter filename: /etc/resolv.conf
Enter filename:
as you can see, it took the filename. If Bareos cannot find a copy of the file, it prints the following:
Enter filename: junk filename
No database record found for: junk filename
Enter filename:
If you want Bareos to read the filenames from a file, you simply precede the filename with a less-than symbol
(<).
It is possible to automate the selection by file by putting your list of files in say /tmp/file-list, then using the
following command:
restore client=client1 file=</tmp/file-list
If in modifying the parameters for the Run Restore job, you find that Bareos asks you to enter a Job number, this is
because you have not yet specified either a Job number or a Bootstrap file. Simply entering zero will allow you to
continue and to select another option to be modified.
#
When restoring, you have the option to specify a Replace option. This directive determines the action to be taken
when restoring a file or directory that already exists. This directive can be set by selecting the mod option. You will
be given a list of parameters to choose from. Full details on this option can be found in the Job Resource section of
the Director documentation.
#
If all the above sounds complicated, you will probably agree that it really isn’t after trying it a few times. It is
possible to do everything that was shown above, with the exception of selecting the FileSet, by using command line
arguments with a single command by entering:
restore client=Rufus select current all done yes
The client=Rufus specification will automatically select Rufus as the client, the current tells Bareos that you
want to restore the system to the most current state possible, and the yes suppresses the final yes/mod/no
prompt and simply runs the restore.
The full list of possible command line arguments are:
- all – select all Files to be restored.
- select – use the tree selection method.
- done – do not prompt the user in tree mode.
- copies – instead of using the actual backup jobs for restoring use the copies which were made of these
backup Jobs. This could mean that on restore the client will contact a remote storage daemon if the
data is copied to a remote storage daemon as part of your copy Job scheme.
- current – automatically select the most current set of backups for the specified client.
- client=xxxx – initially specifies the client from which the backup was made and the client to which
the restore will be make. See also ”restoreclient” keyword.
- restoreclient=xxxx – if the keyword is specified, then the restore is written to that client.
- jobid=nnn – specify a JobId or comma separated list of JobIds to be restored.
- before=YYYY-MM-DD HH:MM:SS – specify a date and time to which the system should be
restored. Only Jobs started before the specified date/time will be selected, and as is the case for current
Bareos will automatically find the most recent prior Full save and all Differential and Incremental saves
run before the date you specify. Note, this command is not too user friendly in that you must specify
the date/time exactly as shown.
- file=filename – specify a filename to be restored. You must specify the full path and filename.
Prefixing the entry with a less-than sign (<) will cause Bareos to assume that the filename is on your
system and contains a list of files to be restored. Bareos will thus read the list from that file. Multiple
file=xxx specifications may be specified on the command line.
- jobid=nnn – specify a JobId to be restored.
- pool=pool-name – specify a Pool name to be used for selection of Volumes when specifying options
5 and 6 (restore current system, and restore current system before given date). This permits you to
have several Pools, possibly one offsite, and to select the Pool to be used for restoring.
- where=/tmp/bareos-restore – restore files in where directory.
- yes – automatically run the restore without prompting for modifications (most useful in batch scripts).
- strip_prefix=/prod – remove a part of the filename when restoring.
- add_prefix=/test – add a prefix to all files when restoring (like where) (can’t be used with where=).
- add_suffix=.old – add a suffix to all your files.
- regexwhere=!a.pdf!a.bkp.pdf! – do complex filename manipulation like with sed unix command.
Will overwrite other filename manipulation. For details, see the regexwhere section.
- restorejob=jobname – Pre-chooses a restore job. Bareos can be configured with multiple restore jobs
(”Type = Restore” in the job definition). This allows the specification of different restore properties,
including a set of RunScripts. When more than one job of this type is configured, during restore, Bareos
will ask for a user selection interactively, or use the given restorejob.
#
The where= option is simple, but not very powerful. With file relocation, Bareos can restore a file to
the same directory, but with a different name, or in an other directory without recreating the full
path.
You can also do filename and path manipulations, such as adding a suffix to all your files, renaming files or
directories, etc. Theses options will overwrite where= option.
For example, many users use OS snapshot features so that file /home/eric/mbox will be backed up from the
directory /.snap/home/eric/mbox, which can complicate restores. If you use where=/tmp, the file will be
restored to /tmp/.snap/home/eric/mbox and you will have to move the file to /home/eric/mbox.bkp by
hand.
However, case, you could use the strip_prefix=/.snap and add_suffix=.bkp options and Bareos will restore the
file to its original location – that is /home/eric/mbox.
To use this feature, there are command line options as described in the restore section of this manual; you can
modify your restore job before running it; or you can add options to your restore job in as described in Strip Prefix
Dir
Job and Add Prefix Dir
Job.
Parameters to modify:
1: Level
2: Storage
...
10: File Relocation
...
Select parameter to modify (1-12):
This will replace your current Where value
1: Strip prefix
2: Add prefix
3: Add file suffix
4: Enter a regexp
5: Test filename manipulation
6: Use this ?
Select parameter to modify (1-6):
The format is very close to that used by sed or Perl (s/replace this/by that/) operator. A valid regexwhere
expression has three fields :
- a search expression (with optional submatch)
- a replacement expression (with optionnal back references $1 to $9)
- a set of search options (only case-insensitive “i” at this time)
Each field is delimited by a separator specified by the user as the first character of the expression. The separator can
be one of the following:
<separator-keyword> = / ! ; % : , ~ # = &
You can use several expressions separated by a commas.
|
|
|
|
| Orignal filename | New filename | RegexWhere | Comments |
|
|
|
|
|
|
|
|
| c:/system.ini | c:/system.old.ini | /.ini$/.old.ini/ | $ matches end of name |
|
|
|
|
| /prod/u01/pdata/ | /rect/u01/rdata | /prod/rect/,/pdata/rdata/ | uses two regexp |
|
|
|
|
| /prod/u01/pdata/ | /rect/u01/rdata | !/prod/!/rect/!,/pdata/rdata/ | use ! as separator |
|
|
|
|
| C:/WINNT | d:/WINNT | /c:/d:/i | case insensitive pattern match |
|
|
|
|
| |
#
Depending how you do the restore, you may or may not get the directory entries back to their original
state. Here are a few of the problems you can encounter, and for same machine restores, how to avoid
them.
- You backed up on one machine and are restoring to another that is either a different OS or doesn’t
have the same users/groups defined. Bareos does the best it can in these situations. Note, Bareos has
saved the user/groups in numeric form, which means on a different machine, they may map to different
user/group names.
- You are restoring into a directory that is already created and has file creation restrictions. Bareos tries
to reset everything but without walking up the full chain of directories and modifying them all during
the restore, which Bareos does and will not do, getting permissions back correctly in this situation
depends to a large extent on your OS.
- You are doing a recursive restore of a directory tree. In this case Bareos will restore a file before
restoring the file’s parent directory entry. In the process of restoring the file Bareos will create the
parent directory with open permissions and ownership of the file being restored. Then when Bareos tries
to restore the parent directory Bareos sees that it already exists (Similar to the previous situation). If
you had set the Restore job’s ”Replace” property to ”never” then Bareos will not change the directory’s
permissions and ownerships to match what it backed up, you should also notice that the actual number
of files restored is less then the expected number. If you had set the Restore job’s ”Replace” property to
”always” then Bareos will change the Directory’s ownership and permissions to match what it backed
up, also the actual number of files restored should be equal to the expected number.
- You selected one or more files in a directory, but did not select the directory entry to be restored. In
that case, if the directory is not on disk Bareos simply creates the directory with some default attributes
which may not be the same as the original. If you do not select a directory and all its contents to be
restored, you can still select items within the directory to be restored by individually marking those
files, but in that case, you should individually use the ”markdir” command to select all higher level
directory entries (one at a time) to be restored if you want the directory entries properly restored.
#
If you are restoring on Windows systems, Bareos will restore the files with the original ownerships and
permissions as would be expected. This is also true if you are restoring those files to an alternate directory
(using the Where option in restore). However, if the alternate directory does not already exist, the
Bareos File daemon (Client) will try to create it. In some cases, it may not create the directories, and if
it does since the File daemon runs under the SYSTEM account, the directory will be created with
SYSTEM ownership and permissions. In this case, you may have problems accessing the newly restored
files.
To avoid this problem, you should create any alternate directory before doing the restore. Bareos will not change the
ownership and permissions of the directory if it is already created as long as it is not one of the directories being
restored (i.e. written to tape).
The default restore location is /tmp/bareos-restores/ and if you are restoring from drive E:, the default will be
/tmp/bareos-restores/e/, so you should ensure that this directory exists before doing the restore, or use the
mod option to select a different where directory that does exist.
Some users have experienced problems restoring files that participate in the Active Directory. They also report that
changing the userid under which Bareos (bareos-fd.exe) runs, from SYSTEM to a Domain Admin userid, resolves
the problem.
#
There are a number of reasons why there may be restore errors or warning messages. Some of the more common
ones are:
-
file count mismatch
- This can occur for the following reasons:
- You requested Bareos not to overwrite existing or newer files.
- A Bareos miscount of files/directories. This is an on-going problem due to the complications of
directories, soft/hard link, and such. Simply check that all the files you wanted were actually
restored.
-
file size error
- When Bareos restores files, it checks that the size of the restored file is the same as the file status
data it saved when starting the backup of the file. If the sizes do not agree, Bareos will print an error message.
This size mismatch most often occurs because the file was being written as Bareos backed up the file. In this
case, the size that Bareos restored will be greater than the status size. This often happens with log
files.
If the restored size is smaller, then you should be concerned about a possible tape error and check the Bareos
output as well as your system logs.
#
Job {
Name = "RestoreFiles"
Type = Restore
Client = Any-client
FileSet = "Any-FileSet"
Storage = Any-storage
Where = /tmp/bareos-restores
Messages = Standard
Pool = Default
}
If Where is not specified, the default location for restoring files will be their original locations.
#
After you have selected the Jobs to be restored and Bareos has created the in-memory directory tree, you will enter
file selection mode as indicated by the dollar sign ($) prompt. While in this mode, you may use the commands listed
above. The basic idea is to move up and down the in memory directory structure with the cd command much as you
normally do on the system. Once you are in a directory, you may select the files that you want restored. As a default
no files are marked to be restored. If you wish to start with all files, simply enter: cd / and mark *. Otherwise
proceed to select the files you wish to restore by marking them with the mark command. The available commands
are:
-
cd
- The cd command changes the current directory to the argument specified. It operates much like the
Unix cd command. Wildcard specifications are not permitted.
Note, on Windows systems, the various drives (c:, d:, ...) are treated like a directory within the file
tree while in the file selection mode. As a consequence, you must do a cd c: or possibly in some cases
a cd C: (note upper case) to get down to the first directory.
-
dir
- The dir command is similar to the ls command, except that it prints it in long format (all details).
This command can be a bit slower than the ls command because it must access the catalog database
for the detailed information for each file.
-
estimate
- The estimate command prints a summary of the total files in the tree, how many are marked
to be restored, and an estimate of the number of bytes to be restored. This can be useful if you are
short on disk space on the machine where the files will be restored.
-
find
- The find command accepts one or more arguments and displays all files in the tree that match that
argument. The argument may have wildcards. It is somewhat similar to the Unix command find /
-name arg.
-
ls
- The ls command produces a listing of all the files contained in the current directory much like the Unix
ls command. You may specify an argument containing wildcards, in which case only those files will be
listed.
Any file that is marked to be restored will have its name preceded by an asterisk (*). Directory names
will be terminated with a forward slash (/) to distinguish them from filenames.
-
lsmark
- The lsmark command is the same as the ls except that it will print only those files marked for
extraction. The other distinction is that it will recursively descend into any directory selected.
-
mark
- The mark command allows you to mark files to be restored. It takes a single argument which is the
filename or directory name in the current directory to be marked for extraction. The argument may
be a wildcard specification, in which case all files that match in the current directory are marked to
be restored. If the argument matches a directory rather than a file, then the directory and all the files
contained in that directory (recursively) are marked to be restored. Any marked file will have its name
preceded with an asterisk (*) in the output produced by the ls or dir commands. Note, supplying a
full path on the mark command does not work as expected to select a file or directory in the current
directory. Also, the mark command works on the current and lower directories but does not touch
higher level directories.
After executing the mark command, it will print a brief summary:
No files marked.
If no files were marked, or:
nn files marked.
if some files are marked.
-
unmark
- The unmark is identical to the mark command, except that it unmarks the specified file or files so that
they will not be restored. Note: the unmark command works from the current directory, so it does not
unmark any files at a higher level. First do a cd / before the unmark * command if you want to unmark
everything.
-
pwd
- The pwd command prints the current working directory. It accepts no arguments.
-
count
- The count command prints the total files in the directory tree and the number of files marked to be
restored.
-
done
- This command terminates file selection mode.
-
exit
- This command terminates file selection mode (the same as done).
-
quit
- This command terminates the file selection and does not run the restore job.
-
help
- This command prints a summary of the commands available.
-
?
- This command is the same as the help command.
If your filename contains some weird caracters, you can use ?, * or ∖∖. For example, if your filename contains a ∖,
you can use ∖∖∖∖.
* mark weird_file\\\\with-backslash
#
This chapter presents most all the features needed to do Volume management. Most of the concepts apply equally
well to both tape and disk Volumes. However, the chapter was originally written to explain backing up to disk, so
you will see it is slanted in that direction, but all the directives presented here apply equally well whether your
volume is disk or tape.
If you have a lot of hard disk storage or you absolutely must have your backups run within a small time window,
you may want to direct Bareos to backup to disk Volumes rather than tape Volumes. This chapter is intended to
give you some of the options that are available to you so that you can manage either disk or tape
volumes.
#
Getting Bareos to write to disk rather than tape in the simplest case is rather easy. In the Storage daemon’s
configuration file, you simply define an Archive Device Sd
Device to be a directory. The default directory to store backups
on disk is /var/lib/bareos/storage:
Device {
Name = FileBackup
Media Type = File
Archive Device = /var/lib/bareos/storage
Random Access = Yes;
AutomaticMount = yes;
RemovableMedia = no;
AlwaysOpen = no;
}
Assuming you have the appropriate Storage resource in your Director’s configuration file that references the above
Device resource,
Storage {
Name = FileStorage
Address = ...
Password = ...
Device = FileBackup
Media Type = File
}
Bareos will then write the archive to the file /var/lib/bareos/storage/<volume-name> where
<volume-name> is the volume name of a Volume defined in the Pool. For example, if you have labeled a Volume
named Vol001, Bareos will write to the file /var/lib/bareos/storage/Vol001. Although you can later move the
archive file to another directory, you should not rename it or it will become unreadable by Bareos. This is because
each archive has the filename as part of the internal label, and the internal label must agree with the system
filename before Bareos will use it.
Although this is quite simple, there are a number of problems. The first is that unless you specify otherwise,
Bareos will always write to the same volume until you run out of disk space. This problem is addressed
below.
In addition, if you want to use concurrent jobs that write to several different volumes at the same time, you will
need to understand a number of other details. An example of such a configuration is given at the end of this chapter
under Concurrent Disk Jobs.
#
Some of the options you have, all of which are specified in the Pool record, are:
- Maximum Volume Jobs Dir
Pool: write only the specified number of jobs on each Volume.
- Maximum Volume Bytes Dir
Pool: limit the maximum size of each Volume.
Note, if you use disk volumes you should probably limit the Volume size to some reasonable value. If
you ever have a partial hard disk failure, you are more likely to be able to recover more data if they
are in smaller Volumes.
- Volume Use Duration Dir
Pool: restrict the time between first and last data written to Volume.
Note that although you probably would not want to limit the number of bytes on a tape as you would on a disk
Volume, the other options can be very useful in limiting the time Bareos will use a particular Volume (be it tape or
disk). For example, the above directives can allow you to ensure that you rotate through a set of daily Volumes if
you wish.
As mentioned above, each of those directives is specified in the Pool or Pools that you use for your Volumes. In the
case of Maximum Volume Jobs Dir
Pool, Maximum Volume Bytes Dir
Pool and Volume Use Duration Dir
Pool, you can actually
specify the desired value on a Volume by Volume basis. The value specified in the Pool record becomes the
default when labeling new Volumes. Once a Volume has been created, it gets its own copy of the Pool
defaults, and subsequently changing the Pool will have no effect on existing Volumes. You can either
manually change the Volume values, or refresh them from the Pool defaults using the update volume
command in the Console. As an example of the use of one of the above, suppose your Pool resource
contains:
Pool {
Name = File
Pool Type = Backup
Volume Use Duration = 23h
}
Configuration 17.1:
Volume Use Duration
then if you run a backup once a day (every 24 hours), Bareos will use a new Volume for each backup, because each
Volume it writes can only be used for 23 hours after the first write. Note, setting the use duration to 23 hours is not
a very good solution for tapes unless you have someone on-site during the weekends, because Bareos will want a new
Volume and no one will be present to mount it, so no weekend backups will be done until Monday
morning.
#
Use of the above records brings up another problem – that of labeling your Volumes. For automated disk backup,
you can either manually label each of your Volumes, or you can have Bareos automatically label new Volumes when
they are needed.
Please note that automatic Volume labeling can also be used with tapes, but it is not nearly so practical since the
tapes must be pre-mounted. This requires some user interaction. Automatic labeling from templates does NOT work
with autochangers since Bareos will not access unknown slots. There are several methods of labeling all
volumes in an autochanger magazine. For more information on this, please see the Autochanger Support
chapter.
Automatic Volume labeling is enabled by making a change to both the PoolDir resource and to the DeviceSd
resource shown above. In the case of the Pool resource, you must provide Bareos with a label format that it will use
to create new names. In the simplest form, the label format is simply the Volume name, to which Bareos will
append a four digit number. This number starts at 0001 and is incremented for each Volume the catalog contains.
Thus if you modify your Pool resource to be:
Pool {
Name = File
Pool Type = Backup
Volume Use Duration = 23h
Label Format = "Vol"
}
Configuration 17.2:
Label Format
Bareos will create Volume names Vol0001, Vol0002, and so on when new Volumes are needed. Much more complex
and elaborate labels can be created using variable expansion defined in the Variable Expansion chapter of this
manual.
The second change that is necessary to make automatic labeling work is to give the Storage daemon permission to
automatically label Volumes. Do so by adding Label Media Sd
Device = yes to the Device resource as
follows:
Device {
Name = File
Media Type = File
Archive Device = /var/lib/bareos/storage/
Random Access = yes
Automatic Mount = yes
Removable Media = no
Always Open = no
Label Media = yes
}
Configuration 17.3:
Label Media = yes
See Label Format Dir
Pool for details about the labeling format.
#
Automatic labeling discussed above brings up the problem of Volume management. With the above scheme, a new
Volume will be created every day. If you have not specified Retention periods, your Catalog will continue to fill
keeping track of all the files Bareos has backed up, and this procedure will create one new archive file (Volume)
every day.
The tools Bareos gives you to help automatically manage these problems are the following:
The first three records (File Retention Dir
Client, Job Retention Dir
Client and Auto Prune Dir
Client) determine the amount of
time that Job and File records will remain in your Catalog and they are discussed in detail in the Automatic
Volume Recycling chapter.
Volume Retention Dir
Pool, Auto Prune Dir
Pool and Recycle Dir
Pool determine how long Bareos will keep your
Volumes before reusing them and they are also discussed in detail in the Automatic Volume Recycling
chapter.
The Maximum Volumes Dir
Pool record can also be used in conjunction with the Volume Retention Dir
Pool period to limit
the total number of archive Volumes that Bareos will create. By setting an appropriate Volume Retention Dir
Pool
period, a Volume will be purged just before it is needed and thus Bareos can cycle through a fixed set of Volumes.
Cycling through a fixed set of Volumes can also be done by setting Purge Oldest Volume Dir
Pool = yes or Recycle
Current Volume Dir
Pool = yes. In this case, when Bareos needs a new Volume, it will prune the specified
volume.
#
Above, we discussed how you could have a single device named FileBackupSd
Device that writes to
volumes in /var/lib/bareos/storage/. You can, in fact, run multiple concurrent jobs using the Storage
definition given with this example, and all the jobs will simultaneously write into the Volume that is being
written.
Now suppose you want to use multiple Pools, which means multiple Volumes, or suppose you want each client to
have its own Volume and perhaps its own directory such as /home/bareos/client1 and /home/bareos/client2
... . With the single Storage and Device definition above, neither of these two is possible. Why? Because Bareos disk
storage follows the same rules as tape devices. Only one Volume can be mounted on any Device at any time. If
you want to simultaneously write multiple Volumes, you will need multiple Device resources in your
Bareos Storage Daemon configuration and thus multiple Storage resources in your Bareos Director
configuration.
Okay, so now you should understand that you need multiple Device definitions in the case of different directories or
different Pools, but you also need to know that the catalog data that Bareos keeps contains only the Media Type
and not the specific storage device. This permits a tape for example to be re-read on any compatible tape
drive. The compatibility being determined by the Media Type (Media Type Dir
Storage and Media Type
Sd
Device). The same applies to disk storage. Since a volume that is written by a Device in say directory
/home/bareos/backups cannot be read by a Device with an Archive Device Sd
Device = /home/bareos/client1,
you will not be able to restore all your files if you give both those devices Media Type Sd
Device = File.
During the restore, Bareos will simply choose the first available device, which may not be the correct
one. If this is confusing, just remember that the Directory has only the Media Type and the Volume
name. It does not know the Archive Device Sd
Device (or the full path) that is specified in the Bareos
Storage Daemon. Thus you must explicitly tie your Volumes to the correct Device by using the Media
Type.
#
The following example is not very practical, but can be used to demonstrate the proof of concept in a relatively
short period of time.
The example consists of a two clients that are backed up to a set of 12 Volumes for each client into different
directories on the Storage machine. Each Volume is used (written) only once, and there are four Full saves done
every hour (so the whole thing cycles around after three hours).
What is key here is that each physical device on the Bareos Storage Daemon has a different Media Type. This allows
the Director to choose the correct device for restores.
The Bareos Director configuration is as follows:
Director {
Name = bareos-dir
QueryFile = "/usr/lib/bareos/scripts/query.sql"
Password = "<secret>"
}
Schedule {
Name = "FourPerHour"
Run = Level=Full hourly at 0:05
Run = Level=Full hourly at 0:20
Run = Level=Full hourly at 0:35
Run = Level=Full hourly at 0:50
}
FileSet {
Name = "Example FileSet"
Include {
Options {
compression=GZIP
signature=SHA1
}
File = /etc
}
}
Job {
Name = "RecycleExample"
Type = Backup
Level = Full
Client = client1-fd
FileSet= "Example FileSet"
Messages = Standard
Storage = FileStorage
Pool = Recycle
Schedule = FourPerHour
}
Job {
Name = "RecycleExample2"
Type = Backup
Level = Full
Client = client2-fd
FileSet= "Example FileSet"
Messages = Standard
Storage = FileStorage2
Pool = Recycle2
Schedule = FourPerHour
}
Client {
Name = client1-fd
Address = client1.example.com
Password = client1_password
}
Client {
Name = client2-fd
Address = client2.example.com
Password = client2_password
}
Storage {
Name = FileStorage
Address = bareos-sd.example.com
Password = local_storage_password
Device = RecycleDir
Media Type = File
}
Storage {
Name = FileStorage2
Address = bareos-sd.example.com
Password = local_storage_password
Device = RecycleDir2
Media Type = File1
}
Catalog {
Name = MyCatalog
...
}
Messages {
Name = Standard
...
}
Pool {
Name = Recycle
Pool Type = Backup
Label Format = "Recycle-"
Auto Prune = yes
Use Volume Once = yes
Volume Retention = 2h
Maximum Volumes = 12
Recycle = yes
}
Pool {
Name = Recycle2
Pool Type = Backup
Label Format = "Recycle2-"
Auto Prune = yes
Use Volume Once = yes
Volume Retention = 2h
Maximum Volumes = 12
Recycle = yes
}
Configuration 17.4:
and the Bareos Storage Daemon configuration is:
Storage {
Name = bareos-sd
Maximum Concurrent Jobs = 10
}
Director {
Name = bareos-dir
Password = local_storage_password
}
Device {
Name = RecycleDir
Media Type = File
Archive Device = /home/bareos/backups
LabelMedia = yes;
Random Access = Yes;
AutomaticMount = yes;
RemovableMedia = no;
AlwaysOpen = no;
}
Device {
Name = RecycleDir2
Media Type = File2
Archive Device = /home/bareos/backups2
LabelMedia = yes;
Random Access = Yes;
AutomaticMount = yes;
RemovableMedia = no;
AlwaysOpen = no;
}
Messages {
Name = Standard
director = bareos-dir = all
}
Configuration 17.5:
With a little bit of work, you can change the above example into a weekly or monthly cycle (take care about the
amount of archive disk space used).
#
Bareos treats disk volumes similar to tape volumes as much as it can. This means that you can only have a single
Volume mounted at one time on a disk as defined in your DeviceSd resource.
If you use Bareos without Data Spooling, multiple concurrent backup jobs can be written to a Volume using
interleaving. However, interleaving has disadvantages, see Concurrent Jobs.
Also the DeviceSd will be in use. If there are other jobs, requesting other Volumes, these jobs have to
wait.
On a tape (or autochanger), this is a physical limitation of the hardware. However, when using disk storage, this is
only a limitation of the software.
To enable Bareos to run concurrent jobs (on disk storage), define as many DeviceSd as concurrent jobs should run.
All these DeviceSds can use the same Archive Device Sd
Device directory. Set Maximum Concurrent Jobs Sd
Device = 1 for all
these devices.
Director {
Name = bareos-dir.example.com
QueryFile = "/usr/lib/bareos/scripts/query.sql"
Maximum Concurrent Jobs = 10
Password = "<secret>"
}
Storage {
Name = File
Address = bareos-sd.bareos.com
Password = "<sd-secret>"
Device = FileStorage1
Device = FileStorage2
Device = FileStorage3
Device = FileStorage4
# number of devices = Maximum Concurrent Jobs
Maximum Concurrent Jobs = 4
Media Type = File
}
[...]
Configuration 17.6:
Bareos Director configuration: using 4 storage devices
Storage {
Name = bareos-sd.example.com
# any number >= 4
Maximum Concurrent Jobs = 20
}
Director {
Name = bareos-dir.example.com
Password = "<sd-secret>"
}
Device {
Name = FileStorage1
Media Type = File
Archive Device = /var/lib/bareos/storage
LabelMedia = yes
Random Access = yes
AutomaticMount = yes
RemovableMedia = no
AlwaysOpen = no
Maximum Concurrent Jobs = 1
}
Device {
Name = FileStorage2
Media Type = File
Archive Device = /var/lib/bareos/storage
LabelMedia = yes
Random Access = yes
AutomaticMount = yes
RemovableMedia = no
AlwaysOpen = no
Maximum Concurrent Jobs = 1
}
Device {
Name = FileStorage3
Media Type = File
Archive Device = /var/lib/bareos/storage
LabelMedia = yes
Random Access = yes
AutomaticMount = yes
RemovableMedia = no
AlwaysOpen = no
Maximum Concurrent Jobs = 1
}
Device {
Name = FileStorage4
Media Type = File
Archive Device = /var/lib/bareos/storage
LabelMedia = yes
Random Access = yes
AutomaticMount = yes
RemovableMedia = no
AlwaysOpen = no
Maximum Concurrent Jobs = 1
}
Configuration 17.7:
Bareos Storage Daemon configuraton: using 4 storage devices
#
By default, once Bareos starts writing a Volume, it can append to the volume, but it will not overwrite the existing
data thus destroying it. However when Bareos recycles a Volume, the Volume becomes available for being reused and
Bareos can at some later time overwrite the previous contents of that Volume. Thus all previous data will be lost. If
the Volume is a tape, the tape will be rewritten from the beginning. If the Volume is a disk file, the file will be
truncated before being rewritten.
You may not want Bareos to automatically recycle (reuse) tapes. This would require a large number of tapes
though, and in such a case, it is possible to manually recycle tapes. For more on manual recycling, see the Manually
Recycling Volumes chapter.
Most people prefer to have a Pool of tapes that are used for daily backups and recycled once a week, another Pool of
tapes that are used for Full backups once a week and recycled monthly, and finally a Pool of tapes that are used
once a month and recycled after a year or two. With a scheme like this, the number of tapes in your pool or pools
remains constant.
By properly defining your Volume Pools with appropriate Retention periods, Bareos can manage the recycling (such
as defined above) automatically.
Automatic recycling of Volumes is controlled by four records in the PoolDir resource definition. These four records
are:
The above three directives are all you need assuming that you fill each of your Volumes then wait the Volume
Retention period before reusing them. If you want Bareos to stop using a Volume and recycle it before it is full, you
can use one or more additional directives such as:
Please see below and the Basic Volume Management chapter of this manual for complete examples.
Automatic recycling of Volumes is performed by Bareos only when it wants a new Volume and no appendable
Volumes are available in the Pool. It will then search the Pool for any Volumes with the Recycle flag set
and the Volume Status is Purged. At that point, it will choose the oldest purged volume and recycle
it.
If there are no volumes with status Purged, then the recycling occurs in two steps:
- The Catalog for a Volume must be pruned of all Jobs (i.e. Purged).
- The actual recycling of the Volume.
Only Volumes marked Full or Used will be considerd for pruning. The Volume will be purged if the
Volume Retention period has expired. When a Volume is marked as Purged, it means that no Catalog records
reference that Volume and the Volume can be recycled.
Until recycling actually occurs, the Volume data remains intact. If no Volumes can be found for recycling for any of
the reasons stated above, Bareos will request operator intervention (i.e. it will ask you to label a new
volume).
A key point mentioned above, that can be a source of frustration, is that Bareos will only recycle purged Volumes
if there is no other appendable Volume available. Otherwise, it will always write to an appendable
Volume before recycling even if there are Volume marked as Purged. This preserves your data as long as
possible. So, if you wish to “force” Bareos to use a purged Volume, you must first ensure that no other
Volume in the Pool is marked Append. If necessary, you can manually set a volume to Full. The reason
for this is that Bareos wants to preserve the data on your old tapes (even though purged from the
catalog) as long as absolutely possible before overwriting it. There are also a number of directives
such as Volume Use Duration that will automatically mark a volume as Used and thus no longer
appendable.
#
As Bareos writes files to tape, it keeps a list of files, jobs, and volumes in a database called the catalog. Among other
things, the database helps Bareos to decide which files to back up in an incremental or differential
backup, and helps you locate files on past backups when you want to restore something. However,
the catalog will grow larger and larger as time goes on, and eventually it can become unacceptably
large.
Bareos’s process for removing entries from the catalog is called Pruning. The default is Automatic Pruning, which
means that once an entry reaches a certain age (e.g. 30 days old) it is removed from the catalog. Note that Job
records that are required for current restore and File records are needed for VirtualFull and Accurate backups won’t
be removed automatically.
Once a job has been pruned, you can still restore it from the backup tape, but one additional step is required:
scanning the volume with bscan.
The alternative to Automatic Pruning is Manual Pruning, in which you explicitly tell Bareos to erase the catalog
entries for a volume. You’d usually do this when you want to reuse a Bareos volume, because there’s no point in
keeping a list of files that USED TO BE on a tape. Or, if the catalog is starting to get too big, you
could prune the oldest jobs to save space. Manual pruning is done with the prune command in the
console.
#
There are three pruning durations. All apply to catalog database records and not to the actual data in a Volume.
The pruning (or retention) durations are for: Volumes (Media records), Jobs (Job records), and Files (File records).
The durations inter-depend because if Bareos prunes a Volume, it automatically removes all the Job records, and all
the File records. Also when a Job record is pruned, all the File records for that Job are also pruned (deleted) from
the catalog.
Having the File records in the database means that you can examine all the files backed up for a particular Job.
They take the most space in the catalog (probably 90-95% of the total). When the File records are pruned, the Job
records can remain, and you can still examine what Jobs ran, but not the details of the Files backed up.
In addition, without the File records, you cannot use the Console restore command to restore the
files.
When a Job record is pruned, the Volume (Media record) for that Job can still remain in the database, and if you
do a list volumes, you will see the volume information, but the Job records (and its File records) will no longer be
available.
In each case, pruning removes information about where older files are, but it also prevents the catalog from growing
to be too large. You choose the retention periods in function of how many files you are backing up and the time
periods you want to keep those records online, and the size of the database. It is possible to re-insert the records
(with 98% of the original data) by using bscan to scan in a whole Volume or any part of the volume that you
want.
By setting Auto Prune Dir
Pool = yes you will permit the Bareos Director to automatically prune all Volumes in the
Pool when a Job needs another Volume. Volume pruning means removing records from the catalog. It does not
shrink the size of the Volume or affect the Volume data until the Volume gets overwritten. When a Job requests
another volume and there are no Volumes with Volume status Append available, Bareos will begin volume pruning.
This means that all Jobs that are older than the Volume Retention period will be pruned from every Volume that
has Volume status Full or Used and has Recycle = yes. Pruning consists of deleting the corresponding Job, File,
and JobMedia records from the catalog database. No change to the physical data on the Volume occurs during the
pruning process. When all files are pruned from a Volume (i.e. no records in the catalog), the Volume will be marked
as Purged implying that no Jobs remain on the volume. The Pool records that control the pruning are described
below.
-
- Auto Prune Dir
Pool = yes: when running a Job and it needs a new Volume but no appendable volumes are
available, apply the Volume retention period. At that point, Bareos will prune all Volumes that can be
pruned in an attempt to find a usable volume. If during the autoprune, all files are pruned from the
Volume, it will be marked with Volume status Purged.
Note, that although the File and Job records may be pruned from the catalog, a Volume will only be
marked Purged (and hence ready for recycling) if the Volume status is Append, Full, Used, or Error. If
the Volume has another status, such as Archive, Read-Only, Disabled, Busy or Cleaning, the Volume
status will not be changed to Purged.
-
- Volume Retention Dir
Pool defines the length of time that Bareos will guarantee that the Volume is not reused
counting from the time the last job stored on the Volume terminated. A key point is that this time
period is not even considered as long at the Volume remains appendable. The Volume Retention period
count down begins only when the Append status has been changed to some other status (Full, Used,
Purged, ...).
When this time period expires and if Auto Prune Dir
Pool = yes and a new Volume is needed, but no
appendable Volume is available, Bareos will prune (remove) Job records that are older than the specified
Volume Retention period.
The Volume Retention period takes precedence over any Job Retention Dir
Client period you have specified
in the Client resource. It should also be noted, that the Volume Retention period is obtained by
reading the Catalog Database Media record rather than the Pool resource record. This means that if you
change the Volume Retention Dir
Pool in the Pool resource record, you must ensure that the corresponding
change is made in the catalog by using the update pool command. Doing so will insure that any new
Volumes will be created with the changed Volume Retention period. Any existing Volumes will have
their own copy of the Volume Retention period that can only be changed on a Volume by Volume
basis using the update volume command.
When all file catalog entries are removed from the volume, its Volume status is set to Purged. The files
remain physically on the Volume until the volume is overwritten.
-
- Recycle Dir
Pool defines whether or not the particular Volume can be recycled (i.e. rewritten). If Recycle is set to
no, then even if Bareos prunes all the Jobs on the volume and it is marked Purged, it will not consider
the tape for recycling. If Recycle is set to yes and all Jobs have been pruned, the volume status will
be set to Purged and the volume may then be reused when another volume is needed. If the volume is
reused, it is relabeled with the same Volume Name, however all previous data will be lost.
#
After all Volumes of a Pool have been pruned (as mentioned above, this happens when a Job needs a new Volume
and no appendable Volumes are available), Bareos will look for the oldest Volume that is Purged (all Jobs and Files
expired), and if the Recycle = yes for that Volume, Bareos will relabel it and write new data on
it.
As mentioned above, there are two key points for getting a Volume to be recycled. First, the Volume must no longer
be marked Append (there are a number of directives to automatically make this change), and second since the last
write on the Volume, one or more of the Retention periods must have expired so that there are no more catalog
backup job records that reference that Volume. Once both those conditions are satisfied, the volume can be marked
Purged and hence recycled.
The full algorithm that Bareos uses when it needs a new Volume is:
The algorithm described below assumes that Auto Prune is enabled, that Recycling is turned on, and that you have
defined appropriate Retention periods or used the defaults for all these items.
- If the request is for an Autochanger device, look only for Volumes in the Autochanger (i.e. with
InChanger set and that have the correct Storage device).
- Search the Pool for a Volume with Volume status=Append (if there is more than one, the Volume with
the oldest date last written is chosen. If two have the same date then the one with the lowest MediaId
is chosen).
- Search the Pool for a Volume with Volume status=Recycle and the InChanger flag is set true (if there
is more than one, the Volume with the oldest date last written is chosen. If two have the same date
then the one with the lowest MediaId is chosen).
- Try recycling any purged Volumes.
- Prune volumes applying Volume retention period (Volumes with VolStatus Full, Used, or Append are
pruned). Note, even if all the File and Job records are pruned from a Volume, the Volume will not be
marked Purged until the Volume retention period expires.
- Search the Pool for a Volume with VolStatus=Purged
- If a Pool named ScratchDir
Pool exists, search for a Volume and if found move it to the current Pool for the
Job and use it. Note, when the Scratch Volume is moved into the current Pool, the basic Pool defaults
are applied as if it is a newly labeled Volume (equivalent to an update volume from pool command).
- If we were looking for Volumes in the Autochanger, go back to step 2 above, but this time, look for
any Volume whether or not it is in the Autochanger.
- Attempt to create a new Volume if automatic labeling enabled. If the maximum number of Volumes
specified for the pool is reached, no new Volume will be created.
- Prune the oldest Volume if Recycle Oldest Volume Dir
Pool=yes (the Volume with the oldest LastWritten
date and VolStatus equal to Full, Recycle, Purged, Used, or Append is chosen). This record ensures
that all retention periods are properly respected.
- Purge the oldest Volume if Purge Oldest Volume Dir
Pool=yes (the Volume with the oldest LastWritten date
and VolStatus equal to Full, Recycle, Purged, Used, or Append is chosen). Please note! We strongly
recommend against the use of Purge Oldest Volume as it can quite easily lead to loss of current
backup data.
- Give up and ask operator.
The above occurs when Bareos has finished writing a Volume or when no Volume is present in the
drive.
On the other hand, if you have inserted a different Volume after the last job, and Bareos recognizes the Volume as
valid, it will request authorization from the Director to use this Volume. In this case, if you have set Recycle Current
Volume Dir
Pool = yes and the Volume is marked as Used or Full, Bareos will prune the volume and if all jobs
were removed during the pruning (respecting the retention periods), the Volume will be recycled and
used.
The recycling algorithm in this case is:
- If the Volume status is Append or Recycle, the volume will be used.
- If Recycle Current Volume Dir
Pool = yes and the volume is marked Full or Used, Bareos will prune the
volume (applying the retention period). If all Jobs are pruned from the volume, it will be recycled.
This permits users to manually change the Volume every day and load tapes in an order different from what
is in the catalog, and if the volume does not contain a current copy of your backup data, it will be
used.
A few points from Alan Brown to keep in mind:
- If Maximum Volumes Dir
Pool is not set, Bareos will prefer to demand new volumes over forcibly purging
older volumes.
- If volumes become free through pruning and the Volume retention period has expired, then they get
marked as Purged and are immediately available for recycling - these will be used in preference to
creating new volumes.
#
Each Volume inherits the Recycle status (yes or no) from the Pool resource record when the Media record is created
(normally when the Volume is labeled). This Recycle status is stored in the Media record of the Catalog. Using the
Console program, you may subsequently change the Recycle status for each Volume. For example in the following
output from list volumes:
+----------+-------+--------+---------+------------+--------+-----+
| VolumeNa | Media | VolSta | VolByte | LastWritte | VolRet | Rec |
+----------+-------+--------+---------+------------+--------+-----+
| File0001 | File | Full | 4190055 | 2002-05-25 | 14400 | 1 |
| File0002 | File | Full | 1896460 | 2002-05-26 | 14400 | 1 |
| File0003 | File | Full | 1896460 | 2002-05-26 | 14400 | 1 |
| File0004 | File | Full | 1896460 | 2002-05-26 | 14400 | 1 |
| File0005 | File | Full | 1896460 | 2002-05-26 | 14400 | 1 |
| File0006 | File | Full | 1896460 | 2002-05-26 | 14400 | 1 |
| File0007 | File | Purged | 1896466 | 2002-05-26 | 14400 | 1 |
+----------+-------+--------+---------+------------+--------+-----+
all the volumes are marked as recyclable, and the last Volume, File0007 has been purged, so it may be immediately
recycled. The other volumes are all marked recyclable and when their Volume Retention period (14400 seconds or
four hours) expires, they will be eligible for pruning, and possibly recycling. Even though Volume
File0007 has been purged, all the data on the Volume is still recoverable. A purged Volume simply
means that there are no entries in the Catalog. Even if the Volume Status is changed to Recycle,
the data on the Volume will be recoverable. The data is lost only when the Volume is re-labeled and
re-written.
To modify Volume File0001 so that it cannot be recycled, you use the update volume pool=File command in
the console program, or simply update and Bareos will prompt you for the information.
+----------+------+-------+---------+-------------+-------+-----+
| VolumeNa | Media| VolSta| VolByte | LastWritten | VolRet| Rec |
+----------+------+-------+---------+-------------+-------+-----+
| File0001 | File | Full | 4190055 | 2002-05-25 | 14400 | 0 |
| File0002 | File | Full | 1897236 | 2002-05-26 | 14400 | 1 |
| File0003 | File | Full | 1896460 | 2002-05-26 | 14400 | 1 |
| File0004 | File | Full | 1896460 | 2002-05-26 | 14400 | 1 |
| File0005 | File | Full | 1896460 | 2002-05-26 | 14400 | 1 |
| File0006 | File | Full | 1896460 | 2002-05-26 | 14400 | 1 |
| File0007 | File | Purged| 1896466 | 2002-05-26 | 14400 | 1 |
+----------+------+-------+---------+-------------+-------+-----+
In this case, File0001 will never be automatically recycled. The same effect can be achieved by setting the Volume
Status to Read-Only.
As you have noted, the Volume Status (VolStatus) column in the catalog database contains the current
status of the Volume, which is normally maintained automatically by Bareos. To give you an idea of
some of the values it can take during the life cycle of a Volume, here is a picture created by Arno
Lehmann:
A typical volume life cycle is like this:
because job count or size limit exceeded
Append --------------------------------------> Used/Full
^ |
| First Job writes to Retention time passed |
| the volume and recycling takes |
| place |
| v
Recycled <-------------------------------------- Purged
Volume is selected for reuse
#
This example is meant to show you how one could define a fixed set of volumes that Bareos will rotate through on a
regular schedule. There are an infinite number of such schemes, all of which have various advantages and
disadvantages.
We start with the following assumptions:
- A single tape has more than enough capacity to do a full save.
- There are ten tapes that are used on a daily basis for incremental backups. They are prelabeled Daily1
... Daily10.
- There are four tapes that are used on a weekly basis for full backups. They are labeled Week1 ...
Week4.
- There are 12 tapes that are used on a monthly basis for full backups. They are numbered Month1 ...
Month12
- A full backup is done every Saturday evening (tape inserted Friday evening before leaving work).
- No backups are done over the weekend (this is easy to change).
- The first Friday of each month, a Monthly tape is used for the Full backup.
- Incremental backups are done Monday - Friday (actually Tue-Fri mornings).
We start the system by doing a Full save to one of the weekly volumes or one of the monthly volumes. The next
morning, we remove the tape and insert a Daily tape. Friday evening, we remove the Daily tape and insert the next
tape in the Weekly series. Monday, we remove the Weekly tape and re-insert the Daily tape. On the first Friday of
the next month, we insert the next Monthly tape in the series rather than a Weekly tape, then continue. When
a Daily tape finally fills up, Bareos will request the next one in the series, and the next day when
you notice the email message, you will mount it and Bareos will finish the unfinished incremental
backup.
What does this give? Well, at any point, you will have the last complete Full save plus several Incremental saves. For
any given file you want to recover (or your whole system), you will have a copy of that file every day for at least the
last 14 days. For older versions, you will have at least three and probably four Friday full saves of that file, and
going back further, you will have a copy of that file made on the beginning of the month for at least a
year.
So you have copies of any file (or your whole system) for at least a year, but as you go back in time, the time
between copies increases from daily to weekly to monthly.
What would the Bareos configuration look like to implement such a scheme?
Schedule {
Name = "NightlySave"
Run = Level=Full Pool=Monthly 1st sat at 03:05
Run = Level=Full Pool=Weekly 2nd-5th sat at 03:05
Run = Level=Incremental Pool=Daily tue-fri at 03:05
}
Job {
Name = "NightlySave"
Type = Backup
Level = Full
Client = LocalMachine
FileSet = "File Set"
Messages = Standard
Storage = DDS-4
Pool = Daily
Schedule = "NightlySave"
}
# Definition of file storage device
Storage {
Name = DDS-4
Address = localhost
SDPort = 9103
Password = XXXXXXXXXXXXX
Device = FileStorage
Media Type = 8mm
}
FileSet {
Name = "File Set"
Include {
Options {
signature=MD5
}
File = fffffffffffffffff
}
Exclude { File=*.o }
}
Pool {
Name = Daily
Pool Type = Backup
AutoPrune = yes
VolumeRetention = 10d # recycle in 10 days
Maximum Volumes = 10
Recycle = yes
}
Pool {
Name = Weekly
Use Volume Once = yes
Pool Type = Backup
AutoPrune = yes
VolumeRetention = 30d # recycle in 30 days (default)
Recycle = yes
}
Pool {
Name = Monthly
Use Volume Once = yes
Pool Type = Backup
AutoPrune = yes
VolumeRetention = 365d # recycle in 1 year
Recycle = yes
}
#
Perhaps the best way to understand the various resource records that come into play during automatic pruning and
recycling is to run a Job that goes through the whole cycle. If you add the following resources to your Director’s
configuration file:
Schedule {
Name = "30 minute cycle"
Run = Level=Full Pool=File Messages=Standard Storage=File
hourly at 0:05
Run = Level=Full Pool=File Messages=Standard Storage=File
hourly at 0:35
}
Job {
Name = "Filetest"
Type = Backup
Level = Full
Client=XXXXXXXXXX
FileSet="Test Files"
Messages = Standard
Storage = File
Pool = File
Schedule = "30 minute cycle"
}
# Definition of file storage device
Storage {
Name = File
Address = XXXXXXXXXXX
SDPort = 9103
Password = XXXXXXXXXXXXX
Device = FileStorage
Media Type = File
}
FileSet {
Name = "File Set"
Include {
Options {
signature=MD5
}
File = fffffffffffffffff
}
Exclude { File=*.o }
}
Pool {
Name = File
Use Volume Once = yes
Pool Type = Backup
LabelFormat = "File"
AutoPrune = yes
VolumeRetention = 4h
Maximum Volumes = 12
Recycle = yes
}
Where you will need to replace the ffffffffff’s by the appropriate files to be saved for your configuration. For the
FileSet Include, choose a directory that has one or two megabytes maximum since there will probably be
approximately eight copies of the directory that Bareos will cycle through.
In addition, you will need to add the following to your Storage daemon’s configuration file:
Device {
Name = FileStorage
Media Type = File
Archive Device = /tmp
LabelMedia = yes;
Random Access = Yes;
AutomaticMount = yes;
RemovableMedia = no;
AlwaysOpen = no;
}
With the above resources, Bareos will start a Job every half hour that saves a copy of the directory you chose to
/tmp/File0001 ... /tmp/File0012. After 4 hours, Bareos will start recycling the backup Volumes (/tmp/File0001 ...).
You should see this happening in the output produced. Bareos will automatically create the Volumes (Files) the first
time it uses them.
To turn it off, either delete all the resources you’ve added, or simply comment out the Schedule record in the Job
resource.
#
Although automatic recycling of Volumes is implemented (see the Automatic Volume Recycling chapter of this
manual), you may want to manually force reuse (recycling) of a Volume.
Assuming that you want to keep the Volume name, but you simply want to write new data on the tape, the steps to
take are:
- Use the update volume command in the Console to ensure that Recycle = yes.
- Use the purge jobs volume command in the Console to mark the Volume as Purged. Check by using
list volumes.
Once the Volume is marked Purged, it will be recycled the next time a Volume is needed.
If you wish to reuse the tape by giving it a new name, use the relabel instead of the purge command.
Please note! The delete command can be dangerous. Once it is done, to recover the File records, you must either
restore your database as it was before the delete command or use the bscan utility program to scan the tape and
recreate the database entries.
#
If you manage five or ten machines and have a nice tape backup, you don’t need Pools, and you may wonder what
they are good for. In this chapter, you will see that Pools can help you optimize disk storage space. The same
techniques can be applied to a shop that has multiple tape drives, or that wants to mount various different Volumes
to meet their needs.
The rest of this chapter will give an example involving backup to disk Volumes, but most of the information applies
equally well to tape Volumes.
Given is a scenario, where the size of a full backup is about 15GB.
It is required, that backup data is available for six months. Old files should be available on a daily basis for a week,
a weekly basis for a month, then monthly for six months. In addition, offsite capability is not needed. The daily
changes amount to about 300MB on the average, or about 2GB per week.
As a consequence, the total volume of data they need to keep to meet their needs is about 100GB (15GB x 6 + 2GB
x 5 + 0.3 x 7) = 102.1GB.
The chosen solution was to use a 120GB hard disk – far less than 1/10th the price of a tape drive
and the cassettes to handle the same amount of data, and to have the backup software write to disk
files.
The rest of this chapter will explain how to setup Bareos so that it would automatically manage a set of disk files
with the minimum sysadmin intervention.
#
Getting Bareos to write to disk rather than tape in the simplest case is rather easy.
One needs to consider about what happens if we have only a single large Bareos Volume defined on our hard disk.
Everything works fine until the Volume fills, then Bareos will ask you to mount a new Volume. This same
problem applies to the use of tape Volumes if your tape fills. Being a hard disk and the only one you
have, this will be a bit of a problem. It should be obvious that it is better to use a number of smaller
Volumes and arrange for Bareos to automatically recycle them so that the disk storage space can be
reused.
As mentioned, the solution is to have multiple Volumes, or files on the disk. To do so, we need to limit the use and
thus the size of a single Volume, by time, by number of jobs, or by size. Any of these would work, but we chose to
limit the use of a single Volume by putting a single job in each Volume with the exception of Volumes containing
Incremental backup where there will be 6 jobs (a week’s worth of data) per volume. The details of this will be
discussed shortly. This is a single client backup, so if you have multiple clients you will need to multiply those
numbers by the number of clients, or use a different system for switching volumes, such as limiting the volume
size.
TODO: This chapter will get rewritten. Instead of limiting a Volume to one job, we will utilize
Max Use Duration = 24 hours. This prevents problems when adding more clients, because otherwise each job
has to run seperat.
The next problem to resolve is recycling of Volumes. As you noted from above, the requirements are to be able to
restore monthly for 6 months, weekly for a month, and daily for a week. So to simplify things, why not do a Full
save once a month, a Differential save once a week, and Incremental saves daily. Now since each of these different
kinds of saves needs to remain valid for differing periods, the simplest way to do this (and possibly the only) is to
have a separate Pool for each backup type.
The decision was to use three Pools: one for Full saves, one for Differential saves, and one for Incremental saves, and
each would have a different number of volumes and a different Retention period to accomplish the
requirements.
#
Putting a single Full backup on each Volume, will require six Full save Volumes, and a retention period of six
months. The Pool needed to do that is:
Pool {
Name = Full-Pool
Pool Type = Backup
Recycle = yes
AutoPrune = yes
Volume Retention = 6 months
Maximum Volume Jobs = 1
Label Format = Full-
Maximum Volumes = 9
}
Configuration 18.1:
Full-Pool
Since these are disk Volumes, no space is lost by having separate Volumes for each backup (done once a month in
this case). The items to note are the retention period of six months (i.e. they are recycled after six months), that
there is one job per volume (Maximum Volume Jobs = 1), the volumes will be labeled Full-0001, ... Full-0006
automatically. One could have labeled these manually from the start, but why not use the features of
Bareos.
Six months after the first volume is used, it will be subject to pruning and thus recycling, so with a maximum of 9
volumes, there should always be 3 volumes available (note, they may all be marked used, but they will be marked
purged and recycled as needed).
If you have two clients, you would want to set Maximum Volume Jobs to 2 instead of one, or set a limit on the
size of the Volumes, and possibly increase the maximum number of Volumes.
#
For the Differential backup Pool, we choose a retention period of a bit longer than a month and ensure
that there is at least one Volume for each of the maximum of five weeks in a month. So the following
works:
Pool {
Name = Diff-Pool
Pool Type = Backup
Recycle = yes
AutoPrune = yes
Volume Retention = 40 days
Maximum Volume Jobs = 1
Label Format = Diff-
Maximum Volumes = 10
}
Configuration 18.2:
Differential Pool
As you can see, the Differential Pool can grow to a maximum of 9 volumes, and the Volumes are retained 40 days
and thereafter they can be recycled. Finally there is one job per volume. This, of course, could be tightened up a lot,
but the expense here is a few GB which is not too serious.
If a new volume is used every week, after 40 days, one will have used 7 volumes, and there should then always be 3
volumes that can be purged and recycled.
See the discussion above concering the Full pool for how to handle multiple clients.
#
Finally, here is the resource for the Incremental Pool:
Pool {
Name = Inc-Pool
Pool Type = Backup
Recycle = yes
AutoPrune = yes
Volume Retention = 20 days
Maximum Volume Jobs = 6
Label Format = Inc-
Maximum Volumes = 7
}
Configuration 18.3:
Incremental Pool
We keep the data for 20 days rather than just a week as the needs require. To reduce the proliferation of volume
names, we keep a week’s worth of data (6 incremental backups) in each Volume. In practice, the retention period
should be set to just a bit more than a week and keep only two or three volumes instead of five. Again, the lost is
very little and as the system reaches the full steady state, we can adjust these values so that the total disk usage
doesn’t exceed the disk capacity.
If you have two clients, the simplest thing to do is to increase the maximum volume jobs from 6 to 12.
As mentioned above, it is also possible limit the size of the volumes. However, in that case, you will
need to have a better idea of the volume or add sufficient volumes to the pool so that you will be
assured that in the next cycle (after 20 days) there is at least one volume that is pruned and can be
recycled.
#
The following example shows you the actual files used, with only a few minor modifications to simplify
things.
The Director’s configuration file is as follows:
Director { # define myself
Name = bareos-dir
QueryFile = "/usr/lib/bareos/scripts/query.sql"
Maximum Concurrent Jobs = 1
Password = "*** CHANGE ME ***"
Messages = Standard
}
JobDefs {
Name = "DefaultJob"
Type = Backup
Level = Incremental
Client = bareos-fd
FileSet = "Full Set"
Schedule = "WeeklyCycle"
Storage = File
Messages = Standard
Pool = Inc-Pool
Full Backup Pool = Full-Pool
Incremental Backup Pool = Inc-Pool
Differential Backup Pool = Diff-Pool
Priority = 10
Write Bootstrap = "/var/lib/bareos/%c.bsr"
}
Job {
Name = client
Client = client-fd
JobDefs = "DefaultJob"
FileSet = "Full Set"
}
# Backup the catalog database (after the nightly save)
Job {
Name = "BackupCatalog"
Client = client-fd
JobDefs = "DefaultJob"
Level = Full
FileSet="Catalog"
Schedule = "WeeklyCycleAfterBackup"
# This creates an ASCII copy of the catalog
# Arguments to make_catalog_backup.pl are:
# make_catalog_backup.pl <catalog-name>
RunBeforeJob = "/usr/lib/bareos/scripts/make_catalog_backup.pl MyCatalog"
# This deletes the copy of the catalog
RunAfterJob = "/usr/lib/bareos/scripts/delete_catalog_backup"
# This sends the bootstrap via mail for disaster recovery.
# Should be sent to another system, please change recipient accordingly
Write Bootstrap = "|/usr/sbin/bsmtp -h localhost -f \"\(Bareos\) \" -s \"Bootstrap for Job %j\" root@localhost"
Priority = 11 # run after main backup
}
# Standard Restore template, to be changed by Console program
Job {
Name = "RestoreFiles"
Type = Restore
Client = client-fd
FileSet="Full Set"
Storage = File
Messages = Standard
Pool = Default
Where = /tmp/bareos-restores
}
# List of files to be backed up
FileSet {
Name = "Full Set"
Include = {
Options {
signature=SHA1;
compression=GZIP9
}
File = /
File = /usr
File = /home
File = /boot
File = /var
File = /opt
}
Exclude = {
File = /proc
File = /tmp
File = /.journal
File = /.fsck
...
}
}
Schedule {
Name = "WeeklyCycle"
Run = Level=Full 1st sun at 2:05
Run = Level=Differential 2nd-5th sun at 2:05
Run = Level=Incremental mon-sat at 2:05
}
# This schedule does the catalog. It starts after the WeeklyCycle
Schedule {
Name = "WeeklyCycleAfterBackup"
Run = Level=Full sun-sat at 2:10
}
# This is the backup of the catalog
FileSet {
Name = "Catalog"
Include {
Options {
signature = MD5
}
File = "/var/lib/bareos/bareos.sql" # database dump
File = "/etc/bareos" # configuration
}
}
Client {
Name = client-fd
Address = client
FDPort = 9102
Password = " *** CHANGE ME ***"
AutoPrune = yes # Prune expired Jobs/Files
Job Retention = 6 months
File Retention = 60 days
}
Storage {
Name = File
Address = localhost
Password = " *** CHANGE ME ***"
Device = FileStorage
Media Type = File
}
Catalog {
Name = MyCatalog
dbname = bareos; user = bareos; password = ""
}
Pool {
Name = Full-Pool
Pool Type = Backup
Recycle = yes # automatically recycle Volumes
AutoPrune = yes # Prune expired volumes
Volume Retention = 6 months
Maximum Volume Jobs = 1
Label Format = Full-
Maximum Volumes = 9
}
Pool {
Name = Inc-Pool
Pool Type = Backup
Recycle = yes # automatically recycle Volumes
AutoPrune = yes # Prune expired volumes
Volume Retention = 20 days
Maximum Volume Jobs = 6
Label Format = Inc-
Maximum Volumes = 7
}
Pool {
Name = Diff-Pool
Pool Type = Backup
Recycle = yes
AutoPrune = yes
Volume Retention = 40 days
Maximum Volume Jobs = 1
Label Format = Diff-
Maximum Volumes = 10
}
Messages {
Name = Standard
mailcommand = "bsmtp -h mail.domain.com -f \"\(Bareos\) %r\"
-s \"Bareos: %t %e of %c %l\" %r"
operatorcommand = "bsmtp -h mail.domain.com -f \"\(Bareos\) %r\"
-s \"Bareos: Intervention needed for %j\" %r"
mail = root@domain.com = all, !skipped
operator = root@domain.com = mount
console = all, !skipped, !saved
append = "/home/bareos/bin/log" = all, !skipped
}
Configuration 18.4:
bareos-dir.conf
and the Storage daemon’s configuration file is:
Storage { # definition of myself
Name = bareos-sd
}
Director {
Name = bareos-dir
Password = " *** CHANGE ME ***"
}
Device {
Name = FileStorage
Media Type = File
Archive Device = /var/lib/bareos/storage
LabelMedia = yes; # lets Bareos label unlabeled media
Random Access = yes;
AutomaticMount = yes; # when device opened, read it
RemovableMedia = no;
AlwaysOpen = no;
}
Messages {
Name = Standard
director = bareos-dir = all
}
Configuration 18.5:
bareos-sd.conf
#
Bareos provides autochanger support for reading and writing tapes. In order to work with an autochanger, Bareos
requires a number of things, each of which is explained in more detail after this list:
- The package bareos-storage-tape must be installed.
- A script that actually controls the autochanger according to commands sent by Bareos. Bareos
contains the script mtx-changer, that utilize the command mtx. It’s config file is normally located at
/etc/bareos/mtx-changer.conf
- That each Volume (tape) to be used must be defined in the Catalog and have a Slot number assigned
to it so that Bareos knows where the Volume is in the autochanger. This is generally done with the
label command, but can also done after the tape is labeled using the update slots command. See
below for more details. You must pre-label the tapes manually before using them.
- Modifications to your Storage daemon’s Device configuration resource to identify that the device is a
changer, as well as a few other parameters.
- You need to ensure that your Storage daemon has access permissions to both the tape drive and the
control device. On Linux, the system user bareos is added to the groups disk and tape, so that it
should have the permission to access the library.
- Set Auto Changer Dir
Storage = yes.
Bareos uses its own mtx-changer script to interface with a program that actually does the tape changing. Thus in
principle, mtx-changer can be adapted to function with any autochanger program, or you can call any
other script or program. The current version of mtx-changer works with the mtx program. FreeBSD
users might need to adapt this script to use chio. For more details, refer to the Testing Autochanger
chapter.
Bareos also supports autochangers with barcode readers. This support includes two Console commands: label
barcodes and update slots. For more details on these commands, see the chapter about Barcode
Support.
Current Bareos autochanger support does not include cleaning, stackers, or silos. Stackers and silos are not
supported because Bareos expects to be able to access the Slots randomly. However, if you are very careful to setup
Bareos to access the Volumes in the autochanger sequentially, you may be able to make Bareos work with stackers
(gravity feed and such).
In principle, if mtx will operate your changer correctly, then it is just a question of adapting the mtx-changer script
(or selecting one already adapted) for proper interfacing.
If you are having troubles, please use the auto command in the btape program to test the functioning of your
autochanger with Bareos. Please remember, that on most distributions, the Bareos Storage Daemon runs as user
bareos and not as root. You will need to ensure that the Storage daemon has sufficient permissions to access the
autochanger.
Some users have reported that the the Storage daemon blocks under certain circumstances in trying to mount a
volume on a drive that has a different volume loaded. As best we can determine, this is simply a matter of waiting a
bit. The drive was previously in use writing a Volume, and sometimes the drive will remain BLOCKED for a good
deal of time (up to 7 minutes on a slow drive) waiting for the cassette to rewind and to unload before the drive can
be used with a different Volume.
#
#
Under Linux, you can
cat /proc/scsi/scsi
to see what SCSI devices you have available. You can also:
cat /proc/scsi/sg/device_hdr /proc/scsi/sg/devices
to find out how to specify their control address (/dev/sg0 for the first, /dev/sg1 for the second, ...) on the
Changer Device Sd
Autochanger Bareos directive.
You can also use the excellent lsscsi tool.
$ lsscsi -g
[1:0:2:0] tape SEAGATE ULTRIUM06242-XXX 1619 /dev/st0 /dev/sg9
[1:0:14:0] mediumx STK L180 0315 /dev/sch0 /dev/sg10
[2:0:3:0] tape HP Ultrium 3-SCSI G24S /dev/st1 /dev/sg11
[3:0:0:0] enclosu HP A6255A HP04 - /dev/sg3
[3:0:1:0] disk HP 36.4G ST336753FC HP00 /dev/sdd /dev/sg4
#
Under FreeBSD, use the following command to list the SCSI devices as well as the /dev/passN that you will use on
the Bareos Changer Device Sd
Autochanger directive:
camcontrol devlist
Please check that your Storage daemon has permission to access this device.
The following tip for FreeBSD users comes from Danny Butroyd: on reboot Bareos will NOT have permission to
control the device /dev/pass0 (assuming this is your changer device). To get around this just edit the
/etc/devfs.conf file and add the following to the bottom:
own pass0 root:bareos
perm pass0 0666
own nsa0.0 root:bareos
perm nsa0.0 0666
This gives the bareos group permission to write to the nsa0.0 device too just to be on the safe side. To bring these
changes into effect just run:-
/etc/rc.d/devfs restart
Commands 19.1:
Basically this will stop you having to manually change permissions on these devices to make Bareos work when
operating the AutoChanger after a reboot.
#
On Solaris, the changer device will typically be some file under /dev/rdsk.
#
To properly address autochangers, Bareos must know which Volume is in each slot of the autochanger. Slots are
where the changer cartridges reside when not loaded into the drive. Bareos numbers these slots from one to the
number of cartridges contained in the autochanger.
Bareos will not automatically use a Volume in your autochanger unless it is labeled and the slot number is stored in
the catalog and the Volume is marked as InChanger. This is because it must know where each volume is to be able
to load the volume. For each Volume in your changer, you will, using the Console program, assign a slot. This
information is kept in Bareos’s catalog database along with the other data for the volume. If no slot is given, or the
slot is set to zero, Bareos will not attempt to use the autochanger even if all the necessary configuration records are
present. When doing a mount command on an autochanger, you must specify which slot you want mounted.
If the drive is loaded with a tape from another slot, it will unload it and load the correct tape, but
normally, no tape will be loaded because an unmount command causes Bareos to unload the tape in the
drive.
You can check if the Slot number and InChanger flag by:
*list volumes
bconsole 19.2:
list volumes
#
Some autochangers have more than one read/write device (drive). The Autochanger resource permits you to group
Device resources, where each device represents a drive. The Director may still reference the Devices (drives) directly,
but doing so, bypasses the proper functioning of the drives together. Instead, the Director (in the Storage resource)
should reference the Autochanger resource name. Doing so permits the Storage daemon to ensure that only
one drive uses the mtx-changer script at a time, and also that two drives don’t reference the same
Volume.
Multi-drive requires the use of the Drive Index Sd
Device directive. Drive numbers or the Device Index
are numbered beginning at zero, which is the default. To use the second Drive in an autochanger,
you need to define a second Device resource, set the Drive Index Sd
Device and set the Archive Device
Sd
Device.
As a default, Bareos jobs will prefer to write to a Volume that is already mounted. If you have a multiple drive
autochanger and you want Bareos to write to more than one Volume in the same Pool at the same time, you will
need to set Prefer Mounted Volumes Dir
Job = no. This will cause the Storage daemon to maximize the use of
drives.
#
Configuration of autochangers within Bareos is done in the Device resource of the Storage daemon.
Following records control how Bareos uses the autochanger:
-
Autochanger Sd
Device
- Specifies if the current device belongs to an autochanger resource.
-
Changer Command Sd
Autochanger (Changer Command Sd
Device)
-
-
Changer Device Sd
Autochanger (Changer Device Sd
Device)
-
-
Drive Index Sd
Device
- Individual driver number, starting at 0.
-
Maximum Changer Wait Sd
Device
#
If you add an Autochanger = yes record to the Storage resource in your Director’s configuration file, the Bareos
Console will automatically prompt you for the slot number when the Volume is in the changer when you add or
label tapes for that Storage device. If your mtx-changer script is properly installed, Bareos will automatically load
the correct tape during the label command.
You must also set Autochanger = yes in the Storage daemon’s Device resource as we have described above in
order for the autochanger to be used. Please see Auto Changer Dir
Storage and Autochanger Sd
Device for more details on
these records.
Thus all stages of dealing with tapes can be totally automated. It is also possible to set or change the Slot using the
update command in the Console and selecting Volume Parameters to update.
Even though all the above configuration statements are specified and correct, Bareos will attempt
to access the autochanger only if a slot is non-zero in the catalog Volume record (with the Volume
name).
If your autochanger has barcode labels, you can label all the Volumes in your autochanger one after another by
using the label barcodes command. For each tape in the changer containing a barcode, Bareos will
mount the tape and then label it with the same name as the barcode. An appropriate Media record will
also be created in the catalog. Any barcode that begins with the same characters as specified on the
”CleaningPrefix=xxx” command, will be treated as a cleaning tape, and will not be labeled. For example
with:
Pool {
Name ...
Cleaning Prefix = "CLN"
}
Any slot containing a barcode of CLNxxxx will be treated as a cleaning tape and will not be mounted.
#
If you wish to insert or remove cartridges in your autochanger or you manually run the mtx program, you must first
tell Bareos to release the autochanger by doing:
unmount
(change cartridges and/or run mtx)
mount
If you do not do the unmount before making such a change, Bareos will become completely confused about what is
in the autochanger and may stop function because it expects to have exclusive use of the autochanger while it has
the drive mounted.
#
If you have several magazines or if you insert or remove cartridges from a magazine, you should notify Bareos of
this. By doing so, Bareos will as a preference, use Volumes that it knows to be in the autochanger before accessing
Volumes that are not in the autochanger. This prevents unneeded operator intervention.
If your autochanger has barcodes (machine readable tape labels), the task of informing Bareos is simple. Every time,
you change a magazine, or add or remove a cartridge from the magazine, simply use following commands in the
Console program:
unmount
(remove magazine)
(insert new magazine)
update slots
mount
This will cause Bareos to request the autochanger to return the current Volume names in the magazine. This will be
done without actually accessing or reading the Volumes because the barcode reader does this during inventory when
the autochanger is first turned on. Bareos will ensure that any Volumes that are currently marked as being in the
magazine are marked as no longer in the magazine, and the new list of Volumes will be marked as being in the
magazine. In addition, the Slot numbers of the Volumes will be corrected in Bareos’s catalog if they are incorrect
(added or moved).
If you do not have a barcode reader on your autochanger, you have several alternatives.
- You can manually set the Slot and InChanger flag using the update volume command in the Console
(quite painful).
- You can issue a
update slots scan
command that will cause Bareos to read the label on each of the cartridges in the magazine in turn and
update the information (Slot, InChanger flag) in the catalog. This is quite effective but does take time to load
each cartridge into the drive in turn and read the Volume label.
#
If you change only one cartridge in the magazine, you may not want to scan all Volumes, so the update slots
command (as well as the update slots scan command) has the additional form:
update slots=n1,n2,n3-n4, ...
where the keyword scan can be appended or not. The n1,n2, ... represent Slot numbers to be updated and the
form n3-n4 represents a range of Slot numbers to be updated (e.g. 4-7 will update Slots 4,5,6, and
7).
This form is particularly useful if you want to do a scan (time expensive) and restrict the update to one or two
slots.
For example, the command:
update slots=1,6 scan
will cause Bareos to load the Volume in Slot 1, read its Volume label and update the Catalog. It will do the same for
the Volume in Slot 6. The command:
update slots=1-3,6
will read the barcoded Volume names for slots 1,2,3 and 6 and make the appropriate updates in the Catalog.
If you don’t have a barcode reader the above command will not find any Volume names so will do
nothing.
#
Let’s assume that you have properly defined the necessary Storage daemon Device records, and you
have added the Autochanger = yes record to the Storage resource in your Director’s configuration
file.
Now you fill your autochanger with say six blank tapes.
What do you do to make Bareos access those tapes?
One strategy is to prelabel each of the tapes. Do so by starting Bareos, then with the Console program, enter the
label command:
./bconsole
Connecting to Director rufus:8101
1000 OK: rufus-dir Version: 1.26 (4 October 2002)
*label
it will then print something like:
Using default Catalog name=BackupDB DB=bareos
The defined Storage resources are:
1: Autochanger
2: File
Select Storage resource (1-2): 1
I select the autochanger (1), and it prints:
Enter new Volume name: TestVolume1
Enter slot (0 for none): 1
where I entered TestVolume1 for the tape name, and slot 1 for the slot. It then asks:
Defined Pools:
1: Default
2: File
Select the Pool (1-2): 1
I select the Default pool. This will be automatically done if you only have a single pool, then Bareos will proceed to
unload any loaded volume, load the volume in slot 1 and label it. In this example, nothing was in the drive, so it
printed:
Connecting to Storage daemon Autochanger at localhost:9103 ...
Sending label command ...
3903 Issuing autochanger "load slot 1" command.
3000 OK label. Volume=TestVolume1 Device=/dev/nst0
Media record for Volume=TestVolume1 successfully created.
Requesting mount Autochanger ...
3001 Device /dev/nst0 is mounted with Volume TestVolume1
You have messages.
*
You may then proceed to label the other volumes. The messages will change slightly because Bareos will unload the
volume (just labeled TestVolume1) before loading the next volume to be labeled.
Once all your Volumes are labeled, Bareos will automatically load them as they are needed.
To ”see” how you have labeled your Volumes, simply enter the list volumes command from the Console program,
which should print something like the following:
*{\bf list volumes}
Using default Catalog name=BackupDB DB=bareos
Defined Pools:
1: Default
2: File
Select the Pool (1-2): 1
+-------+----------+--------+---------+-------+--------+----------+-------+------+
| MedId | VolName | MedTyp | VolStat | Bites | LstWrt | VolReten | Recyc | Slot |
+-------+----------+--------+---------+-------+--------+----------+-------+------+
| 1 | TestVol1 | DDS-4 | Append | 0 | 0 | 30672000 | 0 | 1 |
| 2 | TestVol2 | DDS-4 | Append | 0 | 0 | 30672000 | 0 | 2 |
| 3 | TestVol3 | DDS-4 | Append | 0 | 0 | 30672000 | 0 | 3 |
| ... |
+-------+----------+--------+---------+-------+--------+----------+-------+------+
#
Bareos provides barcode support with two Console commands, label barcodes and update slots.
The label barcodes will cause Bareos to read the barcodes of all the cassettes that are currently installed in the
magazine (cassette holder) using the mtx-changer list command. Each cassette is mounted in turn and labeled
with the same Volume name as the barcode.
The update slots command will first obtain the list of cassettes and their barcodes from mtx-changer. Then it
will find each volume in turn in the catalog database corresponding to the barcodes and set its Slot to correspond to
the value just read. If the Volume is not in the catalog, then nothing will be done. This command is
useful for synchronizing Bareos with the current magazine in case you have changed magazines or in
case you have moved cassettes from one slot to another. If the autochanger is empty, nothing will be
done.
The Cleaning Prefix statement can be used in the Pool resource to define a Volume name prefix, which if it
matches that of the Volume (barcode) will cause that Volume to be marked with a VolStatus of Cleaning. This will
prevent Bareos from attempting to write on the Volume.
#
The status slots storage=xxx command displays autochanger content.
Slot | Volume Name | Status | Type | Pool | Loaded |
------+-----------------+----------+-------------------+----------------+---------|
1 | 00001 | Append | DiskChangerMedia | Default | 0 |
2 | 00002 | Append | DiskChangerMedia | Default | 0 |
3*| 00003 | Append | DiskChangerMedia | Scratch | 0 |
4 | | | | | 0 |
If you see a * near the slot number, you have to run update slots command to synchronize autochanger content
with your catalog.
#
Bareos calls the autochanger script that you specify on the Changer Command statement. Normally this script
will be the mtx-changer script that we provide, but it can in fact be any program. The only requirement for the
script is that it must understand the commands that Bareos uses, which are loaded, load, unload, list, and slots.
In addition, each of those commands must return the information in the precise format as specified
below:
- Currently the changer commands used are:
loaded -- returns number of the slot that is loaded, base 1,
in the drive or 0 if the drive is empty.
load -- loads a specified slot (note, some autochangers
require a 30 second pause after this command) into
the drive.
unload -- unloads the device (returns cassette to its slot).
list -- returns one line for each cassette in the autochanger
in the format <slot>:<barcode>. Where
the {\bf slot} is the non-zero integer representing
the slot number, and {\bf barcode} is the barcode
associated with the cassette if it exists and if you
autoloader supports barcodes. Otherwise the barcode
field is blank.
slots -- returns total number of slots in the autochanger.
Bareos checks the exit status of the program called, and if it is zero, the data is accepted. If the exit status
is non-zero, Bareos will print an error message and request the tape be manually mounted on the
drive.
#
The Bareos Whitepaper Tape Speed Tuning shows that the two parameters Maximum File Size and
Maximum Block Size of the device have significant influence on the tape speed.
While it is no problem to change the Maximum File Size Sd
Device parameter, unfortunately it is not possible to change
the Maximum Block Size Sd
Device parameter, because the previously written tapes would become unreadable
in the new setup. It would require that the Maximum Block Size Sd
Device parameter is switched back
to the old value to be able to read the old volumes, but of course then the new volumes would be
unreadable.
Why is that the case?
The problem is that Bareos writes the label block (header) in the same block size that is configured in the Maximum
Block Size Sd
Device parameter in the device. Per default, this value is 63k, so usually a tape written by Bareos looks like
this:
|-------------------
|label block (63k)|
|-------------------
|data block 1(63k)|
|data block 2(63k)|
|... |
|data block n(63k)|
--------------------
Setting the maximum block size to e.g. 512k, would lead to the following:
|-------------------
|label block (512k)|
|-------------------
|data block 1(512k)|
|data block 2(512k)|
|... |
|data block n(512k)|
--------------------
As you can see, every block is written with the maximum block size, also the label block.
The problem that arises here is that reading a block header with a wrong block size causes a read error which is
interpreted as an non-existent label by Bareos.
This is a potential source of data loss, because in normal operation, Bareos refuses to relabel an already labeled
volume to be sure to not overwrite data that is still needed. If Bareos cannot read the volume label, this security
mechanism does not work and you might label tapes already labeled accidentally.
To solve this problem, the block size handling was changed in Bareos Version >= 14.2.0 in the following
way:
- The tape label block is always written in the standard 63k (64512) block size.
- The following blocks are then written in the block size configured in the Maximum Block Size directive.
- To be able to change the block size in an existing environment, it is now possible to set the Maximum
Block Size Dir
Pool and Minimum Block Size Dir
Pool in the pool resource. This setting is automatically promoted
to each medium in that pool as usual (i.e. when a medium is labeled for that pool or if a volume is
transferred to that pool from the scratch pool). When a volume is mounted, the volume’s block size is
used to write and read the data blocks that follow the header block.
The following picture shows the result:
|--------------------------------|
|label block (label block size) |
|--------------------------------|
|data block 1(maximum block size)|
|data block 2(maximum block size)|
|... |
|data block n(maximum block size)|
---------------------------------|
We have a label block with a certain size (63k per default to be compatible to old installations), and the following
data blocks are written with another blocksize.
This approach has the following advantages:
- If nothing is configured, existing installations keep on working without problems.
- If you want to switch an existing installation that uses the default block size and move to a new (usually
bigger) block size, you can do that easily by creating a new pool, where Maximum Block Size Dir
Pool is
set to the new value that you wish to use in the future:
Pool {
Name = LTO-4-1M
Pool Type = Backup
Recycle = yes # Bareos can automatically recycle Volumes
AutoPrune = yes # Prune expired volumes
Volume Retention = 1 Month # How long should the Full Backups be kept? (#06)
Maximum Block Size = 1048576
Recycle Pool = Scratch
}
Configuration 19.3:
Pool Ressource: setting Maximum Block Size
Now configure your backups that they will write into the newly defined pool in the future, and your backups will be
written with the new block size.
Your existing tapes can be automatically transferred to the new pool when they expire via the Scratch Pool
mechanism. When a tape in your old pool expires, it is transferred to the scratch pool if you set Recycle Pool =
Scratch. When your new pool needs a new volume, it will get it from the scratch pool and apply the new
pool’s properties to that tape which also include Maximum Block Size Dir
Pool and Minimum Block Size
Dir
Pool.
This way you can smoothly switch your tapes to a new block size while you can still restore the data on your old
tapes at any time.
There is only one case where the new block handling will cause problems, and this is if you have used bigger block
sizes already in your setup. As we now defined the label block to always be 63k, all labels will not be
readable.
To also solve this problem, the directive Label Block Size Sd
Device can be used to define a different label block size.
That way, everything should work smoothly as all label blocks will be readable again.
At least on Linux, you can see if Bareos tries to read the blocks with the wrong block size. In that case, you get a
kernel message like the following in your system’s messages:
[542132.410170] st1: Failed to read 1048576 byte block with 64512 byte transfer.
Here, the block was written with 1M block size but we only read 64k.
bls and bextract can directly access Bareos volumes without catalog database. This means that these programs
don’t have information about the used block size.
To be able to read a volume written with an arbitrary block size, you need to set the Label Block Size Sd
Device (to be
able to to read the label block) and the Maximum Block Size Sd
Device (to be able to read the data blocks) setting in the
device definition used by those tools to be able to open the medium.
Example using bls with a tape that was written with another blocksize than the DEFAULT_BLOCK_SIZE (63k), but
with the default label block size of 63k:
root@linux:~#
bls FC-Drive-1 -V A00007L4
bls: butil.c:289-0 Using device: "FC-Drive-1" for reading.
25-Feb 12:47 bls JobId 0: No slot defined in catalog (slot=0) for Volume "A00007L4" on "FC-Drive-1" (/dev/tape/by-id/scsi-350011d00018a5f03-nst).
25-Feb 12:47 bls JobId 0: Cartridge change or "update slots" may be required.
25-Feb 12:47 bls JobId 0: Ready to read from volume "A00007L4" on device "FC-Drive-1" (/dev/tape/by-id/scsi-350011d00018a5f03-nst).
25-Feb 12:47 bls JobId 0: Error: block.c:1004 Read error on fd=3 at file:blk 0:1 on device "FC-Drive-1" (/dev/tape/by-id/scsi-350011d00018a5f03-nst). ERR=Cannot allocate memory.
Bareos status: file=0 block=1
Device status: ONLINE IM_REP_EN file=0 block=2
0 files found.
Commands 19.4:
bls with non-default block size
As can be seen, bls manages to read the label block as it knows what volume is mounted (Ready to read from
volume A00007L4), but fails to read the data blocks.
root@linux:~#
dmesg
[...]
st2: Failed to read 131072 byte block with 64512 byte transfer.
[...]
Commands 19.5:
dmesg
This shows that the block size for the data blocks that we need is 131072.
Now we have to set this block size in the bareos-sd.conf, device resource as Maximum Block Size
Sd
Device:
Device {
Name = FC-Drive-1
Drive Index = 0
Media Type = LTO-4
Archive Device = /dev/tape/by-id/scsi-350011d00018a5f03-nst
AutomaticMount = yes
AlwaysOpen = yes
RemovableMedia = yes
RandomAccess = no
AutoChanger = yes
Maximum Block Size = 131072
}
Configuration 19.6:
Storage Device Resource: setting Maximum Block Size
Now we can call bls again, and everything works as expected:
root@linux:~#
bls FC-Drive-1 -V A00007L4
bls: butil.c:289-0 Using device: "FC-Drive-1" for reading.
25-Feb 12:49 bls JobId 0: No slot defined in catalog (slot=0) for Volume "A00007L4" on "FC-Drive-1" (/dev/tape/by-id/scsi-350011d00018a5f03-nst).
25-Feb 12:49 bls JobId 0: Cartridge change or "update slots" may be required.
25-Feb 12:49 bls JobId 0: Ready to read from volume "A00007L4" on device "FC-Drive-1" (/dev/tape/by-id/scsi-350011d00018a5f03-nst).
bls JobId 203: [...]
Commands 19.7:
bls with non-default block size
The following chart shows how to set the directives for maximum block size and label block size depending on
how your current setup is:
#
Bareos has no build-in functionality for tape drive cleaning. Fortunately this is not required as most modern tape
libraries have build in auto-cleaning functionality. This functionality might require an empty tape drive, so the tape
library gets aware, that it is currently not used. However, by default Bareos keeps tapes in the drives, in case the
same tape is required again.
The directive Cleaning Prefix Dir
Pool is only used for making sure that Bareos does not try to write backups on a
cleaning tape.
If your tape libraries auto-cleaning won’t work when there are tapes in the drives, it’s probably best to set up an
admin job that removes the tapes from the drives. This job has to run, when no other backups do run. A job
definition for an admin job to do that may look like this:
Job {
Name = ReleaseAllTapeDrives
JobDefs = DefaultJob
Schedule = "WeeklyCycleAfterBackup"
Type = Admin
Priority = 200
RunScript {
Runs When = Before
Runs On Client = no
Console = "release storage=Tape alldrives"
}
}
Resource 19.8:
bareos-dir.d/job/ReleaseAllTapeDrives.conf
Replace TapeDir
Storage by the storage name of your tape library. Use the highest Priority Dir
Job value to make sure no other
jobs are running. In the default configuration for example, the CatalogBackupDir
Job job has Priority = 100. The higher
the number, the lower the job priority.
#
Although Recycling and Backing Up to Disk Volume have been discussed in previous chapters, this chapter is meant
to give you an overall view of possible backup strategies and to explain their advantages and disadvantages.
#
Probably the simplest strategy is to back everything up to a single tape and insert a new (or recycled) tape when it
fills and Bareos requests a new one.
#
- The operator intervenes only when a tape change is needed (e.g. once a month).
- There is little chance of operator error because the tape is not changed daily.
- A minimum number of tapes will be needed for a full restore. Typically the best case will be one tape
and worst two.
- You can easily arrange for the Full backup to occur a different night of the month for each system,
thus load balancing and shortening the backup time.
#
- If your site burns down, you will lose your current backups
- After a tape fills and you have put in a blank tape, the backup will continue, and this will generally
happen during working hours.
#
This system is very simple. When the tape fills and Bareos requests a new tape, you unmount the tape from the
Console program, insert a new tape and label it. In most cases after the label, Bareos will automatically mount the
tape and resume the backup. Otherwise, you simply mount the tape.
Using this strategy, one typically does a Full backup once a week followed by daily Incremental backups. To
minimize the amount of data written to the tape, one can do a Full backup once a month on the first Sunday of the
month, a Differential backup on the 2nd-5th Sunday of the month, and incremental backups the rest of the week.
#
If you use the strategy presented above, Bareos will ask you to change the tape, and you will unmount it and then
remount it when you have inserted the new tape.
If you do not wish to interact with Bareos to change each tape, there are several ways to get Bareos to release the
tape:
- In your Storage daemon’s Device resource, set AlwaysOpen = no. In this case, Bareos will release the
tape after every job. If you run several jobs, the tape will be rewound and repositioned to the end at
the beginning of every job. This is not very efficient, but does let you change the tape whenever you
want.
- Use a RunAfterJob statement to run a script after your last job. This could also be an Admin job
that runs after all your backup jobs. The script could be something like:
#!/bin/sh
bconsole <<END_OF_DATA
release storage=your-storage-name
END_OF_DATA
In this example, you would have AlwaysOpen=yes, but the release command would tell Bareos to rewind
the tape and on the next job assume the tape has changed. This strategy may not work on some systems, or
on autochangers because Bareos will still keep the drive open.
- The final strategy is similar to the previous case except that you would use the unmount command to force
Bareos to release the drive. Then you would eject the tape, and remount it as follows:
#!/bin/sh
bconsole <<END_OF_DATA
unmount storage=your-storage-name
END_OF_DATA
# the following is a shell command
mt eject
bconsole <<END_OF_DATA
mount storage=your-storage-name
END_OF_DATA
#
This scheme is quite different from the one mentioned above in that a Full backup is done to a different tape every
day of the week. Generally, the backup will cycle continuously through five or six tapes each week. Variations are to
use a different tape each Friday, and possibly at the beginning of the month. Thus if backups are done
Monday through Friday only, you need only five tapes, and by having two Friday tapes, you need a
total of six tapes. Many sites run this way, or using modifications of it based on two week cycles or
longer.
#
- All the data is stored on a single tape, so recoveries are simple and faster.
- Assuming the previous day’s tape is taken offsite each day, a maximum of one days data will be lost if
the site burns down.
#
- The tape must be changed every day requiring a lot of operator intervention.
- More errors will occur because of human mistakes.
- If the wrong tape is inadvertently mounted, the Backup for that day will not occur exposing the system
to data loss.
- There is much more movement of the tape each day (rewinds) leading to shorter tape drive life time.
- Initial setup of Bareos to run in this mode is more complicated than the Single tape system described
above.
- Depending on the number of systems you have and their data capacity, it may not be possible to do a
Full backup every night for time reasons or reasons of tape capacity.
#
The simplest way to ”force” Bareos to use a different tape each day is to define a different Pool for each day of the
the week a backup is done. In addition, you will need to specify appropriate Job and File retention periods so that
Bareos will relabel and overwrite the tape each week rather than appending to it. Nic Bellamy has supplied an
actual working model of this which we include here.
What is important is to create a different Pool for each day of the week, and on the run statement in
the Schedule, to specify which Pool is to be used. He has one Schedule that accomplishes this, and a
second Schedule that does the same thing for the Catalog backup run each day after the main backup
(Priorities were not available when this script was written). In addition, he uses a Max Start Delay of 22
hours so that if the wrong tape is premounted by the operator, the job will be automatically canceled,
and the backup cycle will re-synchronize the next day. He has named his Friday Pool WeeklyPool
because in that Pool, he wishes to have several tapes to be able to restore to a time older than one
week.
And finally, in his Storage daemon’s Device resource, he has Automatic Mount = yes and Always Open = No.
This is necessary for the tape ejection to work in his end_of_backup.sh script below.
For example, his bareos-dir.conf file looks like the following:
# /etc/bareos/bareos-dir.conf
#
# Bareos Director Configuration file
#
Director {
Name = ServerName
DIRport = 9101
QueryFile = "/etc/bareos/query.sql"
Maximum Concurrent Jobs = 1
Password = "console-pass"
Messages = Standard
}
#
# Define the main nightly save backup job
#
Job {
Name = "NightlySave"
Type = Backup
Client = ServerName
FileSet = "Full Set"
Schedule = "WeeklyCycle"
Storage = Tape
Messages = Standard
Pool = Default
Write Bootstrap = "/var/lib/bareos/NightlySave.bsr"
Max Start Delay = 22h
}
# Backup the catalog database (after the nightly save)
Job {
Name = "BackupCatalog"
Type = Backup
Client = ServerName
FileSet = "Catalog"
Schedule = "WeeklyCycleAfterBackup"
Storage = Tape
Messages = Standard
Pool = Default
# This creates an ASCII copy of the catalog
# WARNING!!! Passing the password via the command line is insecure.
# see comments in make_catalog_backup for details.
RunBeforeJob = "/usr/lib/bareos/make_catalog_backup -u bareos"
# This deletes the copy of the catalog, and ejects the tape
RunAfterJob = "/etc/bareos/end_of_backup.sh"
Write Bootstrap = "/var/lib/bareos/BackupCatalog.bsr"
Max Start Delay = 22h
}
# Standard Restore template, changed by Console program
Job {
Name = "RestoreFiles"
Type = Restore
Client = ServerName
FileSet = "Full Set"
Storage = Tape
Messages = Standard
Pool = Default
Where = /tmp/bareos-restores
}
# List of files to be backed up
FileSet {
Name = "Full Set"
Include = signature=MD5 {
/
/data
}
Exclude = { /proc /tmp /.journal }
}
#
# When to do the backups
#
Schedule {
Name = "WeeklyCycle"
Run = Level=Full Pool=MondayPool Monday at 8:00pm
Run = Level=Full Pool=TuesdayPool Tuesday at 8:00pm
Run = Level=Full Pool=WednesdayPool Wednesday at 8:00pm
Run = Level=Full Pool=ThursdayPool Thursday at 8:00pm
Run = Level=Full Pool=WeeklyPool Friday at 8:00pm
}
# This does the catalog. It starts after the WeeklyCycle
Schedule {
Name = "WeeklyCycleAfterBackup"
Run = Level=Full Pool=MondayPool Monday at 8:15pm
Run = Level=Full Pool=TuesdayPool Tuesday at 8:15pm
Run = Level=Full Pool=WednesdayPool Wednesday at 8:15pm
Run = Level=Full Pool=ThursdayPool Thursday at 8:15pm
Run = Level=Full Pool=WeeklyPool Friday at 8:15pm
}
# This is the backup of the catalog
FileSet {
Name = "Catalog"
Include = signature=MD5 {
/var/lib/bareos/bareos.sql
}
}
# Client (File Services) to backup
Client {
Name = ServerName
Address = dionysus
FDPort = 9102
Password = "client-pass"
File Retention = 30d
Job Retention = 30d
AutoPrune = yes
}
# Definition of file storage device
Storage {
Name = Tape
Address = dionysus
SDPort = 9103
Password = "storage-pass"
Device = Tandberg
Media Type = MLR1
}
# Generic catalog service
Catalog {
Name = MyCatalog
dbname = bareos; user = bareos; password = ""
}
# Reasonable message delivery -- send almost all to email address
# and to the console
Messages {
Name = Standard
mailcommand = "/usr/sbin/bsmtp -h localhost -f \"\(Bareos\) %r\" -s \"Bareos: %t %e of %c %l\" %r"
operatorcommand = "/usr/sbin/bsmtp -h localhost -f \"\(Bareos\) %r\" -s \"Bareos: Intervention needed for %j\" %r"
mail = root@localhost = all, !skipped
operator = root@localhost = mount
console = all, !skipped, !saved
append = "/var/lib/bareos/log" = all, !skipped
}
# Pool definitions
#
# Default Pool for jobs, but will hold no actual volumes
Pool {
Name = Default
Pool Type = Backup
}
Pool {
Name = MondayPool
Pool Type = Backup
Recycle = yes
AutoPrune = yes
Volume Retention = 6d
Maximum Volume Jobs = 2
}
Pool {
Name = TuesdayPool
Pool Type = Backup
Recycle = yes
AutoPrune = yes
Volume Retention = 6d
Maximum Volume Jobs = 2
}
Pool {
Name = WednesdayPool
Pool Type = Backup
Recycle = yes
AutoPrune = yes
Volume Retention = 6d
Maximum Volume Jobs = 2
}
Pool {
Name = ThursdayPool
Pool Type = Backup
Recycle = yes
AutoPrune = yes
Volume Retention = 6d
Maximum Volume Jobs = 2
}
Pool {
Name = WeeklyPool
Pool Type = Backup
Recycle = yes
AutoPrune = yes
Volume Retention = 12d
Maximum Volume Jobs = 2
}
# EOF
In order to get Bareos to release the tape after the nightly backup, this setup uses a RunAfterJob
script that deletes the database dump and then rewinds and ejects the tape. The following is a copy of
end_of_backup.sh
#! /bin/sh
/usr/lib/bareos/delete_catalog_backup
mt rewind
mt eject
exit 0
Finally, if you list his Volumes, you get something like the following:
*list media
Using default Catalog name=MyCatalog DB=bareos
Pool: WeeklyPool
+-----+-----------+-------+--------+-----------+-----------------+-------+------+
| MeId| VolumeName| MedTyp| VolStat| VolBytes | LastWritten | VolRet| Recyc|
+-----+-----------+-------+--------+-----------+-----------------+-------+------+
| 5 | Friday_1 | MLR1 | Used | 2157171998| 2003-07-11 20:20| 103680| 1 |
| 6 | Friday_2 | MLR1 | Append | 0 | 0 | 103680| 1 |
+-----+-----------+-------+--------+-----------+-----------------+-------+------+
Pool: MondayPool
+-----+-----------+-------+--------+-----------+-----------------+-------+------+
| MeId| VolumeName| MedTyp| VolStat| VolBytes | LastWritten | VolRet| Recyc|
+-----+-----------+-------+--------+-----------+-----------------+-------+------+
| 2 | Monday | MLR1 | Used | 2260942092| 2003-07-14 20:20| 518400| 1 |
+-----+-----------+-------+--------+-----------+-----------------+-------+------+
Pool: TuesdayPool
+-----+-----------+-------+--------+-----------+-----------------+-------+------+
| MeId| VolumeName| MedTyp| VolStat| VolBytes | LastWritten | VolRet| Recyc|
+-----+-----------+-------+--------+-----------+-----------------+-------+------+
| 3 | Tuesday | MLR1 | Used | 2268180300| 2003-07-15 20:20| 518400| 1 |
+-----+-----------+-------+--------+-----------+-----------------+-------+------+
Pool: WednesdayPool
+-----+-----------+-------+--------+-----------+-----------------+-------+------+
| MeId| VolumeName| MedTyp| VolStat| VolBytes | LastWritten | VolRet| Recyc|
+-----+-----------+-------+--------+-----------+-----------------+-------+------+
| 4 | Wednesday | MLR1 | Used | 2138871127| 2003-07-09 20:2 | 518400| 1 |
+-----+-----------+-------+--------+-----------+-----------------+-------+------+
Pool: ThursdayPool
+-----+-----------+-------+--------+-----------+-----------------+-------+------+
| MeId| VolumeName| MedTyp| VolStat| VolBytes | LastWritten | VolRet| Recyc|
+-----+-----------+-------+--------+-----------+-----------------+-------+------+
| 1 | Thursday | MLR1 | Used | 2146276461| 2003-07-10 20:50| 518400| 1 |
+-----+-----------+-------+--------+-----------+-----------------+-------+------+
Pool: Default
No results to list.
#
A Bareos Storage Daemon can use various storage backends:
-
Tape
- is used to access tape device and thus has sequential access.
-
File
- tells Bareos that the device is a file. It may either be a file defined on fixed medium or a removable
filesystem such as USB. All files must be random access devices.
-
Fifo
- is a first-in-first-out sequential access read-only or write-only device.
-
GFAPI (GlusterFS)
- is used to access a GlusterFS storage.
-
Rados (Ceph Object Store)
- is used to access a Ceph object store.
-
Droplet
- is used to access an object store supported by libdroplet, most notably S3. For details, refer to
Droplet Storage Backend.
#
The bareos-storage-droplet backend (Version >= 17.2.7) can be used to access Object Storage through
libdroplet. Droplet support a number of backends, most notably S3. For details about Droplet itself see
https://github.com/scality/Droplet.
#
#
Install the package bareos-storage-droplet including its requirements by using an appropriate package
management tool (eg. yum, zypper).
#
The droplet backend requires a Bareos Director Storage Resource, a Bareos Storage Daemon Device Resource as
well as a Droplet profile file where your access– and secret–keys and other parameters for the connection to your
object storage are stored.
Director
First, we will create the new Bareos Director Storage Resource.
For the following example, we
- choose the name S3_ObjectDir
Storage.
- choose Media Type Dir
Storage = S3_Object1. We name it this way, in case we later add more separated
Object Storages that don’t have access to the same volumes.
- assume the Bareos Storage Daemon is located on the host bareos-sd.example.com and will offers the
Device Resource S3_ObjectStorageSd
Device (to be configured in the next section).
Storage {
Name = "S3_Object"
Address = "bareos-sd.example.com"
Password = "secret"
Device = "AWS_S3_1-00"
Media Type = "S3_Object1"
}
Resource 21.1:
bareos-dir.d/storage/S3_Object.conf
These credentials are only used to connect to the Bareos Storage Daemon. The credentials to access the object store
(e.g. S3) are stored in the Bareos Storage Daemon Droplet Profile.
Storage Daemon
As of your Bareos Storage Daemon configuration, we need to setup a new device that acts as a link to Object
Storage backend.
The name and media type must correspond to those settings in the Bareos Director Storage Resource:
A device for the usage of AWS S3 object storage with a bucket named backup-bareos located in EU West 2, would
look like this:
Device {
Name = "AWS_S3_1-00"
Media Type = "S3_Object1"
Archive Device = "AWS S3 Storage"
Device Type = droplet
Device Options = "profile=/etc/bareos/bareos-sd.d/droplet/aws.profile.conf,bucket=backup-bareos,location=eu-west-2,chunksize=100M"
LabelMedia = yes # Lets Bareos label unlabeled media
Random Access = yes
AutomaticMount = yes # When device opened, read it
RemovableMedia = no
AlwaysOpen = no
Maximum File Size = 500M # 500 MB (allows for seeking to small portions of the Volume)
Maximum Concurrent Jobs = 1
Maximum Spool Size = 15000M
}
Resource 21.2:
bareos-sd.d/device/AWS_S3_1-00.conf
In these examples all the backup data is placed in the bareos-backup bucket on the defined S3 storage. In contract
to other Bareos Storage Daemon backends, a Bareos volume is not represented by a single file. Instead a
volume is a sub-directory in the defined bucket and every chunk is placed in the Volume directory with
the filename 0000-9999 and a size that is defined in the chunksize. It is implemented this way, as S3
only allows reading full files, so every append operation could result in reading the full volume file
again.
Following Device Options Sd
Device settings are possible:
-
profile
- Droplet profile path (e.g. /etc/bareos/bareos-sd.d/droplet/droplet.profile.conf). Make sure the
profile file is readable for user bareos.
-
location
- Optional, but required for AWS Storage (e.g. eu-west-2 etc.)
-
acl
- Canned ACL
-
storageclass
- Storage Class to use.
-
bucket
- Bucket to store objects in.
-
chunksize
- Size of Volume Chunks (default = 10 Mb)
-
iothreads
- Number of IO-threads to use for uploads (if not set, blocking uploads are used)
-
ioslots
- Number of IO-slots per IO-thread (default 10). Set this to >= 1 for cached and to 0 for direct
writing.
-
retries
- Number of writing tries before discarding a job. Set this to 0 for unlimited retries. Setting anything
! = 0 here will cause dataloss if the backend is not available, so be very careful.
-
mmap
- Use mmap to allocate Chunk memory instead of malloc().
Create the Droplet profile to be used. This profile is used later by the droplet library when accessing your cloud
storage.
An example for AWS S3 could look like this:
use_https = false # Default is false, if set to true you may use the SSL parameters given in the droplet configuration wiki, see below.
host = s3.amazonaws.com # This parameter is only used as baseurl and will be prepended with bucket and location set in device ressource to form correct url
access_key = myaccesskey
secret_key = mysecretkey
pricing_dir = "" # If not empty, an droplet.csv file will be created which will record all S3 operations.
backend = s3
aws_auth_sign_version = 4 # Currently, AWS S3 uses version 4. The Ceph S3 gateway uses version 2.
Resource 21.3:
bareos-sd.d/droplet/aws.profile.conf
More arguments and the SSL parameters can be found in the documentation of the droplet library:
https://github.com/scality/Droplet/wiki/Configuration-File
Please note, that there is also the Rados Storage Backend backend, which can backup to CEPH directly. However,
currently (17.2.7) the Droplet (S3) is known to outperform the Rados backend.
While parameters have been explained in the AWS S3 section, this gives an example about how to backup to a
CEPH Object Gateway S3.
Storage {
Name = "S3_Object"
Address = "bareos-sd.example.com"
Password = "secret"
Device = "CEPH_1-00"
Media Type = "S3_Object1"
}
Resource 21.4:
bareos-dir.d/storage/S3_Object.conf
A device for CEPH object storage could look like this:
Device {
Name = "CEPH_1-00"
Media Type = "S3_Object1"
Archive Device = "Object S3 Storage"
Device Type = droplet
Device Options = "profile=/etc/bareos/bareos-sd.d/droplet/ceph.profile,bucket=backup-bareos,chunksize=100M"
LabelMedia = yes # Lets Bareos label unlabeled media
Random Access = yes
AutomaticMount = yes # When device opened, read it
RemovableMedia = no
AlwaysOpen = no
Maximum File Size = 500M # 500 MB (allows for seeking to small portions of the Volume)
Maximum Concurrent Jobs = 1
Maximum Spool Size = 15000M
}
Resource 21.5:
bareos-sd.d/device/CEPH_1-00.conf
And for CEPH it would be:
use_https = false
host = CEPH-host.example.com
access_key = myaccesskey
secret_key = mysecretkey
pricing_dir = ""
backend = s3
aws_auth_sign_version = 2
Resource 21.6:
bareos-sd.d.d/droplet/ceph.profile.conf
Main differences are, that a location is not required and in the profile, aws_auth_sign_version = 2 instead of
4.
#
For testing following Device Options Sd
Device should be used:
If the S3 backend becomes or is unreachable, the storage daemon will behave depending on iothreads
and retries. When the storage daemon is using cached writing (iothreads>= 1) and retries is set to
zero (unlimited tries), the job will continue running until the backend becomes available again. The
job cannot be canceled in this case, as the storage daemon will continuously try to write the cached
files.
Great caution should be used when using retries ¿ 0 combined with cached writing. If the backend becomes
unavailable and the storage daemon reaches the predefined tries, the job will be discarded silently yet marked as OK
in the Bareos Director.
You can always check the status of the writing process by using status storage=.... The current writing status
will be displayed then:
...
Device "S3_ObjectStorage" (S3) is mounted with:
Volume: Full-0085
Pool: Full
Media type: S3_Object1
Backend connection is working.
Inflight chunks: 2
Pending IO flush requests:
/Full-0085/0002 - 10485760 (try=0)
/Full-0085/0003 - 10485760 (try=0)
/Full-0085/0004 - 10485760 (try=0)
...
Attached Jobs: 175
...
bconsole 21.7:
status storage
Pending IO flush requests means that there is data to be written. try=0 means that this is the first try
and no problem has occurred. If try > 0, problems occurred and the storage daemon will continue
trying.
Status without pending IO chunks:
...
Device "S3_ObjectStorage" (S3) is mounted with:
Volume: Full-0084
Pool: Full
Media type: S3_Object1
Backend connection is working.
No Pending IO flush requests.
Configured device capabilities:
EOF BSR BSF FSR FSF EOM !REM RACCESS AUTOMOUNT LABEL !ANONVOLS !ALWAYSOPEN
Device state:
OPENED !TAPE LABEL !MALLOC APPEND !READ EOT !WEOT !EOF !NEXTVOL !SHORT MOUNTED
num_writers=0 reserves=0 block=8
Attached Jobs:
...
bconsole 21.8:
status storage
If you use AWS S3 object storage and want to debug your bareos setup, it is recommended to turn on the server
access logging in your bucket properties. You will see if bareos gets to try writing into your bucket or
not.
#
GFAPI (GlusterFS)
A GlusterFS Storage can be used as Storage backend of Bareos. Prerequistes are a working GlusterFS
storage system and the package bareos-storage-glusterfs. See http://www.gluster.org/
for more information regarding GlusterFS installation and configuration and specifically
https://gluster.readthedocs.org/en/latest/Administrator Guide/Bareos/ for Bareos integration. You can
use following snippet to configure it as storage device:
Adapt server and volume name to your environment.
Version >= 15.2.0
#
Rados (Ceph Object Store)
Here you configure the Ceph object store, which is accessed by the SD using the Rados library. Prerequistes are a
working Ceph object store and the package bareos-storage-ceph. See http://ceph.com for more information
regarding Ceph installation and configuration. Assuming that you have an object store with name poolname and
your Ceph access is configured in /etc/ceph/ceph.conf, you can use following snippet to configure it as storage
device:
Version >= 15.2.0
#
Bareos allows you to specify that you want the Storage daemon to initially write your data to disk and then
subsequently to tape. This serves several important purposes.
- It takes a long time for data to come in from the File daemon during an Incremental backup. If it is
directly written to tape, the tape will start and stop or shoe-shine as it is often called causing tape
wear. By first writing the data to disk, then writing it to tape, the tape can be kept in continual
motion.
- While the spooled data is being written to the tape, the despooling process has exclusive use of
the tape. This means that you can spool multiple simultaneous jobs to disk, then have them very
efficiently despooled one at a time without having the data blocks from several jobs intermingled, thus
substantially improving the time needed to restore files. While despooling, all jobs spooling continue
running.
- Writing to a tape can be slow. By first spooling your data to disk, you can often reduce the time
the File daemon is running on a system, thus reducing downtime, and/or interference with users. Of
course, if your spool device is not large enough to hold all the data from your File daemon, you may
actually slow down the overall backup.
Data spooling is exactly that ”spooling”. It is not a way to first write a ”backup” to a disk file and then to a tape.
When the backup has only been spooled to disk, it is not complete yet and cannot be restored until it is written to
tape.
Bareos also supports writing a backup to disk then later migrating or moving it to a tape (or any
other medium). For details on this, please see the Migration and Copy chapter of this manual for more
details.
The remainder of this chapter explains the various directives that you can use in the spooling process.
#
The following directives can be used to control data spooling.
#
- Please note! Exclude your the spool directory from any backup, otherwise, your job will write enormous
amounts of data to the Volume, and most probably terminate in error. This is because in attempting
to backup the spool file, the backup data will be written a second time to the spool file, and so on ad
infinitum.
- Another advice is to always specify the Maximum Spool Size Sd
Device so that your disk doesn’t completely
fill up. In principle, data spooling will properly detect a full disk, and despool data allowing the job
to continue. However, attribute spooling is not so kind to the user. If the disk on which attributes
are being spooled fills, the job will be canceled. In addition, if your working directory is on the same
partition as the spool directory, then Bareos jobs will fail possibly in bizarre ways when the spool fills.
- When data spooling is enabled, Bareos automatically turns on attribute spooling. In other words, it
also spools the catalog entries to disk. This is done so that in case the job fails, there will be no catalog
entries pointing to non-existent tape backups.
- Attribute despooling occurs near the end of a job. The Storage daemon accumulates file attributes
during the backup and sends them to the Director at the end of the job. The Director then inserts the
file attributes into the catalog. During this insertion, the tape drive may be inactive. When the file
attribute insertion is completed, the job terminates.
- Attribute spool files are always placed in the working directory of the Storage daemon.
- When Bareos begins despooling data spooled to disk, it takes exclusive use of the tape. This has the
major advantage that in running multiple simultaneous jobs at the same time, the blocks of several
jobs will not be intermingled.
- It is probably best to provide as large a spool file as possible to avoid repeatedly spooling/despooling.
Also, while a job is despooling to tape, the File daemon must wait (i.e. spooling stops for the job while
it is despooling).
- If you are running multiple simultaneous jobs, Bareos will continue spooling other jobs while one is
despooling to tape, provided there is sufficient spool file space.
#
The term Migration, as used in the context of Bareos, means moving data from one Volume to another. In particular
it refers to a Job (similar to a backup job) that reads data that was previously backed up to a Volume and writes it
to another Volume. As part of this process, the File catalog records associated with the first backup job are purged.
In other words, Migration moves Bareos Job data from one Volume to another by reading the Job data from the
Volume it is stored on, writing it to a different Volume in a different Pool, and then purging the database records for
the first Job.
The Copy process is essentially identical to the Migration feature with the exception that the Job that is copied is
left unchanged. This essentially creates two identical copies of the same backup. However, the copy is treated as a
copy rather than a backup job, and hence is not directly available for restore. If Bareos finds a copy when a job
record is purged (deleted) from the catalog, it will promote the copy as real backup and will make it available for
automatic restore.
Copy and Migration jobs do not involve the File daemon.
Jobs can be selected for migration based on a number of criteria such as:
- a single previous Job
- a Volume
- a Client
- a regular expression matching a Job, Volume, or Client name
- the time a Job has been on a Volume
- high and low water marks (usage or occupation) of a Pool
- Volume size
The details of these selection criteria will be defined below.
To run a Migration job, you must first define a Job resource very similar to a Backup Job but with Type Dir
Job =
Migrate instead of Type Dir
Job = Backup. One of the key points to remember is that the Pool that is specified for the
migration job is the only pool from which jobs will be migrated, with one exception noted below. In addition, the
Pool to which the selected Job or Jobs will be migrated is defined by the Next Pool Dir
Pool = ... in the Pool resource
specified for the Migration Job.
Bareos permits Pools to contain Volumes of different Media Types. However, when doing migration, this is a very
undesirable condition. For migration to work properly, you should use Pools containing only Volumes of the same
Media Type for all migration jobs.
A migration job can be started manually or from a Schedule, like a backup job. It searches for existing backup Jobs
that match the parameters specified in the migration Job resource, primarily a Selection Type Dir
Job. If no match was
found, the Migration job terminates without further action. Otherwise, for each Job found this way,
the Migration Job will run a new Job which copies the Job data to a new Volume in the Migration
Pool.
Normally three jobs are involved during a migration:
- The Migration control Job which starts the migration child Jobs.
- The previous Backup Job (already run). The File records of this Job are purged when the Migration
job terminates successfully. The data remain on the Volume until it is recycled.
- A new Migration Backup Job that moves the data from the previous Backup job to the new Volume.
If you subsequently do a restore, the data will be read from this Job.
If the Migration control Job finds more than one existing Job to migrate, it creates one migration job for each of
them. This may result in a large number of Jobs. Please note that Migration doesn’t scale too well if you migrate
data off of a large Volume because each job must read the same Volume, hence the jobs will have to run
consecutively rather than simultaneously.
#
- Each Pool into which you migrate Jobs or Volumes must contain Volumes of only one Media Type
Dir
Storage.
- Migration takes place on a JobId by JobId basis. That is each JobId is migrated in its entirety and
independently of other JobIds. Once the Job is migrated, it will be on the new medium in the new Pool,
but for the most part, aside from having a new JobId, it will appear with all the same characteristics
of the original job (start, end time, ...). The column RealEndTime in the catalog Job table will contain
the time and date that the Migration terminated, and by comparing it with the EndTime column you
can tell whether or not the job was migrated. Also, the Job table contains a PriorJobId column which
is set to the original JobId for migration jobs. For non-migration jobs this column is zero.
- After a Job has been migrated, the File records are purged from the original Job. Moreover, the Type
of the original Job is changed from ”B” (backup) to ”M” (migrated), and another Type ”B” job record
is added which refers to the new location of the data. Since the original Job record stays in the bareos
catalog, it is still possible to restore from the old media by specifying the original JobId for the restore.
However, no file selection is possible in this case, so one can only restore all files this way.
- A Job will be migrated only if all Volumes on which the job is stored are marked Full, Used, or Error. In
particular, Volumes marked Append will not be considered for migration which rules out the possibility
that new files are appended to a migrated Volume. This policy also prevents deadlock situations, like
attempting to read and write the same Volume from two jobs at the same time.
- Migration works only if the Job resource of the original Job is still defined in the current Director
configuration. Otherwise you’ll get a fatal error.
- Setting the Migration High Bytes Dir
Pool watermark is not sufficient for migration to take place. In addition,
you must define and schedule a migration job which looks for jobs that can be migrated.
- Bareos currently does only minimal Storage conflict resolution, so you must take care to ensure that
you don’t try to read and write to the same device or Bareos may block waiting to reserve a drive that
it will never find. A way to prevent problems is that all your migration pools contain only one Media
Type Dir
Storage, and that you always migrate to a pool with a different Media Type.
- The Next Pool Dir
Pool = ... directive must be defined in the Pool referenced in the Migration Job to define
the Pool into which the data will be migrated.
- Migration has only be tested carefully for the ”Job” and ”Volume” selection types. All other selection
types (time, occupancy, smallest, oldest, ...) are experimental features.
- To figure out which jobs are going to be migrated by a given configuration, choose a debug level of 100
or more. This activates information about the migration selection process.
#
The following directives can be used to define a Copy or Migration job:
Job Resource
Pool Resource
#
Assume a simple configuration with a single backup job as described below.
# Define the backup Job
Job {
Name = "NightlySave"
Type = Backup
Level = Incremental # default
Client=rufus-fd
FileSet="Full Set"
Schedule = "WeeklyCycle"
Messages = Standard
Pool = Default
}
# Default pool definition
Pool {
Name = Default
Pool Type = Backup
AutoPrune = yes
Recycle = yes
Next Pool = Tape
Storage = File
LabelFormat = "File"
}
# Tape pool definition
Pool {
Name = Tape
Pool Type = Backup
AutoPrune = yes
Recycle = yes
Storage = DLTDrive
}
# Definition of File storage device
Storage {
Name = File
Address = rufus
Password = "secret"
Device = "File" # same as Device in Storage daemon
Media Type = File # same as MediaType in Storage daemon
}
# Definition of DLT tape storage device
Storage {
Name = DLTDrive
Address = rufus
Password = "secret"
Device = "HP DLT 80" # same as Device in Storage daemon
Media Type = DLT8000 # same as MediaType in Storage daemon
}
Configuration 23.1:
Backup Job
Note that the backup job writes to the DefaultDir
Pool pool, which corresponds to FileDir
Storage storage. There is no
Storage Dir
Pool directive in the Job resource while the two PoolDir resources contain different Storage Dir
Pool
directives. Moreover, the DefaultDir
Pool pool contains a Next Pool Dir
Pool directive that refers to the TapeDir
Pool
pool.
In order to migrate jobs from the DefaultDir
Pool pool to the TapeDir
Pool pool we add the following Job
resource:
Job {
Name = "migrate-volume"
Type = Migrate
Messages = Standard
Pool = Default
Selection Type = Volume
Selection Pattern = "."
}
Configuration 23.2:
migrate all volumes of a pool
The Selection Type Dir
Job and Selection Pattern Dir
Job directives instruct Bareos to select all volumes of
the given pool (DefaultDir
Pool) whose volume names match the given regular expression (”.”), i.e., all
volumes. Hence those jobs which were backed up to any volume in the DefaultDir
Pool pool will be migrated.
Because of the Next Pool Dir
Pool directive of the DefaultDir
Pool pool resource, the jobs will be migrated to tape
storage.
Another way to accomplish the same is the following Job resource:
Job {
Name = "migrate"
Type = Migrate
Messages = Standard
Pool = Default
Selection Type = Job
Selection Pattern = ".*Save"
}
Configuration 23.3:
migrate all jobs named *Save
This migrates all jobs ending with Save from the DefaultDir
Pool pool to the TapeDir
Pool pool, i.e., from File storage to
Tape storage.
Beginning from Bareos Version >= 13.2.0, Migration and Copy jobs are also possible from one Storage daemon to
another Storage Daemon.
Please note:
- the director must have two different storage resources configured (e.g. storage1 and storage2)
- each storage needs an own device and an individual pool (e.g. pool1, pool2)
- each pool is linked to its own storage via the storage directive in the pool resource
- to configure the migration from pool1 to pool2, the Next Pool Dir
Pool directive of pool1 has to point to
pool2
- the copy job itself has to be of type copy/migrate (exactly as already known in copy- and migration
jobs)
Example:
#bareos-dir.conf
# Fake fileset for copy jobs
Fileset {
Name = None
Include {
Options {
signature = MD5
}
}
}
# Fake client for copy jobs
Client {
Name = None
Address = localhost
Password = "NoNe"
Catalog = MyCatalog
}
# Source storage for migration
Storage {
Name = storage1
Address = sd1.example.com
Password = "secret1"
Device = File1
Media Type = File
}
# Target storage for migration
Storage {
Name = storage2
Address = sd2.example.com
Password = "secret2"
Device = File2
Media Type = File2 # Has to be different than in storage1
}
Pool {
Name = pool1
Storage = storage1
Next Pool = pool2 # This points to the target storage
}
Pool {
Name = pool2
Storage = storage2
}
Job {
Name = CopyToRemote
Type = Copy
Messages = Standard
Selection Type = PoolUncopiedJobs
Spool Data = Yes
Pool = pool1
}
Configuration 23.4:
bareos-dir.conf: Copy Job between different Storage Daemons
#
Always Incremental Backups are available since Bareos Version >= 16.2.4.
#
To better understand the advantages of the Always Incremental Backup scheme, we first analyze the way that the
conventional Incremental - Differential - Full Backup Scheme works.
The following figure shows the jobs available for restore over time. Red are full backups, green are differential
backups and blue are incremental Backups. When you look for a data at the horizontal axis, you see what backup
jobs are available for a restore at this given time.
The next figure shows the amount of data being backed up over the network from that client over
time:
Depending on the retention periods, old jobs are removed to save space for newer backups:
The problem with this way of removing jobs is the fact that jobs are removed from the system which existing jobs
depend on.
#
The Always Incremental Backup Scheme does only incremental backups of clients, which reduces the amount of data
transferred over the network to a minimum.
Only suitable for file based backups.
Always Incremental backups are only suitable for file based backups. Other data can not be combined on the server
side (e.g. vmware plugings, NDMP, ...)
The Always Incremental Backup Scheme works as follows:
Client Backups are always run as incremental backups. This would usually lead to an unlimited chain of incremental
backups that are depend on each other.
To avoid this problem, existing incremental backups older than a configurable age are consolidated into a new
backup.
These two steps are then executed every day:
- Incremental Backup from Client
- Consolidation of the jobs older than maximum configure age
Deleted files will be in the backup forever, if they are not detected as deleted using Accurate Dir
Job backup.
The Always Incremental Backup Scheme does not provide the option to have other longer retention periods for the
backups.
For Longterm Storage of data longer than the Always Incremental Job Retention, there are two options:
- A copy job can be configured that copies existing full backups into a longterm pool.
- A virtual Full Job can be configured that creates a virtual full backup into a longterm pool consolidating
all existing backups into a new one.
The implementation with copy jobs is easy to implement and automatically copies all jobs that need to be
copied in a single configured resource. The disadvantage of the copy job approach is the fact that at a
certain point in time, the data that is copied for long term archive is already ”always incremental job
retention” old, so that the data in the longterm storage is not the current data that is available from the
client.
The solution using virtual full jobs to create longterm storage has the disadvantage, that for every backup job the a
new longterm job needs to be created.
The big advantage is that the current data will be transferred into the longterm storage.
The way that bareos determines on what base the next incremental job will be done, would choose the longterm
storage job to be taken as basis for the next incremental backup which is not what is intended. Therefore, the
jobtype of the longterm job is updated to ”archive”, so that it is not taken as base for then next incrementals and
the always incremental job will stand alone.
#
#
To configure a job to use Always Incremental Backup Scheme, following configuration is required:
Job {
...
Accurate = yes
Always Incremental = yes
Always Incremental Job Retention = <timespec>
Always Incremental Keep Number = <number>
...
}
Resource 24.1:
bareos-dir.d/job/example.conf
-
Accurate Dir
Job = yes
- is required to detect deleted files and prevent that they are kept in the consolidated
backup jobs.
-
Always Incremental Dir
Job = yes
- enables the Always Incremental feature.
-
Always Incremental Job Retention Dir
Job
- set the age where incrementals of this job will be kept, older
jobs will be consolidated.
-
Always Incremental Keep Number Dir
Job
- sets the number of incrementals that will be kept without
regarding the age. This should make sure that a certain history of a job will be kept even if the job is
not executed for some time.
-
Always Incremental Max Full Age Dir
Job
- is described later, see Always Incremental Max Full Age.
#
Job {
Name = "Consolidate"
Type = "Consolidate"
Accurate = "yes"
JobDefs = "DefaultJob"
}
Resource 24.2:
bareos-dir.d/job/Consolidate.conf
-
Type Dir
Job = Consolidate
- configures a job to be a consolidate job. This type have been introduced with the
Always Incremental feature. When used, it automatically trigger the consolidation of incremental jobs
that need to be consolidated.
-
Accurate Dir
Job = yes
- let the generated virtual backup job keep the accurate information.
-
Max Full Consolidations Dir
Job
- is described later, see Max Full Consolidations.
The ConsolidateDir
Job job evaluates all jobs configured with Always Incremental Dir
Job = yes. When a job is selected for
consolidation, all job runs are taken into account, independent of the pool and storage where they are
located.
The always incremental jobs need to be executed during the backup window (usually at night), while the
consolidation jobs should be scheduled during the daytime when no backups are executed.
Please note! All Bareos job resources have some required directives, e.g. Client Dir
Job. Even so, none other than the
mentioned directives are evaluated by a Type Dir
Job = Consolidate, they still have to be defined. Normally all required
directives are already set in Job Defs Dir
Job = DefaultJob. If not, you have to add them. You can use arbitrary, but
valid values.
#
For the Always Incremental Backup Scheme at least two storages are needed. See Using Multiple Storage Devices
how to setup multiple storages.
Pool {
Name = AI-Incremental
Pool Type = Backup
Recycle = yes # Bareos can automatically recycle Volumes
Auto Prune = yes # Prune expired volumes
Volume Retention = 360 days # How long should jobs be kept?
Maximum Volume Bytes = 50G # Limit Volume size to something reasonable
Label Format = "AI-Incremental-"
Volume Use Duration = 23h
Storage = File1
Next Pool = AI-Consolidated # consolidated jobs go to this pool
}
Resource 24.3:
bareos-dir.d/pool/AI-Incremental.conf
Pool {
Name = AI-Consolidated
Pool Type = Backup
Recycle = yes # Bareos can automatically recycle Volumes
Auto Prune = yes # Prune expired volumes
Volume Retention = 360 days # How long should jobs be kept?
Maximum Volume Bytes = 50G # Limit Volume size to something reasonable
Label Format = "AI-Consolidated-"
Volume Use Duration = 23h
Storage = File2
Next Pool = AI-Longterm # copy jobs write to this pool
}
Resource 24.4:
bareos-dir.d/pool/AI-Consolidated.conf
Pool {
Name = AI-Longterm
Pool Type = Backup
Recycle = yes # Bareos can automatically recycle Volumes
Auto Prune = yes # Prune expired volumes
Volume Retention = 10 years # How long should jobs be kept?
Maximum Volume Bytes = 50G # Limit Volume size to something reasonable
Label Format = "AI-Longterm-"
Volume Use Duration = 23h
Storage = File1
}
Resource 24.5:
bareos-dir.d/pool/AI-Longterm.conf
AI-LongtermDir
Pool is optional and will be explained in Long Term Storage of Always Incremental Jobs.
#
The following configuration extract shows how a client backup is configured for always incremental Backup. The
Backup itself is scheduled every night to run as incremental backup, while the consolidation is scheduled to run
every day.
Job {
Name = "BackupClient1"
JobDefs = "DefaultJob"
# Always incremental settings
AlwaysIncremental = yes
AlwaysIncrementalJobRetention = 7 days
Accurate = yes
Pool = AI-Incremental
Full Backup Pool = AI-Consolidated
}
Resource 24.6:
bareos-dir.d/job/BackupClient1.conf
Job {
Name = "Consolidate"
Type = "Consolidate"
Accurate = "yes"
JobDefs = "DefaultJob"
}
Resource 24.7:
bareos-dir.d/job/Consolidate.conf
The following image shows the available backups for each day:
- The backup cycle starts with a full backup of the client.
- Every day a incremental backup is done and is additionally available.
- When the age of the oldest incremental reaches Always Incremental Job Retention Dir
Job, the consolidation
job consolidates the oldest incremental with the full backup before to a new full backup.
This can go on more or less forever and there will be always an incremental history of Always Incremental Job
Retention Dir
Job.
The following plot shows what happens if a job is not run for a certain amount of time.
As can be seen, the nightly consolidation jobs still go on consolidating until the last incremental is too old and then
only one full backup is left. This is usually not what is intended.
For this reason, the directive Always Incremental Keep Number Dir
Job is available which sets the minimum number
of incrementals that should be kept even if they are older than Always Incremental Job Retention
Dir
Job.
Setting Always Incremental Keep Number Dir
Job to 7 in our case leads to the following result:
Always Incremental Keep Number Dir
Job incrementals are always kept, and when the backup starts again the
consolidation of old incrementals starts again.
#
Besides the available backups at each point in time which we have considered until now, the amount of data being
moved during the backups is another very important aspect.
We will have a look at this aspect in the following pictures:
#
The basic always incremental scheme does an incremental backup from the client daily which is relatively small and
as such is very good.
During the consolidation, each day the full backup is consolidated with the oldest incremental backup, which means
that more or less the full amount of data being stored on the client is moved. Although this consolidation only is
performed locally on the storage daemon without client interaction, it is still an enormous amount of data being
touched and can take an considerable amount of time.
If all clients use the ”always incremental” backup scheme, this means that the complete data being stored in the
backup system needs to be moved every day!
This is usually only feasible in relatively small environments.
The following figure shows the Data Volume being moved during the normal always incremental scheme.
- The red bar shows the amount of the first full backup being copied from the client.
- The blue bars show the amount of the daily incremental backups. They are so little that the can be
barely seen.
- The green bars show the amount of data being moved every day during the consolidation jobs.
#
To be able to cope with this problem, the directive Always Incremental Max Full Age Dir
Job was added. When Always
Incremental Max Full Age Dir
Job is configured, in daily operation the Full Backup is left untouched while the
incrementals are consolidated as usual. Only if the Full Backup is older than Always Incremental Max Full Age Dir
Job,
the full backup will also be part of the consolidation.
Depending on the setting of the Always Incremental Max Full Age Dir
Job, the amount of daily data being moved can be
reduced without losing the advantages of the always incremental Backup Scheme.
Always Incremental Max Full Age Dir
Job must be larger than Always Incremental Job Retention Dir
Job.
The resulting interval between full consolidations when running daily backups and daily consolidations is Always
Incremental Max Full Age Dir
Job - Always Incremental Job Retention Dir
Job.
#
When the Always Incremental Max Full Age Dir
Job of many clients is set to the same value, it is probable that all full
backups will reach the Always Incremental Max Full Age Dir
Job at once and so consolidation jobs including the full
backup will be started for all clients at once. This would again mean that the whole data being stored from all
clients will be moved in one day.
The following figure shows the amount of data being copied by the virtual jobs that do the consolidation when
having 3 identically configured backup jobs:
As can be seen, virtual jobs including the full are triggered for all three clients at the same time.
This is of course not desirable so the directive Max Full Consolidations Dir
Job was introduced.
Max Full Consolidations Dir
Job needs to be configured in the Type Dir
Job = Consolidate job:
Job {
Name = "Consolidate"
Type = "Consolidate"
Accurate = "yes"
JobDefs = "DefaultJob"
Max Full Consolidations = 1
}
Resource 24.8:
bareos-dir.d/job/Consolidate.conf
If Max Full Consolidations Dir
Job is configured, the consolidation job will not start more than the specified
Consolidations that include the Full Backup.
This leads to a better load balancing of full backup consolidations over different days. The value should configured
so that the consolidation jobs are completed before the next normal backup run starts.
The number of always incremental jobs, the interval that the jobs are triggered and the setting of
Always Incremental Max Full Age Dir
Job influence the value that makes sense for Max Full Consolidations
Dir
Job.
#
What is missing in the always incremental backup scheme in comparison to the traditional ”Incremental Differential
Full” scheme is the option to store a certain job for a longer time.
When using always incremental, the usual maximum age of data stored during the backup cycle is Always
Incremental Job Retention Dir
Job.
Usually, it is desired to be able to store a certain backup for a longer time, e.g. monthly a backup should be kept for
half a year.
There are two options to achieve this goal.
#
The configuration of archiving via copy job is simple, just configure a copy job that copies over the latest full backup
at that point in time.
As all full backups go into the AI-ConsolidatedDir
Pool, we just copy all uncopied backups in the AI-ConsolidatedDir
Pool
to a longterm pool:
Job {
Name = "CopyLongtermFull"
Schedule = LongtermFull
Type = Copy
Level = Full
Pool = AI-Consolidated
Selection Type = PoolUncopiedJobs
Messages = Standard
}
Resource 24.9:
bareos-dir.d/job/CopyLongtermFull.conf
As can be seen in the plot, the copy job creates a copy of the current full backup that is available and is already 7
days old.
The other disadvantage is, that it copies all jobs, not only the virtual full jobs. It also includes the virtual
incremental jobs from this pool.
#
The alternative to Copy Jobs is creating a virtual Full Backup Job when the data should be stored in a long-term
pool.
Job {
Name = "VirtualLongtermFull"
Client = bareos-fd
FileSet = SelfTest
Schedule = LongtermFull
Type = Backup
Level = VirtualFull
Pool = AI-Consolidated
Messages = Standard
Priority = 13 # run after Consolidate
Run Script {
console = "update jobid=%i jobtype=A"
Runs When = After
Runs On Client = No
Runs On Failure = No
}
}
Resource 24.10:
bareos-dir.d/job/VirtualLongtermFull.conf
To make sure the longterm Level Dir
Job = VirtualFull is not taken as base for the next incrementals, the job type of
the copied job is set to Type Dir
Job = Archive with the Run Script Dir
Job.
As can be seen on the plot, the Level Dir
Job = VirtualFull archives the current data, i.e. it consolidates the full and
all incrementals that are currently available.
#
The always incremental backup scheme minimizes the amount of data that needs to be transferred over the
wire.
This makes it possible to backup big filesystems over small bandwidths.
The only challenge is to do the first full backup.
The easiest way to transfer the data is to copy it to a portable data medium (or even directly store it
on there) and import the data into the local bareos catalog as if it was backed up from the original
client.
This can be done in two ways
- Install a storage daemon in the remote location that needs to be backed up and connect it to the main
director. This makes it easy to make a local backup in the remote location and then transfer the volumes to
the local storage. For this option the communication between the local director and the remote storage
daemon needs to be possible.
- Install a director and a storage daemon in the remote location. This option means that the backup is done
completely independent from the local director and only the volume is then transferred and needs to be
imported afterwards.
#
First setup client, fileset, job and schedule as needed for a always incremental backup of the remote
client.
Run the first backup but make sure that you choose the remote storage to be used.
*run job=BackupClient-remote level=Full storage=File-remote
bconsole 25.1:
run
Transport the volumes that were used for that backup over to the local storage daemon and make them available to
the local storage daemon. This can be either by putting the tapes into the local changer or by storing the file
volumes into the local file volume directory.
If copying a volume to the local storage directory make sure that the file rights are correct.
Now tell the director that the volume now belongs to the local storage daemon.
List volumes shows that the volumes used still belong to the remote storage:
*list volumes
.....
Pool: Full
+---------+------------+-----------+---------+----------+----------+--------------+---------+------+-----------+-----------+---------------------+-------------+
| MediaId | VolumeName | VolStatus | Enabled | VolBytes | VolFiles | VolRetention | Recycle | Slot | InChanger | MediaType | LastWritten | Storage |
+---------+------------+-----------+---------+----------+----------+--------------+---------+------+-----------+-----------+---------------------+-------------+
| 1 | Full-0001 | Append | 1 | 38600329 | 0 | 31536000 | 1 | 0 | 0 | File | 2016-07-28 14:00:47 | File-remote |
+---------+------------+-----------+---------+----------+----------+--------------+---------+------+-----------+-----------+---------------------+-------------+
bconsole 25.2:
list volumes
Use update volume to set the right storage and check with list volumes that it worked:
*update volume=Full-0001 storage=File
*list volumes
...
Pool: Full
+---------+------------+-----------+---------+----------+----------+--------------+---------+------+-----------+-----------+---------------------+---------+
| MediaId | VolumeName | VolStatus | Enabled | VolBytes | VolFiles | VolRetention | Recycle | Slot | InChanger | MediaType | LastWritten | Storage |
+---------+------------+-----------+---------+----------+----------+--------------+---------+------+-----------+-----------+---------------------+---------+
| 1 | Full-0001 | Append | 1 | 38600329 | 0 | 31536000 | 1 | 0 | 0 | File | 2016-07-28 14:00:47 | File |
+---------+------------+-----------+---------+----------+----------+--------------+---------+------+-----------+-----------+---------------------+---------+
bconsole 25.3:
update volume
Now the remote storage daemon can be disabled as it is not needed anymore.
The next incremental run will take the previously taken full backup as reference.
#
If a network connection between the local director and the remote storage daemon is not possible, it is also an
option to setup a fully functional Bareos installation remotely and then to import the created volumes. Of course
the network connection between the Bareos Director and the Bareos File Daemon is needed in any case to make the
incremental backups possible.
- Configure the connection from local Bareos Director to remote Bareos File Daemon, give the remote
client the same name as it was when the data was backed up.
- Add the Fileset created on remote machine to local machine.
- Configure the Job that should backup the remote client with the fileset.
- Run estimate listing on the remote backup job.
- Run list filesets to make sure the fileset was added to the catalog.
Then we need to create a backup on the remote machine onto a portable disk which we can then import into our
local installation.
On remote machine:
- Install full Bareos server on remote server (sd, fd, dir). Using the Sqlite backend is sufficient.
- Add the client to the remote backup server.
- Add fileset which the client will be backed up.
- Add Pool with name transferDir
Pool where the data will be written to.
- create job that will backup the remote client with the remote fileset into the new pool
- Do the local backup using the just created Pool and Filesets.
Transport the newly created volume over to the director machine (e.g. via external harddrive) and store the file
where the device stores its files (e.g. /var/lib/bareos/storage)
Shutdown Director on local director machine.
Import data form volume via bscan, you need to set which database backend is used:
bscan -B sqlite3 FileStorage -V Transfer-0001 -s -S
If the import was successfully completed, test if an incremental job really only backs up the minimum amount of
data.
#
A base job is sort of like a Full save except that you will want the FileSet to contain only files that are unlikely to
change in the future (i.e. a snapshot of most of your system after installing it). After the base job has been run,
when you are doing a Full save, you specify one or more Base jobs to be used. All files that have been backed up in
the Base job/jobs but not modified will then be excluded from the backup. During a restore, the Base jobs will be
automatically pulled in where necessary.
Imagine having 100 nearly identical Windows or Linux machine containing the OS and user files. Now for the OS
part, a Base job will be backed up once, and rather than making 100 copies of the OS, there will be only
one. If one or more of the systems have some files updated, no problem, they will be automatically
backuped.
A new Job directive Base=JobX,JobY,... permits to specify the list of files that will be used during Full backup as
base.
Job {
Name = BackupLinux
Level= Base
...
}
Job {
Name = BackupZog4
Base = BackupZog4, BackupLinux
Accurate = yes
...
}
In this example, the job BackupZog4 will use the most recent version of all files contained in BackupZog4 and
BackupLinux jobs. Base jobs should have run with Level=Base to be used.
By default, Bareos will compare permissions bits, user and group fields, modification time, size and the checksum of
the file to choose between the current backup and the BaseJob file list. You can change this behavior
with the BaseJob FileSet option. This option works like the Verify, that is described in the FileSet
chapter.
FileSet {
Name = Full
Include = {
Options {
BaseJob = pmugcs5
Accurate = mcs
Verify = pin5
}
File = /
}
}
Please note! The current implementation doesn’t permit to scan volume with bscan. The result wouldn’t permit to
restore files easily.
#
The functionality of Bareos can be extended by plugins. They do exists plugins for the different daemons (Director,
Storage- and File-Daemon).
To use plugins, they must be enabled in the configuration (Plugin Directory and optionally Plugin Names).
If a Plugin Directory is specified Plugin Names defines, which plugins get loaded.
If Plugin Names is not defined.
#
File Daemon plugins are configured by the Plugin directive of a File Set.
Please note! Currently the plugin command is being stored as part of the backup. The restore command in
your directive should be flexible enough if things might change in future, otherwise you could run into
trouble.
#
The bpipe plugin is a generic pipe program, that simply transmits the data from a specified program to Bareos for
backup, and from Bareos to a specified program for restore. The purpose of the plugin is to provide an interface to
any system program for backup and restore. That allows you, for example, to do database backups without a local
dump. By using different command lines to bpipe, you can backup any kind of data (ASCII or binary) depending on
the program called.
On Linux, the Bareos bpipe plugin is part of the bareos-filedaemon package and is therefore installed on any
system running the filedaemon.
The bpipe plugin is so simple and flexible, you may call it the ”Swiss Army Knife” of the current existing plugins for
Bareos.
The bpipe plugin is specified in the Include section of your Job’s FileSet resource in your bareos-dir.conf.
FileSet {
Name = "MyFileSet"
Include {
Options {
signature = MD5
compression = gzip
}
Plugin = "bpipe:file=<filepath>:reader=<readprogram>:writer=<writeprogram>
}
}
Configuration 27.1:
bpipe fileset
The syntax and semantics of the Plugin directive require the first part of the string up to the colon to be the name
of the plugin. Everything after the first colon is ignored by the File daemon but is passed to the plugin. Thus the
plugin writer may define the meaning of the rest of the string as he wishes. The full syntax of the plugin directive as
interpreted by the bpipe plugin is:
Plugin = "<plugin>:file=<filepath>:reader=<readprogram>:writer=<writeprogram>"
Configuration 27.2:
bpipe directive
-
plugin
- is the name of the plugin with the trailing -fd.so stripped off, so in this case, we would put bpipe in
the field.
-
filepath
- specifies the namespace, which for bpipe is the pseudo path and filename under which the backup
will be saved. This pseudo path and filename will be seen by the user in the restore file tree. For
example, if the value is /MySQL/mydump.sql, the data backed up by the plugin will be put under that
“pseudo” path and filename. You must be careful to choose a naming convention that is unique to
avoid a conflict with a path and filename that actually exists on your system.
-
readprogram
- for the bpipe plugin specifies the ”reader” program that is called by the plugin during backup
to read the data. bpipe will call this program by doing a popen on it.
-
writeprogram
- for the bpipe plugin specifies the ”writer” program that is called by the plugin during restore
to write the data back to the filesystem.
Please note that the two items above describing the ”reader” and ”writer”, these programs are ”executed” by
Bareos, which means there is no shell interpretation of any command line arguments you might use. If you want to
use shell characters (redirection of input or output, ...), then we recommend that you put your command or
commands in a shell script and execute the script. In addition if you backup a file with reader program,
when running the writer program during the restore, Bareos will not automatically create the path to
the file. Either the path must exist, or you must explicitly do so with your command or in a shell
script.
See the examples about Backup of a PostgreSQL Database and Backup of a MySQL Database.
#
See chapter Backup of a PostgreSQL Databases by using the PGSQL-Plugin.
#
See the chapters Backup of MySQL Databases using the Bareos MySQL Percona xtrabackup Plugin and Backup of
MySQL Databases using the Python MySQL plugin.
#
See chapter Backup of MSSQL Databases with Bareos Plugin.
#
This plugin is intended to backup (and restore) the contents of a LDAP server. It uses normal LDAP operation for
this. The package bareos-filedaemon-ldap-python-plugin (Version >= 15.2.0) contains an example
configuration file, that must be adapted to your envirnoment.
#
Opposite to the Rados Backend that is used to store data on a CEPH Object Store, this plugin is
intended to backup a CEPH Object Store via the Cephfs interface to other media. The package
bareos-filedaemon-ceph-plugin (Version >= 15.2.0) contains an example configuration file, that must be
adapted to your envirnoment.
#
Opposite to the Rados Backend that is used to store data on a CEPH Object Store, this plugin is
intended to backup a CEPH Object Store via the Rados interface to other media. The package
bareos-filedaemon-ceph-plugin (Version >= 15.2.0) contains an example configuration file, that must be
adapted to your envirnoment.
#
Opposite to the GFAPI Backend that is used to store data on a Gluster system, this plugin is intended to backup
data from a Gluster system to other media. The package bareos-filedaemon-glusterfs-plugin (Version >=
15.2.0) contains an example configuration file, that must be adapted to your envirnoment.
#
The python-fd plugin behaves similar to the python-dir Plugin. Base plugins and an example get installed via
the package bareos-filedaemon-python-plugin. Configuration is done in the FileSet Resource on the
director.
We basically distinguish between command-plugin and option-plugins.
Command plugins are used to replace or extend the FileSet definition in the File Section. If you have a
command-plugin, you can use it like in this example:
FileSet {
Name = "mysql"
Include {
Options {
Signature = MD5 # calculate md5 checksum per file
}
File = "/etc"
Plugin = "python:module_path=/usr/lib/bareos/plugins:module_name=bareos-fd-mysql"
}
}
Configuration 27.3:
bareos-dir.conf: Python FD command plugins
This example uses the MySQL plugin to backup MySQL dumps in addition to /etc.
Option plugins are activated in the Options resource of a FileSet definition.
Example:
FileSet {
Name = "option"
Include {
Options {
Signature = MD5 # calculate md5 checksum per file
Plugin = "python:module_path=/usr/lib/bareos/plugins:module_name=bareos-fd-file-interact"
}
File = "/etc"
File = "/usr/lib/bareos/plugins"
}
}
Configuration 27.4:
bareos-dir.conf: Python FD option plugins
This plugin bareos-fd-file-interact from https://github.com/bareos/bareos-contrib/tree/master/fd-plugins/options-plugin-sample
has a method that is called before and after each file that goes into the backup, it can be used as a template for
whatever plugin wants to interact with files before or after backup.
#
The VMware® Plugin can be used for agentless backups of virtual machines running on VMware vSphere®. It makes
use of CBT (Changed Block Tracking) to do space efficient full and incremental backups, see below for mandatory
requirements.
It is included in Bareos since Version >= 15.2.0.
The Plugin can do full, differential and incremental backup and restore of VM disks.
Current limitations amongst others are:
Normal VM disks can not be excluded from the backup.
It is not yet possible to exclude normal (dependent) VM disks from backups. However, independent disks are
excluded implicitly because they are not affected by snapshots which are required for CBT based backup.
VM configuration is not backed up.
The VM configuration is not backed up, so that it is not yet possible to recreate a completely deleted VM.
Virtual Disks have to be smaller than 2TB.
Virtual Disks have to be smaller than 2 TB, see Ticket #670.
Restore can only be done to the same VM or to local VMDK files.
Until Bareos Version 15.2.2, the restore has only be possible to the same existing VM with existing virtual disks.
Since Version >= 15.2.3 it is also possible to restore to local VMDK files, see below for more details.
As the Plugin is based on the VMware vSphere® Storage APIs for Data Protection, which requires at least a
VMware vSphere® Essentials License. It is tested against VMware vSphere® Storage APIs for Data Protection of
VMware® 5.x. It does not work with standalone unlicensed VMware® ESXi™.
Since Bareos Version >= 17.2.4 the plugin is using the Virtual Disk Development Kit (VDDK) 6.5.2, as of
the VDDK 6.5 release notes, it should be compatible with vSphere 6.5 and the next major release
(except new features) and backward compatible with vSphere 5.5 and 6.0, see VDDK release notes at
https://code.vmware.com/web/sdk/65/vddk for details.
Install the package bareos-vmware-plugin including its requirments by using an appropriate package management
tool (eg. yum, zypper, apt)
The FAQ may have additional useful information.
First add a user account in vCenter that has full privileges by assigning the account to an administrator role or by
adding the account to a group that is assigned to an administrator role. While any user account with full privileges
could be used, it is better practice to create a separate user account, so that the actions by this account logged in
vSphere are clearly distinguishable. In the future a more detailed set of required role privilges may be
defined.
When using the vCenter appliance with embedded SSO, a user account usually has the structure
<username>@vsphere.local, it may be different when using Active Directory as SSO in vCenter. For the examples
here, we will use bakadm@vsphere.local with the password Bak.Adm-1234.
For more details regarding users and permissions in vSphere see
Make sure to add or enable the following settings in your Bareos File Daemon configuration:
Client {
...
Plugin Directory = /usr/lib/bareos/plugins
Plugin Names = python
...
}
Resource 27.5:
bareos-fd.d/client/myself.conf
Note: Depending on Platform, the Plugin Directory may also be /usr/lib64/bareos/plugins
To define the backup of a VM in Bareos, a job definition and a fileset resource must be added to the Bareos director
configuration. In vCenter, VMs are usually organized in datacenters and folders. The following example shows how
to configure the backup of the VM named websrv1 in the datacenter mydc1 folder webservers on the vCenter server
vcenter.example.org:
Job {
Name = "vm-websrv1"
JobDefs = "DefaultJob"
FileSet = "vm-websrv1_fileset"
}
FileSet {
Name = "vm-websrv1_fileset"
Include {
Options {
signature = MD5
Compression = GZIP
}
Plugin = "python:module_path=/usr/lib64/bareos/plugins:module_name=bareos-fd-vmware:dc=mydc1:folder=/webservers:vmname=websrv1:vcserver=vcenter.example.org:vcuser=bakadm@vsphere.local:vcpass=Bak.Adm-1234"
}
}
Configuration 27.6:
bareos-dir.conf: VMware Plugin Job and FileSet definition
For VMs defined in the root-folder, folder=/ must be specified in the Plugin definition.
Since Bareos Version >= 17.2.4 the module_path is without vmware_plugin directory. On upgrades you either adapt
your configuration from
Plugin = "python:module_path=/usr/lib64/bareos/plugins/vmware_plugin:module_name=bareos-fd-vmware:...
Configuration 27.7:
python:module_path for Bareos < 17.2.0
to
Plugin = "python:module_path=/usr/lib64/bareos/plugins:module_name=bareos-fd-vmware:...
Configuration 27.8:
python:module_path for Bareos ≥ 17.2.0
or install the bareos-vmware-plugin-compat package which includes compatibility symbolic links.
Since Version >= 17.2.4: as the Plugin is using the Virtual Disk Development Kit (VDDK) 6.5, it is required to pass
the thumbprint of the vCenter SSL Certificate, which is the SHA1 checksum of the SSL Certificate. The thumbprint
can be retrieved like this:
echo -n | openssl s_client -connect vcenter.example.org:443 2>/dev/null | openssl x509 -noout -fingerprint -sha1
Commands 27.9:
Example Retrieving vCenter SSL Certificate Thumbprint
The result would look like this:
SHA1 Fingerprint=CC:81:81:84:A3:CF:53:ED:63:B1:46:EF:97:13:4A:DF:A5:9F:37:89
Commands 27.10:
Example Result Thumbprint
For additional security, there is a now plugin option vcthumbprint, that can optionally be added. It must be given
without colons like in the following example:
...
Plugin = "python:module_path=/usr/lib64/bareos/plugins:module_name=bareos-fd-vmware:dc=mydc1:folder=/webservers:vmname=websrv1:vcserver=vcenter.example.org:vcuser=bakadm@vsphere.local:vcpass=Bak.Adm-1234:vcthumbprint=56F597FE60521773D073A2ED47CE07282CE6FE9C"
...
Configuration 27.11:
bareos-dir.conf: VMware Plugin Options with vcthumbprint
For ease of use (but less secure) when the vcthumbprint is not given, the plugin will retrieve the
thumbprint.
Also since Version >= 17.2.4 another optional plugin option has been added that can be used for
trying to force a given transport method. Normally, when no transport method is given, VDDK will
negotiate available transport methods and select the best one. For a description of transport methods,
see
https://code.vmware.com/doc/preview?id=4076#/doc/vddkDataStruct.5.5.html
When the plugin runs in a VMware virtual machine which has access to datastore where the virtual disks to be
backed up reside, VDDK will use the hotadd transport method. On a physical server without SAN access, it will use
the NBD transport method, hotadd transport is not available in this case.
To try forcing a given transport method, the plugin option transport can be used, for example
...
Plugin = "python:module_path=/usr/lib64/bareos/plugins:module_name=bareos-fd-vmware:dc=mydc1:folder=/webservers:vmname=websrv1:vcserver=vcenter.example.org:vcuser=bakadm@vsphere.local:vcpass=Bak.Adm-1234:transport=nbdssl"
...
Configuration 27.12:
bareos-dir.conf: VMware Plugin options with transport
Note that the backup will fail when specifying a transport method that is not available.
Before running the first backup, CBT (Changed Block Tracking) must be enabled for the VMs to be backed
up.
As of http://kb.vmware.com/kb/2075984 manually enabling CBT is currently not working properly. The API
however works properly. To enable CBT use the Script vmware_cbt_tool.py, it is packaged in the
bareos-vmware-plugin package:
# vmware_cbt_tool.py --help
usage: vmware_cbt_tool.py [-h] -s HOST [-o PORT] -u USER [-p PASSWORD] -d
DATACENTER -f FOLDER -v VMNAME [--enablecbt]
[--disablecbt] [--resetcbt] [--info]
Process args for enabling/disabling/resetting CBT
optional arguments:
-h, --help show this help message and exit
-s HOST, --host HOST Remote host to connect to
-o PORT, --port PORT Port to connect on
-u USER, --user USER User name to use when connecting to host
-p PASSWORD, --password PASSWORD
Password to use when connecting to host
-d DATACENTER, --datacenter DATACENTER
DataCenter Name
-f FOLDER, --folder FOLDER
Folder Name
-v VMNAME, --vmname VMNAME
Names of the Virtual Machines
--enablecbt Enable CBT
--disablecbt Disable CBT
--resetcbt Reset CBT (disable, then enable)
--info Show information (CBT supported and enabled or
disabled)
Commands 27.13:
usage of vmware_cbt_tool.py
For the above configuration example, the command to enable CBT would be
# vmware_cbt_tool.py -s vcenter.example.org -u bakadm@vsphere.local -p Bak.Adm-1234 -d mydc1 -f /webservers -v websrv1 --enablecbt
Commands 27.14:
Example using vmware_cbt_tool.py
Note: CBT does not work if the virtual hardware version is 6 or earlier.
After enabling CBT, Backup Jobs can be run or scheduled as usual, for example in bconsole:
run job=vm-websrv1 level=Full
For restore, the VM must be powered off and no snapshot must exist. In bconsole use the restore menu 5, select
the correct FileSet and enter mark *, then done. After restore has finished, the VM can be powered
on.
Since Version >= 15.2.3 it is possible to restore to local VMDK files. That means, instead of directly restoring
a disk that belongs to the VM, the restore creates VMDK disk image files on the filesystem of the
system that runs the Bareos File Daemon. As the VM that the backup was taken from is not affected
by this, it can remain switched on while restoring to local VMDK. Such a restored VMDK file can
then be uploaded to a VMware vSphere® datastore or accessed by tools like guestfish to extract single
files.
For restoring to local VMDK, the plugin option localvmdk=yes must be passed. The following example shows how to
perform such a restore using bconsole:
*restore
Automatically selected Catalog: MyCatalog
Using Catalog "MyCatalog"
First you select one or more JobIds that contain files
to be restored. You will be presented several methods
of specifying the JobIds. Then you will be allowed to
select which files from those JobIds are to be restored.
To select the JobIds, you have the following choices:
1: List last 20 Jobs run
...
5: Select the most recent backup for a client
...
13: Cancel
Select item: (1-13): 5
Automatically selected Client: vmw5-bareos-centos6-64-devel-fd
The defined FileSet resources are:
1: Catalog
...
5: PyTestSetVmware-test02
6: PyTestSetVmware-test03
...
Select FileSet resource (1-10): 5
+-------+-------+----------+---------------+---------------------+------------------+
| jobid | level | jobfiles | jobbytes | starttime | volumename |
+-------+-------+----------+---------------+---------------------+------------------+
| 625 | F | 4 | 4,733,002,754 | 2016-02-18 10:32:03 | Full-0067 |
...
You have selected the following JobIds: 625,626,631,632,635
Building directory tree for JobId(s) 625,626,631,632,635 ...
10 files inserted into the tree.
You are now entering file selection mode where you add (mark) and
remove (unmark) files to be restored. No files are initially added, unless
you used the "all" keyword on the command line.
Enter "done" to leave this mode.
cwd is: /
$ mark ∗
10 files marked.
$ done
Bootstrap records written to /var/lib/bareos/vmw5-bareos-centos6-64-devel-dir.restore.1.bsr
The job will require the following
Volume(s) Storage(s) SD Device(s)
===========================================================================
Full-0001 File FileStorage
...
Incremental-0078 File FileStorage
Volumes marked with "*" are online.
10 files selected to be restored.
Using Catalog "MyCatalog"
Run Restore job
JobName: RestoreFiles
Bootstrap: /var/lib/bareos/vmw5-bareos-centos6-64-devel-dir.restore.1.bsr
Where: /tmp/bareos-restores
Replace: Always
FileSet: Linux All
Backup Client: vmw5-bareos-centos6-64-devel-fd
Restore Client: vmw5-bareos-centos6-64-devel-fd
Format: Native
Storage: File
When: 2016-02-25 15:06:48
Catalog: MyCatalog
Priority: 10
Plugin Options: *None*
OK to run? (yes/mod/no): mod
Parameters to modify:
1: Level
...
14: Plugin Options
Select parameter to modify (1-14): 14
Please enter Plugin Options string: python:localvmdk=yes
Run Restore job
JobName: RestoreFiles
Bootstrap: /var/lib/bareos/vmw5-bareos-centos6-64-devel-dir.restore.1.bsr
Where: /tmp/bareos-restores
Replace: Always
FileSet: Linux All
Backup Client: vmw5-bareos-centos6-64-devel-fd
Restore Client: vmw5-bareos-centos6-64-devel-fd
Format: Native
Storage: File
When: 2016-02-25 15:06:48
Catalog: MyCatalog
Priority: 10
Plugin Options: python: module_path=/usr/lib64/bareos/plugins:module_name=bareos-fd-vmware: dc=dass5:folder=/: vmname=stephand-test02: vcserver=virtualcenter5.dass-it:vcuser=bakadm@vsphere.local: vcpass=Bak.Adm-1234: localvmdk=yes
OK to run? (yes/mod/no): yes
Job queued. JobId=639
Commands 27.15:
Example restore to local VMDK
Note: Since Bareos Version >= 15.2.3 it is sufficient to add Python plugin options, e.g. by
python:localvmdk=yes
Before, all Python plugin must be repeated and the additional be added, like:
python:module_path=/usr/lib64/bareos/plugins:module_name=bareos-fd-vmware:dc=dass5:folder=/:vmname=stephand-test02:
vcserver=virtualcenter5.dass-it:vcuser=bakadm@vsphere.local:vcpass=Bak.Adm-1234:localvmdk=yes
After the restore process has finished, the restored VMDK files can be found under /tmp/bareos-restores/:
# ls -laR /tmp/bareos-restores
/tmp/bareos-restores:
total 28
drwxr-x--x. 3 root root 4096 Feb 25 15:47 .
drwxrwxrwt. 17 root root 20480 Feb 25 15:44 ..
drwxr-xr-x. 2 root root 4096 Feb 25 15:19 [ESX5-PS100] stephand-test02
/tmp/bareos-restores/[ESX5-PS100] stephand-test02:
total 7898292
drwxr-xr-x. 2 root root 4096 Feb 25 15:19 .
drwxr-x--x. 3 root root 4096 Feb 25 15:47 ..
-rw-------. 1 root root 2075197440 Feb 25 15:19 stephand-test02_1.vmdk
-rw-------. 1 root root 6012731392 Feb 25 15:19 stephand-test02.vmdk
Commands 27.16:
Example result of restore to local VMDK
#
#
This plugin is part of the bareos-storage package.
The autoxflate-sd plugin can inflate (decompress) and deflate (compress) the data being written to or read from a
device. It can also do both.
Therefore the autoxflate plugin inserts a inflate and a deflate function block into the stream going to the device
(called OUT) and coming from the device (called IN).
Each stream passes first the inflate function block, then the deflate function block.
The inflate blocks are controlled by the setting of the Auto Inflate Sd
Device directive.
The deflate blocks are controlled by the setting of the Auto Deflate Sd
Device, Auto Deflate Algorithm Sd
Device and Auto
Deflate Level Sd
Device directives.
The inflate blocks, if enabled, will uncompress data if it is compressed using the algorithm that was used during
compression.
The deflate blocks, if enabled, will compress uncompressed data with the algorithm and level configured in the
according directives.
The series connection of the inflate and deflate function blocks makes the plugin very flexible.
Szenarios where this plugin can be used are for example:
- client computers with weak cpus can do backups without compression and let the sd do the compression
when writing to disk
- compressed backups can be recompressed to a different compression format (e.g. gzip → lzo) using
migration jobs
- client backups can be compressed with compression algorithms that the client itself does not support
Multi-core cpus will be utilized when using parallel jobs as the compression is done in each jobs’ thread.
When the autoxflate plugin is configured, it will write some status information into the joblog.
autodeflation: compressor on device FileStorage is FZ4H
Messages 27.17:
used compression algorithm
autoxflate-sd.c: FileStorage OUT:[SD->inflate=yes->deflate=yes->DEV] IN:[DEV->inflate=yes->deflate=yes->SD]
Messages 27.18:
configured inflation and deflation blocks
autoxflate-sd.c: deflate ratio: 50.59%
Messages 27.19:
overall deflation/inflation ratio
Additional Auto XFlate On Replication Sd
Storage can be configured at the Storage resource.
#
This plugin is part of the bareos-storage-tape package.
LTO Hardware Encryption
Modern tape-drives, for example LTO (from LTO4 onwards) support hardware encryption. There are several
ways of using encryption with these drives. The following three types of key management are available
for encrypting drives. The transmission of the keys to the volumes is accomplished by either of the
three:
- A backup application that supports Application Managed Encryption (AME)
- A tape library that supports Library Managed Encryption (LME)
- A Key Management Appliance (KMA)
We added support for Application Managed Encryption (AME) scheme, where on labeling a crypto key is generated
for a volume and when the volume is mounted, the crypto key is loaded. When finally the volume is
unmounted, the key is cleared from the memory of the Tape Drive using the SCSI SPOUT command
set.
If you have implemented Library Managed Encryption (LME) or a Key Management Appliance (KMA), there is no
need to have support from Bareos on loading and clearing the encryption keys, as either the Library knows the per
volume encryption keys itself, or it will ask the KMA for the encryption key when it needs it. For big installations
you might consider using a KMA, but the Application Managed Encryption implemented in Bareos
should also scale rather well and have a low overhead as the keys are only loaded and cleared when
needed.
The scsicrypto-sd plugin
The scsicrypto-sd hooks into the unload, label read, label write and label verified events for loading and
clearing the key. It checks whether it it needs to clear the drive by either using an internal state (if it loaded a key
before) or by checking the state of a special option that first issues an encrytion status query. If there is a connection
to the director and the volume information is not available, it will ask the director for the data on the
currently loaded volume. If no connection is available, a cache will be used which should contain the
most recently mounted volumes. If an encryption key is available, it will be loaded into the drive’s
memory.
Changes in the director
The director has been extended with additional code for handling hardware data encryption. The extra keyword
encrypt on the label of a volume will force the director to generate a new semi-random passphrase for the volume,
which will be stored in the database as part of the media information.
A passphrase is always stored in the database base64-encoded. When a so called Key Encryption Key is set in
the config of the director, the passphrase is first wrapped using RFC3394 key wrapping and then base64-encoded.
By using key wrapping, the keys in the database are safe against people sniffing the info, as the data is still
encrypted using the Key Encryption Key (which in essence is just an extra passphrase of the same length as the
volume passphrases used).
When the storage daemon needs to mount the volume, it will ask the director for the volume information and that
protocol is extended with the exchange of the base64-wrapped encryption key (passphrase). The storage daemon
provides an extra config option in which it records the Key Encryption Key of the particular director, and as such
can unwrap the key sent into the original passphrase.
As can be seen from the above info we don’t allow the user to enter a passphrase, but generate a semi-random
passphrase using the openssl random functions (if available) and convert that into a readable ASCII stream of
letters, numbers and most other characters, apart from the quotes and space etc. This will produce much stronger
passphrases than when requesting the info from a user. As we store this information in the database, the user never
has to enter these passphrases.
The volume label is written in unencrypted form to the volume, so we can always recognize a Bareos volume. When
the key is loaded onto the drive, we set the decryption mode to mixed, so we can read both unencrypted and
encrypted data from the volume. When no key or the wrong key has been loaded, the drive will give an IO error
when trying to read the volume. For disaster recovery you can store the Key Encryption Key and
the content of the wrapped encryption keys somewhere safe and the bscrypto tool together with the
scsicrypto-sd plugin can be used to get access to your volumes, in case you ever lose your complete
environment.
If you don’t want to use the scsicrypto-sd plugin when doing DR and you are only reading one volume, you can also
set the crypto key using the bscrypto tool. Because we use the mixed decryption mode, in which you can read both
encrypted and unencrypted data from a volume, you can set the right encryption key before reading the volume
label.
If you need to read more than one volume, you better use the scsicrypto-sd plugin with tools like bscan/bextract, as
the plugin will then auto-load the correct encryption key when it loads the volume, similiarly to what the storage
daemon does when performing backups and restores.
The volume label is unencrypted, so a volume can also be recognized by a non-encrypted installation, but it won’t
be able to read the actual data from it. Using an encrypted volume label doesn’t add much security (there is no
security-related info in the volume label anyhow) and it makes it harder to recognize either a labeled
volume with encrypted data or an unlabeled new volume (both would return an IO-error on read of the
label.)
SCSI crypto setup
The initial setup of SCSI crypto looks something like this:
- Generate a Key Encryption Key e.g.
bscrypto -g -
Commands 27.20:
For details see bscrypto.
Security Setup
Some security levels need to be increased for the storage daemon to be able to use the low level SCSI interface for
setting and getting the encryption status on a tape device.
The following additional security is needed for the following operating systems:
Linux (SG_IO ioctl interface): The user running the storage daemon needs the following additional capabilities:
- CAP_SYS_RAWIO (see capabilities(7))
- On older kernels you might need CAP_SYS_ADMIN. Try CAP_SYS_RAWIO first and if that doesn’t
work try CAP_SYS_ADMIN
- If you are running the storage daemon as another user than root (which has the CAP_SYS_RAWIO capability),
you need to add it to the current set of capabilities.
- If you are using systemd, you could add this additional capability to the CapabilityBoundingSet
parameter.
- For systemd add the following to the bareos-sd.service: Capabilities=cap_sys_rawio+ep
You can also set up the extra capability on bscrypto and bareos-sd by running the following commands:
setcap cap_sys_rawio=ep bscrypto
setcap cap_sys_rawio=ep bareos-sd
Commands 27.21:
Check the setting with
getcap -v bscrypto
getcap -v bareos-sd
Commands 27.22:
getcap and setcap are part of libcap-progs.
If bareos-sd does not have the appropriate capabilities, all other tape operations may still work correctly, but you
will get “Unable to perform SG_IO ioctl” errors.
Solaris (USCSI ioctl interface): The user running the storage daemon needs the following additional privileges:
- PRIV_SYS_DEVICES (see privileges(5))
If you are running the storage daemon as another user than root (which has the PRIV_SYS_DEVICES privilege), you
need to add it to the current set of privileges. This can be set up by setting this either as a project for the user, or
as a set of extra privileges in the SMF definition starting the storage daemon. The SMF setup is the cleanest
one.
For SMF make sure you have something like this in the instance block:
<method_context working_directory=":default"> <method_credential user="bareos" group="bareos" privileges="basic,sys_devices"/> </method_context>
Configuration 27.23:
Changes in bareos-sd.conf
- Set the Key Encryption Key
- Enable the loading of storage daemon plugins
- Enable the SCSI encryption option
- Enable this, if you want the plugin to probe the encryption status of the drive when it needs to clear a pending
key
Changes in bareos-dir.conf
- Set the Key Encryption Key
Restart the Storage Daemon and the Director. After this you can label new volumes with the encrypt option,
e.g.
label slots=1-5 barcodes encrypt
Configuration 27.24:
For Disaster Recovery (DR) you need the following information:
- Actual bareos-sd.conf with config options enabled as described above, including, among others, a
definition of a director with the Key Encryption Key used for creating the encryption keys of the
volumes.
- The actual keys used for the encryption of the volumes.
This data needs to be availabe as a so called crypto cache file which is used by the plugin when no connection to the
director can be made to do a lookup (most likely on DR).
Most of the times the needed information, e.g. the bootstrap info, is available on recently written volumes
and most of the time the encryption cache will contain the most recent data, so a recent copy of the
bareos-sd.<portnr>.cryptoc file in the working directory is enough most of the time. You can also save the info
from database in a safe place and use bscrypto to populate this info (VolumeName →EncryptKey) into the crypto
cache file used by bextract and bscan. You can use bscrypto with the following flags to create a new or update an
existing crypto cache file e.g.:
bscrypto -p /var/lib/bareos/bareos-sd.<portnr>.cryptoc
Commands 27.25:
Or something similar (change paths to follow where you installed the software or where the package put
it).
Note: As described at the beginning of this chapter, there are different types of key management, AME, LME and
KMA. If the Library is set up for LME or KMA, it probably won’t allow our AME setup and the scsi-crypto plugin
will fail to set/clear the encryption key. To be able to use AME you need to “Modify Encryption Method” and set it
to something like “Application Managed”. If you decide to use LME or KMA you don’t have to bother with the
whole setup of AME which may for big libraries be easier, although the overhead of using AME even for very big
libraries should be minimal.
#
This plugin is part of the bareos-storage-tape package.
#
The python-sd plugin behaves similar to the python-dir Plugin.
#
#
The python-dir plugin is intended to extend the functionality of the Bareos Director by Python code. A working
example is included.
- install the bareos-director-python-plugin package
- change to the Bareos plugin directory (/usr/lib/bareos/plugins/ or /usr/lib64/bareos/
plugins/)
- copy bareos-dir.py.template to bareos-dir.py
- activate the plugin in the Bareos Director configuration
- restart the Bareos Director
- change bareos-dir.py as required
- restart the Bareos Director
Since Version >= 14.4.0 multiple Python plugins can be loaded and plugin names can be arbitrary. Before this, the
Python plugin always loads the file bareos-dir.py.
The director plugins are configured in the Job-Resource (or JobDefs resource). To load a Python plugin you
need
- pointing to your plugin directory (needs to be enabled in the Director resource, too
- Your plugin (without the suffix .py)
- default is ’0’, you can leave this, as long as you only have 1 Director Python plugin. If you have more
than 1, start with instance=0 and increment the instance for each plugin.
- You can add plugin specific option key-value pairs, each pair separated by ’:’ key=value
Single Python Plugin Loading Example:
Director {
# ...
# Plugin directory
Plugin Directory = /usr/lib64/bareos/plugins
# Load the python plugin
Plugin Names = "python"
}
JobDefs {
Name = "DefaultJob"
Type = Backup
# ...
# Load the class based plugin with testoption=testparam
Dir Plugin Options = "python:instance=0:module_path=/usr/lib64/bareos/plugins:module_name=bareos-dir-class-plugins:testoption=testparam
# ...
}
Configuration 27.27:
bareos-dir.conf: Single Python Plugin Loading Example
Multiple Python Plugin Loading Example:
Director {
# ...
# Plugin directory
Plugin Directory = /usr/lib64/bareos/plugins
# Load the python plugin
Plugin Names = "python"
}
JobDefs {
Name = "DefaultJob"
Type = Backup
# ...
# Load the class based plugin with testoption=testparam
Dir Plugin Options = "python:instance=0:module_path=/usr/lib64/bareos/plugins:module_name=bareos-dir-class-plugins:testoption=testparam1
Dir Plugin Options = "python:instance=1:module_path=/usr/lib64/bareos/plugins:module_name=bareos-dir-class-plugins:testoption=testparam2
# ...
}
Configuration 27.28:
bareos-dir.conf: Multiple Python Plugin Loading Example
Some plugin examples are available on https://github.com/bareos/bareos-contrib. The class-based approach
lets you easily reuse stuff already defined in the baseclass BareosDirPluginBaseclass, which ships with the
bareos-director-python-plugin package. The examples contain the plugin bareos-dir-nsca-sender, that
submits the results and performance data of a backup job directly to Icinga or Nagios using the NSCA
protocol.
#
The Windows version of Bareos is a native Win32 port, but there are very few source code changes to the Unix
code, which means that the Windows version is for the most part running code that has long proved stable on Unix
systems.
Chapter Operating Systems shows, what Windows versions are supported.
The Bareos component that is most often used in Windows is the File daemon or Client program. As a consequence,
when we speak of the Windows version of Bareos below, we are mostly referring to the File daemon
(client).
Once installed Bareos normally runs as a system service. This means that it is immediately started by the operating
system when the system is booted, and runs in the background even if there is no user logged into the
system.
#
Normally, you will install the Windows version of Bareos from the binaries. The winbareos binary packages are
provided under http://download.bareos.org/bareos/release/latest/windows. Additionally, there are OPSI
packages available under http://download.bareos.org/bareos/release/latest/windows/opsi.
This install is standard Windows .exe that runs an install wizard using the NSIS Free Software
installer, so if you have already installed Windows software, it should be very familiar to you.
Providing you do not already have Bareos installed, the installer installs the binaries and dlls in
C:\Program Files\Bareos and the configuration files in C:\ProgramData \Bareos (for Windows XP and older:
C:\Documents and Settings\All Users\Application Data\Bareos ).
In addition, the Start>All Programs>Bareos menu item will be created during the installation, and on that
menu, you will find items for editing the configuration files, displaying the document, and starting a user
interface.
During installation you can decide, what Bareos components you want to install.
Typically, you only want to install the Bareos Client (Bareos File Daemon) and optionally some interface tools on a
Windows system. Normally, we recommend to let the server components run on a Linux or other Unix system.
However, it is possible, to run the Bareos Director, Bareos Storage Daemon and Bareos Webui on a Windows
systems. You should be aware about following limitations:
Limitation: Windows: Bareos Director does not support MySQL database backend.
When running the Bareos Director on Windows, only PostgreSQL (and SQLite) database backends are supported.
SQLite is best suited for test environments.
Limitation: Windows: Bareos Storage Daemon only support backup to disk, not to tape.
Limitation: Windows: The default installation of Bareos Webui is only suitable for local
access.
Normally the Bareos Webui is running on a Apache server on Linux. While it is possible, to run the Bareos Webui
under Apache or another Webserver which supports PHP under Windows, the configuration shipped the the
winbareos package uses the PHP internal webserver. This is okay for local access, but not suitable for being
accessed via the network. To guarantee this, it is configured to only listen locally (http://localhost:9100).
#
Here are the important steps.
- You must be logged in as an Administrator to the local machine to do a correct installation, if not,
please do so before continuing.
- For a standard installation you may only select the ”Tray-Monitor” and the ”Open Firewall for Client” as
additional optional components.
- You need to fill in the name of your bareos director in the client configuration dialogue and the FQDN or ip
address of your client.
- Add the client resource to your Bareos Director Configuration and a job resource for the client as it is also
described in the default bareos-dir.conf
#
Silent installation is possible since Version >= 12.4.4. All inputs that are given during interactive install can now
directly be configured on the commandline, so that an automatic silent install is possible.
Commandline Switches
-
/?
- shows the list of available parameters.
-
/S
- sets the installer to silent. The Installation is done without user interaction. This switch is also available
for the uninstaller.
-
/CLIENTADDRESS
- network address of the client
-
/CLIENTNAME
- sets the name of the client resource
-
/CLIENTMONITORPASSWORD
- sets the password for monitor access
-
/CLIENTPASSWORD
- sets the password to access the client
-
/DBADMINUSER=user
- sets the database admin user, default=postgres. Version >= 14.2.1
-
/DBADMINPASSWORD=password
- sets the database admin password, default=none. Version >=
14.2.1
-
/DIRECTORADDRESS
- sets network address of the director for bconsole or bat access
-
/DIRECTORNAME
- sets the name of the director to access the client and of the director to accessed by
bconsole and bat
-
/DIRECTORPASSWORD
- set the password to access the director
-
/SILENTKEEPCONFIG
- keep configuration files on silent uninstall and use exinsting config files during
silent install. Version >= 12.4.4
-
/INSTALLDIRECTOR
- install the Bareos Director (and bconsole). Version >= 14.2.1
-
/INSTALLSTORAGE
- install the Bareos Storage Daemon. Version >= 14.2.1
-
/WRITELOGS
- makes also non-debug installer write a log file. Version >= 14.2.1
-
/D=C:\specify \installation \directory
- (Important: It has to be the last option!)
By setting the Installation Parameters via commandline and using the silent installer, you can install the bareos
client without having to do any configuration after the installation e.g. as follows:
c:\winbareos.exe /S /CLIENTNAME=hostname-fd /CLIENTPASSWORD="verysecretpassword" /DIRECTORNAME=bareos-dir
DBADMINUSER and DBADMINPASSWORD are used to create the bareos databases. If login is not possible silent
installer will abort
#
#
If you are not using the portable option, and you have Enable VSS Dir
FileSet (Volume Shadow Copy) enabled in the
Bareos Director and you experience problems with Bareos not being able to open files, it is most likely that you are
running an antivirus program that blocks Bareos from doing certain operations. In this case, disable the antivirus
program and try another backup. If it succeeds, either get a different (better) antivirus program or use something
like Client Run Before Job Dir
Job/Client Run Before Job Dir
Job to turn off the antivirus program while the backup is
running.
If turning off anti-virus software does not resolve your VSS problems, you might have to turn on VSS debugging.
The following link describes how to do this: http://support.microsoft.com/kb/887013/en-us.
#
In case of problems, you can enable the creation of log files. For this you have to use the bconsole setdebug
command:
*setdebug client=bareos-fd level=200 trace=1
Connecting to Client bareos-fd at bareos.example.com:9102
2000 OK setdebug=200 trace=1 hangup=0 tracefile=c:\bareos-fd.trace
bconsole 28.1:
Enable debug
#
#
If you are not using the Volume Shadow Copy Service (VSS) option and if any applications are running during the
backup and they have files opened exclusively, Bareos will not be able to backup those files, so be sure you close
your applications (or tell your users to close their applications) before the backup. Fortunately, most Microsoft
applications do not open files exclusively so that they can be backed up. However, you will need to experiment. In
any case, if Bareos cannot open the file, it will print an error message, so you will always know which files
were not backed up. If Volume Shadow Copy Service is enabled, Bareos is able to backing up any
file.
#
During backup, Bareos doesn’t know about the system registry, so you will either need to write it out to an
ASCII file using regedit /e or use a program specifically designed to make a copy or backup the
registry.
#
Version >= 12.4.5
Besides normal files and directories, Windows filesystems also support special files, called ”Reparse Points”. Bareos
can handle the following types of Reparse points:
- Symbolic links to directories
- Symbolic links to files
- Junction Points
- Volume Mount Points
The Volume Mount Points are a special case of a Junction Point. To make things easier, in the following
when talking about Junction Points, we mean only the Junction Points that are not Volume Mount
Points.
The Symbolic Links and the Junction Points are comparable to Symbolic Links in Unix/Linux. They are files that
point to another location in the filesystem.
Symbolic Links and Junction Points can be created with the Windows commandline command mklink.
When doing a directory listing in the commandline (cmd) in Windows, it shows the filetypes JUNCTION,
SYMLINK or SYMLINKD and the target between the square brackets:
C:\linktest>dir
Volume in drive C has no label.
Volume Serial Number is C8A3-971F
Directory of C:\linktest
08/07/2014 03:05 PM <DIR> .
08/07/2014 03:05 PM <DIR> ..
08/07/2014 02:59 PM <SYMLINKD> dirlink [C:\Program Files\Bareos]
08/07/2014 03:02 PM <SYMLINK> filelink [C:\Program Files\Bareos\bareos-dir.exe]
08/07/2014 03:00 PM <JUNCTION> junction [C:\Program Files\Bareos]
08/07/2014 03:05 PM <JUNCTION> volumemountpoint [\??\Volume{e960247d-09a1-11e3-93ec-005056add71d}\]
1 File(s) 0 bytes
5 Dir(s) 90,315,137,024 bytes free
Commands 28.2:
special files
Symbolic Links. Directory Symbolic Links, and Junctions that are not a Volume MountPoint are treated by Bareos
as symbolic links and are backed up and restored as they are, so the object is restored and points to where it
pointed when it was backed up.
Volume Mount Points are different. They allow to mount a harddisk partition as a subfolder of a drive instead of a
driveletter.
When backing up a Volume Mount Point, it is backed up as directory.
If OneFS is set to yes (default), the Volume Mount Point (VMP) is backed up as directory but the content of the
VMP will not be backed up. Also, the Joblog will contain a message like this:
C:/linktest/vmp is a different filesystem. Will not descend from C:/linktest into it.
Messages 28.3:
Warning on Volume Moint Point and OneFS=yes
This is the normal behavior of the OneFS option.
If OneFS is set to no, the filedaemon will change into the VMP as if it was a normal directory and will backup all
files found inside of the VMP.
As Virtual Mount Points mounts another Volume into the current filesystem, it is desired that if the content of the
VMP will be backed up during the backup (onefs = no), we also want to have this volume snapshotted via
VSS.
To achieve this, we now automatically check every volume added to the VSS snapshotset if it contains VMPs, and
add the volumes mounted by those VMPs to the vss snapshotset recursively.
Volumes can be mounted nested and multiple times, but can only be added to the snapshotset once. This is the
reason why the number of vmps can be greater than the number of volumes added for the volume mount
points.
The Job Log will show how many VMPs were found like this:
Volume Mount Points found: 7, added to snapshotset: 5
Messages 28.4:
Volume Mount Points are added automatically to VSS snapshots (if onefs=no)
Accordingly, if OneFS is set to yes, we do not need to handle Volume Mount Points this way. If OneFS is set to yes
(default), the joblog will contain the following information:
VolumeMountpoints are not processed as onefs = yes.
Messages 28.5:
Volume Mount Points are ignored on VSS snapshots (if onefs=yes)
#
Windows also supports hard links, even so they are seldom used. These are treated as normal files and will be
restored as individual files (which will not be hardlinks again)
#
Version >= 14.2.0
Windows supports a special Registry Key that specifies the names of the files and directories that backup
applications should not backup or restore.
The full path to this registry key is HKEY_LOCAL_MACHINE\SYSTEM \CurrentControlSet \Control \BackupRestore \FilesNotToBackup
Bareos automatically converts these entries to wildcards which will be automatically excluded from
backup.
The backup log shows a short information about the creation of the exludes like this:
Created 28 wildcard excludes from FilesNotToBackup Registry key
Messages 28.6:
Excludes according to the FilesNotToBackup registry key
More details can be found if the filedaemon is run in debug mode inside of the bareos-fd.trace logfile. Each entry
and the resulting wildcard are logged.
client-win-fd: win32.c:465-0 (1) "WER" :
client-win-fd: win32.c:482-0 "C:\ProgramData\Microsoft\Windows\WER\* /s"
client-win-fd: win32.c:527-0 -> "C:/ProgramData/Microsoft/Windows/WER/*"
client-win-fd: win32.c:465-0 (2) "Kernel Dumps" :
client-win-fd: win32.c:482-0 "C:\Windows\Minidump\* /s"
client-win-fd: win32.c:527-0 -> "C:/Windows/Minidump/*"
client-win-fd: win32.c:482-0 "C:\Windows\memory.dmp"
client-win-fd: win32.c:527-0 -> "C:/Windows/memory.dmp"
client-win-fd: win32.c:465-0 (3) "Power Management" :
client-win-fd: win32.c:482-0 "\hiberfil.sys"
client-win-fd: win32.c:527-0 -> "[A-Z]:/hiberfil.sys"
client-win-fd: win32.c:465-0 (4) "MS Distributed Transaction Coordinator" :
client-win-fd: win32.c:482-0 "C:\Windows\system32\MSDtc\MSDTC.LOG"
client-win-fd: win32.c:527-0 -> "C:/Windows/system32/MSDtc/MSDTC.LOG"
client-win-fd: win32.c:482-0 "C:\Windows\system32\MSDtc\trace\dtctrace.log"
client-win-fd: win32.c:527-0 -> "C:/Windows/system32/MSDtc/trace/dtctrace.log"
Messages 28.7:
translation between registry key FilesNotToBackup and Bareos Exclude FileSet
It is possible to disable this functionality by setting the FileSet option AutoExclude to no.
The JobLog will then show the following informational line:
Fileset has autoexclude disabled, ignoring FilesNotToBackup Registry key
Messages 28.8:
AutoExclude disabled
For more details about the Windows registry key see
http://msdn.microsoft.com/en-us/library/windows/desktop/bb891959%28v=vs.85%29.aspx#filesnottobackup.
#
Version >= 12.4.5
Windows 2012 has dedup support which needs handling.
#
Version >= 12.4.5
Windows has gathered quite some special specific file flags over the years but not all are saved during backup so
some are never restored by the restore process. The most important ones are the ARCHIVE flag which is ”misused”
by some programs for storing some special information. Others that are known not to be stored are the
COMPRESSED flag which means that a restored file looses it and will be restored as an uncompressed
file.
#
Version >= 12.4.5
Windows has support for a so called EFS filesystem. This is an encrypted filesystem, to be able to backup the data
and to restore it we need to use a special API. With this API you in essence export the data on backup and import
it on restore. This way you never have access to the unencrypted data but just import and export the encrypted
data. This is the cleanest way of handling encryption by just seeing the data as some opaque data and not try to do
anything special with it.
#
VSS is available since Windows XP. From the perspective of a backup-solution for Windows, this
is an extremely important step. VSS allows Bareos to backup open files and even to interact with
applications like RDBMS to produce consistent file copies. VSS aware applications are called VSS
Writers, they register with the OS so that when Bareos wants to do a Snapshot, the OS will notify
the register Writer programs, which may then create a consistent state in their application, which
will be backed up. Examples for these writers are ”MSDE” (Microsoft database engine), ”Event Log
Writer”, ”Registry Writer” plus 3rd party-writers. If you have a non-vss aware application a shadow
copy is still generated and the open files can be backed up, but there is no guarantee that the file is
consistent.
Bareos produces a message from each of the registered writer programs when it is doing a VSS backup so you know
which ones are correctly backed up.
Technically Bareos creates a shadow copy as soon as the backup process starts. It does then backup all files from the
shadow copy and destroys the shadow copy after the backup process. Please have in mind, that VSS creates a
snapshot and thus backs up the system at the state it had when starting the backup. It will disregard file changes
which occur during the backup process.
VSS can be turned on by placing an
Enable VSS = yes
in your FileSet resource.
The VSS aware File daemon has the letters VSS on the signon line that it produces when contacted by the console.
For example:
Tibs-fd Version: 1.37.32 (22 July 2005) VSS Windows XP MVS NT 5.1.2600
the VSS is shown in the line above. This only means that the File daemon is capable of doing VSS not that VSS is
turned on for a particular backup. There are two ways of telling if VSS is actually turned on during a backup. The
first is to look at the status output for a job, e.g.:
Running Jobs:
JobId 1 Job NightlySave.2005-07-23_13.25.45 is running.
VSS Backup Job started: 23-Jul-05 13:25
Files=70,113 Bytes=3,987,180,650 Bytes/sec=3,244,247
Files Examined=75,021
Processing file: c:/Documents and Settings/user/My Documents/My Pictures/Misc1/Sans titre - 39.pdd
SDReadSeqNo=5 fd=352
Here, you see under Running Jobs that JobId 1 is ”VSS Backup Job started ...” This means that VSS is enabled
for that job. If VSS is not enabled, it will simply show ”Backup Job started ...” without the letters
VSS.
The second way to know that the job was backed up with VSS is to look at the Job Report, which will look
something like the following:
23-Jul 13:25 rufus-dir: Start Backup JobId 1, Job=NightlySave.2005-07-23_13.25.45
23-Jul 13:26 rufus-sd: Wrote label to prelabeled Volume "TestVolume001" on device "DDS-4" (/dev/nst0)
23-Jul 13:26 rufus-sd: Spooling data ...
23-Jul 13:26 Tibs: Generate VSS snapshots. Driver="VSS WinXP", Drive(s)="C"
23-Jul 13:26 Tibs: VSS Writer: "MSDEWriter", State: 1 (VSS_WS_STABLE)
23-Jul 13:26 Tibs: VSS Writer: "Microsoft Writer (Bootable State)", State: 1 (VSS_WS_STABLE)
23-Jul 13:26 Tibs: VSS Writer: "WMI Writer", State: 1 (VSS_WS_STABLE)
23-Jul 13:26 Tibs: VSS Writer: "Microsoft Writer (Service State)", State: 1 (VSS_WS_STABLE)
In the above Job Report listing, you see that the VSS snapshot was generated for drive C (if other drives are backed
up, they will be listed on the Drive(s)="C" line. You also see the reports from each of the writer program. Here
they all report VSS_WS_STABLE, which means that you will get a consistent snapshot of the data handled by that
writer.
#
If you are experiencing problems such as VSS hanging on MSDE, first try running vssadmin to check for problems,
then try running ntbackup which also uses VSS to see if it has similar problems. If so, you know that the problem
is in your Windows machine and not with Bareos.
The FD hang problems were reported with MSDEwriter when:
- a local firewall locked local access to the MSDE TCP port (MSDEwriter seems to use TCP/IP and
not Named Pipes).
- msdtcs was installed to run under ”localsystem”: try running msdtcs under networking account (instead
of local system) (com+ seems to work better with this configuration).
#
The Windows buildin Firewall is enabled since Windows version WinXP SP2. The Bareos installer opens the
required network ports for Bareos. However, if you are using another Firewall, you might need to manually open the
Bareos network ports. The Bareos File Daemon listens on 9102/TCP.
#
If you want to see if the File daemon has properly opened the port and is listening, you can enter the following
command in a shell window:
netstat -an | findstr 910[123]
Commands 28.9:
#
Please see the Restoring on Windows chapter for problems that you might encounter doing a restore.
#
If during a Backup, you get the message: ERR=Access is denied and you are using the portable option, you
should try both adding both the non-portable (backup API) and the Volume Shadow Copy options to your
Director’s conf file.
In the Options resource:
portable = no
In the FileSet resource:
enablevss = yes
In general, specifying these two options should allow you to backup any file on a Windows system. However, in some
cases, if users have allowed to have full control of their folders, even system programs such a Bareos can be
locked out. In this case, you must identify which folders or files are creating the problem and do the
following:
- Grant ownership of the file/folder to the Administrators group, with the option to replace the owner
on all child objects.
- Grant full control permissions to the Administrators group, and change the user’s group to only have
Modify permission to the file/folder and all child objects.
Thanks to Georger Araujo for the above information.
#
If you restore files backed up from Windows to an alternate directory, Bareos may need to create some higher level
directories that were not saved (or restored). In this case, the File daemon will create them under the SYSTEM
account because that is the account that Bareos runs under as a service and with full access permission. However,
there may be cases where you have problems accessing those files even if you run as administrator. In principle,
Microsoft supplies you with the way to cease the ownership of those files and thus change the permissions. However,
a much better solution to working with and changing Win32 permissions is the program SetACL, which can be
found at http://setacl.sourceforge.net/.
If you have not installed Bareos while running as Administrator and if Bareos is not running as a Process with the
userid (User Name) SYSTEM, then it is very unlikely that it will have sufficient permission to access all your
files.
Some users have experienced problems restoring files that participate in the Active Directory. They also report that
changing the userid under which Bareos (bareos-fd.exe) runs, from SYSTEM to a Domain Admin userid, resolves
the problem.
#
#
The Bareos File Daemon (and also the Bareos Director and Bareos Storage Daemon) is started as a Windows
service.
This is configured in the Registry at
- Computer\HKEY_LOCAL_MACHINE\SYSTEM\CurrentControlSet\services\Bareos-fd
You can use the command regedit to modify the settings.
E.g. to always start Bareos in debug mode, modify Computer\HKEY_LOCAL_MACHINE\SYSTEM\CurrentControlSet\services\Bareos-fd
ImagePath from
"C:\Program Files\Bareos\bareos-fd.exe" /service
to
"C:\Program Files\Bareos\bareos-fd.exe" /service -d200
After restarting the service, you will find a file called C:\bareos-fd.trace which will contain the debug output
created by the daemon.
It is possible to run multiple Bareos File Daemon instances on Windows. To achieve this, you need to
create a service for each instance, and a configuration file that at least has a individual fd port for each
instance.
To create two bareos-fd services, you can call the following service create calls on the commandline on windows as
administrator:
sc create bareosfd2 binpath="\"C:\Program Files\Bareos\bareos-fd.exe\" /service -c \"C:\ProgramData\Bareos\bareos-fd2.conf\"" depend= "tcpip/afd"
sc create bareosfd3 binpath="\"C:\Program Files\Bareos\bareos-fd.exe\" /service -c \"C:\ProgramData\Bareos\bareos-fd3.conf\"" depend= "tcpip/afd"
Commands 28.10:
This will create two Bareos File Daemon services, one with the name bareosfd2 and the second with the name
bareosfd3.
The configuration files for the two services are bareos-fd.conf and bareos-fd2.conf, and need to have different
network settings.
The services can be started by calling
sc start bareosfd2
Commands 28.11:
and
sc start bareosfd3
Commands 28.12:
#
These options are not normally seen or used by the user, and are documented here only for information purposes. At
the current time, to change the default options, you must either manually run Bareos or you must manually edit
the system registry and modify the appropriate entries.
In order to avoid option clashes between the options necessary for Bareos to run on Windows and the standard
Bareos options, all Windows specific options are signaled with a forward slash character (/), while as usual, the
standard Bareos options are signaled with a minus (-), or a minus minus (--). All the standard Bareos
options can be used on the Windows version. In addition, the following Windows only options are
implemented:
-
/service
- Start Bareos as a service
-
/run
- Run the Bareos application
-
/install
- Install Bareos as a service in the system registry
-
/remove
- Uninstall Bareos from the system registry
-
/about
- Show the Bareos about dialogue box
-
/status
- Show the Bareos status dialogue box
-
/events
- Show the Bareos events dialogue box (not yet implemented)
-
/kill
- Stop any running Bareos
-
/help
- Show the Bareos help dialogue box
It is important to note that under normal circumstances the user should never need to use these options as they are
normally handled by the system automatically once Bareos is installed. However, you may note these options in
some of the .bat files that have been created for your use.
#
#
The Bareos Director knows, when it is required to talk to a client (Bareos File Daemon). Therefore, by defaults, the
Bareos Director connects to the clients.
However, there are setups where this can cause problems, as this means that:
- The client must be reachable by its configured Address Dir
Client. Address can be the DNS name or the IP
address. (For completeness: there are potential workarounds by using the setip command.)
- The Bareos Director must be able to connect to the Bareos File Daemon over the network.
To circumvent these problems, since Bareos Version >= 16.2.2 it is possible to let the Bareos File Daemon initiate
the network connection to the Bareos Director.
Which address the client connects to reach the Bareos Director is configured in the Address Fd
Director
directive.
To additional allow this connection direction use:
To only allow Connection From the Client to the Director use:
Using Client Initiated Connections has disadvantages. Without Client Initiated Connections the Bareos Director
only establishes a network connection when this is required. With Client Initiated Connections, the Bareos File
Daemon connects to the Bareos Director and the Bareos Director keeps these connections open. The command
status dir will show all waiting connections:
*status dir
...
Client Initiated Connections (waiting for jobs):
Connect time Protocol Authenticated Name
====================================================================================================
19-Apr-16 21:50 54 1 client1.example.com
...
====
bconsole 29.1:
show waiting client connections
When both connection directions are allowed, the Bareos Director
- checks, if there is a waiting connection from this client.
- tries to connect to the client (using the usual timeouts).
- waits for a client connection to appear (using the same timeout as when trying to connect to a client).
If none of this worked, the job fails.
When a waiting connection is used for a job, the Bareos File Daemon will detect this and creates an
additional connection. This is required, to keep the client responsive for additional commands, like cancel
.
To get feedback in case the Bareos File Daemon fails to connect to the Bareos Director, consider configuring Bareos
File Daemon to log in a local file. This can be archived by adding the line
Append = "/var/log/bareos/bareos-fd.log" = all, !skipped, !restored
to the default message resource StandardFd
Messages:
Messages {
Name = Standard
Director = bareos-dir = all, !skipped, !restored
Append = "/var/log/bareos/bareos-fd.log" = all, !skipped, !restored
}
Resource 29.2:
bareos-fd.d/messages/Standard.conf
#
The normal way of initializing the data channel (the channel where the backup data itself is transported) is done by
the Bareos File Daemon (client) that connects to the Bareos Storage Daemon.
In many setups, this can cause problems, as this means that:
- The client must be able to resolve the name of the Bareos Storage Daemon (often not true, you have
to do tricks with the hosts file)
- The client must be allowed to create a new connection.
- The client must be able to connect to the Bareos Storage Daemon over the network (often difficult
over NAT or Firewall)
By using Passive Client, the initialization of the datachannel is reversed, so that the storage daemon connects to the
Bareos File Daemon. This solves almost every problem created by firewalls, NAT-gateways and resolving issues,
as
- The Bareos Storage Daemon initiates the connection, and thus can pass through the same or similar
firewall rules that the director already has to access the Bareos File Daemon.
- The client never initiates any connection, thus can be completely firewalled.
- The client never needs any name resolution and is totally independent from any resolving issues.
#
To use this new feature, just configure Passive Dir
Client=yes in the client definition of the Bareos Director:
Client {
Name = client1-fd
Password = "secretpassword"
Passive = yes
[...]
}
Configuration 29.3:
Enable passive mode in bareos-dir.conf
Also, prior to bareos version 15, you need to set Compatible Fd
Client=no in the bareos-fd.conf configuration file.
Since Bareos Version 15, the compatible option is set to no per default and does not need to be specified
anymore.
Director {
Name = bareos-dir
Password = "secretpassword"
}
Client {
Name = client1-fd
[...]
Compatible = no
}
Configuration 29.4:
Disable compatible mode for the Bareos File Daemon in bareos-fd.conf
#
Bareos supports network topologies where the Bareos File Daemon and Bareos Storage Daemon are situated inside
of a LAN, but the Bareos Director is outside of that LAN in the Internet and accesses the Bareos File Daemon and
Bareos Storage Daemon via SNAT / port forwarding.
Consider the following scheme:
/-------------------\
| | LAN 10.0.0.1/24
| |
| FD_LAN SD_LAN |
| .10 .20 |
| |
\___________________/
|
NAT Firewall
FD: 8.8.8.10 -> 10.0.0.10
SD: 8.8.8.20 -> 10.0.0.20
|
/-------------------\
| |
| | WAN / Internet
| DIR |
| 8.8.8.100 |
| |
| FD_WAN SD_WAN |
| .30 .40 |
\___________________/
Commands 29.5:
The Bareos Director can access the FD_LAN via the IP 8.8.8.10, which is forwarded to the IP 10.0.0.10 inside of the
LAN.
The Bareos Director can access the SD_LAN via the IP 8.8.8.20 which is forwarded to the IP 10.0.0.20 inside of the
LAN.
There is also a Bareos File Daemon and a Bareos Storage Daemon outside of the LAN, which have the IPs 8.8.8.30
and 8.8.8.40
All resources are configured so that the Address directive gets the address where the Bareos Director can reach the
daemons.
Additionally, devices being in the LAN get the LAN address configured in the Lan Address directive. The
configuration looks as follows:
Client {
Name = FD_LAN
Address = 8.8.8.10
LanAddress = 10.0.0.10
...
}
Resource 29.6:
bareos-dir.d/client/FD_LAN.conf
Storage {
Name = SD_LAN
Address = 8.8.8.20
LanAddress = 10.0.0.20
...
}
Resource 29.7:
bareos-dir.d/client/SD_LAN.conf
Client {
Name = FD_WAN
Address = 8.8.8.30
...
}
Resource 29.8:
bareos-dir.d/client/FD_WAN.conf
Storage {
Name = SD_WAN
Address = 8.8.8.40
...
}
Resource 29.9:
bareos-dir.d/client/SD_WAN.conf
This way, backups and restores from each Bareos File Daemon using each Bareos Storage Daemon are possible as
long as the firewall allows the needed network connections.
The Bareos Director simply checks if both the involved Bareos File Daemon and Bareos Storage Daemon both have
a Lan Address (Lan Address Dir
Client and Lan Address Dir
Storage) configured.
In that case, the initiating daemon is ordered to connect to the Lan Address instead of the Address. In active client
mode, the Bareos File Daemon connects to the Bareos Storage Daemon, in passive client mode (see Passive Clients)
the Bareos Storage Daemon connects to the Bareos File Daemon.
If only one or none of the involved Bareos File Daemon and Bareos Storage Daemon have a Lan Address
configured, the Address is used as connection target for the initiating daemon.
#
Bareos TLS (Transport Layer Security) is built-in network encryption code to provide secure network transport
similar to that offered by stunnel or ssh. The data written to Volumes by the Storage daemon is not encrypted by
this code. For data encryption, please see the Data Encryption chapter.
The initial Bacula encryption implementation has been written by Landon Fuller.
Supported features of this code include:
- Client/Server TLS Requirement Negotiation
- TLSv1 Connections with Server and Client Certificate Validation
- Forward Secrecy Support via Diffie-Hellman Ephemeral Keying
This document will refer to both “server” and “client” contexts. These terms refer to the accepting and initiating
peer, respectively.
Diffie-Hellman anonymous ciphers are not supported by this code. The use of DH anonymous ciphers increases the
code complexity and places explicit trust upon the two-way CRAM-MD5 implementation. CRAM-MD5 is subject to
known plaintext attacks, and it should be considered considerably less secure than PKI certificate-based
authentication.
#
Additional configuration directives have been added to all the daemons (Director, File daemon, and
Storage daemon) as well as the various different Console programs. These directives are defined as
follows:
-
TLS Enable = <yes|no>
- (default: no)
Enable TLS support. Without setting TLS Require=yes, the connection can fall back to unencrypted
connection, if the other side does not support TLS.
-
TLS Require = <yes|no>
- (default: no)
Require TLS connections. If TLS is not required, then Bareos will connect with other daemons either
with or without TLS depending on what the other daemon requests. If TLS is required, then Bareos
will refuse any connection that does not use TLS. TLS Require=yes implicitly sets TLS Enable=yes.
-
TLS Certificate = <filename>
-
The full path and filename of a PEM encoded TLS certificate. It can be used as either a client or
server certificate. It is used because PEM files are base64 encoded and hence ASCII text based rather
than binary. They may also contain encrypted information.
-
TLS Key = <filename>
-
The full path and filename of a PEM encoded TLS private key. It must correspond to the certificate
specified in the TLS Certificate configuration directive.
-
TLS Verify Peer = <yes|no>
-
Request and verify the peers certificate.
In server context, unless the TLS Allowed CN configuration directive is specified, any client certificate
signed by a known-CA will be accepted.
In client context, the server certificate CommonName attribute is checked against the Address and
TLS Allowed CN configuration directives.
-
TLS Allowed CN = <stringlist>
-
Common name attribute of allowed peer certificates. If TLS Verify Peer=yes, all connection request
certificates will be checked against this list.
This directive may be specified more than once.
-
TLS CA Certificate File = <filename>
-
The full path and filename specifying a PEM encoded TLS CA certificate(s). Multiple certificates are
permitted in the file.
In a client context, one of TLS CA Certificate File or TLS CA Certificate Dir is required.
In a server context, it is only required if TLS Verify Peer is used.
-
TLS CA Certificate Dir = <directory>
-
Full path to TLS CA certificate directory. In the current implementation, certificates must be stored
PEM encoded with OpenSSL-compatible hashes, which is the subject name’s hash and an extension
of .0.
In a client context, one of TLS CA Certificate File or TLS CA Certificate Dir is required.
In a server context, it is only required if TLS Verify Peer is used.
-
TLS DH File = <filename>
-
Path to PEM encoded Diffie-Hellman parameter file. If this directive is specified, DH key exchange will
be used for the ephemeral keying, allowing for forward secrecy of communications. DH key exchange
adds an additional level of security because the key used for encryption/decryption by the server and
the client is computed on each end and thus is never passed over the network if Diffie-Hellman key
exchange is used. Even if DH key exchange is not used, the encryption/decryption key is always passed
encrypted. This directive is only valid within a server context.
To generate the parameter file, you may use openssl:
openssl dhparam -out dh1024.pem -5 1024
Commands 30.1:
create DH key
#
To get a trusted certificate (CA or Certificate Authority signed certificate), you will either need to purchase
certificates signed by a commercial CA or become a CA yourself, and thus you can sign all your own
certificates.
Bareos is known to work well with RSA certificates.
You can use programs like xca or TinyCA to easily manage your own CA with a Graphical User Interface.
#
An example of the TLS portions of the configuration files are listed below.
Another example can be found at Bareos Regression Testing Base Configuration.
#
Director { # define myself
Name = bareos-dir
...
TLS Enable = yes
TLS Require = yes
TLS CA Certificate File = /etc/bareos/tls/ca.pem
# This is a server certificate, used for incoming
# (console) connections.
TLS Certificate = /etc/bareos/tls/bareos-dir.example.com-cert.pem
TLS Key = /etc/bareos/tls/bareos-dir.example.com-key.pem
TLS Verify Peer = yes
TLS Allowed CN = "bareos@backup1.example.com"
TLS Allowed CN = "administrator@example.com"
}
Resource 30.2:
bareos-dir.d/director/bareos-dir.conf
Storage {
Name = File
Address = bareos-sd1.example.com
...
TLS Require = yes
TLS CA Certificate File = /etc/bareos/tls/ca.pem
# This is a client certificate, used by the director to
# connect to the storage daemon
TLS Certificate = /etc/bareos/tls/bareos-dir.example.com-cert.pem
TLS Key = /etc/bareos/tls/bareos-dir.example.com-key.pem
TLS Allowed CN = bareos-sd1.example.com
}
Resource 30.3:
bareos-dir.d/storage/File.conf
Client {
Name = client1-fd
Address = client1.example.com
...
TLS Enable = yes
TLS Require = yes
TLS CA Certificate File = /etc/bareos/tls/ca.pem
TLS Certificate = "/etc/bareos/tls/bareos-dir.example.com-cert.pem"
TLS Key = "/etc/bareos/tls/bareos-dir.example.com-key.pem"
TLS Allowed CN = client1.example.com
}
Resource 30.4:
bareos-dir.d/client/client1-fd.conf
#
Storage {
Name = bareos-sd1
...
# These TLS configuration options are used for incoming
# file daemon connections. Director TLS settings are handled
# in Director resources.
TLS Enable = yes
TLS Require = yes
TLS CA Certificate File = /etc/bareos/tls/ca.pem
# This is a server certificate. It is used by connecting
# file daemons to verify the authenticity of this storage daemon
TLS Certificate = /etc/bareos/tls/bareos-sd1.example.com-cert.pem
TLS Key = /etc/bareos/tls/bareos-sd1.example.com-key.pem
# Peer verification must be disabled,
# or all file daemon CNs must be listed in "TLS Allowed CN".
# Peer validity is verified by the storage connection cookie
# provided to the File Daemon by the Director.
TLS Verify Peer = no
}
Resource 30.5:
bareos-sd.d/storage/bareos-sd1.conf
Director {
Name = bareos-dir
...
TLS Enable = yes
TLS Require = yes
TLS CA Certificate File = /etc/bareos/tls/ca.pem
# This is a server certificate. It is used by the connecting
# director to verify the authenticity of this storage daemon
TLS Certificate = /etc/bareos/tls/bareos-sd1.example.com-cert.pem
TLS Key = /etc/bareos/tls/bareos-sd1.example.com-key.pem
# Require the connecting director to provide a certificate
# with the matching CN.
TLS Verify Peer = yes
TLS Allowed CN = "bareos-dir.example.com"
}
Resource 30.6:
bareos-sd.d/director/bareos-dir.conf
#
Client {
Name = client1-fd
...
# you need these TLS entries so the SD and FD can
# communicate
TLS Enable = yes
TLS Require = yes
TLS CA Certificate File = /etc/bareos/tls/ca.pem
TLS Certificate = /etc/bareos/tls/client1.example.com-cert.pem
TLS Key = /etc/bareos/tls/client1.example.com-key.pem
TLS Allowed CN = bareos-sd1.example.com
}
Resource 30.7:
bareos-fd.d/client/myself.conf
Director {
Name = bareos-dir
...
TLS Enable = yes
TLS Require = yes
TLS CA Certificate File = /etc/bareos/tls/ca.pem
# This is a server certificate. It is used by connecting
# directors to verify the authenticity of this file daemon
TLS Certificate = /etc/bareos/tls/client11.example.com-cert.pem
TLS Key = /etc/bareos/tls/client1.example.com-key.pem
TLS Verify Peer = yes
# Allow only the Director to connect
TLS Allowed CN = "bareos-dir.example.com"
}
Resource 30.8:
bareos-fd.d/director/bareos-dir.conf
#
Bareos permits file data encryption and signing within the File Daemon (or Client) prior to sending data to the
Storage Daemon. Upon restoration, file signatures are validated and any mismatches are reported. At no time does
the Director or the Storage Daemon have access to unencrypted file contents.
Please note! These feature is only available, if Bareos is build against OpenSSL.
It is very important to specify what this implementation does NOT do:
- The implementation does not encrypt file metadata such as file path names, permissions, ownership
and extended attributes. However, Mac OS X resource forks are encrypted.
Encryption and signing are implemented using RSA private keys coupled with self-signed x509 public certificates.
This is also sometimes known as PKI or Public Key Infrastructure.
Each File Daemon should be given its own unique private/public key pair. In addition to this key pair, any number
of ”Master Keys” may be specified – these are key pairs that may be used to decrypt any backups should the File
Daemon key be lost. Only the Master Key’s public certificate should be made available to the File
Daemon. Under no circumstances should the Master Private Key be shared or stored on the Client
machine.
The Master Keys should be backed up to a secure location, such as a CD placed in a in a fire-proof safe or bank
safety deposit box. The Master Keys should never be kept on the same machine as the Storage Daemon or Director
if you are worried about an unauthorized party compromising either machine and accessing your encrypted
backups.
While less critical than the Master Keys, File Daemon Keys are also a prime candidate for off-site backups; burn the
key pair to a CD and send the CD home with the owner of the machine.
Please note! If you lose your encryption keys, backups will be unrecoverable. always store a copy of your master keys
in a secure, off-site location.
The basic algorithm used for each backup session (Job) is:
- The File daemon generates a session key.
- The FD encrypts that session key via PKE for all recipients (the file daemon, any master keys).
- The FD uses that session key to perform symmetric encryption on the data.
#
The implementation uses 128bit AES-CBC, with RSA encrypted symmetric session keys. The RSA key is user
supplied. If you are running OpenSSL >= 0.9.8, the signed file hash uses SHA-256, otherwise SHA-1 is
used.
End-user configuration settings for the algorithms are not currently exposed, only the algorithms listed above are
used. However, the data written to Volume supports arbitrary symmetric, asymmetric, and digest algorithms for
future extensibility, and the back-end implementation currently supports:
Symmetric Encryption:
- 128, 192, and 256-bit AES-CBC
- Blowfish-CBC
Asymmetric Encryption (used to encrypt symmetric session keys):
- RSA
Digest Algorithms:
- MD5
- SHA1
- SHA256
- SHA512
The various algorithms are exposed via an entirely re-usable, OpenSSL-agnostic API (ie, it is possible to drop in a
new encryption backend). The Volume format is DER-encoded ASN.1, modeled after the Cryptographic Message
Syntax from RFC 3852. Unfortunately, using CMS directly was not possible, as at the time of coding a free software
streaming DER decoder/encoder was not available.
#
Generate a Master Key Pair with:
openssl genrsa -out master.key 2048
openssl req -new -key master.key -x509 -out master.cert
Generate a File Daemon Key Pair for each FD:
openssl genrsa -out fd-example.key 2048
openssl req -new -key fd-example.key -x509 -out fd-example.cert
cat fd-example.key fd-example.cert >fd-example.pem
Note, there seems to be a lot of confusion around the file extensions given to these keys. For example, a .pem file
can contain all the following: private keys (RSA and DSA), public keys (RSA and DSA) and (x509)
certificates. It is the default format for OpenSSL. It stores data Base64 encoded DER format, surrounded by
ASCII headers, so is suitable for text mode transfers between systems. A .pem file may contain any
number of keys either public or private. We use it in cases where there is both a public and a private
key.
Above we have used the .cert extension to refer to X509 certificate encoding that contains only a single public
key.
#
#
It is preferable to retain a secure, non-encrypted copy of the client’s own encryption keypair. However, should you
lose the client’s keypair, recovery with the master keypair is possible.
You must:
#
#
NDMP
- is the abbreviation for Network Data Management Protocol.
- is a protocol that transports data between Network Attached Storages (NAS) and backup devices.
- is widely used by storage product vendors and OS vendors like NetApp, Isilon, EMC, Oracle.
- information is available at http://www.ndmp.org/.
- version is currently (2016) NDMP Version 4.
- uses TCP/IP and XDR (External Data Representation) for the communication.
The Bareos NDMP implementation is based on the NDMJOB NDMP reference implementation of Traakan, Inc.,
Los Altos, CA which has a BSD style license (2 clause one) with some enhancements.
In NDMP, there are different components (called “agents”) involved in doing backups. The most important agents
are:
-
Data Management Agent (DMA)
- is the part that controls the NDMP backup or recover operation.
-
Data Agent
- (or Primary Storage System) is the part that reads the data from the Filesystem during
Backup and writes data to the Filesystem during recover.
-
Tape Agent
- (or Secondary Storage System) is the part that writes NDMP blocks to the Tape during
backup and reads them during recover.
-
Robot Agent
- is the part that controls the media changer. It loads/unloads tapes and gets the inventory of
the Changer. The use of a robot agent is optional. It is possible to run backups on a single tape drive.
All elements involved talk to each other via the NDMP protocol which is usually transported via TCP/IP port
10000.
The Data Management Agent is part of the Backup Application.
The Data Agent is part of the (NAS)-System being backed up and recovered.
The Tape Agent and Robot Agent can
- run on the system being backed up
- run as part of the backup application
- or even run independently on a third system
This flexibility leads to different topologies how NDMP backups can be done.
#
When looking at the different topologies, the location of the Robot Agent is not specially considered, as the data
needed to control the robot is minimal compared to the backup data.
So the parts considered are
- the Data Management Agent controlling the operation
- the Data Agent as source of the backup data and
- the Tape Agent as destination of the backup data
The Data Management Agent always controls both Data Agent and Tape Agent over the Network via
NDMP.
The Tape Agent can either
- run on a separate system
- run on the same system
as the Data Agent.
--+--------------- NETWORK ----+-------------------+----
| -->---->---->-->-->-->\ | //==>==>==>==>\\ |
| / | | || (2) || |
| | | | || || |
/----------\ /----------\ /----------\
| | | | | |
| DMA | DISK====>| DATA | | Tape |====>TAPE DRIVE
| | (1) | Agent | | Agent | (3)
\----------/ \----------/ \----------/
The data path consists of three ways
- From Disk to Data Agent (1)
- From Data Agent over the Network to the Tape Agent (2)
- From Tape Agent to the Tape (3)
and is called NDMP 3-way Backup.
--+--------------- NETWORK ----+---------
| -->---->---->-->-->-->\ |
| / | |
| | | |
/----------\ /----------\
| | | Data |
| DMA | DISK====>| Agent |
| | (1) | |
\----------/ | Tape | (2)
| Agent |====>TAPE DRIVE
\----------/
Data Agent and Tape Agent are both part of the same process on the system, so the data path consists of two
ways:
- From Disk to Data Agent (1)
- From Tape Agent to the Tape (2)
and is called NDMP 2-way Backup, also sometimes referred as NDMP local backup.
NDMP 3-way backup:
- The data can be send to a different location over the network
- No need to attach a tape drive to the NAS system.
- The backup speed is usually slower than with 2-way backup as the data is being sent over the network
and processed multiple times.
NDMP 2-way backup:
- The data is directly copied from the NAS system to the Tape
- Usually the fastest way to do a NDMP backup
- tape drives need to be attached to the NAS System
#
Bareos offers two types of NDMP integration:
-
NDMP_NATIVE
-
-
NDMP_BAREOS
In both cases,
- Bareos Director acts as Data Management Agent.
- The Data Agent is part of the storage system and must be provided by the storage vendor.
The main difference is which Tape Agent is used.
When using NDMP_BAREOS, the Bareos Storage Daemon acts as Tape Agent.
When using NDMP_NATIVE, the Tape Agent must be provided by some other systems. Some storage
vendors provide it with there storages, or offer it as an option, e.g. Isilon with their “Isilon Backup
Accelerator”.
|
|
|
| | NDMP_BAREOS | NDMP_NATIVE |
|
|
|
| Data Management Agent | Bareos Director | Bareos Director |
| Tape Agent | Bareos Storage Daemon | external |
| requires external Tape Agent | | x |
| backup to tape (and VTL) | x | x |
| backup to other Device Type Sd
Device | x | |
| 2-way backup | | x |
| 3-way backup | x | untested |
| Full Backups | x | x |
| Differential Backups | x | x |
| Incremental Backups | x (8) | x (8) |
| Single File Restore | x | x |
| DAR | | x |
| DDAR | | x |
| Copy and Migration jobs | x | |
|
|
|
| |
#
Bareos implements the Data Management Agent inside of the Bareos Director and a Tape Agent in the Bareos
Storage Daemon.
The Tape Agent in the Bareos Storage Daemon emulates a NDMP tape drive that has an infinite tape. Because of
the infinite tape, no Robot Agent is required and therefore not implemented. The blocks being written to the
NDMP tape are wrapped into a normal Bareos backup stream and then stored into the volumes managed by
Bareos.
There is always a pair of storage resource definitions:
- a conventional Bareos storage resource and
- a NDMP storage resource
These two are linked together. Data that is received by the Tape Agent inside of the Bareos Storage Daemon is then
stored as Bareos backup stream inside of the paired conventional Bareos storage resource.
On restore, the data is read by the conventional resource, and then recovered as NDMP stream from the NDMP
resource.
#
This example starts from a clean default Bareos installation.
The storage appliance needs to be configured to allow NDMP connections. Therefore usually the NDMP service
needs to be enabled and configured with a username and password.
Add a Client resource to the Bareos Director configuration and configure it to access your NDMP storage system
(Primary Storage System/Data Agent).
In our example we connect to a Isilon storage appliance emulator:
Client {
Name = ndmp-client
Address = isilon.example.com
Port = 10000 # Default port for NDMP
Protocol = NDMPv4 # Need to specify protocol before password as protocol determines password encoding used
Auth Type = Clear # Cleartext Authentication
Username = "ndmpadmin" # username of the NDMP user on the DATA AGENT e.g. storage box being backuped.
Password = "secret" # password of the NDMP user on the DATA AGENT e.g. storage box being backuped.
}
Configuration 32.1:
Verify, that you can access your Primary Storage System via Bareos:
*status client=ndmp-client
Data Agent isilon.example.com NDMPv4
Host info
hostname isilonsim-1
os_type Isilon OneFS
os_vers v7.1.1.5
hostid 005056ad8483ba43cc55a711cd384506e3c1
Server info
vendor Isilon
product Isilon NDMP
revision 2.2
auths (2) NDMP4_AUTH_TEXT NDMP4_AUTH_MD5
Connection types
addr_types (2) NDMP4_ADDR_TCP NDMP4_ADDR_LOCAL
Backup type info of tar format
attrs 0x7fe
set FILESYSTEM=/ifs
set FILES=
set EXCLUDE=
set PER_DIRECTORY_MATCHING=N
set HIST=f
set DIRECT=N
set LEVEL=0
set UPDATE=Y
set RECURSIVE=Y
set ENCODING=UTF-8
set ENFORCE_UNIQUE_NODE=N
set PATHNAME_SEPARATOR=/
set DMP_NAME=
set BASE_DATE=0
set NDMP_UNICODE_FH=N
Backup type info of dump format
attrs 0x7fe
set FILESYSTEM=/ifs
set FILES=
set EXCLUDE=
set PER_DIRECTORY_MATCHING=N
set HIST=f
set DIRECT=N
set LEVEL=0
set UPDATE=Y
set RECURSIVE=Y
set ENCODING=UTF-8
set ENFORCE_UNIQUE_NODE=N
set PATHNAME_SEPARATOR=/
set DMP_NAME=
set BASE_DATE=0
set NDMP_UNICODE_FH=N
File system /ifs
physdev OneFS
unsupported 0x0
type NFS
status
space 12182519808 total, 686768128 used, 11495751680 avail
inodes 17664000 total, 16997501 used
set MNTOPTS=
set MNTTIME=00:00:00 00:00:00
bconsole 32.2:
verify connection to NDMP Primary Storage System
This output shows that the access to the storage appliance was successful.
Enabling NDMP
To enable the NDMP Tape Agent inside of the Bareos Storage Daemon, set NDMP Enable Sd
Storage=yes:
#
# Default SD config block: enable the NDMP protocol,
# otherwise it won’t listen on port 10000.
#
Storage {
Name = ....
...
NDMP Enable = yes
}
Configuration 32.3:
enable NDMP in Bareos Storage Daemon
Add a NDMP resource
Additionally, we need to define the access credentials for our NDMP TAPE AGENT (Secondary Storage) inside of
this Storage Daemon.
These are configured by adding a NDMP resource to bareos-sd.conf:
#
# This resource gives the DMA in the Director access to the Bareos SD via the NDMP protocol.
# This option is used via the NDMP protocol to open the right TAPE AGENT connection to your
# Bareos SD via the NDMP protocol. The initialization of the SD is done via the native protocol
# and is handled via the PairedStorage keyword.
#
Ndmp {
Name = bareos-dir-isilon
Username = ndmpadmin
Password = test
AuthType = Clear
}
Configuration 32.4:
Username and Password can be anything, but they will have to match the settings in the Bareos Director NDMP
Storage resource we configure next.
Now restart the Bareos Storage Daemon. If everything is correct, the Bareos Storage Daemon starts and listens now
on the usual port (9103) and additionally on port 10000 (ndmp).
root@linux:~#
netstat -lntp | grep bareos-sd
tcp 0 0 0.0.0.0:9103 0.0.0.0:* LISTEN 10661/bareos-sd
tcp 0 0 0.0.0.0:10000 0.0.0.0:* LISTEN 10661/bareos-sd
Commands 32.5:
For NDMP Backups, we always need two storages that are paired together. The default configuration already has a
Storage FileDir
Storage defined:
Storage {
Name = File
Address = bareos
Password = "pNZ3TvFAL/t+MyOIQo58p5B/oB79SFncdAmLXKHa9U59"
Device = FileStorage
Media Type = File
}
Configuration 32.6:
We now add a paired storage to the already existing FileDir storage:
#
# Same storage daemon but via NDMP protocol.
# We link via the PairedStorage config option the Bareos SD
# instance definition to a NDMP TAPE AGENT.
#
Storage {
Name = NDMPFile
Address = bareos
Port = 10000
Protocol = NDMPv4
Auth Type = Clear
Username = ndmpadmin
Password = "test"
Device = FileStorage
Media Type = File
PairedStorage = File
}
Configuration 32.7:
The settings of Username and Password need to match the settings of the Bareos Storage Daemon’s NDMP resource
we added before. The address will be used by the storage appliance’s NDMP Daemon to connect to the Bareos
Storage Daemon via NDMP. Make sure that the Storage appliance can resolve the name or use an IP
address.
Now save the director resource and restart the Bareos Director. Verify that the configuration is correct:
*status storage=NDMPFile
Connecting to Storage daemon File at bareos:9103
bareos-sd Version: 15.2.2 (16 November 2015) x86_64-redhat-linux-gnu redhat Red Hat Enterprise Linux Server release 7.0 (Maipo)
Daemon started 14-Jan-16 10:10. Jobs: run=0, running=0.
Heap: heap=135,168 smbytes=34,085 max_bytes=91,589 bufs=75 max_bufs=77
Sizes: boffset_t=8 size_t=8 int32_t=4 int64_t=8 mode=0 bwlimit=0kB/s
Running Jobs:
No Jobs running.
====
Jobs waiting to reserve a drive:
====
Terminated Jobs:
====
Device status:
Device "FileStorage" (/var/lib/bareos/storage) is not open.
==
====
Used Volume status:
====
====
*
bconsole 32.8:
verify connection to the Bareos Storage Daemon
The output looks the same, as if a status storage=File would have been called.
To specify what files and directories from the storage appliance should be backed up, a Fileset needs to be specified.
In our example, we decided to backup /ifs/home directory.
The specified directory needs to be a filesystem or a subdirectory of a filesystem which can be accessed
by NDMP. Which filesystems are available is showed in the status client output of the NDMP
client.
Additionally, NDMP can be configured via NDMP environment variables. These can be specified in the Options
Block of the Fileset with the Meta keyword. Which variables are available is partly depending on the NDMP
implementation of the Storage Appliance.
Fileset {
Name = "NDMP Fileset"
Include {
Options {
meta = "BUTYPE=DUMP"
meta = "USE_TBB_IF_AVAILABLE=y"
meta = "FH_REPORT_FULL_DIRENTS=y"
meta = "RESTORE_HARDLINK_BY_TABLE=y"
}
File = /ifs/home
}
}
Configuration 32.9:
NDMP Fileset
Please note! Normally (Protocol Dir
Client=Native) Filesets get handled by the Bareos File Daemon. When connecting
directly to a NDMP Clients (Protocol Dir
Client=NDMP*), no Bareos File Daemon is involved and therefore
most Fileset options can’t be used. Instead, parameters are handled via Options - Meta from Include
Dir
FileSet.
Please note! Avoid using multiple Include Dir
FileSet File directives. The Bareos Director would try to handle them by
running multiple NDMP jobs in a single Bareos job. Even if this is working fine during backup, restore jobs will
cause trouble.
Some NDMP environment variables are set automatically by the DMA in the Bareos Director. The following
environment variables are currently set automatically:
-
FILESYSTEM
- is set to the Include Dir
FileSet File directive.
-
HIST
- = Y
Specifies the file history format:
-
Y
- Specifies the default file history format determined by your NDMP backup settings.
-
N
- Disables file history. Without file hostory, single file restore is not possible with Bareos.
Some NDMP environments (eg. Isilon OneFS) allow additional parameter:
-
F
- Specifies path-based file history. This is the most efficient with Bareos.
-
D
- Specifies directory or node file history.
-
LEVEL
- is set accordingly to NDMP Backup Level.
-
PREFIX
-
-
TYPE
- is set accordingly to BUTYPE. Default “DUMP”.
-
UPDATE
- = Y
Example NDMP Fileset to backup a subset of a NDMP filesystem
The following fileset is intended to backup all files and directories matching /ifs/home/users/a*. It has been
tested against Isilon OneFS 7.2.0.1. See Isilon OneFS 7.2.0 CLI Administration Guide, section “NDMP environment
variables” for details about the supported NDMP environment variables. Excludes are not used in this
example.
Fileset {
Name = "isilon_fileset_home_a"
Include {
Options {
meta = "BUTYPE=DUMP"
meta = "USE_TBB_IF_AVAILABLE=y"
#
# EXCLUDE
#
#meta = "EXCLUDE=[b-z]*"
#
# INCLUDE
#
meta = "FILES=a*"
}
File = /ifs/home/users
}
}
Configuration 32.10:
NDMP Fileset Isilon Include/Exclude
To do NDMP backups and restores, some special settings need to be configured. We define special Backup and
Restore jobs for NDMP.
Job {
Name = "ndmp-backup-job"
Type = Backup
Protocol = NDMP_BAREOS
Level = Incremental
Client = ndmp-client
Backup Format = dump
FileSet = "NDMP Fileset"
Storage = NDMPFile
Pool = Full
Messages = Standard
}
Configuration 32.11:
NDMP backup job
Job {
Name = "ndmp-restore-job"
Type = Restore
Protocol = NDMP_BAREOS
Client = ndmp-client
Backup Format = dump
FileSet = "NDMP Fileset"
Storage = NDMPFile
Pool = Full
Messages = Standard
Where = /
}
Configuration 32.12:
NDMP restore job
- Backup Format Dir
Job=dump is used in our example. Other Backup Formats have other
advantages/disadvantages.
#
Now we are ready to do our first NDMP backup:
*run job=ndmp-backup-job
Using Catalog "MyCatalog"
Run Backup job
JobName: ndmp-backup-job
Level: Incremental
Client: ndmp-client
Format: dump
FileSet: NDMP Fileset
Pool: Full (From Job resource)
Storage: NDMPFile (From Job resource)
When: 2016-01-14 10:48:04
Priority: 10
OK to run? (yes/mod/no): yes
Job queued. JobId=1
*wait jobid=1
JobId=1
JobStatus=OK (T)
*list joblog jobid=1
2016-01-14 10:57:53 bareos-dir JobId 1: Start NDMP Backup JobId 1, Job=NDMPJob.2016-01-14_10.57.51_04
2016-01-14 10:57:53 bareos-dir JobId 1: Created new Volume "Full-0001" in catalog.
2016-01-14 10:57:53 bareos-dir JobId 1: Using Device "FileStorage" to write.
2016-01-14 10:57:53 bareos-dir JobId 1: Opening tape drive LPDA-DEJC-ENJL-AHAI-JCBD-LICP-LKHL-IEDK@/ifs/home%0 read/write
2016-01-14 10:57:53 bareos-sd JobId 1: Labeled new Volume "Full-0001" on device "FileStorage" (/var/lib/bareos/storage).
2016-01-14 10:57:53 bareos-sd JobId 1: Wrote label to prelabeled Volume "Full-0001" on device "FileStorage" (/var/lib/bareos/storage)
2016-01-14 10:57:53 bareos-dir JobId 1: Commanding tape drive to rewind
2016-01-14 10:57:53 bareos-dir JobId 1: Waiting for operation to start
2016-01-14 10:57:53 bareos-dir JobId 1: Async request NDMP4_LOG_MESSAGE
2016-01-14 10:57:53 bareos-dir JobId 1: Operation started
2016-01-14 10:57:53 bareos-dir JobId 1: Monitoring backup
2016-01-14 10:57:53 bareos-dir JobId 1: LOG_MESSAGE: ’Filetransfer: Transferred 5632 bytes in 0.087 seconds throughput of 63.133 KB/s’
2016-01-14 10:57:53 bareos-dir JobId 1: LOG_MESSAGE: ’Filetransfer: Transferred 5632 total bytes ’
2016-01-14 10:57:53 bareos-dir JobId 1: LOG_MESSAGE: ’CPU user=0.016416 sys=0.029437 ft=0.077296 cdb=0.000000’
2016-01-14 10:57:53 bareos-dir JobId 1: LOG_MESSAGE: ’maxrss=14576 in=13 out=22 vol=155 inv=72’
2016-01-14 10:57:53 bareos-dir JobId 1: LOG_MESSAGE: ’
Objects (scanned/included):
----------------------------
Regular Files: (1/1)
Sparse Files: (0/0)
Stub Files: (0/0)
Directories: (2/2)
ADS Entries: (0/0)
ADS Containers: (0/0)
Soft Links: (0/0)
Hard Links: (0/0)
Block Device: (0/0)
Char Device: (0/0)
FIFO: (0/0)
Socket: (0/0)
Whiteout: (0/0)
Unknown: (0/0)’
2016-01-14 10:57:53 bareos-dir JobId 1: LOG_MESSAGE: ’
Dir Depth (count)
----------------------------
Total Dirs: 2
Max Depth: 1
File Size (count)
----------------------------
== 0 0
<= 8k 1
<= 64k 0
<= 1M 0
<= 20M 0
<= 100M 0
<= 1G 0
> 1G 0
-------------------------
Total Files: 1
Total Bytes: 643
Max Size: 643
Mean Size: 643’
2016-01-14 10:57:53 bareos-dir JobId 1: LOG_MESSAGE: ’
File History
----------------------------
Num FH_HIST_FILE messages: 0
Num FH_HIST_DIR messages: 6
Num FH_HIST_NODE messages: 3’
2016-01-14 10:57:54 bareos-dir JobId 1: Async request NDMP4_NOTIFY_MOVER_HALTED
2016-01-14 10:57:54 bareos-dir JobId 1: DATA: bytes 2053KB MOVER: written 2079KB record 33
2016-01-14 10:57:54 bareos-dir JobId 1: Operation done, cleaning up
2016-01-14 10:57:54 bareos-dir JobId 1: Waiting for operation to halt
2016-01-14 10:57:54 bareos-dir JobId 1: Commanding tape drive to NDMP9_MTIO_EOF 2 times
2016-01-14 10:57:54 bareos-dir JobId 1: Commanding tape drive to rewind
2016-01-14 10:57:54 bareos-dir JobId 1: Closing tape drive LPDA-DEJC-ENJL-AHAI-JCBD-LICP-LKHL-IEDK@/ifs/home%0
2016-01-14 10:57:54 bareos-dir JobId 1: Operation halted, stopping
2016-01-14 10:57:54 bareos-dir JobId 1: Operation ended OKAY
2016-01-14 10:57:54 bareos-sd JobId 1: Elapsed time=00:00:01, Transfer rate=2.128 M Bytes/second
2016-01-14 10:57:54 bareos-dir JobId 1: Bareos bareos-dir 15.2.2 (16Nov15):
Build OS: x86_64-redhat-linux-gnu redhat Red Hat Enterprise Linux Server release 7.0 (Maipo)
JobId: 1
Job: ndmp-backup-job.2016-01-14_10.57.51_04
Backup Level: Full
Client: "ndmp-client"
FileSet: "NDMP Fileset" 2016-01-14 10:57:51
Pool: "Full" (From Job resource)
Catalog: "MyCatalog" (From Client resource)
Storage: "NDMPFile" (From Job resource)
Scheduled time: 14-Jan-2016 10:57:51
Start time: 14-Jan-2016 10:57:53
End time: 14-Jan-2016 10:57:54
Elapsed time: 1 sec
Priority: 10
NDMP Files Written: 3
SD Files Written: 1
NDMP Bytes Written: 2,102,784 (2.102 MB)
SD Bytes Written: 2,128,987 (2.128 MB)
Rate: 2102.8 KB/s
Volume name(s): Full-0001
Volume Session Id: 4
Volume Session Time: 1452764858
Last Volume Bytes: 2,131,177 (2.131 MB)
Termination: Backup OK
bconsole 32.13:
run NDMP backup
We have successfully created our first NDMP backup.
Let us have a look what files are in our backup:
*list files jobid=1
/@NDMP/ifs/home%0
/ifs/home/
/ifs/home/admin/
/ifs/home/admin/.zshrc
bconsole 32.14:
list the files of the backup job
The real backup data is stored in the file /@NDMP/ifs/home%0 (we will refer to it as “NDMP main
backup file” or “main backup file” later on). One NDMP main backup file is created for every directory
specified in the used Fileset. The other files show the file history and are hardlinks to the backup
file.
#
Now that we have a NDMP backup, we of course also want to restore some data from the backup. If the backup we
just did saved the Filehistory, we are able to select single files for restore. Otherwise, we will only be able to restore
the whole backup.
Either select all files or the main backup file (/@NDMP/ifs/home%0). If file history is not included in the backup job,
than only the main backup file is available.
*restore jobid=1
You have selected the following JobId: 1
Building directory tree for JobId(s) 1 ...
2 files inserted into the tree.
You are now entering file selection mode where you add (mark) and
remove (unmark) files to be restored. No files are initially added, unless
you used the "all" keyword on the command line.
Enter "done" to leave this mode.
cwd is: /
$ mark /ifs/home/admin/.zshrc
$ done
Bootstrap records written to /var/lib/bareos/bareos-dir.restore.1.bsr
The job will require the following
Volume(s) Storage(s) SD Device(s)
===========================================================================
Full-0001 File FileStorage
Volumes marked with "*" are online.
1 file selected to be restored.
The defined Restore Job resources are:
1: RestoreFiles
2: ndmp-restore-job
Select Restore Job (1-2): 2
Defined Clients:
1: bareos-fd
2: ndmp-client
Select the Client (1-2): 2
Run Restore job
JobName: ndmp-backup-job
Bootstrap: /var/lib/bareos/bareos-dir.restore.1.bsr
Where: /
Replace: Always
FileSet: NDMP Fileset
Backup Client: ndmp-client
Restore Client: ndmp-client
Format: dump
Storage: File
When: 2016-01-14 11:04:46
Catalog: MyCatalog
Priority: 10
Plugin Options: *None*
OK to run? (yes/mod/no): yes
Job queued. JobId=2
*wait jobid=2
JobId=2
JobStatus=OK (T)
*list joblog jobid=2
14-Jan 11:04 bareos-dir JobId 2: Start Restore Job ndmp-backup-job.2016-01-14_11.04.53_05
14-Jan 11:04 bareos-dir JobId 2: Using Device "FileStorage" to read.
14-Jan 11:04 bareos-dir JobId 2: Opening tape drive KKAE-IMLO-NHJD-GOCO-GJCO-GEHB-BODL-ADNG@/ifs/home read-only
14-Jan 11:04 bareos-dir JobId 2: Commanding tape drive to rewind
14-Jan 11:04 bareos-dir JobId 2: Waiting for operation to start
14-Jan 11:04 bareos-sd JobId 2: Ready to read from volume "Full-0001" on device "FileStorage" (/var/lib/bareos/storage).
14-Jan 11:04 bareos-sd JobId 2: Forward spacing Volume "Full-0001" to file:block 0:194.
14-Jan 11:04 bareos-dir JobId 2: Async request NDMP4_LOG_MESSAGE
14-Jan 11:04 bareos-dir JobId 2: Operation started
14-Jan 11:04 bareos-dir JobId 2: Monitoring recover
14-Jan 11:04 bareos-dir JobId 2: DATA: bytes 0KB MOVER: read 0KB record 0
14-Jan 11:04 bareos-dir JobId 2: LOG_MESSAGE: ’Filetransfer: Transferred 1048576 bytes in 0.135 seconds throughput of 7557.139 KB/s’
14-Jan 11:04 bareos-dir JobId 2: OK: /admin/.zshrc
14-Jan 11:04 bareos-dir JobId 2: LOG_MESSAGE: ’
Objects:
----------------------------
Regular Files: (1)
Stub Files: (0)
Directories: (0)
ADS Entries: (0)
Soft Links: (0)
Hard Links: (0)
Block Device: (0)
Char Device: (0)
FIFO: (0)
Socket: (0)
Unknown: (0)’
14-Jan 11:04 bareos-dir JobId 2: LOG_MESSAGE: ’
File Size (count)
----------------------------
== 0 0
<= 8k 1
<= 64k 0
<= 1M 0
<= 20M 0
<= 100M 0
<= 1G 0
> 1G 0
-------------------------
Total Files: 1
Total Bytes: 643
Max Size: 643
Mean Size: 643’
14-Jan 11:04 bareos-dir JobId 2: Async request NDMP4_NOTIFY_MOVER_PAUSED
14-Jan 11:04 bareos-dir JobId 2: DATA: bytes 1024KB MOVER: read 2079KB record 32
14-Jan 11:04 bareos-dir JobId 2: Mover paused, reason=NDMP9_MOVER_PAUSE_EOF
14-Jan 11:04 bareos-dir JobId 2: End of tapes
14-Jan 11:04 bareos-dir JobId 2: DATA: bytes 1024KB MOVER: read 2079KB record 32
14-Jan 11:04 bareos-dir JobId 2: Operation done, cleaning up
14-Jan 11:04 bareos-dir JobId 2: Waiting for operation to halt
14-Jan 11:04 bareos-dir JobId 2: Commanding tape drive to rewind
14-Jan 11:04 bareos-dir JobId 2: Closing tape drive KKAE-IMLO-NHJD-GOCO-GJCO-GEHB-BODL-ADNG@/ifs/home
14-Jan 11:04 bareos-dir JobId 2: Operation halted, stopping
14-Jan 11:04 bareos-dir JobId 2: Operation ended OKAY
14-Jan 11:04 bareos-dir JobId 2: LOG_FILE messages: 1 OK, 0 ERROR, total 1 of 1
14-Jan 11:04 bareos-dir JobId 2: Bareos bareos-dir 15.2.2 (16Nov15):
Build OS: x86_64-redhat-linux-gnu redhat Red Hat Enterprise Linux Server release 7.0 (Maipo)
JobId: 2
Job: ndmp-backup-job.2016-01-14_11.04.53_05
Restore Client: ndmp-client
Start time: 14-Jan-2016 11:04:55
End time: 14-Jan-2016 11:04:57
Elapsed time: 2 secs
Files Expected: 1
Files Restored: 1
Bytes Restored: 1,048,576
Rate: 524.3 KB/s
SD termination status: OK
Termination: Restore OK
bconsole 32.15:
The restore location is determined by the Where Dir
Job setting of the restore job. In NDMP, this parameter works in a
special manner, the prefix can be either “relative” to the filesystem or “absolute”. If a prefix is set in form of a
directory (like /bareos-restores), it will be a relative prefix and will be added between the filesystem and the
filename. This is needed to make sure that the data is restored in a different directory, but into the same
filesystem. If the prefix is set with a leading caret (ˆ), it will be an absolute prefix and will be put
at the front of the restore path. This is needed if the restored data should be stored into a different
filesystem.
Example:
|
|
|
| original file name | where | restored file |
|
|
|
| /ifs/home/admin/.zshrc | /bareos-restores | /ifs/home/bareos-restores/admin/.zshrc |
| /ifs/home/admin/.zshrc | ˆ/ifs/data/bareos-restores | /ifs/data/bareos-restores/admin/.zshrc |
|
|
|
| |
#
To be able to do copy jobs, we need to have a second storage resource where we can copy the data to. Depending on
your requirements, this resource can be added to the existing Bareos Storage Daemon (e.g. autochanger-0Sd
Storage for
tape based backups) or to an additional Bareos Storage Daemon.
We set up an additional Bareos Storage Daemon on a host named bareos-sd2.example.com with the default
FileStorageSd
Storage device.
When this is done, add a second storage resource File2Dir
Storage to the bareos-dir.conf:
Storage {
Name = File2
Address = bareos-sd2.example.com
Password = <secretpassword>
Device = FileStorage
Media Type = File
}
Configuration 32.16:
Storage resource File2
Copy Jobs copy data from one pool to another (see Migration and Copy). So we need to define a pool where the
copies will be written to:
Add a Pool that the copies will run to:
#
# Copy Destination Pool
#
Pool {
Name = Copy
Pool Type = Backup
Recycle = yes # Bareos can automatically recycle Volumes
AutoPrune = yes # Prune expired volumes
Volume Retention = 365 days # How long should the Full Backups be kept? (#06)
Maximum Volume Bytes = 50G # Limit Volume size to something reasonable
Maximum Volumes = 100 # Limit number of Volumes in Pool
Label Format = "Copy-" # Volumes will be labeled "Full-<volume-id>"
Storage = File2 # Pool belongs to Storage File2
}
Configuration 32.17:
Pool resource Copy
Then we need to define the just defined pool as the Next Pool Dir
Pool of the pool that actually holds the data to be
copied.
In our case this is the FullDir
Pool Pool:
#
# Full Pool definition
#
Pool {
Name = Full
[...]
Next Pool = Copy # <- this line needs to be added!
}
Configuration 32.18:
add Next Pool setting
Finally, we need to define a Copy Job that will select the jobs that are in the FullDir
Pool pool and copy them over to
the CopyDir
Pool pool reading the data via the FileDir
Storage Storage and writing the data via the File2Dir
Storage
Storage:
Job {
Name = NDMPCopy
Type = Copy
Messages = Standard
Selection Type = PoolUncopiedJobs
Pool = Full
Storage = NDMPFile
}
Configuration 32.19:
NDMP copy job
After restarting the director and storage daemon, we can run the Copy job:
*run job=NDMPCopy
Run Copy job
JobName: NDMPCopy
Bootstrap: *None*
Pool: Full (From Job resource)
NextPool: Copy (From unknown source)
Write Storage: File2 (From Storage from Run NextPool override)
JobId: *None*
When: 2016-01-21 09:19:49
Catalog: MyCatalog
Priority: 10
OK to run? (yes/mod/no): yes
Job queued. JobId=74
*wait jobid=74
JobId=74
JobStatus=OK (T)
*list joblog jobid=74
21-Jan 09:19 bareos-dir JobId 74: The following 1 JobId was chosen to be copied: 73
21-Jan 09:19 bareos-dir JobId 74: Automatically selected Catalog: MyCatalog
21-Jan 09:19 bareos-dir JobId 74: Using Catalog "MyCatalog"
21-Jan 09:19 bareos-dir JobId 75: Copying using JobId=73 Job=NDMPJob.2016-01-21_09.18.50_49
21-Jan 09:19 bareos-dir JobId 75: Bootstrap records written to /var/lib/bareos/bareos-dir.restore.20.bsr
21-Jan 09:19 bareos-dir JobId 74: Job queued. JobId=75
21-Jan 09:19 bareos-dir JobId 74: Copying JobId 75 started.
21-Jan 09:19 bareos-dir JobId 74: Bareos bareos-dir 15.2.2 (16Nov15):
Build OS: x86_64-redhat-linux-gnu redhat Red Hat Enterprise Linux Server release 7.0 (Maipo)
Current JobId: 74
Current Job: NDMPCopy.2016-01-21_09.19.50_50
Catalog: "MyCatalog" (From Default catalog)
Start time: 21-Jan-2016 09:19:52
End time: 21-Jan-2016 09:19:52
Elapsed time: 0 secs
Priority: 10
Termination: Copying -- OK
21-Jan 09:19 bareos-dir JobId 75: Start Copying JobId 75, Job=NDMPCopy.2016-01-21_09.19.52_51
21-Jan 09:19 bareos-dir JobId 75: Using Device "FileStorage" to read.
21-Jan 09:19 bareos-dir JobId 76: Using Device "FileStorage2" to write.
21-Jan 09:19 bareos-sd JobId 75: Ready to read from volume "Full-0001" on device "FileStorage" (/var/lib/bareos/storage).
21-Jan 09:19 bareos-sd JobId 76: Volume "Copy-0004" previously written, moving to end of data.
21-Jan 09:19 bareos-sd JobId 76: Ready to append to end of Volume "Copy-0004" size=78177310
21-Jan 09:19 bareos-sd JobId 75: Forward spacing Volume "Full-0001" to file:block 0:78177310.
21-Jan 09:19 bareos-sd JobId 75: End of Volume at file 0 on device "FileStorage" (/var/lib/bareos/storage), Volume "Full-0001"
21-Jan 09:19 bareos-sd JobId 75: End of all volumes.
21-Jan 09:19 bareos-sd JobId 76: Elapsed time=00:00:01, Transfer rate=64.61 K Bytes/second
21-Jan 09:19 bareos-dir JobId 75: Bareos bareos-dir 15.2.2 (16Nov15):
Build OS: x86_64-redhat-linux-gnu redhat Red Hat Enterprise Linux Server release 7.0 (Maipo)
Prev Backup JobId: 73
Prev Backup Job: NDMPJob.2016-01-21_09.18.50_49
New Backup JobId: 76
Current JobId: 75
Current Job: NDMPCopy.2016-01-21_09.19.52_51
Backup Level: Incremental
Client: ndmp-client
FileSet: "NDMP Fileset"
Read Pool: "Full" (From Job resource)
Read Storage: "NDMPFile" (From Job resource)
Write Pool: "Copy" (From Job Pool’s NextPool resource)
Write Storage: "File2" (From Storage from Pool’s NextPool resource)
Next Pool: "Copy" (From Job Pool’s NextPool resource)
Catalog: "MyCatalog" (From Default catalog)
Start time: 21-Jan-2016 09:19:54
End time: 21-Jan-2016 09:19:54
Elapsed time: 0 secs
Priority: 10
SD Files Written: 1
SD Bytes Written: 64,614 (64.61 KB)
Rate: 0.0 KB/s
Volume name(s): Copy-0004
Volume Session Id: 43
Volume Session Time: 1453307753
Last Volume Bytes: 78,242,384 (78.24 MB)
SD Errors: 0
SD termination status: OK
Termination: Copying OK
bconsole 32.20:
run copy job
Now we successfully copied over the NDMP job.
Please note! list jobs will only show the number of main backup files as JobFiles. However, with list
files jobid=... all files are visible.
Unfortunately, we are not able to restore the copied data to our NDMP storage. If we try we get this
message:
21-Jan 09:21 bareos-dir JobId 77: Fatal error: Read storage File2 doesn’t point to storage definition with paired storage option.
Messages 32.21:
To be able to do NDMP operations from the storage that was used to store the copies, we need to define a NDMP
storage that is paired with it. The definition is very similar to our NDMPFileDir
Storage Storage, as we want to restore the
data to the same NDMP Storage system:
Storage {
Name = NDMPFile2
Address = bareos-sd2.example.com
Port = 10000
Protocol = NDMPv4
Auth Type = Clear
Username = ndmpadmin
Password = "test"
Device = FileStorage2
Media Type = File
PairedStorage = File2
}
Configuration 32.22:
add paired Storage resource for File2
Also we have to configure NDMP on the Bareos Storage Daemon bareos-sd2.example.com. For this follow the
instruction from Bareos Storage Daemon: Configure NDMP.
After this, a restore from bareos-sd2.example.com directly to the NDMP Primary Storage System is
possible.
#
This list the specific limitiations of the NDMP_BAREOS protocol. For limitation for all Bareos NDMP
implementation, see Bareos NDMP Common Limitations.
For NDMP jobs, all data is stored into a single big file. The file and directory information (File History in NDMP
Terms) is stored as hardlinks to this big file.
File information are not available in the Bareos backup stream.
As hardlink information is only stored in the Bareos database, but not int the backup stream itself, it is not possible
to recover the file history information from the NDMP stream with bscan.
As storing the database dump for disaster recovery and storing the bootstrap file offsite is recommended
anyway (see Steps to Take Before Disaster Strikes), this should be not a big problem in correctly setup
environments.
For the same reason, the information about the number of files of a job (e.g. JobFiles with list jobs command) is
limited to the number of NDMP backup files in copied jobs.
Contrary to NDMP_NATIVE, the NDMP_BAREOSimplementation do not support NDMP “Direct Access
Restore” (DAR).
On restore, the full main backup file (@NDMP/...%.) is always transfered back to the Primary Storage System,
together with a description, what files to restore.
The reason for this is that the Primary Storage System handles the backup data by itself. Bareos will not modify
the backup data it receives from the Primary Storage System.
#
The NDMP_NATIVE protocol is implemented since Bareos Version >= 17.2.3.
Bareos implements the Data Management Agent inside of the Bareos Director and is the only Bareos Daemon
involved in the backups.
When using NDMP_NATIVE, the Tape Agent must be provided by some other systems. Some storage
vendors provide it with there storages, or offer it as an option, e.g. Isilon with there “Isilon Backup
Accelerator”.
#
This defines the connection to the NDMP Data Agent.
Client {
Name = isilon
Address = isilon.example.com
Port = 10000
Protocol = NDMPv4
Auth Type = MD5
Username = "ndmpadmin"
Password = "secret"
Maximum Concurrent Jobs = 1
}
Resource 32.23:
bareos-dir.d/Client/isilon.conf
Verify, that you can access your Primary Storage System (Tape Agent) via Bareos:
*status client=isilon
Data Agent isilon.example.com NDMPv4
Host info
hostname isilon
os_type Isilon OneFS
os_vers v7.2.1.4
hostid xxxxxxxxxxxxxxxxxxxxxxxxxxxxxxxx
Server info
vendor Isilon
product Isilon NDMP
revision 2.2.1
auths (2) NDMP4_AUTH_TEXT NDMP4_AUTH_MD5
Connection types
addr_types (2) NDMP4_ADDR_TCP NDMP4_ADDR_LOCAL
Backup type info of tar format
attrs 0x7fe
set FILESYSTEM=/ifs
set FILES=
set EXCLUDE=
set PER_DIRECTORY_MATCHING=N
set HIST=f
set DIRECT=N
set LEVEL=0
set UPDATE=Y
set RECURSIVE=Y
set ENCODING=UTF-8
set ENFORCE_UNIQUE_NODE=N
set PATHNAME_SEPARATOR=/
set DMP_NAME=
set BASE_DATE=0
set NDMP_UNICODE_FH=N
Backup type info of dump format
attrs 0x7fe
set FILESYSTEM=/ifs
set FILES=
set EXCLUDE=
set PER_DIRECTORY_MATCHING=N
set HIST=f
set DIRECT=N
set LEVEL=0
set UPDATE=Y
set RECURSIVE=Y
set ENCODING=UTF-8
set ENFORCE_UNIQUE_NODE=N
set PATHNAME_SEPARATOR=/
set DMP_NAME=
set BASE_DATE=0
set NDMP_UNICODE_FH=N
File system /ifs
physdev OneFS
unsupported 0x0
type NFS
status
space 224681156345856 total, 126267678720 used, 224554888667136 avail
inodes 324102912000 total, 323964781836 used
set MNTOPTS=
set MNTTIME=00:00:00 00:00:00
bconsole 32.24:
status ndmp client
This determines what filesystem to backup and configures the NDMP environment to use in the meta options for
it.
Fileset {
Name = "isilon"
Include {
Options {
meta = "HIST=F"
meta = "DIRECT=Y"
meta = "RECURSIVE=Y"
meta = "BUTYPE=DUMP"
}
File = /ifs/home
}
}
Resource 32.25:
bareos-dir.d/Fileset/isilon.conf
The setting of "DIRECT = Y" is required for Direct Access Recovery.
For more information, see Bareos Director: Configure NDMP Fileset.
This defines now to connect to the Tape and Robot Agents and what devices to use.
As we do not yet now the device names, we can put a placeholder string in Device Dir
Storage and NDMP Changer Device
Dir
Storage:
Storage {
Name = isilon
Address = isilon.example.com
Port = 10000
Protocol = NDMPv4
Auth Type = MD5
Username = "ndmpadmin"
Password = "secret"
Maximum Concurrent Jobs = 1
Autochanger = yes
MediaType = NDMP-Tape
Device = unknown # use "status storage" to determine the tape device
NDMP Changer Device = unknown # use "status storage" to determine the changer device
}
Resource 32.26:
bareos-dir.d/Storage/isilon.conf
Verify that the connection to the NDMP Tape Agent and Robot Agent work, by running the status storage
command.
The Tape Agent will return information about the available tape drives. The Robot Agent will return information
about the available tape changer device.
*status storage=isilon
Tape Agent isilon.bareos.com NDMPv4
Host info
hostname isilon
os_type Isilon OneFS
os_vers v7.2.1.4
hostid abcdefg
Server info
vendor Isilon
product Isilon NDMP
revision 2.2.1
auths (2) NDMP4_AUTH_TEXT NDMP4_AUTH_MD5
Connection types
addr_types (2) NDMP4_ADDR_TCP NDMP4_ADDR_LOCAL
tape HP Ultrium 5-SCSI I30Z
device HP-TLD-004-01
attr 0x4
set EXECUTE_CDB=t
set SERIAL_NUMBER=123456
tape HP Ultrium 5-SCSI I30Z
device HP-TLD-004-02
attr 0x4
set EXECUTE_CDB=t
set SERIAL_NUMBER=1234567
Robot Agent isilon.bareos.com NDMPv4
Host info
hostname isilon
os_type Isilon OneFS
os_vers v7.2.1.4
hostid 001517db7e38f40dbb4dfc0b823f29a31e09
Server info
vendor Isilon
product Isilon NDMP
revision 2.2.1
auths (2) NDMP4_AUTH_TEXT NDMP4_AUTH_MD5
scsi QUANTUM Scalar i6000 605A
device mc001
set SERIAL_NUMBER=VL002CX1252BVE01177
bconsole 32.27:
status ndmp storage (Tape Agent and Robot Agent)
The interesting parts of the output is the device information both of the Tape Agent and Robot Agent.
As each NDMP backup or recovery operation always involves exactly one tape and at one robot agent.
We now know the device names and can configure what robot and what tape to use when this storage is used by
bareos by updating the isilonSd
Storage resource:
Storage {
Name = isilon
Address = isilon.example.com
Port = 10000
Protocol = NDMPv4
Auth Type = MD5
Username = "ndmpadmin"
Password = "secret"
Maximum Concurrent Jobs = 1
Autochanger = yes
MediaType = NDMP-Tape
Device = HP-TLD-004-01
NDMP Changer Device = mc001
}
Resource 32.28:
bareos-dir.d/Storage/isilon.conf
Pool {
Name = NDMP-Tape
Pool Type = Backup
Recycle = yes # Bareos can automatically recycle Volumes
Auto Prune = yes # Prune expired volumes
Volume Retention = 365 days # How long should the Full Backups be kept?
}
Resource 32.29:
bareos-dir.d/Pool/NDMP-Tape.conf
To be able to do scheduled backups, we need to configure a backup job that will use the NDMP client and NDMP
storage resources:
Job {
Name = ndmp-native-backup-job
type = backup
protocol = NDMP_NATIVE
level = incremental
client = isilon
storage = isilon
backup format = dump
messages = Standard
Pool = NDMP-Tape
save file history = yes
FileSet = isilon
}
Resource 32.30:
bareos-dir.d/Job/ndmp-native-backup-job.conf
As we also need to be able to do a restore of the backuped data, we also need to define an adequate restore
job:
Job{
Name = ndmp-restore
type = restore
protocol = NDMP_NATIVE
client = isilon
backup format = dump
fileset = isilon
storage = isilon
pool = NDMP-Tape
Messages = Standard
where = /
}
Resource 32.31:
bareos-dir.d/Job/ndmp-native-restore-job.conf
#
Before we can really start do do backups, first we need to label the tapes that should be used.
First we check if our robot has tapes with barcodes by running status slots:
*status slots
Slot | Volume Name | Status | Media Type | Pool |
------+------------------+-----------+----------------+--------------------------|
1@| ? | ? | ? | ? |
2@| ? | ? | ? | ? |
3@| ? | ? | ? | ? |
4@| ? | ? | ? | ? |
[...]
251*| BT0001 | ? | ? | ? |
252*| BT0002 | ? | ? | ? |
253*| BT0003 | ? | ? | ? |
254*| BT0004 | ? | ? | ? |
255*| BT0005 | ? | ? | ? |
256*| BT0006 | ? | ? | ? |
257*| BT0007 | ? | ? | ? |
[...]
bconsole 32.32:
status storage=isilon slots
Now we can label these tapes and add them to the pool that we have created for NDMP Tapes:
*label storage=isilon barcodes slots=251-257
Automatically selected Storage: isilon
Select Drive:
1: Drive 0
2: Drive 1
Select drive (1-12): 1
get ndmp_vol_list...
The following Volumes will be labeled:
Slot Volume
==============
251 BT0001
252 BT0002
253 BT0003
254 BT0004
255 BT0005
256 BT0006
257 BT0007
Do you want to label these Volumes? (yes|no): yes
Defined Pools:
1: Scratch
2: NDMP-Tape
3: Incremental
4: Full
5: Differential
Select the Pool (1-5): 2
ndmp_send_label_request: VolumeName=BT0001 MediaType=NDMP-Tape PoolName=NDMP-Tape drive=0
Catalog record for Volume "BT0001", Slot 251 successfully created.
ndmp_send_label_request: VolumeName=BT0002 MediaType=NDMP-Tape PoolName=NDMP-Tape drive=0
Catalog record for Volume "BT0002", Slot 252 successfully created.
ndmp_send_label_request: VolumeName=BT0003 MediaType=NDMP-Tape PoolName=NDMP-Tape drive=0
Catalog record for Volume "BT0003", Slot 253 successfully created.
ndmp_send_label_request: VolumeName=BT0004 MediaType=NDMP-Tape PoolName=NDMP-Tape drive=0
Catalog record for Volume "BT0004", Slot 254 successfully created.
ndmp_send_label_request: VolumeName=BT0005 MediaType=NDMP-Tape PoolName=NDMP-Tape drive=0
Catalog record for Volume "BT0005", Slot 255 successfully created.
ndmp_send_label_request: VolumeName=BT0006 MediaType=NDMP-Tape PoolName=NDMP-Tape drive=0
Catalog record for Volume "BT0006", Slot 256 successfully created.
ndmp_send_label_request: VolumeName=BT0007 MediaType=NDMP-Tape PoolName=NDMP-Tape drive=0
Catalog record for Volume "BT0007", Slot 257 successfully created.
bconsole 32.33:
label barcodes
We have now 7 volumes in our NDMP-Tape Pool that were labeled and can be used for NDMP Backups.
#
*run job=ndmp-native-backup-job yes
JobId 1: Start NDMP Backup JobId 1, Job=ndmp.2017-04-07_01.40.31_10
JobId 1: Using Data host isilon.bareos.com
JobId 1: Using Tape host:device isilon.bareos.com:HP-TLD-004-01
JobId 1: Using Robot host:device isilon.bareos.com:mc001
JobId 1: Using Tape record size 64512
JobId 1: Found volume for append: BT0001
JobId 1: Commanding robot to load slot @4146 into drive @256
JobId 1: robot moving @4146 to @256
JobId 1: robot move OK @4146 to @256
JobId 1: Opening tape drive HP-TLD-004-01 read/write
JobId 1: Commanding tape drive to rewind
JobId 1: Checking tape label, expect ’BT0001’
JobId 1: Reading label
JobId 1: Commanding tape drive to rewind
JobId 1: Commanding tape drive to NDMP9_MTIO_FSF 1 times
JobId 1: Waiting for operation to start
JobId 1: Operation started
JobId 1: Monitoring backup
JobId 1: DATA: bytes 3703831KB MOVER: written 3703644KB record 58788
JobId 1: LOG_MESSAGE: ’End of medium reached.’
JobId 1: DATA: bytes 4834614KB MOVER: written 4834053KB record 76731
JobId 1: Mover paused, reason=NDMP9_MOVER_PAUSE_EOM
JobId 1: Operation requires next tape
JobId 1: At EOM, not writing filemarks
JobId 1: Commanding tape drive to rewind
JobId 1: Closing tape drive HP-TLD-004-01
JobId 1: Commanding robot to unload drive @256 to slot @4146
JobId 1: robot moving @256 to @4146
JobId 1: robot move OK @256 to @4146
JobId 1: Found volume for append: BT0002
JobId 1: Commanding robot to load slot @4147 into drive @256
JobId 1: robot moving @4147 to @256
JobId 1: robot move OK @4147 to @256
JobId 1: Opening tape drive HP-TLD-004-01 read/write
JobId 1: Commanding tape drive to rewind
JobId 1: Checking tape label, expect ’BT0002’
JobId 1: Reading label
JobId 1: Commanding tape drive to rewind
JobId 1: Commanding tape drive to NDMP9_MTIO_FSF 1 times
JobId 1: Operation resuming
JobId 1: DATA: bytes 6047457KB MOVER: written 6047244KB record 95988
JobId 1: LOG_MESSAGE: ’End of medium reached.’
JobId 1: DATA: bytes 9668679KB MOVER: written 9668106KB record 153462
JobId 1: Mover paused, reason=NDMP9_MOVER_PAUSE_EOM
JobId 1: Operation requires next tape
JobId 1: At EOM, not writing filemarks
JobId 1: Commanding tape drive to rewind
JobId 1: Closing tape drive HP-TLD-004-01
JobId 1: Commanding robot to unload drive @256 to slot @4147
JobId 1: robot moving @256 to @4147
JobId 1: robot move OK @256 to @4147
JobId 1: Found volume for append: BT0003
JobId 1: Commanding robot to load slot @4148 into drive @256
JobId 1: robot moving @4148 to @256
JobId 1: robot move OK @4148 to @256
JobId 1: Opening tape drive HP-TLD-004-01 read/write
JobId 1: Commanding tape drive to rewind
JobId 1: Checking tape label, expect ’BT0003’
JobId 1: Reading label
JobId 1: Commanding tape drive to rewind
JobId 1: Commanding tape drive to NDMP9_MTIO_FSF 1 times
JobId 1: Operation resuming
JobId 1: LOG_MESSAGE: ’Filetransfer: Transferred 10833593344 bytes in 87.187 seconds throughput of 121345.079 KB/s’
JobId 1: LOG_MESSAGE: ’Filetransfer: Transferred 10833593344 total bytes ’
JobId 1: LOG_MESSAGE: ’CPU user=0.528118 sys=54.575536 ft=87.182576 cdb=0.000000’
JobId 1: LOG_MESSAGE: ’maxrss=171972 in=1323908 out=17 vol=199273 inv=5883’
JobId 1: LOG_MESSAGE: ’
Objects (scanned/included):
----------------------------
Regular Files: (2765/2765)
Sparse Files: (0/0)
Stub Files: (0/0)
Directories: (447/447)
ADS Entries: (0/0)
ADS Containers: (0/0)
Soft Links: (0/0)
Hard Links: (0/0)
Block Device: (0/0)
Char Device: (0/0)
FIFO: (0/0)
Socket: (0/0)
Whiteout: (0/0)
Unknown: (0/0)’
JobId 1: LOG_MESSAGE: ’
Dir Depth (count)
----------------------------
Total Dirs: 447
Max Depth: 10
File Size (count)
----------------------------
== 0 14
<= 8k 1814
<= 64k 658
<= 1M 267
<= 20M 10
<= 100M 0
<= 1G 0
> 1G 2
-------------------------
Total Files: 2765
Total Bytes: 10827843824
Max Size: 5368709120
Mean Size: 3916037’
JobId 1: LOG_MESSAGE: ’
File History
----------------------------
Num FH_HIST_FILE messages: 3212
Num FH_HIST_DIR messages: 0
Num FH_HIST_NODE messages: 0’
JobId 1: Async request NDMP4_NOTIFY_MOVER_HALTED
JobId 1: DATA: bytes 10581729KB MOVER: written 10581732KB record 167964
JobId 1: Operation done, cleaning up
JobId 1: Waiting for operation to halt
JobId 1: Commanding tape drive to NDMP9_MTIO_EOF 2 times
JobId 1: Commanding tape drive to rewind
JobId 1: Closing tape drive HP-TLD-004-01
JobId 1: Commanding robot to unload drive @256 to slot @4148
JobId 1: robot moving @256 to @4148
JobId 1: robot move OK @256 to @4148
JobId 1: Operation halted, stopping
JobId 1: Operation ended OKAY
JobId 1: ERR-CONN NDMP4_CONNECT_CLOSE exchange-failed
JobId 1: media #1 BT0001+1/4834053K@4146
JobId 1: valid label=Y filemark=Y n_bytes=Y slot=Y
JobId 1: media used=Y written=Y eof=N eom=Y io_error=N
JobId 1: label read=Y written=N io_error=N mismatch=N
JobId 1: fm_error=N nb_determined=Y nb_aligned=N
JobId 1: slot empty=N bad=N missing=N
JobId 1: media #2 BT0002+1/4834053K@4147
JobId 1: valid label=Y filemark=Y n_bytes=Y slot=Y
JobId 1: media used=Y written=Y eof=N eom=Y io_error=N
JobId 1: label read=Y written=N io_error=N mismatch=N
JobId 1: fm_error=N nb_determined=Y nb_aligned=N
JobId 1: slot empty=N bad=N missing=N
JobId 1: media #3 BT0003+1/913626K@4148
JobId 1: valid label=Y filemark=Y n_bytes=Y slot=Y
JobId 1: media used=Y written=Y eof=N eom=N io_error=N
JobId 1: label read=Y written=N io_error=N mismatch=N
JobId 1: fm_error=N nb_determined=Y nb_aligned=N
JobId 1: slot empty=N bad=N missing=N
JobId 1: Media: BT0001+1/4834053K@251
JobId 1: Media: BT0002+1/4834053K@252
JobId 1: Media: BT0003+1/913626K@253
JobId 1: ndmp_fhdb_lmdb.c:675 Now processing lmdb database
JobId 1: ndmp_fhdb_lmdb.c:679 Processing lmdb database done
JobId 1: Bareos bareos-dir 17.2.3:
Build OS: x86_64-unknown-linux-gnu redhat Red Hat Enterprise Linux Server release 6.8 (Santiago)
JobId: 1
Job: ndmp.2017-04-07_01.40.31_10
Backup Level: Full
Client: "isilon"
FileSet: "isilon" 2017-04-07 01:40:31
Pool: "NDMP-Tape" (From Job resource)
Catalog: "MyCatalog" (From Client resource)
Storage: "isilon" (From Job resource)
Scheduled time: 07-Apr-2017 01:40:31
Start time: 07-Apr-2017 01:40:33
End time: 07-Apr-2017 01:42:03
Elapsed time: 1 min 30 secs
Priority: 10
NDMP Files Written: 3,212
NDMP Bytes Written: 10,835,690,496 (10.83 GB)
Rate: 120396.6 KB/s
Volume name(s): BT0001|BT0002|BT0003
Volume Session Id: 0
Volume Session Time: 0
Last Volume Bytes: 935,553,024 (935.5 MB)
Termination: Backup OK
bconsole 32.34:
run backup job
#
Now we want to restore some files from the backup we just did:
*restore
[...]
cwd is: /
: mark /ifs/home/testdata/git/bareos/src/console/bconsole
1 file marked.
: mark /ifs/home/testdatrandom5G-2
1 file marked.
$ done
Connecting to Director bareos:9101
1000 OK: bareos-dir Version: 17.2.3
Enter a period to cancel a command.
list joblog jobid=2
Automatically selected Catalog: MyCatalog
Using Catalog "MyCatalog"
JobId 2: Start Restore Job ndmp-restore.2017-04-07_01.48.23_13
JobId 2: Namelist add: node:6033532893, info:5464882688, name:"/ifs/home/testdata/random5G-2"
JobId 2: Namelist add: node:6033077461, info:40076288, name:"/ifs/home/testdata/git/bareos/src/console/bconsole"
JobId 2: Record size is 64512
JobId 2: Media: BT0001+1/4834053K@251
JobId 2: Media: BT0002+1/4834053K@252
JobId 2: Media: BT0003+1/913626K@253
JobId 2: Logical slot for volume BT0001 is 251
JobId 2: Physical(NDMP) slot for volume BT0001 is 4146
JobId 2: Media Index of volume BT0001 is 1
JobId 2: Logical slot for volume BT0002 is 252
JobId 2: Physical(NDMP) slot for volume BT0002 is 4147
JobId 2: Media Index of volume BT0002 is 2
JobId 2: Logical slot for volume BT0003 is 253
JobId 2: Physical(NDMP) slot for volume BT0003 is 4148
JobId 2: Media Index of volume BT0003 is 3
JobId 2: Commanding robot to load slot @4146 into drive @256
JobId 2: robot moving @4146 to @256
JobId 2: robot move OK @4146 to @256
JobId 2: Opening tape drive HP-TLD-004-01 read-only
JobId 2: Commanding tape drive to rewind
JobId 2: Checking tape label, expect ’BT0001’
JobId 2: Reading label
JobId 2: Commanding tape drive to rewind
JobId 2: Commanding tape drive to NDMP9_MTIO_FSF 1 times
JobId 2: Waiting for operation to start
JobId 2: Operation started
JobId 2: Monitoring recover
JobId 2: DATA: bytes 0KB MOVER: read 0KB record 0
JobId 2: DATA: bytes 11KB MOVER: read 11KB record 622
JobId 2: Mover paused, reason=NDMP9_MOVER_PAUSE_SEEK
JobId 2: Operation requires a different tape
JobId 2: Commanding tape drive to rewind
JobId 2: Closing tape drive HP-TLD-004-01
JobId 2: Commanding robot to unload drive @256 to slot @4146
JobId 2: robot moving @256 to @4146
JobId 2: robot move OK @256 to @4146
JobId 2: Commanding robot to load slot @4147 into drive @256
JobId 2: robot moving @4147 to @256
JobId 2: robot move OK @4147 to @256
JobId 2: Opening tape drive HP-TLD-004-01 read-only
JobId 2: Commanding tape drive to rewind
JobId 2: Checking tape label, expect ’BT0002’
JobId 2: Reading label
JobId 2: Commanding tape drive to rewind
JobId 2: Commanding tape drive to NDMP9_MTIO_FSF 1 times
JobId 2: Operation resuming
JobId 2: DATA: bytes 79884KB MOVER: read 79884KB record 85979
JobId 2: DATA: bytes 201740KB MOVER: read 201740KB record 87914
JobId 2: DATA: bytes 321548KB MOVER: read 321548KB record 89815
JobId 2: DATA: bytes 440332KB MOVER: read 440332KB record 91701
JobId 2: DATA: bytes 556044KB MOVER: read 556044KB record 93538
JobId 2: DATA: bytes 674828KB MOVER: read 674828KB record 95423
JobId 2: DATA: bytes 796684KB MOVER: read 796684KB record 97357
JobId 2: DATA: bytes 915468KB MOVER: read 915468KB record 99243
JobId 2: DATA: bytes 1036300KB MOVER: read 1036300KB record 101161
JobId 2: DATA: bytes 1157132KB MOVER: read 1157132KB record 103079
JobId 2: DATA: bytes 1277964KB MOVER: read 1277964KB record 104997
JobId 2: DATA: bytes 1398796KB MOVER: read 1398796KB record 106915
JobId 2: DATA: bytes 1518604KB MOVER: read 1518604KB record 108816
JobId 2: DATA: bytes 1622028KB MOVER: read 1622028KB record 110458
JobId 2: DATA: bytes 1741836KB MOVER: read 1741836KB record 112360
JobId 2: DATA: bytes 1859596KB MOVER: read 1859596KB record 114229
JobId 2: DATA: bytes 1981452KB MOVER: read 1981452KB record 116163
JobId 2: DATA: bytes 2094092KB MOVER: read 2094092KB record 117951
JobId 2: DATA: bytes 2207756KB MOVER: read 2207756KB record 119755
JobId 2: DATA: bytes 2328588KB MOVER: read 2328588KB record 121673
JobId 2: DATA: bytes 2448396KB MOVER: read 2448396KB record 123575
JobId 2: DATA: bytes 2569228KB MOVER: read 2569228KB record 125493
JobId 2: DATA: bytes 2689036KB MOVER: read 2689036KB record 127395
JobId 2: DATA: bytes 2810892KB MOVER: read 2810892KB record 129329
JobId 2: DATA: bytes 2926604KB MOVER: read 2926604KB record 131165
JobId 2: DATA: bytes 3043340KB MOVER: read 3043340KB record 133018
JobId 2: DATA: bytes 3163148KB MOVER: read 3163148KB record 134920
JobId 2: DATA: bytes 3279884KB MOVER: read 3279884KB record 136773
JobId 2: DATA: bytes 3400716KB MOVER: read 3400716KB record 138691
JobId 2: DATA: bytes 3518476KB MOVER: read 3518476KB record 140560
JobId 2: DATA: bytes 3636236KB MOVER: read 3636236KB record 142429
JobId 2: DATA: bytes 3757068KB MOVER: read 3757068KB record 144347
JobId 2: DATA: bytes 3877900KB MOVER: read 3877900KB record 146265
JobId 2: DATA: bytes 3994636KB MOVER: read 3994636KB record 148118
JobId 2: DATA: bytes 4116492KB MOVER: read 4116492KB record 150053
JobId 2: DATA: bytes 4237324KB MOVER: read 4237324KB record 151971
JobId 2: DATA: bytes 4331317KB MOVER: read 4331317KB record 153462
JobId 2: Mover paused, reason=NDMP9_MOVER_PAUSE_SEEK
JobId 2: Operation requires a different tape
JobId 2: Commanding tape drive to rewind
JobId 2: Closing tape drive HP-TLD-004-01
JobId 2: Commanding robot to unload drive @256 to slot @4147
JobId 2: robot moving @256 to @4147
JobId 2: robot move OK @256 to @4147
JobId 2: Commanding robot to load slot @4148 into drive @256
JobId 2: robot moving @4148 to @256
JobId 2: robot move OK @4148 to @256
JobId 2: Opening tape drive HP-TLD-004-01 read-only
JobId 2: Commanding tape drive to rewind
JobId 2: Checking tape label, expect ’BT0003’
JobId 2: Reading label
JobId 2: Commanding tape drive to rewind
JobId 2: Commanding tape drive to NDMP9_MTIO_FSF 1 times
JobId 2: Operation resuming
JobId 2: DATA: bytes 4424716KB MOVER: read 4424716KB record 154945
JobId 2: DATA: bytes 4544524KB MOVER: read 4544524KB record 156847
JobId 2: DATA: bytes 4663308KB MOVER: read 4663308KB record 158732
JobId 2: DATA: bytes 4781068KB MOVER: read 4781068KB record 160601
JobId 2: DATA: bytes 4902924KB MOVER: read 4902924KB record 162536
JobId 2: DATA: bytes 5022732KB MOVER: read 5022732KB record 164437
JobId 2: DATA: bytes 5138444KB MOVER: read 5138444KB record 166274
JobId 2: OK: /testdata/git/bareos/src/console/bconsole
JobId 2: OK: /testdata/random5G-2
JobId 2: LOG_MESSAGE: ’Filetransfer: Transferred 5368721181 bytes in 223.436 seconds throughput of 23464.803 KB/s’
JobId 2: LOG_MESSAGE: ’
Objects:
----------------------------
Regular Files: (2)
Stub Files: (0)
Directories: (0)
ADS Entries: (0)
Soft Links: (0)
Hard Links: (0)
Block Device: (0)
Char Device: (0)
FIFO: (0)
Socket: (0)
Unknown: (0)’
JobId 2: LOG_MESSAGE: ’
File Size (count)
----------------------------
== 0 0
<= 8k 1
<= 64k 0
<= 1M 0
<= 20M 0
<= 100M 0
<= 1G 0
> 1G 1
-------------------------
Total Files: 2
Total Bytes: 5368716925
Max Size: 5368709120
Mean Size: 2684358462’
JobId 2: Async request NDMP4_NOTIFY_MOVER_HALTED
JobId 2: DATA: bytes 5242893KB MOVER: read 5242893KB record 167932
JobId 2: Operation done, cleaning up
JobId 2: Waiting for operation to halt
JobId 2: Commanding tape drive to rewind
JobId 2: Closing tape drive HP-TLD-004-01
JobId 2: Commanding robot to unload drive @256 to slot @4148
JobId 2: robot moving @256 to @4148
JobId 2: robot move OK @256 to @4148
JobId 2: Operation halted, stopping
JobId 2: Operation ended OKAY
JobId 2: ERR-CONN NDMP4_CONNECT_CLOSE exchange-failed
JobId 2: LOG_FILE messages: 2 OK, 0 ERROR, total 2 of 2
JobId 2: media #1 BT0001+1/4834053K@4146
JobId 2: valid label=Y filemark=Y n_bytes=Y slot=Y
JobId 2: media used=Y written=N eof=N eom=N io_error=N
JobId 2: label read=Y written=N io_error=N mismatch=N
JobId 2: fm_error=N nb_determined=N nb_aligned=N
JobId 2: slot empty=N bad=N missing=N
JobId 2: media #2 BT0002+1/4834053K@4147
JobId 2: valid label=Y filemark=Y n_bytes=Y slot=Y
JobId 2: media used=Y written=N eof=N eom=N io_error=N
JobId 2: label read=Y written=N io_error=N mismatch=N
JobId 2: fm_error=N nb_determined=N nb_aligned=N
JobId 2: slot empty=N bad=N missing=N
JobId 2: media #3 BT0003+1/911610K@4148
JobId 2: valid label=Y filemark=Y n_bytes=Y slot=Y
JobId 2: media used=Y written=N eof=N eom=N io_error=N
JobId 2: label read=Y written=N io_error=N mismatch=N
JobId 2: fm_error=N nb_determined=Y nb_aligned=N
JobId 2: slot empty=N bad=N missing=N
JobId 2: Bareos bareos-dir 17.2.3:
Build OS: x86_64-unknown-linux-gnu redhat Red Hat Enterprise Linux Server release 6.8 (Santiago)
JobId: 2
Job: ndmp-restore.2017-04-07_01.48.23_13
Restore Client: isilon
Start time: 07-Apr-2017 01:48:25
End time: 07-Apr-2017 01:52:11
Elapsed time: 3 mins 46 secs
Files Expected: 2
Files Restored: 1
Bytes Restored: 5,368,722,944
Rate: 23755.4 KB/s
bconsole 32.35:
run ndmp restore job
#
Only use the first tape drive will be used.
A NDMP job only uses a single tape drive. Currently, a Bareos job always uses the first defined tape drive of the
Tape Agent.
#
This section contains additional information about the Bareos NDMP implementation that are valid for all Bareos
NDMP protocols.
#
The trailing number in the main backup file (after the % character) indicates the NDMP backup level:
|
|
| Level | Description |
|
|
| 0 | Full NDMP backup. |
| 1 | Differential or first Incremental backup. |
| 2-9 | second to ninth Incremental backup. |
|
|
| |
Differential Backups
are supported. The NDMP backup level will be 1, visible as trailing number in the backup file
(/@NDMP/ifs/home%1).
Incremental Backups
are supported. The NDMP backup level will increment with each run, until a Full (0) or Differential (1) will be
made. The maximum backup level will be 9. Additional Incremental backups will result in a failed job and the
message:
2016-01-21 13:35:51 bareos-dir JobId 12: Fatal error: NDMP dump format doesn’t support more than 8 incrementals, please run a Differential or a Full Backup
Messages 32.36:
#
To debug the NDMP backups, these settings can be adapted:
This will create a lot of debugging output that will help to find the problem during NDMP backups.
#
A NDMP fileset should only contain a single File directive and Meta options.
Using multiple Include Dir
FileSet File directives should be avoided. The Bareos Director would try to handle them by
running multiple NDMP jobs in a single Bareos job. Even if this is working fine during backup, restore jobs will
cause trouble.
Normally (Protocol Dir
Client=Native) Filesets get handled by the Bareos File Daemon. When connecting directly to
a NDMP Clients (Protocol Dir
Client=NDMP*), no Bareos File Daemon is involved and therefore most
Fileset options can’t be used. Instead, parameters are handled via Options - Meta from Include Dir
FileSet.
No single file restore on merged backups.
Unfortunately, it is currently (bareos-15.2.2) not possible to restore a chain of Full and Incremental backups at once.
The workaround for that problem is to restore the full backup and each incremental each in a single restore
operation.
64-bit system recommended.
The Bareos Director uses a memory mapped database (LMBD) to temporarily store NDMP file information. On
some 32-bit systems the default File History Size Dir
Job requires a larger memory area than available. In this case, you
either have to lower the File History Size Dir
Job or preferably run the Bareos Director on a 64-bit system.
#
Bareos NDMP support have been tested against:
|
|
|
|
|
|
|
| Vendor | Product | NDMP Subsystem | Bareos version | Tape Agent | Features | Remarks |
|
|
|
|
|
|
|
| Isilon | Isilon OneFS v7.2.1.4 | Isilon NDMP 2.2.1 | bareos-17.2.3 | Isilon Backup Accelerator | | Protocol: NDMP_NATIVE |
| Isilon | Isilon OneFS v7.2.0.1 | Isilon NDMP 2.2 | bareos-16.2.6 | Bareos Storage Daemon | | |
| Isilon | Isilon OneFS v7.1.1.5 | Isilon NDMP 2.2 | bareos-15.2.2 | Bareos Storage Daemon | | |
| NetApp | | Release 8.2.3 7-Mode | bareos-15.2.2 | Bareos Storage Daemon | | |
| Oracle/Sun | ZFS Storage Appliance, OS 8.3 | | bareos-15.2.2 | Bareos Storage Daemon | | |
|
|
|
|
|
|
|
| |
#
#
Bareos stores its catalog in a database. Different database backends are offered:
What database will be used, can be configured in the Bareos Director configuration, see the Catalog
Resource.
The database often runs on the same server as the Bareos Director. However, it is also possible to run it on a
different system. This might require some more manual configuration, a PostgreSQL example can be found in
Remote PostgreSQL Database.
#
Since Bareos Version >= 14.2.0 the Debian (and Ubuntu) based packages support the dbconfig-common mechanism
to create and update the Bareos database, according to the user choices.
The first choice is, if dbconfig-common should be used at all. If you decide against it, the database must be
configured manually, see Manual Configuration.
If you decided to use dbconfig-common, the next question will only be asked, if more than one Bareos database
backend (bareos-database-*) is installed. If this is the case, select the database backend you want to
use.
Depending on the selected database backend, more questions about how to access the database will be asked. Often,
the default values are suitable.
The dbconfig-common configuration (and credentials) is done by the bareos-database-common package. Settings
are stored in the file /etc/dbconfig-common/bareos-database-common.conf.
The Bareos database backend will get automatically configured in /etc/bareos/bareos-dir.d/catalog/MyCatalog.conf.
If the Server is not running locally you need to specify DB Address Dir
Catalog in the catalog ressource. A later
reconfiguration might require manual adapt changes.
Please note! When using the PostgreSQL backend and updating to Bareos < 14.2.3, it is necessary to manually grant
database permissions (grant_bareos_privileges), normally by
root@linux:~#
su - postgres -c /usr/lib/bareos/scripts/grant_bareos_privileges
Commands 33.1:
For details see chapter Manual Configuration.
#
Bareos comes with a number of scripts to prepare and update the databases. All these scripts are located in the
Bareos script directory, normally at /usr/lib/bareos/scripts/.
|
|
|
| Script | Stage | Description |
|
|
|
|
|
|
| create_bareos_database | installation | create Bareos database |
| make_bareos_tables | installation | create Bareos tables |
| grant_bareos_privileges | installation | grant database access privileges |
|
|
|
| update_bareos_tables [-f] | update | update the database schema |
|
|
|
| drop_bareos_tables | deinstallation | remove Bareos database tables |
| drop_bareos_database | deinstallation | remove Bareos database |
|
|
|
| make_catalog_backup.pl | backup | backup the Bareos database, default on Linux |
| make_catalog_backup | backup | backup the Bareos database for systems without Perl |
| delete_catalog_backup | backup helper | remove the temporary Bareos database backup file |
|
|
|
| |
The database preparation scripts have following configuration options:
-
db_type
-
- command line parameter $1
- DB Driver Dir
Catalog from the configuration
- installed database backends
- fallback: postgresql
-
db_name
-
-
db_user
-
-
db_password
-
Reading the settings from the configuration require read permission for the current user. The normal PostgreSQL
administrator user (postgres) don’t have these permissions. So if you plan to use non-default database settings, you
might add the user postgres to the group bareos.
The database preparation scripts need to have password-less administrator access to the database. Depending on the
distribution you’re using, this require additional configuration. See the following section about howto achieve this for
the different database systems.
To view and test the currently configured settings, use following commands:
root@linux:~#
/usr/sbin/bareos-dbcheck -B
catalog=MyCatalog
db_name=bareos
db_driver=mysql
db_user=bareos
db_password=YourPassword
db_address=
db_port=0
db_socket=
db_type=MySQL
working_dir=/var/lib/bareos
Commands 33.2:
Show current database configuration
root@linux:~#
/usr/sbin/bareos-dir -t -f -d 500
[...]
bareos-dir: mysql.c:204-0 Error 1045 (28000): Access denied for user ’bareos’@’localhost’ (using password: YES)
bareos-dir: dird.c:1114-0 Could not open Catalog "MyCatalog", database "bareos".
bareos-dir: dird.c:1119-0 mysql.c:200 Unable to connect to MySQL server.
Database=bareos User=bareos
MySQL connect failed either server not running or your authorization is incorrect.
bareos-dir: mysql.c:239-0 closedb ref=0 connected=0 db=0
25-Apr 16:25 bareos-dir ERROR TERMINATION
Please correct the configuration in /etc/bareos/bareos-dir.d/*/*.conf
Commands 33.3:
Test the database connection. Example: wrong password
On most distributions, PostgreSQL uses ident to allow access to the database system. The database administrator
account is the Unix user postgres. Normally, this user can access the database without password, as the ident
mechanism is used to identify the user.
If this works on your system can be verified by
su - postgres
psql
Commands 33.4:
Access the local PostgreSQL database
If your database is configured to require a password, this must be definied in the file ~/.pgpass in the following
syntax: HOST:PORT:DATABASE:USER:PASSWORD, e.g.
localhost:*:bareos:bareos:secret
Configuration 33.5:
PostgreSQL
access
credentials
The permission of this file must be 0600 (chmod 0600 ~/.pgpass).
Again, verify that you have specified the correct settings by calling the psql command. If this connects you to the
database, your credentials are good. Exit the PostgreSQL client and run the Bareos database preparation
scripts:
su - postgres
/usr/lib/bareos/scripts/create_bareos_database
/usr/lib/bareos/scripts/make_bareos_tables
/usr/lib/bareos/scripts/grant_bareos_privileges
Commands 33.6:
Setup Bareos catalog database
The encoding of the bareos database must be SQL_ASCII. The command create_bareos_database automatically
creates the database with this encoding. This can be verified by the command psql -l, which shows information
about existing databases:
root@linux:~#
psql -l
List of databases
Name | Owner | Encoding
-----------+----------+-----------
bareos | postgres | SQL_ASCII
postgres | postgres | UTF8
template0 | postgres | UTF8
template1 | postgres | UTF8
(4 rows)
Commands 33.7:
List existing databases
The owner of the database may vary. The Bareos database maintance scripts don’t change the default owner of the
Bareos database, so it stays at the PostgreSQL administration user. The grant_bareos_privileges script grant
the required permissions to the Bareos database user. In contrast, when installing (not updating) using dbconfig, the
database owner will be identical with the Bareos database user.
By default, using PostgreSQL ident, a Unix user can access a database of the same name. Therefore the user bareos
can access the database bareos.
root@linux:~# su - bareos -s /bin/sh
bareos@linux:~# psql
Welcome to psql 8.3.23, the PostgreSQL interactive terminal.
Type: \copyright for distribution terms
\h for help with SQL commands
\? for help with psql commands
\g or terminate with semicolon to execute query
\q to quit
bareos=> ∖dt
List of relations
Schema | Name | Type | Owner
--------+------------------------+-------+----------
public | basefiles | table | postgres
public | cdimages | table | postgres
public | client | table | postgres
public | counters | table | postgres
public | device | table | postgres
public | devicestats | table | postgres
public | file | table | postgres
public | filename | table | postgres
public | fileset | table | postgres
public | job | table | postgres
public | jobhisto | table | postgres
public | jobmedia | table | postgres
public | jobstats | table | postgres
public | location | table | postgres
public | locationlog | table | postgres
public | log | table | postgres
public | media | table | postgres
public | mediatype | table | postgres
public | ndmpjobenvironment | table | postgres
public | ndmplevelmap | table | postgres
public | path | table | postgres
public | pathhierarchy | table | postgres
public | pathvisibility | table | postgres
public | pool | table | postgres
public | quota | table | postgres
public | restoreobject | table | postgres
public | status | table | postgres
public | storage | table | postgres
public | unsavedfiles | table | postgres
public | version | table | postgres
(30 rows)
bareos=> select ∗ from Version;
versionid
-----------
2002
(1 row)
bareos=> ∖du
List of roles
Role name | Superuser | Create role | Create DB | Connections | Member of
---------------+-----------+-------------+-----------+-------------+-----------
bareos | no | no | no | no limit | {}
postgres | yes | yes | yes | no limit | {}
(2 rows)
bareos=> ∖dp
Access privileges for database "bareos"
Schema | Name | Type | Access privileges
--------+-----------------------------------+----------+--------------------------------------
public | basefiles | table | {root=arwdxt/root,bareos=arwdxt/root}
public | basefiles_baseid_seq | sequence | {root=rwU/root,bareos=rw/root}
...
bareos=>
Commands 33.8:
Verify Bareos database on PostgreSQL as Unix user bareos (bareos-13.2.3)
When configuring bareos with a remote database, your first step is to check the connection from the Bareos Director
host into the database. A functional connection can be verified by
su - postgres
psql --host bareos-database.example.com
Commands 33.9:
Access the remote PostgreSQL database
With a correct configuration you can access the database, if it fails you need to correct the PostgreSQL servers
configuration files.
One way to manually create the database would be calling the bareos database preparation scripts with the --host
option, explained later. How ever, it is advised to use the dbconfig-common. Both methods require you to add the
database hostname/address as DB Address Dir
Catalog.
If you’re using dbconfig-common you should choose New Host, enter the hostname or the local address followed by
the password. As dbconfig-common uses the ident authentication by default the first try to connect will fail.
Don’t be bothered by that. Choose Retry when prompted. From there, read carefully and configure
the database to your needs. The authentication should be set to password, as the ident method will
not work with a remote server. Set the user and administrator according to your PostgreSQL servers
settings.
Set the PostgreSQL server IP as DB Address Dir
Catalog in Catalog Resource. You can also customize other parameters
or use the defaults. A quick check should display your recent changes:
root@linux:~#
/usr/sbin/bareos-dbcheck -B
catalog=MyCatalog
db_name=bareos
db_driver=postgresql
db_user=bareos
db_password=secret
db_address=bareos-database.example.com
db_port=0
db_socket=
db_type=PostgreSQL
working_dir=/var/lib/bareos
Commands 33.10:
Show current database configuration
If dbconfig-common did not succeed or you choosed not to use it, run the Bareos database preparation scripts
with:
su - postgres
/usr/lib/bareos/scripts/create_bareos_database --host=bareos-database.example.com
/usr/lib/bareos/scripts/make_bareos_tables --host=bareos-database.example.com
/usr/lib/bareos/scripts/grant_bareos_privileges --host=bareos-database.example.com
Commands 33.11:
Setup Bareos catalog database
MySQL user authentication is username, password and host-based. The database administrator is the user
root.
On some distributions access to the MySQL database is allowed password-less as database user root, on other
distributions, a password is required. On productive systems you normally want to have password secured
access.
The bareos database preparation scripts require password-less access to the database. To guarantee this, create a
MySQL credentials file ~/.my.cnf with the credentials of the database administrator:
[client]
host=localhost
user=root
password=YourPasswordForAccessingMysqlAsRoot
Configuration 33.12:
MySQL
credentials
file
.my.cnf
Alternatively you can specifiy your database password by adding it to the file /etc/my.cnf.
Verify that you have specified the correct settings by calling the mysql command. If this connects you to the
database, your credentials are good. Exit the MySQL client.
For the Bareos database connection, you should specify a database password. Otherwise the Bareos database user
gets the permission to connect without password. This is not recommended. Choose a database password and add it
into the Bareos Director configuration file /etc/bareos/bareos-dir.conf:
...
#
# Generic catalog service
#
Catalog {
Name = MyCatalog
dbdriver = "mysql"
dbname = "bareos"
dbuser = "bareos"
dbpassword = "YourSecretPassword"
}
...
Configuration 33.13:
Bareos catalog configuration
After this, run the Bareos database preparation scripts. For Bareos <= 13.2.2, the database password must be
specified as environment variable db_password. From Version >= 13.2.3 the database password is read from the
configuration, if no environment variable is given.
export db_password=YourSecretPassword
/usr/lib/bareos/scripts/create_bareos_database
/usr/lib/bareos/scripts/make_bareos_tables
/usr/lib/bareos/scripts/grant_bareos_privileges
Commands 33.14:
Setup Bareos catalog database
After this, you can use the mysql command to verify that your database setup is okay and works with
your the Bareos database user. The result should look similar as this (here Bareos 13.2 is used on
SLES11):
root@linux:~# mysql --user=bareos --password=YourSecretPassword bareos
Welcome to the MySQL monitor. Commands end with ; or \g.
Your MySQL connection id is 162
Server version: 5.5.32 SUSE MySQL package
Copyright (c) 2000, 2013, Oracle and/or its affiliates. All rights reserved.
Oracle is a registered trademark of Oracle Corporation and/or its
affiliates. Other names may be trademarks of their respective
owners.
Type ’help;’ or ’\h’ for help. Type ’\c’ to clear the current input statement.
mysql> show tables;
+--------------------+
| Tables_in_bareos |
+--------------------+
| BaseFiles |
| CDImages |
| Client |
| Counters |
| Device |
| DeviceStats |
| File |
| FileSet |
| Filename |
| Job |
| JobHisto |
| JobMedia |
| JobStats |
| Location |
| LocationLog |
| Log |
| Media |
| MediaType |
| NDMPJobEnvironment |
| NDMPLevelMap |
| Path |
| PathHierarchy |
| PathVisibility |
| Pool |
| Quota |
| RestoreObject |
| Status |
| Storage |
| UnsavedFiles |
| Version |
+--------------------+
30 rows in set (0.00 sec)
mysql> describe Job;
+-----------------+---------------------+------+-----+---------+----------------+
| Field | Type | Null | Key | Default | Extra |
+-----------------+---------------------+------+-----+---------+----------------+
| JobId | int(10) unsigned | NO | PRI | NULL | auto_increment |
| Job | tinyblob | NO | | NULL | |
| Name | tinyblob | NO | MUL | NULL | |
| Type | binary(1) | NO | | NULL | |
| Level | binary(1) | NO | | NULL | |
| ClientId | int(11) | YES | | 0 | |
| JobStatus | binary(1) | NO | | NULL | |
| SchedTime | datetime | YES | | NULL | |
| StartTime | datetime | YES | | NULL | |
| EndTime | datetime | YES | | NULL | |
| RealEndTime | datetime | YES | | NULL | |
| JobTDate | bigint(20) unsigned | YES | | 0 | |
| VolSessionId | int(10) unsigned | YES | | 0 | |
| VolSessionTime | int(10) unsigned | YES | | 0 | |
| JobFiles | int(10) unsigned | YES | | 0 | |
| JobBytes | bigint(20) unsigned | YES | | 0 | |
| ReadBytes | bigint(20) unsigned | YES | | 0 | |
| JobErrors | int(10) unsigned | YES | | 0 | |
| JobMissingFiles | int(10) unsigned | YES | | 0 | |
| PoolId | int(10) unsigned | YES | | 0 | |
| FileSetId | int(10) unsigned | YES | | 0 | |
| PriorJobId | int(10) unsigned | YES | | 0 | |
| PurgedFiles | tinyint(4) | YES | | 0 | |
| HasBase | tinyint(4) | YES | | 0 | |
| HasCache | tinyint(4) | YES | | 0 | |
| Reviewed | tinyint(4) | YES | | 0 | |
| Comment | blob | YES | | NULL | |
+-----------------+---------------------+------+-----+---------+----------------+
27 rows in set (0,00 sec)
mysql> select ∗ from Version;
+-----------+
| VersionId |
+-----------+
| 2002 |
+-----------+
1 row in set (0.00 sec)
mysql> exit
Bye
Commands 33.15:
Verify Bareos database on MySQL
Modify database credentials
If you want to change the Bareos database credentials, do the following:
- stop the Bareos director
- modify the configuration
- rerun the grant script grant_bareos_privileges (or modify database user directly)
- start the Bareos director
Modify the configuration, set a new password:
Catalog {
Name = MyCatalog
dbdriver = "mysql"
dbname = "bareos"
dbuser = "bareos"
dbpassword = "MyNewSecretPassword"
}
Resource 33.16:
bareos-dir.d/Catalog/MyCatalog.conf
Rerun the Bareos grant script grant_bareos_privileges ...
export db_password=MyNewSecretPassword
/usr/lib/bareos/scripts/grant_bareos_privileges
Commands 33.17:
Modify database privileges
There are different versions of Sqlite available. When we use the term Sqlite, we will always refer to
Sqlite3.
Sqlite is a file based database. Access via network connection is not supported. Because its setup is easy, it is a good
database for testing. However please don’t use it in a production environment.
Sqlite stores a database in a single file. Bareos creates this file at /var/lib/bareos/bareos.db.
Sqlite does not offer access permissions. The only permissions that do apply are the Unix file permissions.
The database is accessable by following command:
root@linux:~#
sqlite3 /var/lib/bareos/bareos.db
SQLite version 3.7.6.3
Enter ".help" for instructions
Enter SQL statements terminated with a ";"
sqlite> .tables
BaseFiles Filename Media Pool
CDImages Job MediaType Quota
Client JobHisto NDMPJobEnvironment RestoreObject
Counters JobMedia NDMPLevelMap Status
Device JobStats NextId Storage
DeviceStats Location Path UnsavedFiles
File LocationLog PathHierarchy Version
FileSet Log PathVisibility
sqlite> select ∗ from Version;
2002
sqlite>
Commands 33.18:
Verify Bareos database on Sqlite3 (bareos-13.2.3)
#
#
As mentioned above, if you do not do automatic pruning, your Catalog will grow each time you run a Job. Normally,
you should decide how long you want File records to be maintained in the Catalog and set the File Retention
period to that time. Then you can either wait and see how big your Catalog gets or make a calculation assuming
approximately 154 bytes for each File saved and knowing the number of Files that are saved during each backup and
the number of Clients you backup.
For example, suppose you do a backup of two systems, each with 100,000 files. Suppose further that you do a Full
backup weekly and an Incremental every day, and that the Incremental backup typically saves 4,000 files. The size of
your database after a month can roughly be calculated as:
Size = 154 * No. Systems * (100,000 * 4 + 10,000 * 26)
where we have assumed four weeks in a month and 26 incremental backups per month. This would give the
following:
Size = 154 * 2 * (100,000 * 4 + 10,000 * 26) = 203,280,000 bytes
So for the above two systems, we should expect to have a database size of approximately 200 Megabytes. Of course,
this will vary according to how many files are actually backed up.
You will note that the File table (containing the file attributes) make up the large bulk of the number of records as
well as the space used. As a consequence, the most important Retention period will be the File Retention
period.
Without proper setup and maintenance, your Catalog may continue to grow indefinitely as you run Jobs and backup
Files, and/or it may become very inefficient and slow. How fast the size of your Catalog grows depends on the
number of Jobs you run and how many files they backup. By deleting records within the database, you
can make space available for the new records that will be added during the next Job. By constantly
deleting old expired records (dates older than the Retention period), your database size will remain
constant.
#
Bareos uses three Retention periods: the File Retention period, the Job Retention period, and the Volume
Retention period. Of these three, the File Retention period is by far the most important in determining how large
your database will become.
The File Retention and the Job Retention are specified in each Client resource as is shown below. The Volume
Retention period is specified in the Pool resource, and the details are given in the next chapter of this
manual.
-
File Retention = <time-period-specification>
- The File Retention record defines the length of time
that Bareos will keep File records in the Catalog database. When this time period expires, and if
AutoPrune is set to yes, Bareos will prune (remove) File records that are older than the specified
File Retention period. The pruning will occur at the end of a backup Job for the given Client. Note
that the Client database record contains a copy of the File and Job retention periods, but Bareos uses
the current values found in the Director’s Client resource to do the pruning.
Since File records in the database account for probably 80 percent of the size of the database, you
should carefully determine exactly what File Retention period you need. Once the File records have
been removed from the database, you will no longer be able to restore individual files in a Job. However,
as long as the Job record still exists, you will be able to restore all files in the job.
Retention periods are specified in seconds, but as a convenience, there are a number of modifiers that
permit easy specification in terms of minutes, hours, days, weeks, months, quarters, or years on the
record. See the Configuration chapter of this manual for additional details of modifier specification.
The default File retention period is 60 days.
-
Job Retention = <time-period-specification>
- The Job Retention record defines the length of time
that Bareos will keep Job records in the Catalog database. When this time period expires, and if
AutoPrune is set to yes Bareos will prune (remove) Job records that are older than the specified
Job Retention period. Note, if a Job record is selected for pruning, all associated File and JobMedia
records will also be pruned regardless of the File Retention period set. As a consequence, you normally
will set the File retention period to be less than the Job retention period.
As mentioned above, once the File records are removed from the database, you will no longer be able
to restore individual files from the Job. However, as long as the Job record remains in the database,
you will be able to restore all the files backuped for the Job. As a consequence, it is generally a good
idea to retain the Job records much longer than the File records.
The retention period is specified in seconds, but as a convenience, there are a number of modifiers that
permit easy specification in terms of minutes, hours, days, weeks, months, quarters, or years. See the
Configuration chapter of this manual for additional details of modifier specification.
The default Job Retention period is 180 days.
-
- Auto Prune Dir
Client If set to yes, Bareos will automatically apply the File retention period and the Job
retention period for the Client at the end of the Job. If you turn this off by setting it to no, your
Catalog will grow each time you run a Job.
Bareos catalog contains lot of information about your IT infrastructure, how many files, their size, the number of
video or music files etc. Using Bareos catalog during the day to get them permit to save resources on your
servers.
In this chapter, you will find tips and information to measure Bareos efficiency and report statistics.
If you want to have statistics on your backups to provide some Service Level Agreement indicators, you could use a
few SQL queries on the Job table to report how many:
- jobs have run
- jobs have been successful
- files have been backed up
- ...
However, these statistics are accurate only if your job retention is greater than your statistics period. Ie, if jobs are
purged from the catalog, you won’t be able to use them.
Now, you can use the update stats [days=num] console command to fill the JobHistory table with new
Job records. If you want to be sure to take in account only good jobs, ie if one of your important job
has failed but you have fixed the problem and restarted it on time, you probably want to delete the
first bad job record and keep only the successful one. For that simply let your staff do the job, and
update JobHistory table after two or three days depending on your organization using the [days=num]
option.
These statistics records aren’t used for restoring, but mainly for capacity planning, billings, etc.
The Statistics Retention Dir
Director defines the length of time that Bareos will keep statistics job records in the Catalog
database after the Job End time. This information is stored in the JobHistory table. When this time period
expires, and if user runs prune stats command, Bareos will prune (remove) Job records that are older than the
specified period.
You can use the following Job resource in your nightly BackupCatalogDir
Job job to maintain statistics.
Job {
Name = BackupCatalog
...
RunScript {
Console = "update stats days=3"
Console = "prune stats yes"
RunsWhen = After
RunsOnClient = no
}
}
Resource 33.19:
bareos-dir.d/Job/BackupCatalog.conf
#
#
Over time, as noted above, your database will tend to grow until Bareos starts deleting old expired records based on
retention periods. After that starts, it is expected that the database size remains constant, provided that the
amount of clients and files being backed up is constant.
Note that PostgreSQL uses multiversion concurrency control (MVCC), so that an UPDATE or DELETE of a row
does not immediately remove the old version of the row. Space occupied by outdated or deleted row versions is only
reclaimed for reuse by new rows when running VACUUM. Such outdated or deleted row versions are also referred
to as dead tuples.
Since PostgreSQL Version 8.3, autovacuum is enabled by default, so that setting up a cron job to run
VACUUM is not necesary in most of the cases. Note that there are two variants of VACUUM: standard
VACUUM and VACUUM FULL. Standard VACUUM only marks old row versions for reuse, it does not
free any allocated disk space to the operating system. Only VACUUM FULL can free up disk space,
but it requires exclusive table locks so that it can not be used in parallel with production database
operations and temporarily requires up to as much additional disk space that the table being processed
occupies.
All database programs have some means of writing the database out in ASCII format and then reloading it. Doing
so will re-create the database from scratch producing a compacted result, so below, we show you how you can do
this for PostgreSQL.
For a PostgreSQL database, you could write the Bareos database as an ASCII file (bareos.sql) then reload it by
doing the following:
pg_dump -c bareos > bareos.sql
cat bareos.sql | psql bareos
rm -f bareos.sql
Commands 33.20:
Depending on the size of your database, this will take more or less time and a fair amount of disk space. For
example, you can cd to the location of the Bareos database (typically /var/lib/pgsql/data or possible
/usr/local/pgsql/data) and check the size.
Except from special cases PostgreSQL does not need to be dumped/restored to keep the database efficient. A
normal process of vacuuming will prevent the database from getting too large. If you want to fine-tweak the
database storage, commands such as VACUUM, VACUUM FULL, REINDEX, and CLUSTER exist specifically to
keep you from having to do a dump/restore.
More details on this subject can be found in the PostgreSQL documentation. The page http://www.postgresql.org/docs/
contains links to the documentation for all PostgreSQL versions. The section Routine Vacuuming explains how VACUUM
works and why it is required, see http://www.postgresql.org/docs/current/static/routine-vacuuming.html
for the current PostgreSQL version.
Especially when a high number of files are beeing backed up or when working with high retention periods, it is
probable that autovacuuming will not work. When starting to use Bareos with an empty Database, it is normal that
the file table and other tables grow, but the growth rate should drop as soon as jobs are deleted by retention or
pruning. The file table is usually the largest table in Bareos.
The reason for autovacuuming not beeing triggered is then probably the default setting of
autovacuum_vacuum_scale_factor = 0.2, the current value can be shown with the following query or looked up in
postgresql.conf:
bareos=# show autovacuum_vacuum_scale_factor;
autovacuum_vacuum_scale_factor
--------------------------------
0.2
(1 row)
Commands 33.21:
SQL statement to show the autovacuum_vacuum_scale_factor parameter
In essence, this means that a VACUUM is only triggered when 20% of table size are obsolete. Consequently, the
larger the table is, the less frequently VACUUM will be triggered by autovacuum. This make sense because
vacuuming has a performance impact. While it is possible to override the autovacuum parameters on a
table-by-table basis, it can then still be triggered at any time.
To learn more details about autovacuum see http://www.postgresql.org/docs/current/static/routine-vacuuming.html#AUTOVACUUM
The following example shows how to configure running VACUUM on the file table by using an admin-job in Bareos.
The job will be scheduled to run at a time that should not run in parallel with normal backup jobs, here by
scheduling it to run after the BackupCatalog job.
First step is to check the amount of dead tuples and if autovacuum triggers VACUUM:
bareos=# SELECT relname, n_dead_tup, last_vacuum, last_autovacuum, last_analyze, last_autoanalyze
FROM pg_stat_user_tables WHERE n_dead_tup > 0 ORDER BY n_dead_tup DESC;
-[ RECORD 1 ]----+------------------------------
relname | file
n_dead_tup | 2955116
last_vacuum |
last_autovacuum |
last_analyze |
last_autoanalyze |
-[ RECORD 2 ]----+------------------------------
relname | log
n_dead_tup | 111298
last_vacuum |
last_autovacuum |
last_analyze |
last_autoanalyze |
-[ RECORD 3 ]----+------------------------------
relname | job
n_dead_tup | 1785
last_vacuum |
last_autovacuum | 2015-01-08 01:13:20.70894+01
last_analyze |
last_autoanalyze | 2014-12-27 18:00:58.639319+01
...
Commands 33.22:
Check dead tuples and vacuuming on PostgreSQL
In the above example, the file table has a high number of dead tuples and it has not been vacuumed. Same
for the log table, but the dead tuple count is not very high. On the job table autovacuum has been
triggered.
Note that the statistics views in PostgreSQL are not persistent, their values are reset on restart of the PostgreSQL
service.
To setup a scheduled admin job for vacuuming the file table, the following must be done:
- Create a file with the SQL statements for example
/usr/local/lib/bareos/scripts/postgresql_file_table_maintenance.sql
with the following content:
\t \x
SELECT relname, n_dead_tup, last_vacuum, last_autovacuum, last_analyze, last_autoanalyze
FROM pg_stat_user_tables WHERE relname=’file’;
VACUUM VERBOSE ANALYZE file;
SELECT relname, n_dead_tup, last_vacuum, last_autovacuum, last_analyze, last_autoanalyze
FROM pg_stat_user_tables WHERE relname=’file’;
\t \x
SELECT table_name,
pg_size_pretty(pg_total_relation_size(table_name)) AS total_sz,
pg_size_pretty(pg_total_relation_size(table_name) - pg_relation_size(table_name)) AS idx_sz
FROM ( SELECT (’"’ || relname || ’"’ ) AS table_name
FROM pg_stat_user_tables WHERE relname != ’batch’ ) AS all_tables
ORDER BY pg_total_relation_size(table_name) DESC LIMIT 5;
Commands 33.23:
SQL Script for vacuuming the file table on PostgreSQL
The SELECT statements are for informational purposes only, the final statement shows the total and index
disk usage of the 5 largest tables.
- Create a shell script that runs the SQL statements, for example
/usr/local/lib/bareos/scripts/postgresql_file_table_maintenance.sh
with the following content:
#!/bin/sh
psql bareos < /usr/local/lib/bareos/scripts/postgresql_file_table_maintenance.sql
Commands 33.24:
SQL Script for vacuuming the file table on PostgreSQL
- As in PostgreSQL only the database owner or a database superuser is allowed to run VACUUM, the script will
be run as the postgres user. To permit the bareos user to run the script via sudo, write the following sudo
rule to a file by executing visudo -f /etc/sudoers.d/bareos_postgres_vacuum:
bareos ALL = (postgres) NOPASSWD: /usr/local/lib/bareos/scripts/postgresql_file_table_maintenance.sh
Commands 33.25:
sudo rule for allowing bareos to run a script as postgres
and make sure that /etc/sudoers includes it, usually by the line
#includedir /etc/sudoers.d
- Create the following admin job in the director configuration
# PostgreSQL file table maintenance job
Job {
Name = FileTableMaintJob
JobDefs = DefaultJob
Schedule = "WeeklyCycleAfterBackup"
Type = Admin
Priority = 20
RunScript {
RunsWhen = Before
RunsOnClient = no
Fail Job On Error = yes
Command = "sudo -u postgres /usr/local/lib/bareos/scripts/postgresql_file_table_maintenance.sh"
}
}
Commands 33.26:
SQL Script for vacuuming the file table on PostgreSQL
In this example the job will be run by the schedule WeeklyCycleAfterBackup, the Priority should be set to a
higher value than Priority in the BackupCatalog job.
#
The same considerations apply as for Repairing Your MySQL Database. Consult the PostgreSQL documents for
how to repair the database.
For Bareos specific problems, consider using bareos-dbcheck program.
#
#
As MariaDB is a fork of MySQL, we use MySQL as synonym for MariaDB and fully support it. We test our
packages against the preferred MySQL fork that a distribution provides.
#
Over time, as noted above, your database will tend to grow. Even though Bareos regularly prunes files, MySQL
does not automatically reuse the space, and instead continues growing.
It is assumed that you are using the InnoDB database engine (which is the default since MySQL Version
5.5).
It is recommended that you use the OPTIMIZE TABLE and ANALYZE TABLE statements
regularly. This is to make sure that all indices are up to date and to recycle space inside the database
files.
You can do this via the mysqlcheck command:
mysqlcheck -a -o -A
Please note that the database files are never shrunk by MySQL. If you really need to shrink the database files, you need
to recreate the database. This only works if you use per-table tablespaces by setting the innodb_file_per_table
configuration option. See http://dev.mysql.com/doc/refman/5.5/en/innodb-multiple-tablespaces.html for
details.
#
If you find that you are getting errors writing to your MySQL database, or Bareos hangs each time it tries to access
the database, you should consider running MySQL’s database check and repair routines.
This can be done by running the mysqlcheck command:
mysqlcheck --all-databases
If the errors you are getting are simply SQL warnings, then you might try running bareos-dbcheck before (or
possibly after) using the MySQL database repair program. It can clean up many of the orphaned record problems,
and certain other inconsistencies in the Bareos database.
A typical cause of MySQL database problems is if your partition fills. In such a case, you will need to create
additional space on the partition.
#
If you are running into the error The table ’File’ is full ..., it is probably because on version 4.x MySQL, the
table is limited by default to a maximum size of 4 GB and you have probably run into the limit. The solution can be
found at: http://dev.mysql.com/doc/refman/5.0/en/full-table.html
You can display the maximum length of your table with:
mysql bareos
SHOW TABLE STATUS FROM bareos like "File";
If the column labeled ”Max_data_length” is around 4Gb, this is likely to be the source of your problem, and you can
modify it with:
mysql bareos
ALTER TABLE File MAX_ROWS=281474976710656;
#
If you are having problems with the MySQL server disconnecting or with messages saying that your MySQL server
has gone away, then please read the MySQL documentation, which can be found at:
http://dev.mysql.com/doc/refman/5.0/en/gone-away.html
#
When doing backups with large numbers of files, MySQL creates some temporary tables. When these tables are
small they can be held in system memory, but as they approach some size, they spool off to disk. The default
location for these temp tables is /tmp. Once that space fills up, Bareos daemons such as the Storage daemon doing
spooling can get strange errors. E.g.
Fatal error: spool.c:402 Spool data read error.
Fatal error: backup.c:892 Network send error to SD. ERR=Connection reset by
peer
What you need to do is setup MySQL to use a different (larger) temp directory, which can be set in the /etc/my.cnf
with these variables set:
tmpdir=/path/to/larger/tmpdir
bdb_tmpdir=/path/to/larger/tmpdir
#
In large environments, the Bareos MySQL/MariaDB backend may run in a lock wait timeout. This can be seen as
Bareos message, e.g.:
Fatal error: sql_create.c:899 Fill File table Query failed: INSERT INTO File (FileIndex, JobId, PathId, FilenameId, LStat, MD5, DeltaSeq) SELECT batch.FileIndex, batch.JobId, Path.PathId, Filename.FilenameId,batch.LStat, batch.MD5, batch.DeltaSeq FROM batch JOIN Path ON (batch.Path = Path.Path) JOIN Filename ON (batch.Name = Filename.Name): ERR=Lock wait timeout exceeded; try restarting transaction
Messages 33.27:
Bareos error message because of MySQL/MariaDB lock time timeout
In this case the MySQL/MariaDB innodb_lock_wait_timeout must be increased. A value of 300 should be
sufficient.
...
[mysqld]
innodb_lock_wait_timeout = 300
...
Configuration 33.28:
/etc/my.cnf.d/server.cnf
#
If ever the machine on which your Bareos database crashes, and you need to restore from backup tapes, one of your
first priorities will probably be to recover the database. Although Bareos will happily backup your catalog database
if it is specified in the FileSet, this is not a very good way to do it, because the database will be saved while Bareos
is modifying it. Thus the database may be in an instable state. Worse yet, you will backup the database before all
the Bareos updates have been applied.
To resolve these problems, you need to backup the database after all the backup jobs have been run. In addition,
you will want to make a copy while Bareos is not modifying it. To do so, you can use two scripts provided in the
release make_catalog_backup and delete_catalog_backup. These files will be automatically generated along
with all the other Bareos scripts. The first script will make an ASCII copy of your Bareos database into bareos.sql
in the working directory you specified in your configuration, and the second will delete the bareos.sql
file.
The basic sequence of events to make this work correctly is as follows:
- Run all your nightly backups
- After running your nightly backups, run a Catalog backup Job
- The Catalog backup job must be scheduled after your last nightly backup
- You use Run Before Job Dir
Job to create the ASCII backup file and Run After Job Dir
Job to clean up
Assuming that you start all your nightly backup jobs at 1:05 am (and that they run one after another), you can do
the catalog backup with the following additional Director configuration statements:
# Backup the catalog database (after the nightly save)
Job {
Name = "BackupCatalog"
Type = Backup
Client=rufus-fd
FileSet="Catalog"
Schedule = "WeeklyCycleAfterBackup"
Storage = DLTDrive
Messages = Standard
Pool = Default
# This creates an ASCII copy of the catalog
# Arguments to make_catalog_backup.pl are:
# make_catalog_backup.pl <catalog-name>
RunBeforeJob = "/usr/lib/bareos/scripts/make_catalog_backup.pl MyCatalog"
# This deletes the copy of the catalog
RunAfterJob = "/usr/lib/bareos/scripts/delete_catalog_backup"
# This sends the bootstrap via mail for disaster recovery.
# Should be sent to another system, please change recipient accordingly
Write Bootstrap = "|/usr/sbin/bsmtp -h localhost -f \"\(Bareos\) \" -s \"Bootstrap for Job %j\" root@localhost"
}
Resource 33.29:
bareos-dir.d/Job/BackupCatalog.conf
# This schedule does the catalog. It starts after the WeeklyCycle
Schedule {
Name = "WeeklyCycleAfterBackup"
Run = Level=Full sun-sat at 1:10
}
Resource 33.30:
bareos-dir.d/Schedule/WeeklyCycleAfterBackup.conf
# This is the backup of the catalog
FileSet {
Name = "Catalog"
Include {
Options {
signature=MD5
}
File = "/var/lib/bareos/bareos.sql" # database dump
File = "/etc/bareos" # configuration
}
}
Resource 33.31:
bareos-dir.d/FileSet/Catalog.conf
It is preferable to write/send the bootstrap file to another computer. It will allow you to quickly recover the
database backup should that be necessary. If you do not have a bootstrap file, it is still possible to recover your
database backup, but it will be more work and take longer.
#
- Security means being able to restore your files, so read the Critical Items Chapter of this manual.
- The clients (bareos-fd) must run as root to be able to access all the system files.
- It is not necessary to run the Director as root.
- It is not necessary to run the Storage daemon as root, but you must ensure that it can open the tape
drives, which are often restricted to root access by default. In addition, if you do not run the Storage
daemon as root, it will not be able to automatically set your tape drive parameters on most OSes since
these functions, unfortunately require root access.
- You should restrict access to the Bareos configuration files, so that the passwords are not
world-readable. The Bareos daemons are password protected using CRAM-MD5 (i.e. the password
is not sent across the network). This will ensure that not everyone can access the daemons. It is a
reasonably good protection, but can be cracked by experts.
- If you are using the recommended ports 9101, 9102, and 9103, you will probably want to protect these
ports from external access using a firewall and/or using tcp wrappers (etc/hosts.allow).
- By default, all data that is sent across the network is unencrypted. However, Bareos does support
TLS (transport layer security) and can encrypt transmitted data. Please read the TLS (SSL)
Communications Encryption section of this manual.
- You should ensure that the Bareos working directories are readable and writable only by the Bareos
daemons.
- The default Bareos grant_bareos_privileges script grants all permissions to use the MySQL (and
PostgreSQL) database without a password. If you want security, please tighten this up!
- Don’t forget that Bareos is a network program, so anyone anywhere on the network with the console
program and the Director’s password can access Bareos and the backed up data.
- You can restrict what IP addresses Bareos will bind to by using the appropriate DirAddress,
FDAddress, or SDAddress records in the respective daemon configuration files.
#
The TCP wrapper functionality is available on different platforms. Be default, it is activated on Bareos for Linux.
With this enabled, you may control who may access your daemons. This control is done by modifying the file:
/etc/hosts.allow. The program name that Bareos uses when applying these access restrictions is the
name you specify in the daemon configuration file (see below for examples). You must not use the
twist option in your /etc/hosts.allow or it will terminate the Bareos daemon when a connection is
refused.
#
From https://en.wikipedia.org/w/index.php?title=Data_erasure&oldid=675388437:
Strict industry standards and government regulations are in place that force organizations
to mitigate the risk of unauthorized exposure of confidential corporate and government
data. Regulations in the United States include HIPAA (Health Insurance Portability and
Accountability Act); FACTA (The Fair and Accurate Credit Transactions Act of 2003); GLB
(Gramm-Leach Bliley); Sarbanes-Oxley Act (SOx); and Payment Card Industry Data Security
Standards (PCI DSS) and the Data Protection Act in the United Kingdom. Failure to comply
can result in fines and damage to company reputation, as well as civil and criminal liability.
Bareos supports the secure erase of files that usually are simply deleted. Bareos uses an external command to do the
secure erase itself.
This makes it easy to choose a tool that meets the secure erase requirements.
To configure this functionality, a new configuration directive with the name Secure Erase Command has been
introduced.
This directive is optional and can be configured in:
This directive configures the secure erase command globally for the daemon it was configured in.
If set, the secure erase command is used to delete files instead of the normal delete routine.
If files are securely erased during a job, the secure delete command output will be shown in the job
log.
08-Sep 12:58 win-fd JobId 10: secure_erase: executing C:/cygwin64/bin/shred.exe "C:/temp/bareos-restores/C/Program Files/Bareos/Plugins/bareos_fd_consts.py"
08-Sep 12:58 win-fd JobId 10: secure_erase: executing C:/cygwin64/bin/shred.exe "C:/temp/bareos-restores/C/Program Files/Bareos/Plugins/bareos_sd_consts.py"
08-Sep 12:58 win-fd JobId 10: secure_erase: executing C:/cygwin64/bin/shred.exe "C:/temp/bareos-restores/C/Program Files/Bareos/Plugins/bpipe-fd.dll"
Logging 34.1:
bareos.log
The current status of the secure erase command is also shown in the output of status director, status client and
status storage.
If the secure erase command is configured, the current value is printed.
Example:
* status dir
backup1.example.com-dir Version: 15.3.0 (24 August 2015) x86_64-suse-linux-gnu suse openSUSE 13.2 (Harlequin) (x86_64)
Daemon started 08-Sep-15 12:50. Jobs: run=0, running=0 mode=0 db=sqlite3
Heap: heap=290,816 smbytes=89,166 max_bytes=89,166 bufs=334 max_bufs=335
secure erase command=’/usr/bin/wipe -V’
bconsole 34.2:
Example for Secure Erase Command Settings:
-
Linux:
- Secure Erase Command = "/usr/bin/wipe -V"
-
Windows:
- Secure Erase Command = "C:/cygwin64/bin/shred.exe"
Our tests with the sdelete command was not successful, as sdelete seems to stay active in the background.
#
- The minimum versions for each of the databases supported by Bareos are:
- PostgreSQL 8.4 (since Bareos 13.2.3)
- MySQL 4.1 - 5.6 or compatible fork (e.g. MariaDB), see MySQL/MariaDB Support
- SQLite 3
- Windows release is cross-compiled on Linux
- Bareos requires a good implementation of pthreads to work. This is not the case on some of the BSD
systems.
- The source code has been written with portability in mind and is mostly POSIX compatible. Thus porting to
any POSIX compatible operating system should be relatively easy.
- Jansson library: Bareos Version >= 15.2.0 offers a JSON API mode, see Bareos Developer Guide
(api-mode-2-json) . On some platform, the Jansson library is directory available. On others it can easly be
added. For some older platforms, we compile Bareos without JSON API mode.
#
The Bareos project provides and supports packages that have been released at http://download.bareos.org/bareos/release/
However, the following tabular gives an overview, what components are expected on which platforms to
run:
|
|
|
|
|
| Operating Systems | Version | Client Daemon | Director Daemon | Storage Daemon |
|
|
|
|
|
|
|
|
|
|
| Linux |
|
|
|
|
|
| Arch Linux | | X | X | X |
|
|
|
|
|
| CentOS | current | v12.4 | v12.4 | v12.4 |
|
|
|
|
|
| Debian | current | v12.4 | v12.4 | v12.4 |
|
|
|
|
|
| Fedora | current | v12.4 | v12.4 | v12.4 |
|
|
|
|
|
| Gentoo | | X | X | X |
|
|
|
|
|
| openSUSE | current | v12.4 | v12.4 | v12.4 |
|
|
|
|
|
| RHEL | current | v12.4 | v12.4 | v12.4 |
|
|
|
|
|
| SLES | current | v12.4 | v12.4 | v12.4 |
|
|
|
|
|
| Ubuntu | current | v12.4 | v12.4 | v12.4 |
|
|
|
|
|
| Univention Corporate Linux | App Center | v12.4 | v12.4 | v12.4 |
|
|
|
|
|
| MS Windows |
|
|
|
|
|
| MS Windows 32bit | 10/8/7 | v12.4 | v15.2 | v15.2 |
| | 2008/Vista | | | |
| | 2003/XP | v12.4–v14.2 | | |
|
|
|
|
|
| MS Windows 64bit | 10/8/2012/7 | v12.4 | v15.2 | v15.2 |
| | 2008/Vista | | | |
|
|
|
|
|
| Mac OS
|
|
|
|
|
|
| Mac OS X/Darwin | | v14.2 | | |
|
|
|
|
|
| BSD
|
|
|
|
|
|
| FreeBSD | ≥ 5.0 | X | X | X |
|
|
|
|
|
| OpenBSD | | X | | |
|
|
|
|
|
| NetBSD | | X | | |
|
|
|
|
|
| Unix
|
|
|
|
|
|
| AIX | ≥ 4.3 | com-13.2 | ⋆ | ⋆ |
|
|
|
|
|
| HP-UX | | com-13.2 | | |
|
|
|
|
|
| Irix | | ⋆ | | |
|
|
|
|
|
| Solaris | ≥ 8 | com-12.4 | com-12.4 | com-12.4 |
|
|
|
|
|
| True64 | | ⋆ | | |
|
|
|
|
|
| |
vVV.V | starting with Bareos version VV.V, this platform is official supported by the Bareos.org
project |
com-VV.V | starting with Bareos version VV.V, this platform is supported. However, pre-build
packages are only available from Bareos.com |
nightly | provided by Bareos nightly build. Bug reports are welcome, however it is not official
supported |
X | known to work |
⋆ | has been reported to work by the community |
| |
#
B.1
#
The following tables summarize what packages are available for the different Linux platforms.
This information is generated based on http://download.bareos.com/bareos/release/. In most cases this is
identical to the packages provided by http://download.bareos.org/bareos/release/. Only if a package have
been added later in a maintenance release, these information may differ.
Distributions that are no longer relevant are left out. However, you might still find the packages on our download
servers.
Bareos tries to provide all packages for all current platforms. For extra packages, it depends if the distribution
contains the required dependencies.
For general information about the packages, see Bareos Packages.
Packages names not containing the word bareos are required packages where we decided to include them
ourselves.
|
|
|
|
|
|
|
|
| | CentOS | RHEL
|
| | 5 | 6 | 7 | 4 | 5 | 6 | 7 |
|
|
|
|
|
|
|
|
| bareos | 12.4-16.2 | 12.4-17.2 | 12.4-17.2 | 13.2-14.2 | 12.4-17.2 | 12.4-17.2 | 12.4-17.2 |
| bareos-bat | | 12.4-16.2 | 12.4-16.2 | | | 12.4-16.2 | 12.4-16.2 |
| bareos-bconsole | 12.4-16.2 | 12.4-17.2 | 12.4-17.2 | 13.2-14.2 | 12.4-17.2 | 12.4-17.2 | 12.4-17.2 |
| bareos-client | 12.4-16.2 | 12.4-17.2 | 12.4-17.2 | 13.2-14.2 | 12.4-17.2 | 12.4-17.2 | 12.4-17.2 |
| bareos-common | 12.4-16.2 | 12.4-17.2 | 12.4-17.2 | 13.2-14.2 | 12.4-17.2 | 12.4-17.2 | 12.4-17.2 |
| bareos-database-common | 12.4-16.2 | 12.4-17.2 | 12.4-17.2 | | 12.4-17.2 | 12.4-17.2 | 12.4-17.2 |
| bareos-database-mysql | 12.4-16.2 | 12.4-17.2 | 12.4-17.2 | | 12.4-17.2 | 12.4-17.2 | 12.4-17.2 |
| bareos-database-postgresql | 12.4-16.2 | 12.4-17.2 | 12.4-17.2 | | 12.4-17.2 | 12.4-17.2 | 12.4-17.2 |
| bareos-database-sqlite3 | 12.4-16.2 | 12.4-17.2 | 12.4-17.2 | | 12.4-17.2 | 12.4-17.2 | 12.4-17.2 |
| bareos-database-tools | 12.4-16.2 | 12.4-17.2 | 12.4-17.2 | | 12.4-17.2 | 12.4-17.2 | 12.4-17.2 |
| bareos-director | 12.4-16.2 | 12.4-17.2 | 12.4-17.2 | | 12.4-17.2 | 12.4-17.2 | 12.4-17.2 |
| bareos-director-python-plugin | | 14.2-17.2 | 14.2-17.2 | | | 14.2-17.2 | 14.2-17.2 |
| bareos-filedaemon | 12.4-16.2 | 12.4-17.2 | 12.4-17.2 | 13.2-14.2 | 12.4-17.2 | 12.4-17.2 | 12.4-17.2 |
| bareos-filedaemon-ceph-plugin | | | | | | | 15.2-17.2 |
| bareos-filedaemon-glusterfs-plugin | | | 15.2-17.2 | | | | 15.2-17.2 |
| bareos-filedaemon-ldap-python-plugin | | 15.2-17.2 | 15.2-17.2 | | | 15.2-17.2 | 15.2-17.2 |
| bareos-filedaemon-python-plugin | | 14.2-17.2 | 14.2-17.2 | | | 14.2-17.2 | 14.2-17.2 |
| bareos-regress-config | | 17.2 | 17.2 | | 17.2 | 17.2 | 17.2 |
| | | | | | | | |
| bareos-storage | 12.4-16.2 | 12.4-17.2 | 12.4-17.2 | | 12.4-17.2 | 12.4-17.2 | 12.4-17.2 |
| bareos-storage-ceph | | | | | | | 14.2-17.2 |
| bareos-storage-droplet | | | 17.2 | | | | 17.2 |
| bareos-storage-fifo | 14.2-16.2 | 14.2-17.2 | 14.2-17.2 | | 14.2-17.2 | 14.2-17.2 | 14.2-17.2 |
| bareos-storage-glusterfs | | | 14.2-17.2 | | | | 14.2-17.2 |
| bareos-storage-python-plugin | | 14.2-17.2 | 14.2-17.2 | | | 14.2-17.2 | 14.2-17.2 |
| bareos-storage-tape | 12.4-16.2 | 12.4-17.2 | 12.4-17.2 | | 12.4-17.2 | 12.4-17.2 | 12.4-17.2 |
| bareos-tools | 12.4-16.2 | 12.4-17.2 | 12.4-17.2 | | 12.4-17.2 | 12.4-17.2 | 12.4-17.2 |
| bareos-traymonitor | | 12.4-17.2 | 12.4-17.2 | | | 12.4-17.2 | 12.4-17.2 |
| bareos-vadp-dumper | | | 15.2-17.2 | | | | 15.2-17.2 |
| bareos-vmware-plugin | | | 15.2-17.2 | | | | 15.2-17.2 |
| bareos-vmware-vix-disklib | | | 15.2-17.2 | | | | 15.2-17.2 |
| bareos-webui | | 15.2 | 15.2-17.2 | | | 15.2 | 15.2-17.2 |
| libdroplet | | 17.2 | 17.2 | | | 17.2 | 17.2 |
| libfastlz | 12.4-16.2 | 12.4-17.2 | 12.4-17.2 | 13.2-14.2 | 12.4-17.2 | 12.4-17.2 | 12.4-17.2 |
| lzo | 12.4-16.2 | | | 13.2-14.2 | 12.4-17.2 | | |
| python-bareos | | 17.2 | 17.2 | | 17.2 | 17.2 | 17.2 |
|
|
|
|
|
|
|
|
| |
| |
| |
| |
| |
|
|
|
|
|
|
|
|
|
| | | Fedora
| | 20 | 21 | 22 | 23 | 24 | 25 | 26 | 27 |
|
|
|
|
|
|
|
|
|
| bareos | 12.4-15.2 | 14.2-15.2 | 15.2 | 15.2-16.2 | 16.2 | 17.2 | 17.2 | |
| bareos-bat | 12.4-15.2 | 14.2-15.2 | 15.2 | 15.2-16.2 | 16.2 | | | |
| bareos-bconsole | 12.4-15.2 | 14.2-15.2 | 15.2 | 15.2-16.2 | 16.2 | 17.2 | 17.2 | |
| bareos-client | 12.4-15.2 | 14.2-15.2 | 15.2 | 15.2-16.2 | 16.2 | 17.2 | 17.2 | |
| bareos-common | 12.4-15.2 | 14.2-15.2 | 15.2 | 15.2-16.2 | 16.2 | 17.2 | 17.2 | |
| bareos-database-common | 12.4-15.2 | 14.2-15.2 | 15.2 | 15.2-16.2 | 16.2 | 17.2 | 17.2 | |
| bareos-database-mysql | 12.4-15.2 | 14.2-15.2 | 15.2 | 15.2-16.2 | 16.2 | 17.2 | 17.2 | |
| bareos-database-postgresql | 12.4-15.2 | 14.2-15.2 | 15.2 | 15.2-16.2 | 16.2 | 17.2 | 17.2 | |
| bareos-database-sqlite3 | 12.4-15.2 | 14.2-15.2 | 15.2 | 15.2-16.2 | 16.2 | 17.2 | 17.2 | |
| bareos-database-tools | 12.4-15.2 | 14.2-15.2 | 15.2 | 15.2-16.2 | 16.2 | 17.2 | 17.2 | |
| bareos-director | 12.4-15.2 | 14.2-15.2 | 15.2 | 15.2-16.2 | 16.2 | 17.2 | 17.2 | |
| bareos-director-python-plugin | 14.2-15.2 | 14.2-15.2 | 15.2 | 15.2-16.2 | 16.2 | 17.2 | 17.2 | |
| bareos-filedaemon | 12.4-15.2 | 14.2-15.2 | 15.2 | 15.2-16.2 | 16.2 | 17.2 | 17.2 | |
| bareos-filedaemon-glusterfs-plugin | 15.2 | 15.2 | 15.2 | 15.2-16.2 | 16.2 | 17.2 | 17.2 | |
| bareos-filedaemon-ldap-python-plugin | 15.2 | 15.2 | 15.2 | 15.2-16.2 | 16.2 | 17.2 | 17.2 | |
| bareos-filedaemon-python-plugin | 14.2-15.2 | 14.2-15.2 | 15.2 | 15.2-16.2 | 16.2 | 17.2 | 17.2 | |
| bareos-regress-config | | | | | | 17.2 | 17.2 | |
| bareos-storage | 12.4-15.2 | 14.2-15.2 | 15.2 | 15.2-16.2 | 16.2 | 17.2 | 17.2 | |
| | | | | | | | | |
| bareos-storage-fifo | 14.2-15.2 | 14.2-15.2 | 15.2 | 15.2-16.2 | 16.2 | 17.2 | 17.2 | |
| bareos-storage-glusterfs | 14.2-15.2 | 14.2-15.2 | 15.2 | 15.2-16.2 | 16.2 | 17.2 | 17.2 | |
| bareos-storage-python-plugin | 14.2-15.2 | 14.2-15.2 | 15.2 | 15.2-16.2 | 16.2 | 17.2 | 17.2 | |
| bareos-storage-tape | 12.4-15.2 | 14.2-15.2 | 15.2 | 15.2-16.2 | 16.2 | 17.2 | 17.2 | |
| bareos-tools | 12.4-15.2 | 14.2-15.2 | 15.2 | 15.2-16.2 | 16.2 | 17.2 | 17.2 | |
| bareos-traymonitor | 12.4-15.2 | 14.2-15.2 | 15.2 | 15.2-16.2 | 16.2 | 17.2 | 17.2 | |
| bareos-webui | 15.2 | 15.2 | 15.2 | 15.2-16.2 | 16.2 | 17.2 | 17.2 | |
| libfastlz | 12.4-15.2 | 14.2-15.2 | 15.2 | 15.2-16.2 | 16.2 | 17.2 | 17.2 | 17.2 |
| python-bareos | | | | | | 17.2 | 17.2 | 17.2 |
|
|
|
|
|
|
|
|
|
| |
| |
| |
| |
| |
|
|
|
|
|
|
| | SLES
|
| | 10sp4 | 11sp4 | 12sp1 | 12sp2 | 12sp3 |
|
|
|
|
|
|
| bareos | 14.2 | 14.2-17.2 | 14.2-17.2 | 17.2 | 17.2 |
| bareos-bat | | 14.2-16.2 | 14.2-16.2 | | |
| bareos-bconsole | 14.2 | 14.2-17.2 | 14.2-17.2 | 17.2 | 17.2 |
| bareos-client | 14.2 | 14.2-17.2 | 14.2-17.2 | 17.2 | 17.2 |
| bareos-common | 14.2 | 14.2-17.2 | 14.2-17.2 | 17.2 | 17.2 |
| bareos-database-common | 14.2 | 14.2-17.2 | 14.2-17.2 | 17.2 | 17.2 |
| bareos-database-mysql | 14.2 | 14.2-17.2 | 14.2-17.2 | 17.2 | 17.2 |
| bareos-database-postgresql | 14.2 | 14.2-17.2 | 14.2-17.2 | 17.2 | 17.2 |
| bareos-database-sqlite3 | | 14.2-17.2 | 14.2-17.2 | 17.2 | 17.2 |
| bareos-database-tools | 14.2 | 14.2-17.2 | 14.2-17.2 | 17.2 | 17.2 |
| bareos-director | 14.2 | 14.2-17.2 | 14.2-17.2 | 17.2 | 17.2 |
| bareos-director-python-plugin | | 14.2-17.2 | 14.2-17.2 | 17.2 | 17.2 |
| bareos-filedaemon | 14.2 | 14.2-17.2 | 14.2-17.2 | 17.2 | 17.2 |
| bareos-filedaemon-ceph-plugin | | | 15.2-17.2 | | |
| bareos-filedaemon-ldap-python-plugin | | 15.2-17.2 | 15.2-17.2 | 17.2 | 17.2 |
| bareos-filedaemon-python-plugin | | 14.2-17.2 | 14.2-17.2 | 17.2 | 17.2 |
| bareos-regress-config | | 17.2 | 17.2 | 17.2 | 17.2 |
| bareos-storage | 14.2 | 14.2-17.2 | 14.2-17.2 | 17.2 | 17.2 |
| | | | | | |
| bareos-storage-ceph | | | 15.2-17.2 | | |
| bareos-storage-droplet | | | 17.2 | 17.2 | 17.2 |
| bareos-storage-fifo | 14.2 | 14.2-17.2 | 14.2-17.2 | 17.2 | 17.2 |
| bareos-storage-python-plugin | | 14.2-17.2 | 14.2-17.2 | 17.2 | 17.2 |
| bareos-storage-tape | 14.2 | 14.2-17.2 | 14.2-17.2 | 17.2 | 17.2 |
| bareos-tools | 14.2 | 14.2-17.2 | 14.2-17.2 | 17.2 | 17.2 |
| bareos-traymonitor | | 14.2-17.2 | 14.2-17.2 | 17.2 | 17.2 |
| bareos-vadp-dumper | | 15.2-16.2 | 16.2-17.2 | 17.2 | 17.2 |
| bareos-vmware-plugin | | 15.2-16.2 | 16.2-17.2 | 17.2 | 17.2 |
| bareos-vmware-vix-disklib | | 15.2-16.2 | 16.2-17.2 | 17.2 | 17.2 |
| bareos-webui | | 15.2-17.2 | 15.2-17.2 | 17.2 | 17.2 |
| libdroplet | | | 17.2 | 17.2 | 17.2 |
| libfastlz | 14.2 | 14.2-17.2 | 14.2-17.2 | 17.2 | 17.2 |
| libjansson4 | | 15.2-17.2 | 15.2-17.2 | 17.2 | 17.2 |
| libjansson4-32bit | | 15.2-17.2 | | | |
| libjansson4-x86 | | 15.2-17.2 | | | |
| python-bareos | | 17.2 | 17.2 | 17.2 | 17.2 |
| python-py | | 15.2-16.2 | | | |
| python-pyvmomi | | 15.2-17.2 | 16.2-17.2 | 17.2 | 17.2 |
| python-requests | | 15.2-16.2 | | | |
| |
| python-six | | 15.2-16.2 | | | |
|
|
|
|
|
|
| |
| |
| |
| |
| |
|
|
|
|
|
|
| | openSUSE
|
| | 13.1 | 13.2 | 42.1 | 42.2 | 42.3 |
|
|
|
|
|
|
| bareos | 12.4-15.2 | 13.2-16.2 | 15.2-16.2 | 17.2 | 17.2 |
| bareos-bat | 12.4-15.2 | 13.2-16.2 | 15.2-16.2 | | |
| bareos-bconsole | 12.4-15.2 | 13.2-16.2 | 15.2-16.2 | 17.2 | 17.2 |
| bareos-client | 12.4-15.2 | 13.2-16.2 | 15.2-16.2 | 17.2 | 17.2 |
| bareos-common | 12.4-15.2 | 13.2-16.2 | 15.2-16.2 | 17.2 | 17.2 |
| bareos-database-common | 12.4-15.2 | 13.2-16.2 | 15.2-16.2 | 17.2 | 17.2 |
| bareos-database-mysql | 12.4-15.2 | 13.2-16.2 | 15.2-16.2 | 17.2 | 17.2 |
| bareos-database-postgresql | 12.4-15.2 | 13.2-16.2 | 15.2-16.2 | 17.2 | 17.2 |
| bareos-database-sqlite3 | 12.4-15.2 | 13.2-16.2 | 15.2-16.2 | 17.2 | 17.2 |
| bareos-database-tools | 12.4-15.2 | 13.2-16.2 | 15.2-16.2 | 17.2 | 17.2 |
| bareos-director | 12.4-15.2 | 13.2-16.2 | 15.2-16.2 | 17.2 | 17.2 |
| bareos-director-python-plugin | 14.2-15.2 | 14.2-16.2 | 15.2-16.2 | 17.2 | 17.2 |
| bareos-filedaemon | 12.4-15.2 | 13.2-16.2 | 15.2-16.2 | 17.2 | 17.2 |
| bareos-filedaemon-ldap-python-plugin | 15.2 | 15.2-16.2 | 15.2-16.2 | 17.2 | 17.2 |
| bareos-filedaemon-python-plugin | 14.2-15.2 | 14.2-16.2 | 15.2-16.2 | 17.2 | 17.2 |
| bareos-regress-config | | | | 17.2 | 17.2 |
| bareos-storage | 12.4-15.2 | 13.2-16.2 | 15.2-16.2 | 17.2 | 17.2 |
| bareos-storage-droplet | | | | 17.2 | 17.2 |
| | | | | | |
| bareos-storage-fifo | 14.2-15.2 | 14.2-16.2 | 15.2-16.2 | 17.2 | 17.2 |
| bareos-storage-python-plugin | 14.2-15.2 | 14.2-16.2 | 15.2-16.2 | 17.2 | 17.2 |
| bareos-storage-tape | 12.4-15.2 | 13.2-16.2 | 15.2-16.2 | 17.2 | 17.2 |
| bareos-tools | 12.4-15.2 | 13.2-16.2 | 15.2-16.2 | 17.2 | 17.2 |
| bareos-traymonitor | 12.4-15.2 | 13.2-16.2 | 15.2-16.2 | 17.2 | 17.2 |
| bareos-webui | 15.2 | 15.2-16.2 | 15.2-16.2 | 17.2 | 17.2 |
| libdroplet | | | | 17.2 | 17.2 |
| libfastlz | 12.4-15.2 | 13.2-16.2 | 15.2-16.2 | 17.2 | 17.2 |
| python-bareos | | | | 17.2 | 17.2 |
|
|
|
|
|
|
| |
| |
| |
| |
| |
|
|
|
|
|
|
|
| | Debian | Univention
|
| | 6 | 7 | 8 | 9 | 4.0 | 4.2 |
|
|
|
|
|
|
|
| bareos | 12.4-15.2 | 12.4-17.2 | 14.2-17.2 | 17.2 | 15.2-16.2 | 17.2 |
| bareos-bat | 12.4-15.2 | 12.4-16.2 | 14.2-16.2 | | 15.2-16.2 | |
| bareos-bconsole | 12.4-15.2 | 12.4-17.2 | 14.2-17.2 | 17.2 | 15.2-16.2 | 17.2 |
| bareos-client | 12.4-15.2 | 12.4-17.2 | 14.2-17.2 | 17.2 | 15.2-16.2 | 17.2 |
| bareos-common | 12.4-15.2 | 12.4-17.2 | 14.2-17.2 | 17.2 | 15.2-16.2 | 17.2 |
| bareos-database-common | 12.4-15.2 | 12.4-17.2 | 14.2-17.2 | 17.2 | 15.2-16.2 | 17.2 |
| bareos-database-mysql | 12.4-15.2 | 12.4-17.2 | 14.2-17.2 | 17.2 | 15.2-16.2 | 17.2 |
| bareos-database-postgresql | 12.4-15.2 | 12.4-17.2 | 14.2-17.2 | 17.2 | 15.2-16.2 | 17.2 |
| bareos-database-sqlite3 | 12.4-15.2 | 12.4-17.2 | 14.2-17.2 | 17.2 | 15.2-16.2 | 17.2 |
| bareos-database-tools | 12.4-15.2 | 12.4-17.2 | 14.2-17.2 | 17.2 | 15.2-16.2 | 17.2 |
| bareos-director | 12.4-15.2 | 12.4-17.2 | 14.2-17.2 | 17.2 | 15.2-16.2 | 17.2 |
| bareos-director-python-plugin | 14.2-15.2 | 14.2-17.2 | 14.2-17.2 | 17.2 | 15.2-16.2 | 17.2 |
| bareos-filedaemon | 12.4-15.2 | 12.4-17.2 | 14.2-17.2 | 17.2 | 15.2-16.2 | 17.2 |
| bareos-filedaemon-ceph-plugin | | | 15.2-16.2 | 17.2 | | |
| bareos-filedaemon-glusterfs-plugin | | | 15.2-17.2 | 17.2 | | 17.2 |
| bareos-filedaemon-ldap-python-plugin | 15.2 | 15.2-17.2 | 15.2-17.2 | 17.2 | 15.2-16.2 | 17.2 |
| bareos-filedaemon-python-plugin | 14.2-15.2 | 14.2-17.2 | 14.2-17.2 | 17.2 | 15.2-16.2 | 17.2 |
| bareos-regress-config | | 17.2 | 17.2 | 17.2 | | 17.2 |
| | | | | | | |
| bareos-storage | 12.4-15.2 | 12.4-17.2 | 14.2-17.2 | 17.2 | 15.2-16.2 | 17.2 |
| bareos-storage-ceph | | | 15.2-16.2 | 17.2 | | |
| bareos-storage-fifo | 14.2-15.2 | 14.2-17.2 | 14.2-17.2 | 17.2 | 15.2-16.2 | 17.2 |
| bareos-storage-glusterfs | | | 15.2-17.2 | 17.2 | | 17.2 |
| bareos-storage-python-plugin | 14.2-15.2 | 14.2-17.2 | 14.2-17.2 | 17.2 | 15.2-16.2 | 17.2 |
| bareos-storage-tape | 12.4-15.2 | 12.4-17.2 | 14.2-17.2 | 17.2 | 15.2-16.2 | 17.2 |
| bareos-tools | 12.4-15.2 | 12.4-17.2 | 14.2-17.2 | 17.2 | 15.2-16.2 | 17.2 |
| bareos-traymonitor | 12.4-15.2 | 12.4-17.2 | 14.2-17.2 | 17.2 | 15.2-16.2 | 17.2 |
| bareos-vadp-dumper | | | 15.2-17.2 | | | |
| bareos-vmware-plugin | | | 15.2-17.2 | | | |
| bareos-vmware-vix-disklib | | | 17.2 | | | 17.2 |
| bareos-vmware-vix-disklib5 | | | 15.2-16.2 | | | |
| bareos-webui | | 15.2-17.2 | 15.2-17.2 | 17.2 | 15.2-16.2 | 17.2 |
| libfastlz | 12.4-15.2 | 12.4-17.2 | 14.2-17.2 | 17.2 | 15.2-16.2 | 17.2 |
| libjansson4 | 15.2 | | | | | |
| python-bareos | | | 17.2 | 17.2 | | 17.2 |
| univention-bareos | | | | | 15.2-16.2 | 17.2 |
|
|
|
|
|
|
|
| |
| |
| |
| |
| |
|
|
|
|
|
|
| | Ubuntu
|
| | 10.04 | 12.04 | 14.04 | 16.04 | 8.04 |
|
|
|
|
|
|
| bareos | 12.4-15.2 | 12.4-17.2 | 13.2-17.2 | 15.2-17.2 | 13.2-14.2 |
| bareos-bat | 12.4-15.2 | 12.4-16.2 | 13.2-16.2 | 15.2-16.2 | |
| bareos-bconsole | 12.4-15.2 | 12.4-17.2 | 13.2-17.2 | 15.2-17.2 | 13.2-14.2 |
| bareos-client | 12.4-15.2 | 12.4-17.2 | 13.2-17.2 | 15.2-17.2 | 13.2-14.2 |
| bareos-common | 12.4-15.2 | 12.4-17.2 | 13.2-17.2 | 15.2-17.2 | 13.2-14.2 |
| bareos-database-common | 12.4-15.2 | 12.4-17.2 | 13.2-17.2 | 15.2-17.2 | 13.2-14.2 |
| bareos-database-mysql | 12.4-15.2 | 12.4-17.2 | 13.2-17.2 | 15.2-17.2 | 13.2-14.2 |
| bareos-database-postgresql | 12.4-15.2 | 12.4-17.2 | 13.2-17.2 | 15.2-17.2 | 13.2-14.2 |
| bareos-database-sqlite3 | 12.4-15.2 | 12.4-17.2 | 13.2-17.2 | 15.2-17.2 | 13.2-14.2 |
| bareos-database-tools | 12.4-15.2 | 12.4-17.2 | 13.2-17.2 | 15.2-17.2 | 13.2-14.2 |
| bareos-director | 12.4-15.2 | 12.4-17.2 | 13.2-17.2 | 15.2-17.2 | 13.2-14.2 |
| bareos-director-python-plugin | 14.2-15.2 | 14.2-17.2 | 14.2-17.2 | 15.2-17.2 | |
| bareos-filedaemon | 12.4-15.2 | 12.4-17.2 | 13.2-17.2 | 15.2-17.2 | 13.2-14.2 |
| bareos-filedaemon-ceph-plugin | | | 15.2-16.2 | 15.2-17.2 | |
| bareos-filedaemon-glusterfs-plugin | | | | 15.2-17.2 | |
| bareos-filedaemon-ldap-python-plugin | 15.2 | 15.2-17.2 | 15.2-17.2 | 15.2-17.2 | |
| bareos-filedaemon-python-plugin | 14.2-15.2 | 14.2-17.2 | 14.2-17.2 | 15.2-17.2 | |
| bareos-regress-config | | 17.2 | 17.2 | 17.2 | |
| | | | | | |
| bareos-storage | 12.4-15.2 | 12.4-17.2 | 13.2-17.2 | 15.2-17.2 | 13.2-14.2 |
| bareos-storage-ceph | | | 15.2-16.2 | 15.2-17.2 | |
| bareos-storage-fifo | 14.2-15.2 | 14.2-17.2 | 14.2-17.2 | 15.2-17.2 | 14.2 |
| bareos-storage-glusterfs | | | | 15.2-17.2 | |
| bareos-storage-python-plugin | 14.2-15.2 | 14.2-17.2 | 14.2-17.2 | 15.2-17.2 | |
| bareos-storage-tape | 12.4-15.2 | 12.4-17.2 | 13.2-17.2 | 15.2-17.2 | 13.2-14.2 |
| bareos-tools | 12.4-15.2 | 12.4-17.2 | 13.2-17.2 | 15.2-17.2 | 13.2-14.2 |
| bareos-traymonitor | 12.4-15.2 | 12.4-17.2 | 13.2-17.2 | 15.2-17.2 | |
| bareos-vadp-dumper | | | | 17.2 | |
| bareos-vmware-plugin | | | | 17.2 | |
| bareos-vmware-vix-disklib | | | | 17.2 | |
| bareos-webui | 15.2 | 15.2-17.2 | 15.2-17.2 | 15.2-17.2 | |
| libfastlz | 12.4-15.2 | 12.4-17.2 | 12.4-17.2 | 15.2-17.2 | 13.2-14.2 |
| libjansson4 | 15.2 | | | | |
| python-bareos | | | 17.2 | 17.2 | |
|
|
|
|
|
|
| |
| |
| |
| |
| |
#
Univention The Bareos version for the Univention App Center integraties into the Univention Enterprise Linux
environment, making it easy to backup all the systems managed by the central Univention Corporate
Server.
The Univention Corporate Server is an enterprise Linux distribution based on Debian. It consists of an integrated
management system for the centralised administration of servers, computer workplaces, users and their rights as well
as a wide range of server applications. It also includes an Unvention App Center for the easy installation and
management of extensions and appliances.
Bareos is part of the App Center and therefore an Univention environment can easily be extended to provide backup
functionality for the Univention servers as well as for the connected client systems. Using the Univention
Management Console (UMC), you can also create backup jobs for client computers (Windows or Linux systems),
without the need of editing configuration files.
The Bareos Univention App is shipped with a default configuration for the director daemon and the storage
daemon.
Please note! You need to review some Univention configuration registry (UCR) variables. Most likely, you will want
to set the location where the backups are stored. Otherwise, you may quickly run out of disk space on your backup
server!
You will find further information under Backup Storage.
-
bareos/filestorage
- : /var/lib/bareos/storage (default)
- Location where to store the backup files. Make sure, it offers enough disk space for a configured
backup volumes.
-
bareos/max_full_volume_bytes
- : 20 (default)
- Maximum size (in GB) of a volume for the FullDir
Pool backup pool
-
bareos/max_full_volumes
- : 1 (default)
- Maximum number of volumes for the FullDir
Pool backup pool
-
bareos/max_diff_volume_bytes
- : 10 (default)
- Maximum size (in GB) of a volume for the DifferentialDir
Pool backup pool
-
bareos/max_diff_volumes
- : 1 (default)
- Maximum number of volumes for the DifferentialDir
Pool backup pool
-
bareos/max_incr_volume_bytes
- : 1 (default)
- Maximum size (in GB) of a volume for the IncrementalDir
Pool backup pool
-
bareos/max_incr_volumes
- : 1 (default)
- Maximum number of volumes for the IncrementalDir
Pool backup pool
-
bareos/backup_myself
- : no (default)
-
no
- don’t backup the server itself
-
yes
- backup the server itself
-
bareos/webui/console/user1/username
- : Administrator (default)
- User name to login at the bareos-webui
-
bareos/webui/console/user1/password
- : (no default value)
- Password to login at the bareos-webui
UCR variables can be set via the Univention Configuration Registry Web interface
or using the ucr command line tool:
root@ucs:~# ucr set bareos/backup_myself=yes
Setting bareos/backup_myself
File: /etc/bareos/bareos-dir.conf
[ ok ] Reloading Bareos Director: bareos-dir.
Commands B.1:
Enable backup of the server itself
Please note! univention-bareos < 15.2 did require a manual reload/restart of the bareos-dir service:
root@ucs:~# service bareos-dir reload
[ ok ] Reloading Bareos Director: bareos-dir.
Commands B.2:
let bareos-dir reload its configuration
After installation of the Bareos app, Bareos is ready for operation. A default configuration is created
automatically.
Bareos consists of three daemons called director (or bareos-dir), storage-daemon (or bareos-sd) and
filedaemon (or bareos-fd). All three daemons are started right after the installation by the Univention App
Center.
If you want to enable automatic backups of the server, you need to set the Univention configuration registry (UCR)
variable bareos/backup_myself to yes and reload the director daemon.
For general tasks the bareos-webui can be used. Additional, there is the bconsole command line tool:
root@ucs:~# bconsole
Connecting to Director ucs:9101
1000 OK: ucs-dir Version: 15.2.2 (15 November 2015)
Enter a period to cancel a command.
*
Commands B.3:
Starting the bconsole
For general information, see the Bconsole Tuturial.
As a result of the default configuration located at the bareos-dir, the backup schedule will look as
follows:
-
Full Backups
-
- are written into the FullDir
Pool pool
- on the first saturday at 21:00 o’clock
- and kept for 365 days
-
Differential Backups
-
- are written into the DifferentialDir
Pool pool
- on every 2nd to 5th saturday at 21:00 o’clock
- and kept for 90 days
-
Incremental Backups
-
- are written into the IncrementalDir
Pool pool
- on every day from monday to friday at 21:00 o’clock
- and kept for 30 days
That means full backups will be written every first saturday at 21:00 o’clock, differential backups every 2nd to 5th
saturday at 21:00 o’clock and incremental backups from monday to friday at 21:00 o’clock. So you
have got one full backup every month, four weekly differential and 20 daily incremental backups per
month.
This schedule is active for the Univention server backup of itself and all other clients, which are backed up through
the bareos-dir on the Univention server.
There is also a special backup task, which is the Bareos backups itself for a possible disaster recovery. This backup
has got its own backup cycle which starts after the main backups. The backup consists of a database backup
for the metadata of the Bareos backup server and a backup of the Bareos configuration files under
/etc/bareos/.
Data from the backup jobs is written to volumes, which are organized in pools (see chapter Pool Resource).
The default configuration uses three different pools, called FullDir
Pool, DifferentialDir
Pool and IncrementalDir
Pool, which
are used for full backups, differential and incremental backups, respectively.
If you change the UCR variables, the configuration files will be rewritten automatically. After each change you will
need to reload the director daemon.
root@ucs:~# ucr set bareos/max_full_volumes=10
Setting bareos/max_full_volumes
File: /etc/bareos/bareos-dir.conf
[ ok ] Reloading Bareos Director: bareos-dir.
root@ucs:~# ucr set bareos/max_full_volume_bytes=20
Setting bareos/max_full_volume_bytes
File: /etc/bareos/bareos-dir.conf
[ ok ] Reloading Bareos Director: bareos-dir.
Commands B.4:
Example for changing the Full pool size to 10 ∗ 20 GB
Please note! This only affects new volumes. Existing volumes will not change there size.
Please note! Using the default configuration, Bareos will store backups on your local disk. You may want to store the
data to another location to avoid using up all of your disk space.
The location for backups is /var/lib/bareos/storage in the default configuration.
For example, to use a NAS device for storing backups, you can mount your NAS volume via NFS on
/var/lib/bareos/storage. Alternatively, you can mount the NAS volume to another directory of your own choice,
and change the UCR variable bareos/filestorage to the corresponding path. The directory needs to be writable
by user bareos.
root@ucs:/etc/bareos# ucr set bareos/filestorage=/path/to/your/storage
Setting bareos/filestorage
File: /etc/bareos/bareos-sd.conf
Commands B.5:
Example for changing the storage path
Please note! You need to restart the Bareos storage daemon after having changed the storage path:
root@ucs:/# service bareos-sd restart
Commands B.6:
After installation you just need to setup your login credentials via UCR variables. Therefore, set the
Univention configuration registry (UCR) variable bareos/webui/console/user1/username and
bareos/webui/consoles/user1/password according to your needs. The director configuration is automatically
reloaded if one of those two variables changes.
Alternatively you can also set those UCR variables via commandline.
root@ucs:~# ucr set bareos/webui/console/user1/username=”bareos”
Setting bareos/webui/console/user1/username
File: /etc/bareos/bareos-dir.conf
[ ok ] Reloading Bareos Director: bareos-dir.
root@ucs:~# ucr set bareos/webui/console/user1/password=”secret”
Setting bareos/webui/console/user1/password
File: /etc/bareos/bareos-dir.conf
[ ok ] Reloading Bareos Director: bareos-dir.
Commands B.7:
Example for changing webui login credentials
When your login credentials are set, you can login into Bareos Webui by following the entry in your Administration
UCS Overview or directly via https://<UCS_SERVER>/bareos-webui/.
Overview
- Install the Bareos client software on the target system, see Adding a Bareos Client
- Use the Univention Management Console to add the client to the backup, see the screenshot below
- Copy the filedaemon resource configuration file from the Univention server to the target system
Bareos >= 16.2.4
Server-side
The Univention Bareos application comes with an automatism for the client and job configuration. If you want to
add a client to the Bareos director configuration, you need use the Univention Management Console, select the
client you want to backup and set the enable backup job checkbox to true, as shown in the screenshot
below.
If the name of the client is testw1.example.com, corresponding configuration files will be generated:
- /etc/bareos/autogenerated/clients/testw1.example.com.include
- /etc/bareos/bareos-dir-export/client/testw1.example.com-fd/bareos-fd.d/director/
bareos-dir.conf
Generated configuration files under /etc/bareos/bareos-dir-export/client/ are intended for the target systems.
After you have installed the Bareos client on the target system, copy the generated client configuration over to the
client and save it to following directories:
- on Linux: /etc/bareos/bareos-fd.d/director/
- on Windows: C:\Program Files\Bareos\bareos-fd.d/director/
root@ucs:~# CLIENTNAME=testw1.example.com
root@ucs:~# scp /etc/bareos/bareos-dir-export/client/${CLIENTNAME}-fd/bareos-fd.d/director/∗.conf root@${CLIENTNAME}:/etc/bareos/bareos-fd.d/director/
Commands B.8:
copy client configuration from the server to the testw1.example.com client (Linux)
Background
The settings for each job resource are defined by the template files you see below:
The files
- /etc/bareos/autogenerated/clients/generic.template
- /etc/bareos/autogenerated/clients/windows.template
are used as templates for new clients. For Windows clients the file windows.template is used, the
generic.template is used for all other client types.
If you disable the Bareos backup for a client, the client will not be removed from the configuration files. Only the
backup job will be set inactive.
If you add three client, your client directory will look similar to this:
root@ucs:/etc/bareos/autogenerated/clients# ls -l
-rw-r--r-- 1 root root 430 16. Mai 15:15 generic.template
-rw-r----- 1 root bareos 513 21. Mai 14:46 testw1.example.com.include
-rw-r----- 1 root bareos 518 21. Mai 14:49 testw2.example.com.include
-rw-r----- 1 root bareos 518 16. Mai 18:17 testw3.example.com.include
-rw-r--r-- 1 root root 439 16. Mai 15:15 windows.template
Commands B.9:
The client configuration file contains, as you can see below, the client connection and the job information:
root@ucs:/etc/bareos/autogenerated/clients# cat testw2.example.com.include
Client {
Name = "testw2.example.com-fd"
Address = "testw2.example.com"
Password = "DBLtVnRKq5nRUOrnB3i3qAE38SiDtV8tyhzXIxqR"
}
Job {
Name = "Backup-testw2.example.com" # job name
Client = "testw2.example.com-fd" # client name
JobDefs = "DefaultJob" # job definition for the job
FileSet = "Windows All Drives" # FileSet (data which is backed up)
Schedule = "WeeklyCycle" # schedule for the backup tasks
Enabled = "Yes" #this is the ressource which is toggled on/off by enabling or disabling a backup from the univention gui
}
Commands B.10:
Bareos < 16.2.0
Older versions of Bareos handle generating the client configuration similar, but not identical:
If the name of the client is testw1.example.com, corresponding configuration files will be generated/adapted:
- creates /etc/bareos/autogenerated/fd-configs/testw1.example.com.conf
- creates /etc/bareos/autogenerated/clients/testw1.example.com.include
- extends /etc/bareos/autogenerated/clients.include
Here the files intended for the target systems are generated under /etc/bareos/autogenerated/fd-configs/ and
they do not only definr a director resource, but are full configuration files for the client. After you have installed the
Bareos client on the target system, copy the generated client configuration over to the client and save it
to
- on Linux: /etc/bareos/bareos-fd.conf
- on Windows: C:\Program Files\Bareos\bareos-fd.conf
root@ucs:~# CLIENTNAME=testw1.example.com
root@ucs:~# scp /etc/bareos/autogenerated/fd-configs/${CLIENTNAME}.conf root@${CLIENTNAME}:/etc/bareos/bareos-fd.conf
Commands B.11:
copy client configuration from the server to the testw1.example.com client (Linux)
#
The distributions of Debian >= 8 include a version of Bareos. Ubuntu Universe >= 15.04 does also include these
packages.
In the further text, these version will be named Bareos (Debian.org) (also for the Ubuntu Universe version, as
this is based on the Debian version).
- Debian.org does not include the libfastlz compression library and therefore the Bareos (Debian.org)
packages do not offer the fileset options compression=LZFAST, compression=LZ4 and compression=
LZ4HC.
- Debian.org prefers that Bareos (Debian.org) is linked against GnuTLS instead of OpenSSL. Therefore,
the Bareos (Debian.org) package only support Transport Encryption but no Data Encryption.
- Debian.org does not include the bareos-webui package.
#
Bareos for MacOS X is available either
However, you have to choose upfront, which client you want to use. Otherwise conflicts do occur.
Both packages contain the Bareos File Daemon and bconsole.
The Bareos installer package for Mac OS X contains the Bareos File Daemon for Mac OS X 10.5 or
later.
On your local Mac, you must be an admin user. The main user is an admin user.
Download the bareos-client*.pkg installer package from http://download.bareos.org/bareos/release/latest/MacOS/.
Find the .pkg you just downloaded. Install the .pkg by holding the CTRL key, left-clicking the installer and choosing
“open”.
Follow the directions given to you and finish the installation.
To make use of your Bareos File Daemon on your system, it is required to configure the Bareos Director and the
local Bareos File Daemon.
Configure the server-side by follow the instructions at Adding a Client.
After configuring the server-side you can either transfer the necessary configuration file using following command or
configure the client locally.
Option 1: Copy the director resource from the Bareos Director to the Client
Assuming your client has the DNS entry client2.example.com and has been added to Bareos Director as
client2-fdbareos-dir
client :
scp /etc/bareos/bareos-dir-export/client/client2-fd/bareos-fd.d/director/bareos-dir.conf root@client2.example.com:/usr/local/etc/bareos/bareos-fd.d/director/
Commands B.12:
This differs in so far, as on Linux the configuration files are located under /etc/bareos/, while on MacOS they are
located at /usr/local/etc/bareos/.
Option 2: Edit the director resource on the Client
Alternatively, you can edit the file /usr/local/etc/bareos/bareos-fd.d/director/bareos-dir.conf.
This can be done by right-clicking the finder icon in your task bar, select “Go to folder ...” and paste
/usr/local/etc/bareos/bareos-fd.d/director/.
Select the bareos-dir.conf file and open it.
Alternatively you can also call following command on the command console:
open -t /usr/local/etc/bareos/bareos-fd.d/director/bareos-dir.conf
Commands B.13:
The file should look similar to this:
Director {
Name = bareos-dir
Password = "SOME_RANDOM_PASSWORD"
Description = "Allow the configured Director to access this file daemon."
}
Resource B.14:
bareos-fd.d/director/bareos-dir.conf
Set this client-side password to the same value as given on the server-side.
Please note! The configuration file contains passwords and therefore must not be accessible for any users except
admin users.
The bareos-fd must be restarted to reread its configuration:
sudo launchctl stop org.bareos.bareos-fd
sudo launchctl start org.bareos.bareos-fd
Commands B.15:
Restart the Bareos File Daemon
Open the bconsole on your Bareos Director and check the status of the client with
*status client=client2-fd
Configuration B.16:
In case, the client does not react, following command are useful the check the status:
# check if bareos-fd is started by system:
sudo launchctl list org.bareos.bareos-fd
# get process id (PID) of bareos-fd
pgrep bareos-fd
# show files opened by bareos-fd
sudo lsof -p ‘pgrep bareos-fd‘
# check what process is listening on the \bareosFd port
sudo lsof -n -iTCP:9102 | grep LISTEN
Commands B.17:
Verify the status of Bareos File Daemon
You can also manually start bareos-fd in debug mode by:
sudo /usr/local/sbin/bareos-fd -f -d 100
Commands B.18:
Start Bareos File Daemon in debug mode
#
#
#
Each of the three daemons (Director, File, Storage) accepts a small set of options on the command line. In general,
each of the daemons as well as the Console program accepts the following options:
-
-c <path>
- Define the file or directory to use for the configuration. See Configuration Path Layout.
-
-d nnn
- Set the debug level to nnn. Generally anything between 50 and 200 is reasonable. The higher the
number, the more output is produced. The output is written to standard output. The debug level can
also be set during runtime, see section bconsole: setdebug.
-
-f
- Run the daemon in the foreground. This option is needed to run the daemon under the debugger.
-
-g <group>
- Run the daemon under this group. This must be a group name, not a GID.
-
-s
- Do not trap signals. This option is needed to run the daemon under the debugger.
-
-t
- Read the configuration file and print any error messages, then immediately exit. Useful for syntax testing
of new configuration files.
-
-u <user>
- Run the daemon as this user. This must be a user name, not a UID.
-
-v
- Be more verbose or more complete in printing error and informational messages.
-
-xc
- Print the current configuration and exit.
-
-xs
- Print configuration schema in JSON format and exit.
-
-?
- Print the version and list of options.
#
Bareos Director.
#
Bareos Storage Daemon.
#
Bareos File Daemon.
#
#
There is an own chapter on bconsole. Please refer to chapter Bareos Console.
#
For further information regarding the Bareos Webui, please refer to Installing Bareos Webui.
#
The Bacula/Bareos Administration Tool (bat) has been a native GUI for Bareos. It has been marked deprecated
since Version >= 15.2.0. Since Bareos Version >= 17.2.0 it is no longer part of Bareos. We encourage the use of
Bareos Webui instead.
#
This document describes the utility programs written to aid Bareos users and developers in dealing with Volumes
external to Bareos and to perform other useful tasks.
#
Each of the utilities that deal with Volumes require a valid Bareos Storage Daemon configuration
(actually, the only part of the configuration file that these programs need is the DeviceSd resource
definitions). This permits the programs to find the configuration parameters for your Archive Device
Sd
Device. Using the -c option a custom Bareos Storage Daemon configuration file or directory can be
selected.
Each of these programs require a device-name where the Volume can be found. The device-name is either the name
of the Bareos Storage Daemon device (Name Sd
Device) or its Archive Device Sd
Device.
Specifying a Device Name For a Tape
In the case of a tape, this is the physical device name such as /dev/nst0 or /dev/rmt/0ubn depending on your
system.
Please note! If you have Bareos running and you want to use one of these programs, you will either need to stop the
Bareos Storage Daemon or unmount any tape drive you want to use, otherwise the drive may get busy because
Bareos is using it. After this, you can use the command mtx or mtx-changer script to load the required volume into
the tape drive.
Specifying a Device Name For a File
If you are attempting to read or write an archive file rather than a tape, the device-name can be the full
path to the archive location specified at Archive Device Sd
Device or this including the filename of the
volume. The filename (last part of the specification) will be stripped and used as the Volume name
So, the path is equivalent to the Archive Device Sd
Device and the filename is equivalent to the volume
name.
Often you must specify the Volume name to the programs below. The best method to do so is to specify a bootstrap
file on the command line with the -b option. As part of the bootstrap file, you will then specify the Volume
name or Volume names if more than one volume is needed. For example, suppose you want to read
tapes tapevolume1 and tapevolume2. First construct a bootstrap file named say, list.bsr which
contains:
Volume=tapevolume1|tapevolume2
where each Volume is separated by a vertical bar. Then simply use:
bls -b list.bsr /dev/nst0
Commands C.1:
In the case of Bareos Volumes that are on files, you may simply append volumes as follows:
bls /var/lib/bareos/storage/volume1\|volume2
Commands C.2:
where the backslash (∖) was necessary as a shell escape to permit entering the vertical bar (|).
And finally, if you feel that specifying a Volume name is a bit complicated with a bootstrap file, you can use the -V
option (on all programs except bcopy) to specify one or more Volume names separated by the vertical bar (|). For
example:
bls /dev/nst0 -V tapevolume1
Commands C.3:
You may also specify an asterisk (*) to indicate that the program should accept any volume. For example:
bls /dev/nst0 -V*
Commands C.4:
If your Bareos Storage Daemon has following resource,
Device {
Name = FileStorage
Archive Device = /var/lib/bareos/storage
...
}
Resource C.5:
bareos-sd.d/device/FileStorage.conf
following calls of bls should behave identical:
bls FileStorage -V Full1
Commands C.6:
bls using Storage Device Name
or
bls /var/lib/bareos/storage -V Full1
Commands C.7:
bls using the Archive Device of a Storage Device
or
bls /var/lib/bareos/storage/Full1
Commands C.8:
bls using the Archive Device of a Storage Device and volume name
If you use Bareos with non-default block sizes defined in the pools (Maximum Block Size Dir
Pool), it might be necessary
to specify the Maximum Block Size Sd
Device also in the storage device resource, see Direct access to Volumes with
non-default blocksizes.
#
bls can be used to do an ls type listing of a Bareos tape or file. It is called:
Usage: bls [options] <device-name>
-b <file> specify a bootstrap file
-c <file> specify a Storage configuration file
-D <director> specify a director name specified in the Storage
configuration file for the Key Encryption Key selection
-d <nn> set debug level to <nn>
-dt print timestamp in debug output
-e <file> exclude list
-i <file> include list
-j list jobs
-k list blocks
(no j or k option) list saved files
-L dump label
-p proceed inspite of errors
-v be verbose
-V specify Volume names (separated by |)
-? print this message
Commands C.9:
Normally if no options are specified, bls will produce the equivalent output to the ls -l command for each
volume.
For example, to list the contents of a tape:
bls -V Volume-name /dev/nst0
Commands C.10:
Or to list the contents of a volume file:
bls FileStorage -V Full1
Commands C.11:
or
bls /var/lib/bareos/storage -V Full1
Commands C.12:
or
bls /var/lib/bareos/storage/Full1
Commands C.13:
For example:
root@linux:~#
bls FileStorage -V Full1
bls: butil.c:282-0 Using device: "/var/lib/bareos/storage" for reading.
12-Sep 18:30 bls JobId 0: Ready to read from volume "Full1" on device "FileStorage" (/var/lib/bareos/storage).
bls JobId 1: -rwxr-xr-x 1 root root 4614 2013-01-22 22:24:11 /usr/sbin/service
bls JobId 1: -rwxr-xr-x 1 root root 13992 2013-01-22 22:24:12 /usr/sbin/rtcwake
bls JobId 1: -rwxr-xr-x 1 root root 6243 2013-02-06 11:01:29 /usr/sbin/update-fonts-scale
bls JobId 1: -rwxr-xr-x 1 root root 43240 2013-01-22 22:24:10 /usr/sbin/grpck
bls JobId 1: -rwxr-xr-x 1 root root 16894 2013-01-22 22:24:11 /usr/sbin/update-rc.d
bls JobId 1: -rwxr-xr-x 1 root root 9480 2013-01-22 22:47:43 /usr/sbin/gss_clnt_send_err
...
bls JobId 456: -rw-r----- 1 root bareos 1008 2013-05-23 13:17:45 /etc/bareos/bareos-fd.conf
bls JobId 456: drwxr-xr-x 2 root root 4096 2013-07-04 17:40:21 /etc/bareos/
12-Sep 18:30 bls JobId 0: End of Volume at file 0 on device "FileStorage" (/var/lib/bareos/storage), Volume "Full1"
12-Sep 18:30 bls JobId 0: End of all volumes.
2972 files found.
Commands C.14:
To retrieve information, about how a file is stored on the volume, you can use bls in verbose mode:
root@linux:~#
bls FileStorage -V TestVolume001 -v
bls: butil.c:273-0 Using device: "FileStorage" for reading.
22-Jun 19:34 bls JobId 0: Ready to read from volume "TestVolume001" on device "Storage1" (/var/lib/bareos/storage).
Volume Label Record: VolSessionId=1 VolSessionTime=1498152622 JobId=0 DataLen=168
Begin Job Session Record: VolSessionId=1 VolSessionTime=1498152622 JobId=1 DataLen=169
FileIndex=1 Stream=1 UATTR DataLen=129 | -rw-rw-r-- 1 root root 5 2017-06-22 19:30:21
| /srv/data/test1.dat
FileIndex=1 Stream=29 COMPRESSED DataLen=25 | GZIP, level=9, version=1, length=13
FileIndex=1 Stream=3 MD5 DataLen=16 | 2Oj8otwPiW/Xy0ywAxuiSQ (base64)
FileIndex=2 Stream=1 UATTR DataLen=123 | drwxrwxr-x 2 root root 4096 2017-06-22 19:30:21
| /srv/data/
...
End Job Session Record: VolSessionId=1 VolSessionTime=1498152622 JobId=1
DataLen=205
22-Jun 19:34 bls JobId 0: End of Volume at file 0 on device "FileStorage" (/var/lib/bareos/storage), Volume "TestVolume001"
22-Jun 19:34 bls JobId 0: End of all volumes.
End of Physical Medium Record: VolSessionId=0 VolSessionTime=0 JobId=0 DataLen=0
9 files and directories found.
Commands C.15:
For details about the Volume format, see Bareos Developer Guide (storage-media-output-format) .
Using the -L the label information of a Volume is shown:
root@linux:~#
bls -L /var/lib/bareos/storage/testvol
bls: butil.c:282-0 Using device: "/var/lib/bareos/storage" for reading.
12-Sep 18:41 bls JobId 0: Ready to read from volume "testvol" on device "FileStorage" (/var/lib/bareos/storage).
Volume Label:
Id : Bareos 0.9 mortal
VerNo : 10
VolName : File002
PrevVolName :
VolFile : 0
LabelType : VOL_LABEL
LabelSize : 147
PoolName : Default
MediaType : File
PoolType : Backup
HostName : debian6
Date label written: 06-Mar-2013 17:21
Commands C.16:
bls: show volume label
If you are listing a Volume to determine what Jobs to restore, normally the -j option provides you with most of
what you will need as long as you don’t have multiple clients. For example:
root@linux:~#
bls /var/lib/bareos/storage/testvol -j
bls: butil.c:282-0 Using device: "/var/lib/bareos/storage" for reading.
12-Sep 18:33 bls JobId 0: Ready to read from volume "testvol" on device "FileStorage" (/var/lib/bareos/storage).
Volume Record: File:blk=0:193 SessId=1 SessTime=1362582744 JobId=0 DataLen=158
Begin Job Session Record: File:blk=0:64705 SessId=1 SessTime=1362582744 JobId=1
Job=BackupClient1.2013-03-06_17.22.48_05 Date=06-Mar-2013 17:22:51 Level=F Type=B
End Job Session Record: File:blk=0:6499290 SessId=1 SessTime=1362582744 JobId=1
Date=06-Mar-2013 17:22:52 Level=F Type=B Files=162 Bytes=6,489,071 Errors=0 Status=T
Begin Job Session Record: File:blk=0:6563802 SessId=2 SessTime=1362582744 JobId=2
Job=BackupClient1.2013-03-06_23.05.00_02 Date=06-Mar-2013 23:05:02 Level=I Type=B
End Job Session Record: File:blk=0:18832687 SessId=2 SessTime=1362582744 JobId=2
Date=06-Mar-2013 23:05:02 Level=I Type=B Files=3 Bytes=12,323,791 Errors=0 Status=T
...
Begin Job Session Record: File:blk=0:319219736 SessId=299 SessTime=1369307832 JobId=454
Job=BackupClient1.2013-09-11_23.05.00_25 Date=11-Sep-2013 23:05:03 Level=I Type=B
End Job Session Record: File:blk=0:319219736 SessId=299 SessTime=1369307832 JobId=454
Date=11-Sep-2013 23:05:03 Level=I Type=B Files=0 Bytes=0 Errors=0 Status=T
Begin Job Session Record: File:blk=0:319284248 SessId=301 SessTime=1369307832 JobId=456
Job=BackupCatalog.2013-09-11_23.10.00_28 Date=11-Sep-2013 23:10:03 Level=F Type=B
End Job Session Record: File:blk=0:320694269 SessId=301 SessTime=1369307832 JobId=456
Date=11-Sep-2013 23:10:03 Level=F Type=B Files=12 Bytes=1,472,681 Errors=0 Status=T
12-Sep 18:32 bls JobId 0: End of Volume at file 0 on device "FileStorage" (/var/lib/bareos/storage), Volume "testvol"
12-Sep 18:32 bls JobId 0: End of all volumes.
Commands C.17:
bls: list jobs
Adding the -v option will display virtually all information that is available for each record.
Normally, except for debugging purposes, you will not need to list Bareos blocks (the ”primitive” unit of Bareos
data on the Volume). However, you can do so with:
root@linux:~#
bls -k /tmp/File002
bls: butil.c:148 Using device: /tmp
Block: 1 size=64512
Block: 2 size=64512
...
Block: 65 size=64512
Block: 66 size=19195
bls: Got EOF on device /tmp
End of File on device
Commands C.18:
By adding the -v option, you can get more information, which can be useful in knowing what sessions were written
to the volume:
root@linux:~#
bls -k -v /tmp/File002
Date label written: 2002-10-19 at 21:16
Block: 1 blen=64512 First rec FI=VOL_LABEL SessId=1 SessTim=1035062102 Strm=0 rlen=147
Block: 2 blen=64512 First rec FI=6 SessId=1 SessTim=1035062102 Strm=DATA rlen=4087
Block: 3 blen=64512 First rec FI=12 SessId=1 SessTim=1035062102 Strm=DATA rlen=5902
Block: 4 blen=64512 First rec FI=19 SessId=1 SessTim=1035062102 Strm=DATA rlen=28382
...
Block: 65 blen=64512 First rec FI=83 SessId=1 SessTim=1035062102 Strm=DATA rlen=1873
Block: 66 blen=19195 First rec FI=83 SessId=1 SessTim=1035062102 Strm=DATA rlen=2973
bls: Got EOF on device /tmp
End of File on device
Commands C.19:
Armed with the SessionId and the SessionTime, you can extract just about anything.
If you want to know even more, add a second -v to the command line to get a dump of every record in every
block.
root@linux:~#
bls -k -vv /tmp/File002
bls: block.c:79 Dump block 80f8ad0: size=64512 BlkNum=1
Hdrcksum=b1bdfd6d cksum=b1bdfd6d
bls: block.c:92 Rec: VId=1 VT=1035062102 FI=VOL_LABEL Strm=0 len=147 p=80f8b40
bls: block.c:92 Rec: VId=1 VT=1035062102 FI=SOS_LABEL Strm=-7 len=122 p=80f8be7
bls: block.c:92 Rec: VId=1 VT=1035062102 FI=1 Strm=UATTR len=86 p=80f8c75
bls: block.c:92 Rec: VId=1 VT=1035062102 FI=2 Strm=UATTR len=90 p=80f8cdf
bls: block.c:92 Rec: VId=1 VT=1035062102 FI=3 Strm=UATTR len=92 p=80f8d4d
bls: block.c:92 Rec: VId=1 VT=1035062102 FI=3 Strm=DATA len=54 p=80f8dbd
bls: block.c:92 Rec: VId=1 VT=1035062102 FI=3 Strm=MD5 len=16 p=80f8e07
bls: block.c:92 Rec: VId=1 VT=1035062102 FI=4 Strm=UATTR len=98 p=80f8e2b
bls: block.c:92 Rec: VId=1 VT=1035062102 FI=4 Strm=DATA len=16 p=80f8ea1
bls: block.c:92 Rec: VId=1 VT=1035062102 FI=4 Strm=MD5 len=16 p=80f8ec5
bls: block.c:92 Rec: VId=1 VT=1035062102 FI=5 Strm=UATTR len=96 p=80f8ee9
bls: block.c:92 Rec: VId=1 VT=1035062102 FI=5 Strm=DATA len=1783 p=80f8f5d
bls: block.c:92 Rec: VId=1 VT=1035062102 FI=5 Strm=MD5 len=16 p=80f9668
bls: block.c:92 Rec: VId=1 VT=1035062102 FI=6 Strm=UATTR len=95 p=80f968c
bls: block.c:92 Rec: VId=1 VT=1035062102 FI=6 Strm=DATA len=32768 p=80f96ff
bls: block.c:92 Rec: VId=1 VT=1035062102 FI=6 Strm=DATA len=32768 p=8101713
bls: block.c:79 Dump block 80f8ad0: size=64512 BlkNum=2
Hdrcksum=9acc1e7f cksum=9acc1e7f
bls: block.c:92 Rec: VId=1 VT=1035062102 FI=6 Strm=contDATA len=4087 p=80f8b40
bls: block.c:92 Rec: VId=1 VT=1035062102 FI=6 Strm=DATA len=31970 p=80f9b4b
bls: block.c:92 Rec: VId=1 VT=1035062102 FI=6 Strm=MD5 len=16 p=8101841
...
Commands C.20:
#
If you find yourself using bextract, you probably have done something wrong. For example, if you are
trying to recover a file but are having problems, please see the Restoring When Things Go Wrong
chapter.
Normally, you will restore files by running a Restore Job from the Console program. However, bextract can be
used to extract a single file or a list of files from a Bareos tape or file. In fact, bextract can be a useful tool to
restore files to an empty system assuming you are able to boot, you have statically linked bextract and you have an
appropriate bootstrap file.
Please note that some of the current limitations of bextract are:
- It cannot restore access control lists (ACL) that have been backed up along with the file data.
- It cannot restore encrypted files.
- The command line length is relatively limited, which means that you cannot enter a huge number of
volumes. If you need to enter more volumes than the command line supports, please use a bootstrap
file (see below).
- Extracting files from a Windows backup on a Linux system will only extract the plain files, not the
additional Windows file information. If you have to extract files from a Windows backup, you should
use the Windows version of bextract.
It is called:
Usage: bextract <options> <bareos-archive-device-name> <directory-to-store-files>
-b <file> specify a bootstrap file
-c <file> specify a Storage configuration file
-D <director> specify a director name specified in the Storage
configuration file for the Key Encryption Key selection
-d <nn> set debug level to <nn>
-dt print timestamp in debug output
-e <file> exclude list
-i <file> include list
-p proceed inspite of I/O errors
-v verbose
-V <volumes> specify Volume names (separated by |)
-? print this message
Commands C.21:
where device-name is the Archive Device (raw device name or full filename) of the device to be read, and
directory-to-store-files is a path prefix to prepend to all the files restored.
Please note! On Windows systems, if you specify a prefix of say d:/tmp, any file that would have been restored to
C:/My Documents will be restored to D:/tmp/My Documents. That is, the original drive specification will be
stripped. If no prefix is specified, the file will be restored to the original drive.
Using the -e option, you can specify a file containing a list of files to be excluded. Wildcards can be used in the
exclusion list. This option will normally be used in conjunction with the -i option (see below). Both the -e and the
-i options may be specified at the same time as the -b option. The bootstrap filters will be applied first, then the
include list, then the exclude list.
Likewise, and probably more importantly, with the -i option, you can specify a file that contains a list (one file per
line) of files and directories to include to be restored. The list must contain the full filename with the path. If you
specify a path name only, all files and subdirectories of that path will be restored. If you specify a line containing
only the filename (e.g. my-file.txt) it probably will not be extracted because you have not specified the full
path.
For example, if the file include-list contains:
/etc/bareos
/usr/sbin
Then the command:
bextract -i include-list -V Volume /dev/nst0 /tmp
Commands C.22:
will restore from the Bareos archive /dev/nst0 all files and directories in the backup from /etc/bareos and from
/usr/sbin. The restored files will be placed in a file of the original name under the directory /tmp (i.e.
/tmp/etc/bareos/... and /tmp/usr/sbin/...).
The -b option is used to specify a bootstrap file containing the information needed to restore precisely the files you
want. Specifying a bootstrap file is optional but recommended because it gives you the most control over which
files will be restored. For more details on the bootstrap file, please see Restoring Files with the Bootstrap File
chapter of this document. Note, you may also use a bootstrap file produced by the restore command. For
example:
bextract -b bootstrap-file /dev/nst0 /tmp
Commands C.23:
The bootstrap file allows detailed specification of what files you want restored (extracted). You may specify a
bootstrap file and include and/or exclude files at the same time. The bootstrap conditions will first be applied, and
then each file record seen will be compared to the include and exclude lists.
If you wish to extract files that span several Volumes, you can specify the Volume names in the bootstrap file or you
may specify the Volume names on the command line by separating them with a vertical bar. See the
section above under the bls program entitled Listing Multiple Volumes for more information. The
same techniques apply equally well to the bextract program or read the Bootstrap chapter of this
document.
Please note! If you use bextract under Windows, the ordering of the parameters is essential.
To use bextract, the Bareos Storage Daemon must be installed. As bextract works on tapes
or disk volumes, these must be configured in the Storage Daemon configuration file, normally found
at C:\ProgrammData \Bareos \bareos -sd.conf. However, it is not required to start the Bareos
Storage Daemon. Normally, if the Storage Daemon would be able to run, bextract would not be
required.
After installing, bextract can be called via command line:
C:\Program Files\Bareos .\bextract.exe -c "C:\ProgrammData\Bareos\bareos-sd.conf" -V <Volume> <YourStorage> <YourDestination>
Commands C.24:
Call of bextract
If you want to use exclude or include files you need to write them like you do on Linux. That means each path
begins with a ”/” and not with ”yourdrive:/”. You need to specify the parameter -e exclude.list as first parameter.
For example:
/Program Files/Bareos/bareos-dir.exe
/ProgramData/
Configuration C.25:
Example
exclude.list
C:\Program Files\Bareos .\bextract.exe -e exclude.list -c "C:\ProgrammData\Bareos\bareos-sd.conf" -V <Volume> <YourStorage> <YourDestination>
Commands C.26:
Call bextract with exclude list
#
If you find yourself using this program, you have probably done something wrong. For example, the best way to
recover a lost or damaged Bareos database is to reload the database by using the bootstrap file that was written
when you saved it (default Bareos-dir.conf file).
The bscan program can be used to re-create a database (catalog) records from the backup information
written to one or more Volumes. This is normally needed only if one or more Volumes have been pruned
or purged from your catalog so that the records on the Volume are no longer in the catalog, or for
Volumes that you have archived. Note, if you scan in Volumes that were previously purged, you will
be able to do restores from those Volumes. However, unless you modify the Job and File retention
times for the Jobs that were added by scanning, the next time you run any backup Job with the same
name, the records will be pruned again. Since it takes a long time to scan Volumes this can be very
frustrating.
With some care, bscan can also be used to synchronize your existing catalog with a Volume. Although we have
never seen a case of bscan damaging a catalog, since bscan modifies your catalog, we recommend that you do a
simple ASCII backup of your database before running bscan just to be sure. See Compacting Your Database for the
details of making a copy of your database.
bscan can also be useful in a disaster recovery situation, after the loss of a hard disk, if you do not have a valid
bootstrap file for reloading your system, or if a Volume has been recycled but not overwritten, you can use bscan
to re-create your database, which can then be used to restore your system or a file to its previous
state.
It is called:
Usage: bscan [options] <Bareos-archive>
-B <driver name> specify the database driver name (default NULL) <postgresql|mysql|sqlite>
-b bootstrap specify a bootstrap file
-c <file> specify configuration file
-d <nn> set debug level to nn
-dt print timestamp in debug output
-m update media info in database
-D <director> specify a director name specified in the Storage
configuration file for the Key Encryption Key selection
-n <name> specify the database name (default Bareos)
-u <user> specify database user name (default Bareos)
-P <password> specify database password (default none)
-h <host> specify database host (default NULL)
-t <port> specify database port (default 0)
-p proceed inspite of I/O errors
-r list records
-s synchronize or store in database
-S show scan progress periodically
-v verbose
-V <Volumes> specify Volume names (separated by |)
-w <dir> specify working directory (default from conf file)
-? print this message
Commands C.27:
As Bareos supports loading its database backend dynamically you need to specify the right database driver to use
using the -B option.
If you are using MySQL or PostgreSQL, there is no need to supply a working directory since in that case, bscan
knows where the databases are. However, if you have provided security on your database, you may need to
supply either the database name (-b option), the user name (-u option), and/or the password (-p)
options.
NOTE: before bscan can work, it needs at least a bare bones valid database. If your database exists but some
records are missing because they were pruned, then you are all set. If your database was lost or destroyed, then you
must first ensure that you have the SQL program running (MySQL or PostgreSQL), then you must create the
Bareos database (normally named bareos), and you must create the Bareos tables. This is explained in Prepare
Bareos database chapter of the manual. Finally, before scanning into an empty database, you must start and stop
the Director with the appropriate Bareos-dir.conf file so that it can create the Client and Storage records which are
not stored on the Volumes. Without these records, scanning is unable to connect the Job records to the proper
client.
Forgetting for the moment the extra complications of a full rebuild of your catalog, let’s suppose that you did a
backup to Volumes ”Vol001” and ”Vol002”, then sometime later all records of one or both those Volumes were
pruned or purged from the database. By using bscan you can recreate the catalog entries for those Volumes and
then use the restore command in the Console to restore whatever you want. A command something
like:
bscan -v -V Vol001|Vol002 /dev/nst0
Commands C.28:
will give you an idea of what is going to happen without changing your catalog. Of course, you may need to change
the path to the Storage daemon’s conf file, the Volume name, and your tape (or disk) device name. This command
must read the entire tape, so if it has a lot of data, it may take a long time, and thus you might want to
immediately use the command listed below. Note, if you are writing to a disk file, replace the device name with the
path to the directory that contains the Volumes. This must correspond to the Archive Device in the conf
file.
Then to actually write or store the records in the catalog, add the -s option as follows:
bscan -s -m -v -V Vol001|Vol002 /dev/nst0
Commands C.29:
When writing to the database, if bscan finds existing records, it will generally either update them if
something is wrong or leave them alone. Thus if the Volumes you are scanning are all or partially
in the catalog already, no harm will be done to that existing data. Any missing data will simply be
added.
If you have multiple tapes, you should scan them with:
bscan -s -m -v -V Vol001|Vol002|Vol003 /dev/nst0
Commands C.30:
Since there is a limit on the command line length (511 bytes) accepted by bscan, if you have too many Volumes, you
will need to manually create a bootstrap file. See the Bootstrap chapter of this manual for more details, in
particular the section entitled Bootstrap for bscan. Basically, the .bsr file for the above example might look
like:
Volume=Vol001
Volume=Vol002
Volume=Vol003
Note: bscan does not support supplying Volume names on the command line and at the same time in a bootstrap
file. Please use only one or the other.
You should, always try to specify the tapes in the order they are written. If you do not, any Jobs that span a volume
may not be fully or properly restored. However, bscan can handle scanning tapes that are not sequential. Any
incomplete records at the end of the tape will simply be ignored in that case. If you are simply repairing an existing
catalog, this may be OK, but if you are creating a new catalog from scratch, it will leave your database in an
incorrect state. If you do not specify all necessary Volumes on a single bscan command, bscan will not be able to
correctly restore the records that span two volumes. In other words, it is much better to specify two or three
volumes on a single bscan command (or in a .bsr file) rather than run bscan two or three times, each with a single
volume.
Note, the restoration process using bscan is not identical to the original creation of the catalog data. This is because
certain data such as Client records and other non-essential data such as volume reads, volume mounts, etc is not
stored on the Volume, and thus is not restored by bscan. The results of bscanning are, however, perfectly valid, and
will permit restoration of any or all the files in the catalog using the normal Bareos console commands. If you are
starting with an empty catalog and expecting bscan to reconstruct it, you may be a bit disappointed,
but at a minimum, you must ensure that your Bareos-dir.conf file is the same as what it previously
was – that is, it must contain all the appropriate Client resources so that they will be recreated in
your new database before running bscan. Normally when the Director starts, it will recreate any
missing Client records in the catalog. Another problem you will have is that even if the Volumes (Media
records) are recreated in the database, they will not have their autochanger status and slots properly set.
As a result, you will need to repair that by using the update slots command. There may be other
considerations as well. Rather than bscanning, you should always attempt to recover you previous catalog
backup.
If you wish to compare the contents of a Volume to an existing catalog without changing the catalog, you can safely
do so if and only if you do not specify either the -m or the -s options. However, the comparison routines are not as
good or as thorough as they should be, so we don’t particularly recommend this mode other than for
testing.
This is the mode for which bscan is most useful. You can either bscan into a freshly created catalog, or directly
into your existing catalog (after having made an ASCII copy as described above). Normally, you should start with a
freshly created catalog that contains no data.
Starting with a single Volume named TestVolume1, you run a command such as:
bscan -V TestVolume1 -v -s -m /dev/nst0
Commands C.31:
If there is more than one volume, simply append it to the first one separating it with a vertical bar. You may need
to precede the vertical bar with a forward slash escape the shell – e.g. TestVolume1|TestVolume2. The -v
option was added for verbose output (this can be omitted if desired). The -s option that tells bscan
to store information in the database. The physical device name /dev/nst0 is specified after all the
options.
For example, after having done a full backup of a directory, then two incrementals, I reinitialized the SQLite
database as described above, and using the bootstrap.bsr file noted above, I entered the following
command:
bscan -b bootstrap.bsr -v -s /dev/nst0
Commands C.32:
which produced the following output:
bscan: bscan.c:182 Using Database: Bareos, User: bacula
bscan: bscan.c:673 Created Pool record for Pool: Default
bscan: bscan.c:271 Pool type "Backup" is OK.
bscan: bscan.c:632 Created Media record for Volume: TestVolume1
bscan: bscan.c:298 Media type "DDS-4" is OK.
bscan: bscan.c:307 VOL_LABEL: OK for Volume: TestVolume1
bscan: bscan.c:693 Created Client record for Client: Rufus
bscan: bscan.c:769 Created new JobId=1 record for original JobId=2
bscan: bscan.c:717 Created FileSet record "Users Files"
bscan: bscan.c:819 Updated Job termination record for new JobId=1
bscan: bscan.c:905 Created JobMedia record JobId 1, MediaId 1
bscan: Got EOF on device /dev/nst0
bscan: bscan.c:693 Created Client record for Client: Rufus
bscan: bscan.c:769 Created new JobId=2 record for original JobId=3
bscan: bscan.c:708 Fileset "Users Files" already exists.
bscan: bscan.c:819 Updated Job termination record for new JobId=2
bscan: bscan.c:905 Created JobMedia record JobId 2, MediaId 1
bscan: Got EOF on device /dev/nst0
bscan: bscan.c:693 Created Client record for Client: Rufus
bscan: bscan.c:769 Created new JobId=3 record for original JobId=4
bscan: bscan.c:708 Fileset "Users Files" already exists.
bscan: bscan.c:819 Updated Job termination record for new JobId=3
bscan: bscan.c:905 Created JobMedia record JobId 3, MediaId 1
bscan: Got EOF on device /dev/nst0
bscan: bscan.c:652 Updated Media record at end of Volume: TestVolume1
bscan: bscan.c:428 End of Volume. VolFiles=3 VolBlocks=57 VolBytes=10,027,437
Commands C.33:
The key points to note are that bscan prints a line when each major record is created. Due to the volume of output,
it does not print a line for each file record unless you supply the -v option twice or more on the command
line.
In the case of a Job record, the new JobId will not normally be the same as the original Jobid. For example, for the
first JobId above, the new JobId is 1, but the original JobId is 2. This is nothing to be concerned about as it is the
normal nature of databases. bscan will keep everything straight.
Although bscan claims that it created a Client record for Client: Rufus three times, it was actually only created the
first time. This is normal.
You will also notice that it read an end of file after each Job (Got EOF on device ...). Finally the last line gives the
total statistics for the bscan.
If you had added a second -v option to the command line, Bareos would have been even more verbose, dumping
virtually all the details of each Job record it encountered.
Now if you start Bareos and enter a list jobs command to the console program, you will get:
+-------+----------+------------------+------+-----+----------+----------+---------+
| JobId | Name | StartTime | Type | Lvl | JobFiles | JobBytes | JobStat |
+-------+----------+------------------+------+-----+----------+----------+---------+
| 1 | usersave | 2002-10-07 14:59 | B | F | 84 | 4180207 | T |
| 2 | usersave | 2002-10-07 15:00 | B | I | 15 | 2170314 | T |
| 3 | usersave | 2002-10-07 15:01 | B | I | 33 | 3662184 | T |
+-------+----------+------------------+------+-----+----------+----------+---------+
bconsole C.34:
list jobs
which corresponds virtually identically with what the database contained before it was re-initialized and restored
with bscan. All the Jobs and Files found on the tape are restored including most of the Media record. The Volume
(Media) records restored will be marked as Full so that they cannot be rewritten without operator
intervention.
It should be noted that bscan cannot restore a database to the exact condition it was in previously
because a lot of the less important information contained in the database is not saved to the tape.
Nevertheless, the reconstruction is sufficiently complete, that you can run restore against it and get valid
results.
An interesting aspect of restoring a catalog backup using bscan is that the backup was made while Bareos was
running and writing to a tape. At the point the backup of the catalog is made, the tape Bareos is writing to will
have say 10 files on it, but after the catalog backup is made, there will be 11 files on the tape Bareos is writing. This
there is a difference between what is contained in the backed up catalog and what is actually on the tape. If after
restoring a catalog, you attempt to write on the same tape that was used to backup the catalog, Bareos will detect
the difference in the number of files registered in the catalog compared to what is on the tape, and will mark the
tape in error.
There are two solutions to this problem. The first is possibly the simplest and is to mark the volume as Used before
doing any backups. The second is to manually correct the number of files listed in the Media record of the catalog.
This procedure is documented elsewhere in the manual and involves using the update volume command in
bconsole.
If the Storage daemon crashes during a backup Job, the catalog will not be properly updated for the Volume being
used at the time of the crash. This means that the Storage daemon will have written say 20 files on the tape, but
the catalog record for the Volume indicates only 19 files.
Bareos refuses to write on a tape that contains a different number of files from what is in the catalog. To correct this
situation, you may run a bscan with the -m option (but without the -s option) to update only the final Media
record for the Volumes read.
If you use bscan to enter the contents of the Volume into an existing catalog, you should be aware that the
records you entered may be immediately pruned during the next job, particularly if the Volume is
very old or had been previously purged. To avoid this, after running bscan, you can manually set the
volume status (VolStatus) to Read-Only by using the update command in the catalog. This will allow
you to restore from the volume without having it immediately purged. When you have restored and
backed up the data, you can reset the VolStatus to Used and the Volume will be purged from the
catalog.
#
The bcopy program can be used to copy one Bareos archive file to another. For example, you may copy a tape to a
file, a file to a tape, a file to a file, or a tape to a tape. For tape to tape, you will need two tape drives. In the process
of making the copy, no record of the information written to the new Volume is stored in the catalog. This means
that the new Volume, though it contains valid backup data, cannot be accessed directly from existing catalog
entries. If you wish to be able to use the Volume with the Console restore command, for example, you must first
bscan the new Volume into the catalog.
Usage: bcopy [-d debug_level] <input-archive> <output-archive>
-b bootstrap specify a bootstrap file
-c <file> specify configuration file
-D <director> specify a director name specified in the Storage
configuration file for the Key Encryption Key selection
-dnn set debug level to nn
-dt print timestamp in debug output
-i specify input Volume names (separated by |)
-o specify output Volume names (separated by |)
-p proceed inspite of I/O errors
-v verbose
-w dir specify working directory (default /tmp)
-? print this message
Commands C.35:
By using a bootstrap file, you can copy parts of a Bareos archive file to another archive.
One of the objectives of this program is to be able to recover as much data as possible from a damaged tape.
However, the current version does not yet have this feature.
As this is a new program, any feedback on its use would be appreciated. In addition, I only have a single tape drive,
so I have never been able to test this program with two tape drives.
#
This program permits a number of elementary tape operations via a tty command interface. It works only with
tapes and not with other kinds of Bareos storage media (DVD, File, ...). The test command, described below,
can be very useful for testing older tape drive compatibility problems. Aside from initial testing of
tape drive compatibility with Bareos, btape will be mostly used by developers writing new tape
drivers.
btape can be dangerous to use with existing Bareos tapes because it will relabel a tape or write on the tape if so
requested regardless that the tape may contain valuable data, so please be careful and use it only on blank
tapes.
To work properly, btape needs to read the Storage daemon’s configuration file.
The physical device name must be specified on the command line, and this same device name must be present in the
Storage daemon’s configuration file read by btape.
Usage: btape <options> <device_name>
-b <file> specify bootstrap file
-c <file> set configuration file to file
-D <director> specify a director name specified in the Storage
configuration file for the Key Encryption Key selection
-d <nn> set debug level to nn
-dt print timestamp in debug output
-p proceed inspite of I/O errors
-s turn off signals
-v be verbose
-? print this message.
Commands C.36:
An important reason for this program is to ensure that a Storage daemon configuration file is defined so that Bareos
will correctly read and write tapes.
It is highly recommended that you run the test command before running your first Bareos job to ensure that the
parameters you have defined for your storage device (tape drive) will permit Bareos to function properly. You only
need to mount a blank tape, enter the command, and the output should be reasonably self explanatory. Please see
the Tape Testing Chapter of this manual for the details.
The full list of commands are:
Command Description
======= ===========
autochanger test autochanger
bsf backspace file
bsr backspace record
cap list device capabilities
clear clear tape errors
eod go to end of Bareos data for append
eom go to the physical end of medium
fill fill tape, write onto second volume
unfill read filled tape
fsf forward space a file
fsr forward space a record
help print this command
label write a Bareos label to the tape
load load a tape
quit quit btape
rawfill use write() to fill tape
readlabel read and print the Bareos tape label
rectest test record handling functions
rewind rewind the tape
scan read() tape block by block to EOT and report
scanblocks Bareos read block by block to EOT and report
speed report drive speed
status print tape status
test General test Bareos tape functions
weof write an EOF on the tape
wr write a single Bareos block
rr read a single record
qfill quick fill command
bconsole C.37:
btape commands
The most useful commands are:
- test – test writing records and EOF marks and reading them back.
- fill – completely fill a volume with records, then write a few records on a second volume, and finally,
both volumes will be read back. This command writes blocks containing random data, so your drive
will not be able to compress the data, and thus it is a good test of the real physical capacity of your
tapes.
- readlabel – read and dump the label on a Bareos tape.
- cap – list the device capabilities and status.
The readlabel command can be used to display the details of a Bareos tape label. This can be useful if the physical
tape label was lost or damaged.
In the event that you want to relabel a Bareos volume, you can simply use the label command which will write over
any existing label. However, please note for labeling tapes, we recommend that you use the label command in the
Console program since it will never overwrite a valid Bareos tape.
Testing your Tape Drive
To determine the best configuration of your tape drive, you can run the new speed command available in the btape
program.
This command can have the following arguments:
- Specify the Maximum File Size Sd
Device for this test. This counter is in GB.
- Specify the number of file to be written. The amount of data should be greater than your memory
(file_size ∗ nb_file).
- This flag permits to skip tests with constant data.
- This flag permits to skip tests with random data.
- This flag permits to skip tests with raw access.
- This flag permits to skip tests with Bareos block access.
*speed file_size=3 skip_raw
btape.c:1078 Test with zero data and Bareos block structure.
btape.c:956 Begin writing 3 files of 3.221 GB with blocks of 129024 bytes.
++++++++++++++++++++++++++++++++++++++++++
btape.c:604 Wrote 1 EOF to "Drive-0" (/dev/nst0)
btape.c:406 Volume bytes=3.221 GB. Write rate = 44.128 MB/s
...
btape.c:383 Total Volume bytes=9.664 GB. Total Write rate = 43.531 MB/s
btape.c:1090 Test with random data, should give the minimum throughput.
btape.c:956 Begin writing 3 files of 3.221 GB with blocks of 129024 bytes.
+++++++++++++++++++++++++++++++++++++++++++
btape.c:604 Wrote 1 EOF to "Drive-0" (/dev/nst0)
btape.c:406 Volume bytes=3.221 GB. Write rate = 7.271 MB/s
+++++++++++++++++++++++++++++++++++++++++++
...
btape.c:383 Total Volume bytes=9.664 GB. Total Write rate = 7.365 MB/s
bconsole C.38:
btape speed
When using compression, the random test will give your the minimum throughput of your drive . The test using
constant string will give you the maximum speed of your hardware chain. (cpu, memory, scsi card, cable, drive,
tape).
You can change the block size in the Storage Daemon configuration file.
#
bscrypto is used in the process of encrypting tapes (see also LTO Hardware Encryption). The Bareos Storage
Daemon and the btools (bls, bextract, bscan, btape, bextract) will use a so called Bareos Storage Daemon
plugin to perform the setting and clearing of the encryption keys. To bootstrap the encryption support and for
populating things like the crypto cache with encryption keys of volumes that you want to scan, you need to use the
bscrypto tool. The bscrypto tool has the following capabilities:
- Generate a new passphrase
- to be used as a so called Key Encryption Key (KEK) for wrapping a passphrase using RFC3394
key wrapping with aes-wrap
- or -
- for usage as a clear text encryption key loaded into the tape drive.
- Base64-encode a key if requested
- Generate a wrapped passphrase which performs the following steps:
- generate a semi random clear text passphrase
- wrap the passphrase using the Key Encryption Key using RFC3394
- base64-encode the wrapped key (as the wrapped key is binary, we always need to base64-encode
it in order to be able to pass the data as part of the director to storage daemon protocol
- show the content of a wrapped or unwrapped keyfile.
This can be used to reveal the content of the passphrase when a passphrase is stored in the database and you
have the urge to change the Key Encryption Key. Normally it is unwise to change the Key Encryption Key, as
this means that you have to redo all your stored encryption keys, as they are stored in the database
wrapped using the Key Encryption Key available in the config during the label phase of the
volume.
- Clear the crypto cache on the machine running the bareos-sd, which keeps a cache of used encryption keys,
which can be used when the bareos-sd is restarted without the need to connect to the bareos-dir to retrieve the
encryption keys.
- Set the encryption key of the drive
- Clear the encryption key of the drive
- Show the encryption status of the drive
- Show the encryption status of the next block (e.g. volume)
- Populate the crypto cache with data
#
The following programs are general utility programs and in general do not need a configuration file nor a device
name.
#
bsmtp is a simple mail transport program that permits more flexibility than the standard mail programs typically
found on Unix systems. It can even be used on Windows machines.
It is called:
Usage: bsmtp [-f from] [-h mailhost] [-s subject] [-c copy] [recipient ...]
-4 forces bsmtp to use IPv4 addresses only.
-6 forces bsmtp to use IPv6 addresses only.
-8 set charset to UTF-8
-a use any ip protocol for address resolution
-c set the Cc: field
-d <nn> set debug level to <nn>
-dt print a timestamp in debug output
-f set the From: field
-h use mailhost:port as the SMTP server
-s set the Subject: field
-r set the Reply-To: field
-l set the maximum number of lines to send (default: unlimited)
-? print this message.
Commands C.39:
bsmtp
If the -f option is not specified, bsmtp will use your userid. If the option -h is not specified bsmtp will use the value
in the environment variable bsmtpSERVER or if there is none localhost. By default port 25 is
used.
If a line count limit is set with the -l option, bsmtp will not send an email with a body text exceeding that number
of lines. This is especially useful for large restore job reports where the list of files restored might produce very long
mails your mail-server would refuse or crash. However, be aware that you will probably suppress the job report and
any error messages unless you check the log file written by the Director (see the messages resource in this manual for
details).
recipients is a space separated list of email recipients.
The body of the email message is read from standard input.
An example of the use of bsmtp would be to put the following statement in the Messages resource of your Bareos
Director configuration.
Mail Command = "bsmtp -h mail.example.com -f \"\(Bareos\) %r\" -s \"Bareos: %t %e of %c %l\" %r"
Operator Command = "bsmtp -h mail.example.com -f \"\(Bareos\) %r\" -s \"Bareos: Intervention needed for %j\" %r"
Configuration C.40:
bsmtp in Message resource
You have to replace mail.example.com with the fully qualified name of your SMTP (email) server, which
normally listens on port 25. For more details on the substitution characters (e.g. %r) used in the above
line, please see the documentation of the MailCommand in the Messages Resource chapter of this
manual.
It is HIGHLY recommended that you test one or two cases by hand to make sure that the mailhost that you
specified is correct and that it will accept your email requests. Since bsmtp always uses a TCP connection rather
than writing in the spool file, you may find that your from address is being rejected because it does not contain a
valid domain, or because your message is caught in your spam filtering rules. Generally, you should
specify a fully qualified domain name in the from field, and depending on whether your bsmtp gateway
is Exim or Sendmail, you may need to modify the syntax of the from part of the message. Please
test.
When running bsmtp by hand, you will need to terminate the message by entering a ctrl-d in column 1 of the last
line.
If you are getting incorrect dates (e.g. 1970) and you are running with a non-English language setting, you might try
adding a LANG=C immediately before the bsmtp call.
In general, bsmtp attempts to cleanup email addresses that you specify in the from, copy, mailhost, and recipient
fields, by adding the necessary < and > characters around the address part. However, if you include a
display-name (see RFC 5332), some SMTP servers such as Exchange may not accept the message if the
display-name is also included in < and >. As mentioned above, you must test, and if you run into this situation,
you may manually add the < and > to the Bareos Mail Command Dir
Messages or Operator Command Dir
Messages and when
bsmtp is formatting an address if it already contains a < or > character, it will leave the address
unchanged.
#
bareos-dbcheck is a simple program that will search for logical inconsistencies in the Bareos tables in your
database, and optionally fix them. It is a database maintenance routine, in the sense that it can detect
and remove unused rows, but it is not a database repair routine. To repair a database, see the tools
furnished by the database vendor. Normally bareos-dbcheck should never need to be run, but if
Bareos has crashed or you have a lot of Clients, Pools, or Jobs that you have removed, it could be
useful.
bareos-dbcheck is best started as the same user, as the Bareos Director is running, normally bareos. If you are
root on Linux, use the following command to switch to user bareos:
su -s /bin/bash - bareos
Commands C.41:
Substitute user to bareos
If not, problems of reading the Bareos configuration or accessing the database can arise.
bareos-dbcheck supports following command line options:
Usage: bareos-dbcheck [-c config ] [-B] [-C catalog name] [-d debug level] [-D driver name] <working-directory> <bareos-database> <user> <password> [<dbhost>] [<dbport>]
-b batch mode
-C catalog name in the director conf file
-c Director configuration filename or configuration directory (e.g. /etc/bareos)
-B print catalog configuration and exit
-d <nn> set debug level to <nn>
-dt print a timestamp in debug output
-D <driver name> specify the database driver name (default NULL) <postgresql|mysql|sqlite>
-f fix inconsistencies
-v verbose
-? print this message
Commands C.42:
When using the default configuration paths, it is not necessary to specify any options. Optionally, as Bareos
supports loading its database backend dynamically you may specify the right database driver to use using the -D
option.
If the -B option is specified, bareos-dbcheck will print out catalog information in a simple text based
format:
# bareos-dbcheck -B
catalog=MyCatalog
db_type=SQLite
db_name=bareos
db_driver=
db_user=bareos
db_password=
db_address=
db_port=0
db_socket=
Commands C.43:
If the -c option is given with the Bareos Director configuration, there is no need to enter any of the
command line arguments, in particular the working directory as bareos-dbcheck will read them from the
file.
If the -f option is specified, bareos-dbcheck will repair (fix) the inconsistencies it finds. Otherwise, it will report
only.
If the -b option is specified, bareos-dbcheck will run in batch mode, and it will proceed to examine and fix (if -f is
set) all programmed inconsistency checks. If the -b option is not specified, bareos-dbcheck will enter interactive
mode and prompt with the following:
Hello, this is the database check/correct program.
Modify database is off. Verbose is off.
Please select the function you want to perform.
1) Toggle modify database flag
2) Toggle verbose flag
3) Repair bad Filename records
4) Repair bad Path records
5) Eliminate duplicate Filename records
6) Eliminate duplicate Path records
7) Eliminate orphaned Jobmedia records
8) Eliminate orphaned File records
9) Eliminate orphaned Path records
10) Eliminate orphaned Filename records
11) Eliminate orphaned FileSet records
12) Eliminate orphaned Client records
13) Eliminate orphaned Job records
14) Eliminate all Admin records
15) Eliminate all Restore records
16) All (3-15)
17) Quit
Select function number:
Commands C.44:
By entering 1 or 2, you can toggle the modify database flag (-f option) and the verbose flag (-v). It can be
helpful and reassuring to turn off the modify database flag, then select one or more of the consistency
checks (items 3 through 13) to see what will be done, then toggle the modify flag on and re-run the
check.
Since Bareos Version >= 16.2.5, when running bareos-dbcheck with -b and -v, it will not interactively ask if
results should be printed or not. Instead, it does not print any detail results.
The inconsistencies examined are the following:
- Duplicate Filename records. This can happen if you accidentally run two copies of Bareos at the
same time, and they are both adding filenames simultaneously. It is a rare occurrence, but will create
an inconsistent database. If this is the case, you will receive error messages during Jobs warning of
duplicate database records. If you are not getting these error messages, there is no reason to run this
check.
- Repair bad Filename records. This checks and corrects filenames that have a trailing slash. They should
not.
- Repair bad Path records. This checks and corrects path names that do not have a trailing slash. They
should.
- Duplicate Path records. This can happen if you accidentally run two copies of Bareos at the same
time, and they are both adding filenames simultaneously. It is a rare occurrence, but will create an
inconsistent database. See the item above for why this occurs and how you know it is happening.
- Orphaned JobMedia records. This happens when a Job record is deleted (perhaps by a user issued
SQL statement), but the corresponding JobMedia record (one for each Volume used in the Job) was
not deleted. Normally, this should not happen, and even if it does, these records generally do not take
much space in your database. However, by running this check, you can eliminate any such orphans.
- Orphaned File records. This happens when a Job record is deleted (perhaps by a user issued SQL
statement), but the corresponding File record (one for each Volume used in the Job) was not deleted.
Note, searching for these records can be very time consuming (i.e. it may take hours) for a large
database. Normally this should not happen as Bareos takes care to prevent it. Just the same, this check
can remove any orphaned File records. It is recommended that you run this once a year since orphaned
File records can take a large amount of space in your database. You might want to ensure that you
have indexes on JobId, FilenameId, and PathId for the File table in your catalog before running this
command.
- Orphaned Path records. This condition happens any time a directory is deleted from your system and
all associated Job records have been purged. During standard purging (or pruning) of Job records,
Bareos does not check for orphaned Path records. As a consequence, over a period of time, old unused
Path records will tend to accumulate and use space in your database. This check will eliminate them.
It is recommended that you run this check at least once a year.
- Orphaned Filename records. This condition happens any time a file is deleted from your system and all
associated Job records have been purged. This can happen quite frequently as there are quite a large
number of files that are created and then deleted. In addition, if you do a system update or delete an
entire directory, there can be a very large number of Filename records that remain in the catalog but
are no longer used.
During standard purging (or pruning) of Job records, Bareos does not check for orphaned Filename
records. As a consequence, over a period of time, old unused Filename records will accumulate and use
space in your database. This check will eliminate them. It is strongly recommended that you run this
check at least once a year, and for large database (more than 200 Megabytes), it is probably better to
run this once every 6 months.
- Orphaned Client records. These records can remain in the database long after you have removed a
client.
- Orphaned Job records. If no client is defined for a job or you do not run a job for a long time, you can
accumulate old job records. This option allow you to remove jobs that are not attached to any client
(and thus useless).
- All Admin records. This command will remove all Admin records, regardless of their age.
- All Restore records. This command will remove all Restore records, regardless of their age.
If you are using MySQL, bareos-dbcheck in interactive mode will ask you if you want to create temporary indexes
to speed up orphaned Path and Filename elimination. In batch mode (-b) the temporary indexes will be created
without asking.
If you are using bvfs (e.g. used by bareos-webui), don’t eliminate orphaned path, else you will have to rebuild
brestore_pathvisibility and brestore_pathhierarchy indexes.
Normally you should never need to run bareos-dbcheck in spite of the recommendations given above, which are
given so that users don’t waste their time running bareos-dbcheck too often.
#
bregex is a simple program that will allow you to test regular expressions against a file of data. This can be
useful because the regex libraries on most systems differ, and in addition, regex expressions can be
complicated.
To run it, use:
Usage: bregex [-d debug_level] -f <data-file>
-f specify file of data to be matched
-l suppress line numbers
-n print lines that do not match
-? print this message.
The <data-file> is a filename that contains lines of data to be matched (or not) against one or more patterns. When
the program is run, it will prompt you for a regular expression pattern, then apply it one line at a time against the
data in the file. Each line that matches will be printed preceded by its line number. You will then be prompted
again for another pattern.
Enter an empty line for a pattern to terminate the program. You can print only lines that do not match by using the
-n option, and you can suppress printing of line numbers with the -l option.
This program can be useful for testing regex expressions to be applied against a list of filenames.
#
bwild is a simple program that will allow you to test wild-card expressions against a file of data.
To run it, use:
Usage: bwild [-d debug_level] -f <data-file>
-f specify file of data to be matched
-l suppress line numbers
-n print lines that do not match
-? print this message.
The <data-file> is a filename that contains lines of data to be matched (or not) against one or more patterns. When
the program is run, it will prompt you for a wild-card pattern, then apply it one line at a time against the data in
the file. Each line that matches will be printed preceded by its line number. You will then be prompted again for
another pattern.
Enter an empty line for a pattern to terminate the program. You can print only lines that do not match by using the
-n option, and you can suppress printing of line numbers with the -l option.
This program can be useful for testing wild expressions to be applied against a list of filenames.
#
The main purpose of bpluginfo is to display different information about Bareos plugin. You can use it to check a
plugin name, author, license and short description. You can use -f option to display API implemented by the plugin.
Some plugins may require additional ’-a’ option for val- idating a Bareos Daemons API. In most cases it is not
required.
#
TODO: This chapter is going to be rewritten (by Philipp).
The information in this chapter is provided so that you may either create your own bootstrap files, or
so that you can edit a bootstrap file produced by Bareos. However, normally the bootstrap file will
be automatically created for you during the restore in the Console program, or by using a Write
Bootstrap Dir
Job record in your Backup Jobs, and thus you will never need to know the details of this
file.
The bootstrap file contains ASCII information that permits precise specification of what files should be restored,
what volume they are on, and where they are on the volume. It is a relatively compact form of specifying the
information, is human readable, and can be edited with any text editor.
#
The general format of a bootstrap file is:
<keyword>= <value>
Where each keyword and the value specify which files to restore. More precisely the keyword and their values
serve to limit which files will be restored and thus act as a filter. The absence of a keyword means that all records
will be accepted.
Blank lines and lines beginning with a pound sign (#) in the bootstrap file are ignored.
There are keywords which permit filtering by Volume, Client, Job, FileIndex, Session Id, Session Time,
...
The more keywords that are specified, the more selective the specification of which files to restore will be. In fact,
each keyword is ANDed with other keywords that may be present.
For example,
Volume = Test-001
VolSessionId = 1
VolSessionTime = 108927638
directs the Storage daemon (or the bextract program) to restore only those files on Volume Test-001 AND having
VolumeSessionId equal to one AND having VolumeSession time equal to 108927638.
The full set of permitted keywords presented in the order in which they are matched against the Volume records
are:
-
Volume
- The value field specifies what Volume the following commands apply to. Each Volume specification
becomes the current Volume, to which all the following commands apply until a new current Volume
(if any) is specified. If the Volume name contains spaces, it should be enclosed in quotes. At lease one
Volume specification is required.
-
Count
- The value is the total number of files that will be restored for this Volume. This allows the Storage
daemon to know when to stop reading the Volume. This value is optional.
-
VolFile
- The value is a file number, a list of file numbers, or a range of file numbers to match on the current
Volume. The file number represents the physical file on the Volume where the data is stored. For a
tape volume, this record is used to position to the correct starting file, and once the tape is past the
last specified file, reading will stop.
-
VolBlock
- The value is a block number, a list of block numbers, or a range of block numbers to match
on the current Volume. The block number represents the physical block within the file on the Volume
where the data is stored.
-
VolSessionTime
- The value specifies a Volume Session Time to be matched from the current volume.
-
VolSessionId
- The value specifies a VolSessionId, a list of volume session ids, or a range of volume session
ids to be matched from the current Volume. Each VolSessionId and VolSessionTime pair corresponds
to a unique Job that is backed up on the Volume.
-
JobId
- The value specifies a JobId, list of JobIds, or range of JobIds to be selected from the current Volume.
Note, the JobId may not be unique if you have multiple Directors, or if you have reinitialized your
database. The JobId filter works only if you do not run multiple simultaneous jobs. This value is
optional and not used by Bareos to restore files.
-
Job
- The value specifies a Job name or list of Job names to be matched on the current Volume. The Job
corresponds to a unique VolSessionId and VolSessionTime pair. However, the Job is perhaps a bit more
readable by humans. Standard regular expressions (wildcards) may be used to match Job names. The
Job filter works only if you do not run multiple simultaneous jobs. This value is optional and not used
by Bareos to restore files.
-
Client
- The value specifies a Client name or list of Clients to will be matched on the current Volume.
Standard regular expressions (wildcards) may be used to match Client names. The Client filter works
only if you do not run multiple simultaneous jobs. This value is optional and not used by Bareos to
restore files.
-
FileIndex
- The value specifies a FileIndex, list of FileIndexes, or range of FileIndexes to be selected from
the current Volume. Each file (data) stored on a Volume within a Session has a unique FileIndex.
For each Session, the first file written is assigned FileIndex equal to one and incremented for each file
backed up.
This for a given Volume, the triple VolSessionId, VolSessionTime, and FileIndex uniquely identifies a
file stored on the Volume. Multiple copies of the same file may be stored on the same Volume, but for
each file, the triple VolSessionId, VolSessionTime, and FileIndex will be unique. This triple is stored
in the Catalog database for each file.
To restore a particular file, this value (or a range of FileIndexes) is required.
-
FileRegex
- The value is a regular expression. When specified, only matching filenames will be restored.
FileRegex=^/etc/passwd(.old)?
-
Slot
- The value specifies the autochanger slot. There may be only a single Slot specification for each
Volume.
-
Stream
- The value specifies a Stream, a list of Streams, or a range of Streams to be selected from the current
Volume. Unless you really know what you are doing (the internals of Bareos), you should avoid this
specification. This value is optional and not used by Bareos to restore files.
The Volume record is a bit special in that it must be the first record. The other keyword records may appear in
any order and any number following a Volume record.
Multiple Volume records may be specified in the same bootstrap file, but each one starts a new set of filter criteria
for the Volume.
In processing the bootstrap file within the current Volume, each filter specified by a keyword is ANDed with the
next. Thus,
Volume = Test-01
Client = "My machine"
FileIndex = 1
will match records on Volume Test-01 AND Client records for My machine AND FileIndex equal to
one.
Multiple occurrences of the same record are ORed together. Thus,
Volume = Test-01
Client = "My machine"
Client = "Backup machine"
FileIndex = 1
will match records on Volume Test-01 AND (Client records for My machine OR Backup machine) AND
FileIndex equal to one.
For integer values, you may supply a range or a list, and for all other values except Volumes, you may specify a list.
A list is equivalent to multiple records of the same keyword. For example,
Volume = Test-01
Client = "My machine", "Backup machine"
FileIndex = 1-20, 35
will match records on Volume Test-01 AND (Client records for My machine OR Backup machine) AND
(FileIndex 1 OR 2 OR 3 ... OR 20 OR 35).
As previously mentioned above, there may be multiple Volume records in the same bootstrap file. Each new Volume
definition begins a new set of filter conditions that apply to that Volume and will be ORed with any other Volume
definitions.
As an example, suppose we query for the current set of tapes to restore all files on Client Rufus using the query
command in the console program:
Using default Catalog name=MySQL DB=bareos
*query
Available queries:
1: List Job totals:
2: List where a file is saved:
3: List where the most recent copies of a file are saved:
4: List total files/bytes by Job:
5: List total files/bytes by Volume:
6: List last 10 Full Backups for a Client:
7: List Volumes used by selected JobId:
8: List Volumes to Restore All Files:
Choose a query (1-8): 8
Enter Client Name: Rufus
+-------+------------------+------------+-----------+----------+------------+
| JobId | StartTime | VolumeName | StartFile | VolSesId | VolSesTime |
+-------+------------------+------------+-----------+----------+------------+
| 154 | 2002-05-30 12:08 | test-02 | 0 | 1 | 1022753312 |
| 202 | 2002-06-15 10:16 | test-02 | 0 | 2 | 1024128917 |
| 203 | 2002-06-15 11:12 | test-02 | 3 | 1 | 1024132350 |
| 204 | 2002-06-18 08:11 | test-02 | 4 | 1 | 1024380678 |
+-------+------------------+------------+-----------+----------+------------+
The output shows us that there are four Jobs that must be restored. The first one is a Full backup, and the
following three are all Incremental backups.
The following bootstrap file will restore those files:
Volume=test-02
VolSessionId=1
VolSessionTime=1022753312
Volume=test-02
VolSessionId=2
VolSessionTime=1024128917
Volume=test-02
VolSessionId=1
VolSessionTime=1024132350
Volume=test-02
VolSessionId=1
VolSessionTime=1024380678
As a final example, assume that the initial Full save spanned two Volumes. The output from query might look
like:
+-------+------------------+------------+-----------+----------+------------+
| JobId | StartTime | VolumeName | StartFile | VolSesId | VolSesTime |
+-------+------------------+------------+-----------+----------+------------+
| 242 | 2002-06-25 16:50 | File0003 | 0 | 1 | 1025016612 |
| 242 | 2002-06-25 16:50 | File0004 | 0 | 1 | 1025016612 |
| 243 | 2002-06-25 16:52 | File0005 | 0 | 2 | 1025016612 |
| 246 | 2002-06-25 19:19 | File0006 | 0 | 2 | 1025025494 |
+-------+------------------+------------+-----------+----------+------------+
and the following bootstrap file would restore those files:
Volume=File0003
VolSessionId=1
VolSessionTime=1025016612
Volume=File0004
VolSessionId=1
VolSessionTime=1025016612
Volume=File0005
VolSessionId=2
VolSessionTime=1025016612
Volume=File0006
VolSessionId=2
VolSessionTime=1025025494
#
One thing that is probably worth knowing: the bootstrap files that are generated automatically at the end of the job
are not as optimized as those generated by the restore command. This is because during Incremental and
Differential jobs, the records pertaining to the files written for the Job are appended to the end of the bootstrap file.
As consequence, all the files saved to an Incremental or Differential job will be restored first by the Full save, then
by any Incremental or Differential saves.
When the bootstrap file is generated for the restore command, only one copy (the most recent) of each file is
restored.
So if you have spare cycles on your machine, you could optimize the bootstrap files by doing the following:
bconsole
restore client=xxx select all
done
no
quit
Backup bootstrap file.
The above will not work if you have multiple FileSets because that will be an extra prompt. However, the restore
client=xxx select all builds the in-memory tree, selecting everything and creates the bootstrap
file.
The no answers the Do you want to run this (yes/mod/no) question.
#
If you have a very large number of Volumes to scan with bscan, you may exceed the command line limit (511
characters). In that case, you can create a simple bootstrap file that consists of only the volume names. An example
might be:
Volume="Vol001"
Volume="Vol002"
Volume="Vol003"
Volume="Vol004"
Volume="Vol005"
#
If you want to extract or copy a single Job, you can do it by selecting by JobId (code not tested) or better yet, if
you know the VolSessionTime and the VolSessionId (printed on Job report and in Catalog), specifying this is by far
the best. Using the VolSessionTime and VolSessionId is the way Bareos does restores. A bsr file might look like the
following:
Volume="Vol001"
VolSessionId=10
VolSessionTime=1080847820
If you know how many files are backed up (on the job report), you can enormously speed up the selection by adding
(let’s assume there are 157 files):
FileIndex=1-157
Count=157
Finally, if you know the File number where the Job starts, you can also cause bcopy to forward space to the right
file without reading every record:
VolFile=20
There is nothing magic or complicated about a BSR file. Parsing it and properly applying it within Bareos *is*
magic, but you don’t need to worry about that.
If you want to see a *real* bsr file, simply fire up the restore command in the console program, select something,
then answer no when it prompts to run the job. Then look at the file restore.bsr in your working
directory.
#
Since Bareos maintains a catalog of files, their attributes, and either SHA1 or MD5 signatures, it can be an ideal
tool for improving computer security. This is done by making a snapshot of your system files with a Verify
Job and then checking the current state of your system against the snapshot, on a regular basis (e.g.
nightly).
The first step is to set up a Verify Job and to run it with:
Level = InitCatalog
The InitCatalog level tells Bareos simply to get the information on the specified files and to put it into the
catalog. That is your database is initialized and no comparison is done. The InitCatalog is normally run one time
manually.
Thereafter, you will run a Verify Job on a daily (or whatever) basis with:
Level = Catalog
The Level = Catalog level tells Bareos to compare the current state of the files on the Client to the last
InitCatalog that is stored in the catalog and to report any differences. See the example below for the format of the
output.
You decide what files you want to form your ”snapshot” by specifying them in a FileSet resource, and normally,
they will be system files that do not change, or that only certain features change.
Then you decide what attributes of each file you want compared by specifying comparison options on the Include
statements that you use in the FileSet resource of your Catalog Jobs.
#
In the discussion that follows, we will make reference to the Verify Configuration Example that is included below in
the A Verify Configuration Example section. You might want to look it over now to get an idea of what it
does.
The main elements consist of adding a schedule, which will normally be run daily, or perhaps more often. This is
provided by the VerifyCycle Schedule, which runs at 5:05 in the morning every day.
Then you must define a Job, much as is done below. We recommend that the Job name contain the name of your
machine as well as the word Verify or Check. In our example, we named it MatouVerify. This will permit you to
easily identify your job when running it from the Console.
You will notice that most records of the Job are quite standard, but that the FileSet resource contains
verify=pins1 option in addition to the standard signature=SHA1 option. If you don’t want SHA1 signature
comparison, and we cannot imagine why not, you can drop the signature=SHA1 and none will be computed nor
stored in the catalog. Or alternatively, you can use verify=pins5 and signature=MD5, which will use
the MD5 hash algorithm. The MD5 hash computes faster than SHA1, but is cryptographically less
secure.
The verify=pins1 is ignored during the InitCatalog Job, but is used during the subsequent Catalog Jobs to
specify what attributes of the files should be compared to those found in the catalog. pins1 is a reasonable set to
begin with, but you may want to look at the details of these and other options. They can be found in the FileSet
Resource section of this manual. Briefly, however, the p of the pins1 tells Verify to compare the permissions bits,
the i is to compare inodes, the n causes comparison of the number of links, the s compares the file size, and
the 1 compares the SHA1 checksums (this requires the signature=SHA1 option to have been set
also).
You must also specify the Client and the Catalog resources for your Verify job, but you probably already have
them created for your client and do not need to recreate them, they are included in the example below for
completeness.
As mentioned above, you will need to have a FileSet resource for the Verify job, which will have the additional
verify=pins1 option. You will want to take some care in defining the list of files to be included in your FileSet.
Basically, you will want to include all system (or other) files that should not change on your system. If you select
files, such as log files or mail files, which are constantly changing, your automatic Verify job will be constantly
finding differences. The objective in forming the FileSet is to choose all unchanging important system files. Then if
any of those files has changed, you will be notified, and you can determine if it changed because you loaded a new
package, or because someone has broken into your computer and modified your files. The example below shows a
list of files that I use on my Red Hat 7.3 system. Since I didn’t spend a lot of time working on it, it
probably is missing a few important files (if you find one, please send it to me). On the other hand,
as long as I don’t load any new packages, none of these files change during normal operation of the
system.
#
The first thing you will want to do is to run an InitCatalog level Verify Job. This will initialize the catalog to
contain the file information that will later be used as a basis for comparisons with the actual file system, thus
allowing you to detect any changes (and possible intrusions into your system).
The easiest way to run the InitCatalog is manually with the console program by simply entering run. You will be
presented with a list of Jobs that can be run, and you will choose the one that corresponds to your Verify Job,
MatouVerify in this example.
The defined Job resources are:
1: MatouVerify
2: usersrestore
3: Filetest
4: usersave
Select Job resource (1-4): 1
Next, the console program will show you the basic parameters of the Job and ask you:
Run Verify job
JobName: MatouVerify
FileSet: Verify Set
Level: Catalog
Client: MatouVerify
Storage: DLTDrive
Verify Job:
Verify List: /tmp/regress/working/MatouVerify.bsr
OK to run? (yes/mod/no): mod
Here, you want to respond mod to modify the parameters because the Level is by default set to Catalog and we
want to run an InitCatalog Job. After responding mod, the console will ask:
Parameters to modify:
1: Level
2: Storage
3: Job
4: FileSet
5: Client
6: When
7: Priority
8: Pool
9: Verify Job
Select parameter to modify (1-5): 1
you should select number 2 to modify the Level, and it will display:
Levels:
1: Initialize Catalog
2: Verify Catalog
3: Verify Volume to Catalog
4: Verify Disk to Catalog
5: Verify Volume Data (not yet implemented)
Select level (1-4): 1
Choose item 1, and you will see the final display:
Run Verify job
JobName: MatouVerify
FileSet: Verify Set
Level: Initcatalog
Client: MatouVerify
Storage: DLTDrive
Verify Job:
Verify List: /tmp/regress/working/MatouVerify.bsr
OK to run? (yes/mod/no): yes
at which point you respond yes, and the Job will begin.
Thereafter the Job will automatically start according to the schedule you have defined. If you wish to immediately
verify it, you can simply run a Verify Catalog which will be the default. No differences should be
found.
To use a previous job, you can add jobid=xxx option in run command line. It will run the Verify job against the
specified job.
*run jobid=1 job=MatouVerify
Run Verify job
JobName: MatouVerify
Level: Catalog
Client: 127.0.0.1-fd
FileSet: Full Set
Pool: Default (From Job resource)
Storage: File (From Job resource)
Verify Job: MatouVerify.2010-09-08_15.33.33_03
Verify List: /tmp/regress/working/MatouVerify.bsr
When: 2010-09-08 15:35:32
Priority: 10
OK to run? (yes/mod/no):
#
If you have setup your messages correctly, you should be notified if there are any differences and exactly what they
are. For example, below is the email received after doing an update of OpenSSH:
HeadMan: Start Verify JobId 83 Job=RufusVerify.2002-06-25.21:41:05
HeadMan: Verifying against Init JobId 70 run 2002-06-21 18:58:51
HeadMan: File: /etc/pam.d/sshd
HeadMan: st_ino differ. Cat: 4674b File: 46765
HeadMan: File: /etc/rc.d/init.d/sshd
HeadMan: st_ino differ. Cat: 56230 File: 56231
HeadMan: File: /etc/ssh/ssh_config
HeadMan: st_ino differ. Cat: 81317 File: 8131b
HeadMan: st_size differ. Cat: 1202 File: 1297
HeadMan: SHA1 differs.
HeadMan: File: /etc/ssh/sshd_config
HeadMan: st_ino differ. Cat: 81398 File: 81325
HeadMan: st_size differ. Cat: 1182 File: 1579
HeadMan: SHA1 differs.
HeadMan: File: /etc/ssh/ssh_config.rpmnew
HeadMan: st_ino differ. Cat: 812dd File: 812b3
HeadMan: st_size differ. Cat: 1167 File: 1114
HeadMan: SHA1 differs.
HeadMan: File: /etc/ssh/sshd_config.rpmnew
HeadMan: st_ino differ. Cat: 81397 File: 812dd
HeadMan: st_size differ. Cat: 2528 File: 2407
HeadMan: SHA1 differs.
HeadMan: File: /etc/ssh/moduli
HeadMan: st_ino differ. Cat: 812b3 File: 812ab
HeadMan: File: /usr/bin/scp
HeadMan: st_ino differ. Cat: 5e07e File: 5e343
HeadMan: st_size differ. Cat: 26728 File: 26952
HeadMan: SHA1 differs.
HeadMan: File: /usr/bin/ssh-keygen
HeadMan: st_ino differ. Cat: 5df1d File: 5e07e
HeadMan: st_size differ. Cat: 80488 File: 84648
HeadMan: SHA1 differs.
HeadMan: File: /usr/bin/sftp
HeadMan: st_ino differ. Cat: 5e2e8 File: 5df1d
HeadMan: st_size differ. Cat: 46952 File: 46984
HeadMan: SHA1 differs.
HeadMan: File: /usr/bin/slogin
HeadMan: st_ino differ. Cat: 5e359 File: 5e2e8
HeadMan: File: /usr/bin/ssh
HeadMan: st_mode differ. Cat: 89ed File: 81ed
HeadMan: st_ino differ. Cat: 5e35a File: 5e359
HeadMan: st_size differ. Cat: 219932 File: 234440
HeadMan: SHA1 differs.
HeadMan: File: /usr/bin/ssh-add
HeadMan: st_ino differ. Cat: 5e35b File: 5e35a
HeadMan: st_size differ. Cat: 76328 File: 81448
HeadMan: SHA1 differs.
HeadMan: File: /usr/bin/ssh-agent
HeadMan: st_ino differ. Cat: 5e35c File: 5e35b
HeadMan: st_size differ. Cat: 43208 File: 47368
HeadMan: SHA1 differs.
HeadMan: File: /usr/bin/ssh-keyscan
HeadMan: st_ino differ. Cat: 5e35d File: 5e96a
HeadMan: st_size differ. Cat: 139272 File: 151560
HeadMan: SHA1 differs.
HeadMan: 25-Jun-2002 21:41
JobId: 83
Job: RufusVerify.2002-06-25.21:41:05
FileSet: Verify Set
Verify Level: Catalog
Client: RufusVerify
Start time: 25-Jun-2002 21:41
End time: 25-Jun-2002 21:41
Files Examined: 4,258
Termination: Verify Differences
At this point, it was obvious that these files were modified during installation of the RPMs. If you want to be
super safe, you should run a Verify Level=Catalog immediately before installing new software to
verify that there are no differences, then run a Verify Level=InitCatalog immediately after the
installation.
To keep the above email from being sent every night when the Verify Job runs, we simply re-run the Verify Job
setting the level to InitCatalog (as we did above in the very beginning). This will re-establish the current state of
the system as your new basis for future comparisons. Take care that you don’t do an InitCatalog after someone has
placed a Trojan horse on your system!
If you have included in your FileSet a file that is changed by the normal operation of your system, you will get false
matches, and you will need to modify the FileSet to exclude that file (or not to Include it), and then re-run the
InitCatalog.
The FileSet that is shown below is what I use on my Red Hat 7.3 system. With a bit more thought, you can
probably add quite a number of additional files that should be monitored.
#
Schedule {
Name = "VerifyCycle"
Run = Level=Catalog sun-sat at 5:05
}
Job {
Name = "MatouVerify"
Type = Verify
Level = Catalog # default level
Client = MatouVerify
FileSet = "Verify Set"
Messages = Standard
Storage = DLTDrive
Pool = Default
Schedule = "VerifyCycle"
}
#
# The list of files in this FileSet should be carefully
# chosen. This is a good starting point.
#
FileSet {
Name = "Verify Set"
Include {
Options {
verify=pins1
signature=SHA1
}
File = /boot
File = /bin
File = /sbin
File = /usr/bin
File = /lib
File = /root/.ssh
File = /home/user/.ssh
File = /var/named
File = /etc/sysconfig
File = /etc/ssh
File = /etc/security
File = /etc/exports
File = /etc/rc.d/init.d
File = /etc/sendmail.cf
File = /etc/sysctl.conf
File = /etc/services
File = /etc/xinetd.d
File = /etc/hosts.allow
File = /etc/hosts.deny
File = /etc/hosts
File = /etc/modules.conf
File = /etc/named.conf
File = /etc/pam.d
File = /etc/resolv.conf
}
Exclude = { }
}
Client {
Name = MatouVerify
Address = lmatou
Catalog = Bareos
Password = ""
File Retention = 80d # 80 days
Job Retention = 1y # one year
AutoPrune = yes # Prune expired Jobs/Files
}
Catalog {
Name = Bareos
dbname = verify; user = bareos; password = ""
}
#
#
One of the major goals of Backup software is to ensure that you can restore tapes (the word tape should also include
disk volumes) that you wrote years ago. This means that each new version of the software should be able to read old
format tapes. The first problem you will have is to ensure that the hardware is still working some
years down the road, and the second problem will be to ensure that the media will still be good, then
your OS must be able to interface to the device, and finally Bareos must be able to recognize old
formats. All the problems except the last are ones that we cannot solve, but by careful planning you
can.
Since the very beginning of Bacula (January 2000) until today (2015), there have been three major Bacula/Bareos
tape formats. The second format was introduced in Bacula version 1.27 in November of 2002. Bareos has been
required to adapt the tape format to avoid potential trademark issues, but is able to read also the old Bacula tape
formats.
Though the tape format is basically fixed, the kinds of data that we can put on the tapes are extensible, and that is
how we added new features such as ACLs, Win32 data, encrypted data, ... Obviously, an older version of
Bacula/Bareos would not know how to read these newer data streams, but each newer version of Bareos should
know how to read all the older streams.
#
A Director and a Storage Daemon should (must) always run at the same version. This is true for Bareos as well as
for Bacula. It is not possible to mix these components. This is because the protocol between Director and Storage
Daemon itself is not versioned (also true for Bareos and Bacula). If you want to be able to switch back from Bareos
to Bacula after using a Bareos director and storage daemon you have to enable the compatible mode
in the Bareos storage daemon to have it write the data in the same format as the Bacula storage
daemon.
The Bareos File Daemon is compatible with all version of the Bacula director (tested with version 5.2.13 and
lower) when you enable the compatible mode in the configuration of the Bareos File Daemon. The
compatible option was set by default in Bareos < 15.2.0, and is disabled by default since Version >=
15.2.0.
To be sure this is enabled you can explicitly set the compatible option:
Compatible Fd
Client = True
A Bareos Director can only talk to Bacula file daemons of version 2.0 or higher. Through a change in the
Bacula network protocols, it is currently not possible to use a Bacula file daemon ≥ 6.0 with a Bareos
Director.
These combinations of Bareos and Bacula are know to work together:
|
|
|
|
| Director | Storage Daemon | File Daemon | Remarks |
|
|
|
|
|
|
|
|
| Bareos | Bareos | Bareos | |
|
|
|
|
| Bareos | Bareos | 2.0 ≤ Bacula < 6.0 | |
|
|
|
|
| Bacula | Bacula | Bacula | |
|
|
|
|
| Bacula | Bacula | Bareos (compatibility mode) | |
|
|
|
|
| |
Other combinations like Bacula Director with Bareos Storage Daemon will not work. However this wasn’t even
possible with different versions of bacula-dir and bacula-sd.
#
Upgrade is supported from Bacula version 5.2.x. If you are running any older version of Bacula, please update to 5.2
first (see Bacula documentation).
Please note! Updating from Bacula ≥ 7.0 to Bareos has not been tested.
Please note! As Bareos and Bacula packages bring binaries with identical paths and names, it is on most platforms
not possible to install components from both in parallel. Your package management tool will warn you about
this.
To have bareos running without any permission hassle, it is recommended to rename the user and group
bacula to the user and group bareos before upgrading. That way, we minimize the effort for the
user to recheck all config files and the rights on every script/directory etc. involved in the existing
setup.
The required commands should look something like this:
usermod -l bareos bacula
groupmod -n bareos bacula
Commands F.1:
Proceed with the following steps:
- Stop bacula services
- Backup your catalog database:
mysqldump bacula > /tmp/bacula_5.2.sql
Commands F.2:
- Make the user bareos have the same userid and the group bareos the same groupid as the user/group bacula
had before. This will solve a lot of rights problems.
- Install Bareos packages
- Run the update script on the old bacula database:
export db_name=bacula
/usr/lib/bareos/update_bareos_tables
unset db_name
Commands F.3:
- Backup upgraded DB:
mysqldump bacula > /tmp/bacula.sql
Commands F.4:
- Create bareos database:
/usr/lib/bareos/create_bareos_database
Commands F.5:
- Insert backuped db into new database:
cat /tmp/bacula.sql | mysql bareos
Commands F.6:
- Grant permissions:
/usr/lib/bareos/grant_mysql_privileges
Commands F.7:
- Adapt file permissions to bareos, if you have any file storage
- Adapt configs (not complete)
- With bacula the default setting for pid files was /var/run, which may not work if the
bareos-director runs as user bareos. Best way is to comment out the entry Pid Directory = "/
var/run" in your director config. Bareos will set a working default value (supposed to be
/var/lib/bareos/)
Renaming a postgresql database:
#
Bareos stores its information in a database, named Catalog. It is configured by Catalog Resource.
#
#
The status of a Bareos job is stored as abbreviation in the Catalog database table Job. It is also displayed by some
bconsole commands, eg. list jobs.
This table lists the abbreviations together with its description and weight. The weight is used, when
multiple states are applicable for a job. In this case, only the status with the highest weight/priority is
applied.
|
|
|
| Abbr. | Description | Weight |
|
|
|
| C | Created, not yet running | 15 |
| R | Running | 15 |
| B | Blocked | 15 |
| T | Completed successfully | 10 |
| E | Terminated with errors | 25 |
| e | Non-fatal error | 20 |
| f | Fatal error | 100 |
| D | Verify found differences | 15 |
| A | Canceled by user | 90 |
| I | Incomplete job | 15 |
| L | Committing data | 15 |
| W | Terminated with warnings | 20 |
| l | Doing data despooling | 15 |
| q | Queued waiting for device | 15 |
| F | Waiting for Client | 15 |
| S | Waiting for Storage daemon | 15 |
| m | Waiting for new media | 15 |
| M | Waiting for media mount | 15 |
| s | Waiting for storage resource | 15 |
| | | |
| j | Waiting for job resource | 15 |
| c | Waiting for client resource | 15 |
| d | Waiting on maximum jobs | 15 |
| t | Waiting on start time | 15 |
| p | Waiting on higher priority jobs | 15 |
| i | Doing batch insert file records | 15 |
| a | SD despooling attributes | 15 |
|
|
|
| |
| |
| |
| |
| |
#
#
If your are testing your configuration, but don’t want to store the backup data, it is possible to use a dummy
FIFO device to test your configuration, see Stored configuration.
Obviously, it can not be used to do a restore.
Device {
Name = NULL
Media Type = NULL
Device Type = Fifo
Archive Device = /dev/null
LabelMedia = yes
Random Access = no
AutomaticMount = no
RemovableMedia = no
MaximumOpenWait = 60
AlwaysOpen = no
}
Configuration H.1:
FIFO Storage Device Configuration
#
If you are running a database in production mode on your machine, Bareos will happily backup the files, but if the
database is in use while Bareos is reading it, you may back it up in an unstable state.
The best solution is to shutdown your database before backing it up, or use some tool specific to your database to
make a valid live copy perhaps by dumping the database in ASCII format.
#
Version >= 13.2.0
If you like to use the MSSQL-Plugin to backing up your Databases you need to consider some things:
- Database Mode
The database need to run in Full Recovery Mode. Otherwise you are not able to use differential
and incremental backups or to use point in time recovery.
Please note! If you set the databases into the mentionend mode you have to consider some maintance
facts. The database doesn’t shrink or delete the logs unanttended, so you have to shrink them manual
once a week and you have to truncate the logs once in a month.
- Security and Access
For connections you can use a SQL-User or a integrated systemaccount (Windows NT user). Both connection
types are supported.
- Standard Security
You have to provide user credentials within your options which do belong to user with the
sufficent right performing restores and backups from the database. This way stands for an extra
backup/restore user.
- Trusted Security
You use a systemaccount which have the sufficent rights to performing backups and restores on a
database. This systemaccount have to be same account like the bareos-filedeamon runs on.
- Permissions and Roles
- Server-Role
The user should be in the groups sysadmin and dbcreator.
- Database permissions
The user have to be a backupoperator and dbowner of the database which you like to backup.
There is no difference for the rights and roles between using a systemaccount (trusted security method) or a extra
backup user (standard security method). Please keep in mind if you use the trusted security method you have to use
the same system account like the bareos-filedeamon runs on.
For Bareos < 14.2, install the Bareos MSSQL plugin onto the MSSQL server you want to backup. Bareos >= 14.2
also allows to backup remote MSSQL servers (option serveraddress).
Bareos Windows-Installer
Install the Bareos filedaemon including the component ”Bareos FileDameon Plugins”. Make sure, that you install
the file daemon without the ”compatible” option.
Manual install
After downloading the plugin you need to copy it into C:\Program Files\Bareos\Plugins. Then you need to
define the plugin directory and which plugin the bareos-filedaemon should use. You have to edit the
bareos-filedaemon resource in C:\Program Data\bareos-fd.conf as follows:
FileDaemon {
Name = mssqlserver-fd
Maximum Concurrent Jobs = 20
# remove comment in next line to load plugins from specified directory
Plugin Directory = "C:/Program Files/Bareos/Plugins"
Plugin Names = "mssqlvdi"
compatible = no # this is the default since bareos 15
}
Configuration H.2:
MSSQL plugin configuration
*status client=mssqlserver-fd
Connecting to Client mssqlserver-fd at 192.168.10.101:9102
mssqlserver-fd Version: 13.2.2 (12 November 2013) VSS Linux Cross-compile Win64
Daemon started 18-Nov-13 11:51. Jobs: run=0 running=0.
Microsoft Windows Server 2012 Standard Edition (build 9200), 64-bit
Heap: heap=0 smbytes=20,320 max_bytes=20,522 bufs=71 max_bufs=73
Sizeof: boffset_t=8 size_t=8 debug=0 trace=1 bwlimit=0kB/s
Plugin Info:
Plugin : mssqlvdi-fd.dll
Description: Bareos MSSQL VDI Windows File Daemon Plugin
Version : 1, Date: July 2013
Author : Zilvinas Krapavickas
License : Bareos AGPLv3
Usage :
mssqlvdi:
serveraddress=<hostname>:
instance=<instance name>:
database=<database name>:
username=<database username>:
password=<database password>:
norecovery=<yes|no>:
replace=<yes|no>:
recoverafterrestore=<yes|no>:
stopbeforemark=<log sequence number specification>:
stopatmark=<log sequence number specification>:
stopat=<timestamp>
examples:
timestamp: ’Apr 15, 2020 12:00 AM’
log sequence number: ’lsn:15000000040000037’
bconsole H.3:
status client=mssqlserver-fd
To use the plugin you need to configure it in the fileset as a plugin resource. For each database instance you need to
define a exclusive backup job and fileset.
Fileset {
Name = "Mssql"
Enable VSS = no
Include {
Options {
Signature = MD5
}
Plugin = "mssqlvdi:instance=default:database=myDatabase:username=bareos:password=bareos"
}
}
Configuration H.4:
MSSQL FileSet
In this example we use the standard security method for the connection.
Used options in the plugin string are:
-
mssqlvdi
- This is the reference to the MSSQL plugin.
-
serveraddress
- (Version >= 14.2.2) Defines the server address to connect to (if empty defaults to localhost).
-
instance
- Defines the instance within the database server.
-
database
- Defines the database that should get backuped.
-
username and password
- Username and Password are required, when the connection is done using a
MSSQL user. If the systemaccount the bareos-fd runs with has succifient permissions, this is not
required.
It is recommend to define an additional restore job.
For every database separate job and FileSet are required.
Here you can see an example for a backup:
*run job=MSSQLBak
Using Catalog "MyCatalog"
Run Backup job
JobName: MSSQLBak
Level: Full
Client: mssqlserver-fd
Format: Native
FileSet: Mssql
Pool: File (From Job resource)
Storage: File (From Job resource)
When: 2013-11-21 09:48:27
Priority: 10
OK to run? (yes/mod/no): yes
Job queued. JobId=7
You have no messages.
*mess
21-Nov 09:48 bareos-dir JobId 7: Start Backup JobId 7, Job=MSSQLBak.2013-11-21_09.48.30_04
21-Nov 09:48 bareos-dir JobId 7: Using Device "FileStorage" to write.
21-Nov 09:49 bareos-sd JobId 7: Volume "test1" previously written, moving to end of data.
21-Nov 09:49 bareos-sd JobId 7: Ready to append to end of Volume "test1" size=2300114868
21-Nov 09:49 bareos-sd JobId 7: Elapsed time=00:00:27, Transfer rate=7.364 M Bytes/second
21-Nov 09:49 bareos-dir JobId 7: Bareos bareos-dir 13.4.0 (01Oct13):
Build OS: x86_64-pc-linux-gnu debian Debian GNU/Linux 7.0 (wheezy)
JobId: 7
Job: MSSQLBak.2013-11-21_09.48.30_04
Backup Level: Full
Client: "mssqlserver-fd" 13.2.2 (12Nov13) Microsoft Windows Server 2012 Standard Edition (build 9200), 64-bit,Cross-compile,Win64
FileSet: "Mssql" 2013-11-04 23:00:01
Pool: "File" (From Job resource)
Catalog: "MyCatalog" (From Client resource)
Storage: "File" (From Job resource)
Scheduled time: 21-Nov-2013 09:48:27
Start time: 21-Nov-2013 09:49:13
End time: 21-Nov-2013 09:49:41
Elapsed time: 28 secs
Priority: 10
FD Files Written: 1
SD Files Written: 1
FD Bytes Written: 198,836,224 (198.8 MB)
SD Bytes Written: 198,836,435 (198.8 MB)
Rate: 7101.3 KB/s
Software Compression: None
VSS: no
Encryption: no
Accurate: no
Volume name(s): test1
Volume Session Id: 1
Volume Session Time: 1384961357
Last Volume Bytes: 2,499,099,145 (2.499 GB)
Non-fatal FD errors: 0
SD Errors: 0
FD termination status: OK
SD termination status: OK
Termination: Backup OK
bconsole H.5:
run MSSQL backup job
At least you gain a full backup which contains the follow:
@MSSQL/
@MSSQL/default/
@MSSQL/default/myDatabase/
@MSSQL/default/myDatabase/db-full
So if you perform your first full backup your are capable to perfom differntial and incremental backups.
Differntial FileSet example:
/@MSSQL/
/@MSSQL/default/
/@MSSQL/default/myDatabase/
/@MSSQL/default/myDatabase/db-full
/@MSSQL/default/myDatabase/db-diff
Incremental FileSet example:
*@MSSQL/
*default/
*myDatabase/
*db-diff
*db-full
*log-2013-11-21 17:32:20
If you want to perfom a restore of a full backup without differentials or incrementals you have some options which
helps you to restore even the corrupted database still exist. But you have to specifiy the options like plugin, instance
and database during every backup.
-
replace=<yes|no>
- With this option you can replace the database if it still exist.
-
instance
- Defines the server instance whithin the database is running.
-
database
- Defines the database you want to backup.
If you want to restore the actual backup to a set of backup files which you can use to restore a database under an
new name or perform any kind of special operations using for example the sql management studio, you can use a
where setting for the restore other then ’/’. When the where is set to ’/’ it will restore to the Virtual Device
Interface (VDI).
When you specify for restore a where path which is lets say ’c:/temp’ the plugin will restore the selected backup files
under a relocated path under c:/temp/@MSSQL@/...
Example for a full restore:
*restore client=mssqlserver-fd
Using Catalog "MyCatalog"
First you select one or more JobIds that contain files
to be restored. You will be presented several methods
of specifying the JobIds. Then you will be allowed to
select which files from those JobIds are to be restored.
To select the JobIds, you have the following choices:
1: List last 20 Jobs run
2: List Jobs where a given File is saved
3: Enter list of comma separated JobIds to select
4: Enter SQL list command
5: Select the most recent backup for a client
6: Select backup for a client before a specified time
7: Enter a list of files to restore
8: Enter a list of files to restore before a specified time
9: Find the JobIds of the most recent backup for a client
10: Find the JobIds for a backup for a client before a specified time
11: Enter a list of directories to restore for found JobIds
12: Select full restore to a specified Job date
13: Cancel
Select item: (1-13): 5
Automatically selected FileSet: Mssql
+-------+-------+----------+-------------+---------------------+------------+
| JobId | Level | JobFiles | JobBytes | StartTime | VolumeName |
+-------+-------+----------+-------------+---------------------+------------+
| 8 | F | 1 | 198,836,224 | 2013-11-21 09:52:28 | test1 |
+-------+-------+----------+-------------+---------------------+------------+
You have selected the following JobId: 8
Building directory tree for JobId(s) 8 ...
1 files inserted into the tree.
You are now entering file selection mode where you add (mark) and
remove (unmark) files to be restored. No files are initially added, unless
you used the "all" keyword on the command line.
Enter "done" to leave this mode.
cwd is: /
$ mark ∗
1 file marked.
$ done
Bootstrap records written to /var/lib/bareos/bareos-dir.restore.4.bsr
The job will require the following
Volume(s) Storage(s) SD Device(s)
===========================================================================
test1 File FileStorage
Volumes marked with "*" are online.
1 file selected to be restored.
The defined Restore Job resources are:
1: RestoreMSSQL
2: RestoreFiles
Select Restore Job (1-2): 1
Using Catalog "MyCatalog"
Run Restore job
JobName: RestoreMSSQL
Bootstrap: /var/lib/bareos/bareos-dir.restore.4.bsr
Where: /
Replace: Always
FileSet: Mssql
Backup Client: mssqlserver-fd
Restore Client: mssqlserver-fd
Format: Native
Storage: File
When: 2013-11-21 17:12:05
Catalog: MyCatalog
Priority: 10
Plugin Options: *None*
OK to run? (yes/mod/no): mod
Parameters to modify:
1: Level
2: Storage
3: Job
4: FileSet
5: Restore Client
6: Backup Format
7: When
8: Priority
9: Bootstrap
10: Where
11: File Relocation
12: Replace
13: JobId
14: Plugin Options
Select parameter to modify (1-14): 14
Please enter Plugin Options string: mssqlvdi:instance=default:database=myDatabase:replace=yes
Run Restore job
JobName: RestoreMSSQL
Bootstrap: /var/lib/bareos/bareos-dir.restore.4.bsr
Where: /
Replace: Always
FileSet: Mssql
Backup Client: mssqlserver-fd
Restore Client: mssqlserver-fd
Format: Native
Storage: File
When: 2013-11-21 17:12:05
Catalog: MyCatalog
Priority: 10
Plugin Options: mssqlvdi:instance=default:database=myDatabase:replace=yes
OK to run? (yes/mod/no): yes
Job queued. JobId=10
You have messages.
*mess
21-Nov 17:12 bareos-dir JobId 10: Start Restore Job RestoreMSSQL.2013-11-21_17.12.26_11
21-Nov 17:12 bareos-dir JobId 10: Using Device "FileStorage" to read.
21-Nov 17:13 damorgan-sd JobId 10: Ready to read from volume "test1" on device "FileStorage" (/storage).
21-Nov 17:13 damorgan-sd JobId 10: Forward spacing Volume "test1" to file:block 0:2499099145.
21-Nov 17:13 damorgan-sd JobId 10: End of Volume at file 0 on device "FileStorage" (/storage), Volume "test1"
21-Nov 17:13 damorgan-sd JobId 10: End of all volumes.
21-Nov 17:13 bareos-dir JobId 10: Bareos bareos-dir 13.4.0 (01Oct13):
Build OS: x86_64-pc-linux-gnu debian Debian GNU/Linux 7.0 (wheezy)
JobId: 10
Job: RestoreMSSQL.2013-11-21_17.12.26_11
Restore Client: mssqlserver-fd
Start time: 21-Nov-2013 17:12:28
End time: 21-Nov-2013 17:13:21
Files Expected: 1
Files Restored: 1
Bytes Restored: 198,836,224
Rate: 3751.6 KB/s
FD Errors: 0
FD termination status: OK
SD termination status: OK
Termination: Restore OK
bconsole H.6:
restore MSSQL database
Restore a Backup Chain
If you like to restore a specific state or a whole chain consists of full, incremental and differential backups you need
to use the ”norecovery=yes” option. After this the database is in ”recovery mode”. You can also use a option which
put the database right after the restore back into the right mode. If you like to restore certains point with protocols
or ”LSN” it it not recommend to work with this option.
-
norecovery=<yes|no>
- This option must be set to yes, if the database server should not do a automatic
recovery after the backup. Instead, additional manual maintenace operations are possible.
-
recoverafterrestore=<yes|no>
- With this command the database is right after backup in the correct mode. If
you not use this you have to use the followed tsql statement:
Restore DATABASE yourDatabase WITH RECOVERY
GO
-
stopbeforemark=<log sequence number specification>
- used for point in time recovery.
-
stopatmark=<log sequence number specification>
- used for point in time recovery.
-
stopat=<timestamp>
- used for point in time recovery.
Followed is a example for a restore of full, differential and incremental backup with a replace of the original
database:
*restore client=mssqlserver-fd
First you select one or more JobIds that contain files
to be restored. You will be presented several methods
of specifying the JobIds. Then you will be allowed to
select which files from those JobIds are to be restored.
To select the JobIds, you have the following choices:
1: List last 20 Jobs run
2: List Jobs where a given File is saved
3: Enter list of comma separated JobIds to select
4: Enter SQL list command
5: Select the most recent backup for a client
6: Select backup for a client before a specified time
7: Enter a list of files to restore
8: Enter a list of files to restore before a specified time
9: Find the JobIds of the most recent backup for a client
10: Find the JobIds for a backup for a client before a specified time
11: Enter a list of directories to restore for found JobIds
12: Select full restore to a specified Job date
13: Cancel
Select item: (1-13): 5
Automatically selected FileSet: Mssql
+-------+-------+----------+-------------+---------------------+------------+
| JobId | Level | JobFiles | JobBytes | StartTime | VolumeName |
+-------+-------+----------+-------------+---------------------+------------+
| 8 | F | 1 | 198,836,224 | 2013-11-21 09:52:28 | test1 |
| 11 | D | 1 | 2,555,904 | 2013-11-21 17:19:45 | test1 |
| 12 | I | 1 | 720,896 | 2013-11-21 17:29:39 | test1 |
+-------+-------+----------+-------------+---------------------+------------+
You have selected the following JobIds: 8,11,12
Building directory tree for JobId(s) 8,11,12 ...
3 files inserted into the tree.
You are now entering file selection mode where you add (mark) and
remove (unmark) files to be restored. No files are initially added, unless
you used the "all" keyword on the command line.
Enter "done" to leave this mode.
cwd is: /
$ mark ∗
3 files marked.
$ lsmark
*@MSSQL/
*default/
*myDatabase/
*db-diff
*db-full
*log-2013-11-21 17:32:20
$ done
Bootstrap records written to /var/lib/bareos/bareos-dir.restore.6.bsr
The job will require the following
Volume(s) Storage(s) SD Device(s)
===========================================================================
test1 File FileStorage
Volumes marked with "*" are online.
1 file selected to be restored.
The defined Restore Job resources are:
1: RestoreMSSQL
2: RestoreFiles
Select Restore Job (1-2): 1
Run Restore job
JobName: RestoreMSSQL
Bootstrap: /var/lib/bareos/bareos-dir.restore.6.bsr
Where: /
Replace: Always
FileSet: Mssql
Backup Client: mssqlserver-fd
Restore Client: mssqlserver-fd
Format: Native
Storage: File
When: 2013-11-21 17:34:23
Catalog: MyCatalog
Priority: 10
Plugin Options: *None*
OK to run? (yes/mod/no): mod
Parameters to modify:
1: Level
2: Storage
3: Job
4: FileSet
5: Restore Client
6: Backup Format
7: When
8: Priority
9: Bootstrap
10: Where
11: File Relocation
12: Replace
13: JobId
14: Plugin Options
Select parameter to modify (1-14): 14
Please enter Plugin Options string: mssqlvdi:instance=default:database=myDatabase:replace=yes:norecovery=yes
Run Restore job
JobName: RestoreMSSQL
Bootstrap: /var/lib/bareos/bareos-dir.restore.6.bsr
Where: /
Replace: Always
FileSet: Mssql
Backup Client: mssqlserver-fd
Restore Client: mssqlserver-fd
Format: Native
Storage: File
When: 2013-11-21 17:34:23
Catalog: MyCatalog
Priority: 10
Plugin Options: mssqlvdi:instance=default:database=myDatabase:replace=yes:norecovery=yes
OK to run? (yes/mod/no): yes
Job queued. JobId=14
21-Nov 17:34 bareos-dir JobId 14: Start Restore Job RestoreMSSQL.2013-11-21_17.34.40_16
21-Nov 17:34 bareos-dir JobId 14: Using Device "FileStorage" to read.
21-Nov 17:35 damorgan-sd JobId 14: Ready to read from volume "test1" on device "FileStorage" (/storage).
21-Nov 17:35 damorgan-sd JobId 14: Forward spacing Volume "test1" to file:block 0:2499099145.
21-Nov 17:35 damorgan-sd JobId 14: End of Volume at file 0 on device "FileStorage" (/storage), Volume "test1"
21-Nov 17:35 damorgan-sd JobId 14: End of all volumes.
21-Nov 17:35 bareos-dir JobId 14: Bareos bareos-dir 13.4.0 (01Oct13):
Build OS: x86_64-pc-linux-gnu debian Debian GNU/Linux 7.0 (wheezy)
JobId: 14
Job: RestoreMSSQL.2013-11-21_17.34.40_16
Restore Client: mssqlserver-fd
Start time: 21-Nov-2013 17:34:42
End time: 21-Nov-2013 17:35:36
Files Expected: 1
Files Restored: 3
Bytes Restored: 202,113,024
Rate: 3742.8 KB/s
FD Errors: 0
FD termination status: OK
SD termination status: OK
Termination: Restore OK
bconsole H.7:
restore MSSQL database chain
#
In this section, we describe different methods how to do backups of the PostgreSQL databases.
One method to backup a PostgreSQL database is to use the pg_dumpall tool to dump the database into a file and
then backup it as a normal file. After the backup, the file can be removed. It may also be an option not to remove it,
so that the latest version is always available immediately. On the next job run it will be overwritten
anyway.
This can be done by using Run Script Dir
Job directives inside a Job Resource, for example:
Job {
Name = "BackupDatabase"
JobDefs = "DefaultJob"
Client = dbserver-fd
Level = Full
FileSet="Database"
# This creates a dump of our database in the local filesystem on the client
RunScript {
FailJobOnError = Yes
RunsOnClient = Yes
RunsWhen = Before
Command = "sh -c ’pg_dumpall -U postgres > /var/lib/bareos/postgresql_dump.sql’"
}
# This deletes the dump in our local filesystem on the client
RunScript {
RunsOnSuccess = Yes
RunsOnClient = Yes
RunsWhen = After
Command = "rm /var/lib/bareos/postgresql_dump.sql"
}
}
FileSet {
Name = "Database"
Include {
Options {
signature = MD5
compression = gzip
}
# database dump file
File = "/var/lib/bareos/postgresql_dump.sql"
}
}
Configuration H.8:
RunScript job resource for a PostgreSQL backup
Note that redirecting the pg_dumpall output to a file requires to run the whole command line through a shell,
otherwise the pg_dumpall would not know what do with the > character and the job would fail. As no shell features
like redirection or piping are used for the rm, the sh -c is not needed there. See Run Script Dir
Job for more
details.
Instead of creating a temporary database dump file, the bpipe plugin can be used. For general information about
bpipe, see the bpipe Plugin section. The bpipe plugin is configured inside the Include Dir
FileSet section of a File Set,
e.g.:
FileSet {
Name = "postgresql-all"
Include {
Plugin = "bpipe:file=/POSTGRESQL/dump.sql:reader=pg_dumpall -U postgres:writer=psql -U postgres"
Options {
signature = MD5
compression = gzip
}
}
}
Configuration H.9:
bpipe directive for PostgreSQL backup
This causes the File Daemon to call bpipe plugin, which will write its data into the ”pseudo” file
/POSTGRESQL/dump.sql by calling the program pg_dumpall -U postgres to read the data during backup. The
pg_dumpall command outputs all the data for the database, which will be read by the plugin and stored in the
backup. During restore, the data that was backed up will be sent to the program specified in the last field, which in
this case is psql. When psql is called, it will read the data sent to it by the plugin then write it back to the same
database from which it came from.
This can also be used, to backup a database that is running on a remote host:
FileSet {
Name = "postgresql-remote"
Include {
Plugin = "bpipe:file=/POSTGRESQL/dump.sql:reader=pg_dumpall -h <hostname> -U <username> -W <password>:writer=psql -h <hostname> -U <username> -W <password>"
Options {
signature = MD5
compression = gzip
}
}
}
Configuration H.10:
bpipe directive to backup a PostgreSQL database that is running on a remote host
The PGSQL-Plugin supports an online (Hot) backup of database files and database transaction logs (WAL)
archiving (with pgsql-archlog) and backup. With online database and transaction logs the backup plugin can
perform Poin-In-Time-Restore up to a single selected transaction or date/time.
Database recovery is performed fully automatic with dedicated pgsql-restore utility.
For a full description, see https://github.com/bareos/contrib-pgsql-plugin/wiki.
#
In this section, we describe different methods to do a full backup of a MySQL database.
This plugin is available since Version >= 16.2.4, it uses the xtrabackup tool from Percona to perform full and
incremental hot-backups of MySQL / MariaDB tables of type InnoDB. It can also backup MyISAM tables but only
as full backups. On restore it requires a preparation using the xtrabackup tools, before the tables can be restored. If
you simply want to backup full dumps, then using Backup of MySQL Databases using the Python MySQL plugin is
the easier way.
Prerequisites
Install the xtrabackup tool from Percona. Documentation and packages are available here:
https://www.percona.com/software/mysql-database/percona-xtrabackup. The plugin was successfully tested
with xtrabackup versions 2.3.5 and 2.4.4.
As it is a Python plugin, it will also require to have the package bareos-filedaemon-python-plugin installed on
the Bareos File Daemon, where you run it.
For authentication the .mycnf file of the user running the Bareos File Daemon. Before proceeding, make sure that
xtrabackup can connect to the database and create backups.
Installation
Make sure you have met the prerequisites. Install the files BareosFdPercona.py and bareos-fd-percona.py in
your Bareos plugin directory (usually /usr/lib64/bareos/plugins). These files are available in the Git repository
https://github.com/bareos/bareos-contrib/tree/master/fd-plugins/bareos_percona.
Configuration
Activate your plugin directory in the Bareos File Daemon configuration. See File Daemon Plugins for more about
plugins in general.
Client {
...
Plugin Directory = /usr/lib64/bareos/plugins
Plugin Names = "python"
}
Resource H.11:
bareos-fd.d/client/myself.conf
Now include the plugin as command-plugin in the Fileset resource:
FileSet {
Name = "mysql"
Include {
Options {
compression=GZIP
signature = MD5
}
File = /etc
#...
Plugin = "python:module_path=/usr/lib64/bareos/plugins:module_name=bareos-fd-percona:mycnf=/root/.my.cnf"
}
}
Resource H.12:
bareos-dir.d/fileset/mysql.conf
If used this way, the plugin will call xtrabackup to create a backup of all databases in the xbstream format. This
stream will be processed by Bareos. If job level is incremental, xtrabackup will perform an incremental backup
since the last backup – for InnoDB tables. If you have MyISAM tables, you will get a full backup of
those.
You can append options to the plugin call as key=value pairs, separated by ’:’. The following options are
available:
- With mycnf you can make xtrabackup use a special mycnf-file with login credentials.
- dumpbinary lets you modify the default command xtrabackup.
- dumpoptions to modify the options for xtrabackup. Default setting is: --backup --datadir=/var/
lib/mysql/ --stream=xbstream --extra-lsndir=/tmp/individual_tempdir
- restorecommand to modify the command for restore. Default setting is: xbstream -x -C
- strictIncremental: By default (false), an incremental backup will create data, even if the Log
Sequence Number (LSN) wasn’t increased since last backup. This is to ensure, that eventual changes to
MYISAM tables get into the backup. MYISAM does not support incremental backups, you will always
get a full bakcup of these tables. If set to true, no data will be written into backup, if the LSN wasn’t
changed.
Restore
With the usual Bareos restore mechanism a file-hierarchy will be created on the restore client under the default
restore location:
/tmp/bareos-restores/_percona/
Each restore job gets an own subdirectory, because Percona expects an empty directory. In that subdirectory, a new
directory is created for every backup job that was part of the Full-Incremental sequence.
The naming scheme is: fromLSN_toLSN_jobid
Example:
/tmp/bareos-restores/_percona/351/
|-- 00000000000000000000_00000000000010129154_0000000334
|-- 00000000000010129154_00000000000010142295_0000000335
|-- 00000000000010142295_00000000000010201260_0000000338
This example shows the restore tree for restore job with ID 351. First subdirectory has all files from the first full
backup job with ID 334. It starts at LSN 0 and goes until LSN 10129154.
Next line is the first incremental job with ID 335, starting at LSN 10129154 until 10142295. The third line is the 2nd
incremental job with ID 338.
To further prepare the restored files, use the xtrabackup --prepare command. Read
https://www.percona.com/doc/percona-xtrabackup/2.4/xtrabackup_bin/incremental_backups.html for
more information.
The Python plugin from https://github.com/bareos/bareos-contrib/tree/master/fd-plugins/mysql-python
makes a backup of all or selected MySQL databases from the Bareos File Daemon or any other MySQL server. It
makes use of the mysqldump command and basically grabs data from mysqldump via pipe. This plugin is suitable to
backup database dumps. If you prefer to use mechanisms like incremental hot-backups of InnoDB tables, please use
the Bareos MySQL / MariaDB Percona xtrabackup Plugin (see Backup of MySQL Databases using the Bareos
MySQL Percona xtrabackup Plugin).
Following settings must be done on the Bareos client (Bareos File Daemon):
- install and enable the Bareos File Daemon Python plugin
- install the Python MySQL plugin (for some platforms it is available prepackaged from
http://download.bareos.org/bareos/contrib/, on the other platforms: copy the plugin files to the
Bareos Plugin Directory)
- disable bacula compatibility (default for Bareos >= 15.2)
Client {
...
Plugin Directory = /usr/lib64/bareos/plugins
Plugin Names = "python"
compatible = no
}
Resource H.13:
bareos-fd.d/client/myself.conf
Configure the plugin in the Bareos Director:
FileSet {
Name = "mysql"
Include {
Options {
signature = MD5
compression = lz4
}
Plugin = "python:module_path=/usr/lib64/bareos/plugins:module_name=bareos-fd-mysql:db=test,wikidb"
#Plugin = "python:module_path=/usr/lib64/bareos/plugins:module_name=bareos-fd-mysql:mysqlhost=dbhost:mysqluser=bareos:mysqlpassword=bareos"
}
}
Resource H.14:
bareos-dir.d/fileset/mysql.conf
In the above example the plugin creates and saves a dump from the databases called test and wikidb, running on the
file-daemon. The commented example below specifies an explicit MySQL server called dbhost, and connects with
user bareos, password bareos, to create and save a backup of all databases.
The plugin creates a pipe internally, thus no extra space on disk is needed. You will find one file per database in the
backups in the virtual directory /_mysqlbackups_.
List of supported options:
-
db
- comma separated list of databases to save, where each database will be stored in a separate file. If
ommited, all databases will be saved.
-
dumpbinary
- command (with or without full path) to create the dumps. Default: mysqldump
-
dumpoptions
- options for dumpbinary, default: “–events –single-transaction”
-
drop_and_recreate
- if not set to false, adds –add-drop-database –databases to dumpoptions
-
mysqlhost
- MySQL host to connect to, default: localhost
-
mysqluser
- MySQL user. Default: unset, the user running the file-daemon will be used (usually root)
-
mysqlpassword
- MySQL password. Default: unset (better use my.cnf to store passwords)
On restore, the database dumps are restored to the subdirectory _mysqlbackups_ in the restore path. The database
restore must be triggered manually (mysql < _mysqlbackups_/DATABASENAME.sql).
One method to backup a MySQL database is to use the mysqldump tool to dump the database into a file and then
backup it as a normal file. After the backup, the file can be removed. It may also be an option not to remove it, so
that the latest version is always available immediately. On the next job run it will be overwritten
anyway.
This can be done by using Run Script Dir
Job directives, for example:
Job {
Name = "BackupDatabase"
JobDefs = "DefaultJob"
Client = dbserver-fd
Level = Full
FileSet="Database"
# This creates a dump of our database in the local filesystem on the Client
RunScript {
FailJobOnError = Yes
RunsOnClient = Yes
RunsWhen = Before
Command = "sh -c ’mysqldump --user=<username> --password=<password> --opt --all-databases > /var/lib/bareos/mysql_dump.sql’"
}
# This deletes the dump in the local filesystem on the Client
RunScript {
RunsOnSuccess = Yes
RunsOnClient = Yes
RunsWhen = After
Command = "rm /var/lib/bareos/mysql_dump.sql"
}
}
FileSet {
Name = "Database"
Include {
Options {
signature = MD5
compression = gzip
}
# database dump file
File = "/var/lib/bareos/mysql_dump.sql"
}
}
Configuration H.15:
RunScript job resource for a MySQL backup
Note that redirecting the mysqldump output to a file requires to run the whole command line through a shell,
otherwise the mysqldump would not know what do with the > character and the job would fail. As no shell features
like redirection or piping are used for the rm, the sh -c is not needed there. See Run Script Dir
Job for more
details.
Instead of creating a temporary database dump file, the bpipe plugin can be used. For general information about
bpipe, see the bpipe Plugin section. The bpipe plugin is configured inside the Include section of a File Set,
e.g.:
FileSet {
Name = "mysql-all"
Include {
Plugin = "bpipe:file=/MYSQL/dump.sql:reader=mysqldump --user=<user> --password=<password> --opt --all-databases:writer=mysql --user=<user> --password=<password>"
Options {
signature = MD5
compression = gzip
}
}
}
Configuration H.16:
bpipe fileset for MySQL backup
This can also be used, to backup a database that is running on a remote host:
FileSet{
Name = "mysql-all"
Include {
Plugin = "bpipe:file=/MYSQL/dump.sql:reader=mysqldump --host=<hostname> --user=<user> --password=<password> --opt --all-databases:writer=mysql --host=<hostname> --user=<user> --password=<password>"
Options {
signature = MD5
compression = gzip
}
}
}
Configuration H.17:
bpipe directive to backup a MySQL database that is running on a remote host
If you do not want a direct restore of your data in your plugin directive, as shown in the examples above, there is
the possibility to restore the dump to the filesystem first, which offers you more control over the restore process,
e.g.:
FileSet{
Name = "mysql-all"
Include {
Plugin = "bpipe:file=/MYSQL/dump.sql:reader=mysqldump --host=<hostname> --user=<user> --password=<password> --opt --all-databases:writer=/usr/lib/bareos/scripts/bpipe-restore.sh"
Options {
signature = MD5
compression = gzip
}
}
}
Configuration H.18:
bpipe directive to backup a MySQL database and restore the dump to the filesystem first
A very simple corresponding shell script (bpipe-restore.sh) to the method above might look like the following
one:
#!/bin/bash
cat - > /tmp/dump.sql
exit 0
Configuration H.19:
bpipe shell script for a restore to filesystem
#
#
When disaster strikes, you must have a plan, and you must have prepared in advance, otherwise the work of
recovering your system and your files will be considerably greater. For example, if you have not previously saved
the partitioning information for your hard disk, how can you properly rebuild it if the disk must be
replaced?
Unfortunately, many of the steps one must take before and immediately after a disaster are very much dependent on
the operating system in use. As a consequence, this chapter will discuss in detail disaster recovery only for selected
operating systems.
#
Here are a few important considerations concerning disaster recovery that you should take into account before a
disaster strikes.
- If the building which houses your computers burns down or is otherwise destroyed, do you have off-site
backup data?
- Disaster recovery is much easier if you have several machines. If you have a single machine, how will
you handle unforeseen events if your only machine is down?
- Do you want to protect your whole system and use Bareos to recover everything? Or do you want
to try to restore your system from the original installation disks, apply any other updates and only
restore the user files?
#
- Create a rescue or CDROM for your systems. Generally, they are offered by each distribution, and
there are many good rescue disks on the Web
- Ensure that you always have a valid bootstrap file for your backup and that it is saved to an alternate
machine. This will permit you to easily do a full restore of your system.
- If possible copy your catalog nightly to an alternate machine. If you have a valid bootstrap file, this is
not necessary, but can be very useful if you do not want to reload everything.
- Ensure that you always have a valid bootstrap file for your catalog backup that is saved to an alternate
machine. This will permit you to restore your catalog more easily if needed.
- Try out how to use the Rescue CDROM before you are forced to use it in an emergency situation.
- Make a copy of your Bareos .conf files, particularly your bareos-dir.conf, and your bareos-sd.conf files,
because if your server goes down, these files will be needed to get it back up and running, and they
can be difficult to rebuild from memory.
#
A so called ”Bare Metal” recovery is one where you start with an empty hard disk and you restore your
machine.
Generally, following components are required for a Bare Metal Recovery:
- A rescue CDROM containing a copy of your OS and including the Bareos File daemon, including all
libraries
- The Bareos client configuration files
- Useful: a copy of your hard disk information
- A full Bareos backup of your system
#
From the Relax-and-Recover web site (http://relax-and-recover.org):
Relax-and-Recover is a setup-and-forget Linux bare metal disaster recovery solution. It is easy
to set up and requires no maintenance so there is no excuse for not using it.
Relax-and-Recover (ReaR) is quite easy to use with Bareos.
Bareos is a supported backend for ReaR >= 1.15. To use the BAREOS_CLIENT option, ReaR >= 1.17 is
required. If ReaR >= 1.17 is not part of your distribution, check the download section on the ReaR
website.
Assuming you have a working Bareos configuration on the system you want to protect with ReaR
and Bareos references this system by the name bareosclient-fd, the only configuration for ReaR
is:
BACKUP=BAREOS
BAREOS_CLIENT=bareosclient-fd
You also need to specify in your ReaR configuration file (/etc/rear/local.conf) where you want to store your
recovery images. Please refer to the ReaR documentation for details.
For example, if you want to create an ISO image and store it to an NFS server with the IP Address 192.168.10.1,
you can use the following configuration:
# This is default:
#OUTPUT=ISO
# Where to write the iso image
# You can use NFS, if you want to write your iso image to a nfs server
# If you leave this blank, it will
# be written to: /var/lib/rear/output/
OUTPUT_URL=nfs://192.168.10.1/rear
BACKUP=BAREOS
BAREOS_CLIENT=bareosclient-fd
Configuration I.1:
Full
Rear
configuration
in
/etc/rear/local.conf
If you have installed and configured ReaR on your system, type
root@linux:~#
rear -v mkrescue
Commands I.2:
Create Rescue Image
to create the rescue image. If you used the configuration example above, you will get a bootable ISO image which
can be burned onto a CD.
Please note! This will not create a Bareos backup on your system! You will have to do that by other means, e.g. by a
regular Bareos backup schedule. Also rear mkbackup will not create a backup. In this configuration it will only
create the rescue ISO (same as the rear mkrescue command).
In case, you want to recover your system, boot it using the generated ReaR recovery ISO. After booting log in as
user root and type
root@linux:~#
rear recover
Commands I.3:
Restore your system using Rear and Bareos
ReaR will now use the most recent backup from Bareos to restore your system. When the restore job has finished,
ReaR will start a new shell which you can use to verify if the system has been restored correctly. The restored
system can be found under the /mnt/local directory. When you are done¡ with the verification, type ’exit’
to leave the shell, getting back to the recovery process. Finally, you will be asked to confirm that
everything is correct. Type ’yes’ to continue. After that, ReaR will restore your bootloader. Recovery is
complete.
#
Above, we considered how to recover a client machine where a valid Bareos server was running on another machine.
However, what happens if your server goes down and you no longer have a running Director, Catalog, or Storage
daemon? There are several solutions:
- Bring up static versions of your Director, Catalog, and Storage daemon on the damaged machine.
- Move your server to another machine.
- Use a Hot Spare Server on another Machine.
The first option, is very difficult because it requires you to have created a static version of the Director and the
Storage daemon as well as the Catalog. If the Catalog uses MySQL or PostgreSQL, this may or may not be possible.
In addition, to loading all these programs on a bare system (quite possible), you will need to make sure you have a
valid driver for your tape drive.
The second suggestion is probably a much simpler solution, and one I have done myself. To do so, you might want to
consider the following steps:
- Install the same database server as on the original system.
- Install Bareos and initialize the Bareos database.
- Ideally, you will have a copy of all the Bareos conf files that were being used on your server. If not,
you will at a minimum need create a bareos-dir.conf that has the same Client resource that was used
to backup your system.
- If you have a valid saved Bootstrap file as created for your damaged machine with WriteBootstrap,
use it to restore the files to the damaged machine, where you have loaded a static Bareos File daemon
using the Rescue disk). This is done by using the restore command and at the yes/mod/no prompt,
selecting mod then specifying the path to the bootstrap file.
- If you have the Bootstrap file, you should now be back up and running, if you do not have a Bootstrap
file, continue with the suggestions below.
- Using bscan scan the last set of backup tapes into your MySQL, PostgreSQL or SQLite database.
- Start Bareos, and using the Console restore command, restore the last valid copy of the Bareos
database and the Bareos configuration files.
- Move the database to the correct location.
- Start the database, and restart Bareos. Then use the Console restore command, restore all the files
on the damaged machine, where you have loaded a Bareos File daemon using the Rescue disk.
For additional details of restoring your database, please see the Restoring When Things Go Wrong
chapter.
#
#
The Bareos programs contain a lot of debug messages. Normally, these are not printed. See the setdebug chapter
about how to enable them.
#
There are several reasons why a Bareos Director could not contact a client on a different machine. They
are:
- Check if the client file daemon is really running.
- The Client address or port is incorrect or not resolved by DNS. See if you can ping the client machine
using the same address as in the Client record.
- You have a firewall, and it is blocking traffic on port 9102 between the Director’s machine and the
Client’s machine (or on port 9103 between the Client and the Storage daemon machines).
- If your system is using Tcpwrapper (hosts.allow or hosts.deny file), verify that is permitting access.
- Your password or names are not correct in both the Director and the Client machine. Try configuring
everything identical to how you run the client on the same machine as the Director, but just change
the address. If that works, make the other changes one step at a time until it works.
Some of the DNS and Firewall problems can be circumvented by configuring clients using Client Initiated
Connection or as Passive Clients.
#
If you are having difficulties getting one or more of your File daemons to connect to the Storage daemon, it is most
likely because you have not used a fully qualified domain name on the Address Dir
Storage directive. That is the resolver
on the File daemon’s machine (not on the Director’s) must be able to resolve the name you supply into an IP
address. An example of an address that is guaranteed not to work: localhost. An example that may work:
bareos-sd1. An example that is more likely to work: bareos-sd1.example.com.
You can verify how a Bareos File Daemon resolves a DNS name by the following command:
*resolve client=bareos-fd NONEXISTINGHOSTNAME
Connecting to Client bareos-fd at bareos:9102
bareos-fd: Failed to resolve NONEXISTINGHOSTNAME
*resolve client=bareos-fd bareos-sd1.example.com
Connecting to Client bareos-fd at bareos:9102
bareos-fd resolves bareos-sd1.example.com to host[ipv4;192.168.0.1]
bconsole J.1:
Test DNS resolution of the Bareos File Daemon bareos-fd
If your address is correct, then make sure that no other program is using the port 9103 on the Storage daemon’s
machine. The Bacula project has reserved these port numbers by IANA, therefore they should only be used by
Bacula and its replacements like Bareos. However, apparently some HP printers do use these port numbers. A
netstat -lntp on the Bareos Storage Daemon’s machine can determine who is listening on the 9103 port (used for
FD to SD communications in Bareos).
#
For security reasons, Bareos requires that both the File daemon and the Storage daemon know the name of the
Director as well as its password. As a consequence, if you change the Director’s name or password, you
must make the corresponding change in the Storage daemon’s and in the File daemon’s configuration
files.
During the authorization process, the Storage daemon and File daemon also require that the Director authenticates
itself, so both ends require the other to have the correct name and password.
If you have edited the configuration files and modified any name or any password, and you are getting
authentication errors, then your best bet is to go back to the original configuration files generated by the Bareos
installation process. Make only the absolutely necessary modifications to these files – e.g. add the correct email
address. Then follow the instructions in the Running Bareos chapter of this manual. You will run a backup
to disk and a restore. Only when that works, should you begin customization of the configuration
files.
Some users report that authentication fails if there is not a proper reverse DNS lookup entry for the machine. This
seems to be a requirement of gethostbyname(), which is what Bareos uses to translate names into IP
addresses. If you cannot add a reverse DNS entry, or you don’t know how to do so, you can avoid the
problem by specifying an IP address rather than a machine name in the appropriate Bareos configuration
file.
Here is a picture that indicates what names/passwords in which files/Resources must match up:
In the left column, you will find the Director, Storage, and Client resources, with their names and passwords
– these are all in the Bareos Director configuration. The right column is where the corresponding
values should be found in the Console, Storage daemon (SD), and File daemon (FD) configuration
files.
Another thing to check is to ensure that the Bareos component you are trying to access has Maximum Concurrent Jobs
set large enough to handle each of the Jobs and the Console that want to connect simultaneously. Once the
maximum connections has been reached, each Bareos component will reject all new connections.
#
Bareos can run multiple concurrent jobs. Using the Maximum Concurrent Jobs directives, you can configure how
many and which jobs can be run simultaneously:
-
Bareos Director
-
-
Bareos Storage Daemon
-
-
Bareos File Daemon
-
For example, if you want two different jobs to run simultaneously backing up the same Client to the same
Storage device, they will run concurrently only if you have set Maximum Concurrent Jobs greater
than one in the Director resource, the Client resource, and the Storage resource in Bareos Director
configuration.
When running concurrent jobs without Data Spooling, the volume format becomes more complicated,
consequently, restores may take longer if Bareos must sort through interleaved volume blocks from multiple
simultaneous jobs. This can be avoided by having each simultaneous job write to a different volume or by using data
spooling We recommend that you read the Data Spooling of this manual first, then test your multiple concurrent
backup including restore testing before you put it into production.
When using random access media as backup space (e.g. disk), you should also read the chapter about Concurrent
Disk Jobs.
Below is a super stripped down bareos-dir.conf file showing you the four places where the the file must be
modified to allow the same job NightlySaveDir
Job to run up to four times concurrently. The change to the
Job resource is not necessary if you want different Jobs to run at the same time, which is the normal
case.
#
# Bareos Director Configuration file -- bareos-dir.conf
#
Director {
Name = rufus-dir
Maximum Concurrent Jobs = 4
...
}
Job {
Name = "NightlySave"
Maximum Concurrent Jobs = 4
Client = rufus-fd
Storage = File
...
}
Client {
Name = rufus-fd
Maximum Concurrent Jobs = 4
...
}
Storage {
Name = File
Maximum Concurrent Jobs = 4
...
}
Configuration J.2:
Concurrent Jobs Example
#
In some situation, you receive an error message similar to this:
12-Apr 15:10 bareos-dir JobId 15860: Fatal error: Catalog error updating Media record. sql_update.c:385 update UPDATE Media SET VolJobs=12,VolFiles=10,VolBlocks=155013,VolBytes=10000263168,VolMounts=233,VolErrors=0,VolWrites=2147626019,MaxVolBytes=0,VolStatus=’Append’,Slot=1,InChanger=1,VolReadTime=0,VolWriteTime=842658562655,LabelType=0,StorageId=3,PoolId=2,VolRetention=144000,VolUseDuration=82800,MaxVolJobs=0,MaxVolFiles=0,Enabled=1,LocationId=0,ScratchPoolId=0,RecyclePoolId=0,RecycleCount=201,Recycle=1,ActionOnPurge=0,MinBlocksize=0,MaxBlocksize=0 WHERE VolumeName=’000194L5’ failed:
ERROR: integer out of range
bconsole J.3:
The database column VolWrites in the Media table stores the number of write accesses to a volume. It is only used
for statistics.
However, it has happened that the number of write accesses exceeds the maximum value supported by the database
column (on PostgreSQL it is currently 2147483647, 32 bit, signed integer). The result is a database error, similar to
the one mentioned above.
As a temporary fix, just reset this counter:
1000 OK: bareos-dir Version: 17.2.5 (14 Feb 2018)
Enter a period to cancel a command.
*sqlquery
Automatically selected Catalog: MyCatalog
Using Catalog "MyCatalog"
Entering SQL query mode.
Terminate each query with a semicolon.
Terminate query mode with a blank line.
Enter SQL query: UPDATE Media SET VolWrites = 0 WHERE VolWrites > ’2000000000’;
No results to list.
SELECT volwrites FROM media; volwrites > ’0’;
+-----------+
| volwrites |
+-----------+
| 0 |
| 0 |
| 0 |
| 0 |
+-----------+
Enter SQL query:
bconsole J.4:
Reset the VolWrites counter
In the long run, it is planed to modify the database schema to enable storing much larger numbers.
#
By default, Bareos uses its own tape label (see Tape Formats and Label Type Dir
Pool). However, Bareos also supports
reading and write ANSI and IBM tape labels.
#
Reading ANSI/IBM labels is important, if some of your tapes are used by other programs that also support
ANSI/IBM labels. For example, LTFS tapes are indicated by an ANSI label.
If your are running Bareos in such an environment, you must set Check Labels Sd
Device to yes, otherwise Bareos will
not recognize that these tapes are already in use.
#
To configure Bareos to also write ANSI/IBM tape labels, use Label Type Dir
Pool or Label Type Sd
Device. With the proper
configuration, you can force Bareos to require ANSI or IBM labels.
Even though Bareos will recognize and write ANSI and IBM labels, it always writes its own tape labels as
well.
If you have labeled your volumes outside of Bareos, then the ANSI/IBM label will be recognized by Bareos only if
you have created the HDR1 label with BAREOS.DATA in the filename field (starting with character
5). If Bareos writes the labels, it will use this information to recognize the tape as a Bareos tape.
This allows ANSI/IBM labeled tapes to be used at sites with multiple machines and multiple backup
programs.
#
This chapter is concerned with testing and configuring your tape drive to make sure that it will work properly with
Bareos using the btape program.
#
In general, you should follow the following steps to get your tape drive to work with Bareos. Start with a tape
mounted in your drive. If you have an autochanger, load a tape into the drive. We use /dev/nst0 as the tape drive
name, you will need to adapt it according to your system.
Do not proceed to the next item until you have succeeded with the previous one.
- Make sure that Bareos (the Storage daemon) is not running or that you have unmounted the drive
you will use for testing.
- Use tar to write to, then read from your drive:
mt -f /dev/nst0 rewind
tar cvf /dev/nst0 .
mt -f /dev/nst0 rewind
tar tvf /dev/nst0
- Make sure you have a valid and correct Device resource corresponding to your drive. For Linux users,
generally, the default one works. For FreeBSD users, there are two possible Device configurations (see below).
For other drives and/or OSes, you will need to first ensure that your system tape modes are properly setup
(see below), then possibly modify you Device resource depending on the output from the btape program
(next item). When doing this, you should consult the Storage Daemon Configuration of this
manual.
- If you are using a Fibre Channel to connect your tape drive to Bareos, please be sure to disable any caching in
the NSR (network storage router, which is a Fibre Channel to SCSI converter).
- Run the btape test command:
btape /dev/nst0
test
It isn’t necessary to run the autochanger part of the test at this time, but do not go past this point until the
basic test succeeds. If you do have an autochanger, please be sure to read the Autochanger chapter of this
manual.
- Run the btape fill command, preferably with two volumes. This can take a long time. If you have an
autochanger and it is configured, Bareos will automatically use it. If you do not have it configured, you can
manually issue the appropriate mtx command, or press the autochanger buttons to change the tape when
requested to do so.
- Run Bareos, and backup a reasonably small directory, say 60 Megabytes. Do three successive backups of this
directory.
- Stop Bareos, then restart it. Do another full backup of the same directory. Then stop and restart
Bareos.
- Do a restore of the directory backed up, by entering the following restore command, being careful to restore it
to an alternate location:
restore select all done
yes
Do a diff on the restored directory to ensure it is identical to the original directory. If you are going to backup
multiple different systems (Linux, Windows, Mac, Solaris, FreeBSD, ...), be sure you test the restore on each
system type.
- If you have an autochanger, you should now go back to the btape program and run the autochanger
test:
btape /dev/nst0
auto
Adjust your autochanger as necessary to ensure that it works correctly. See the Autochanger chapter of this
manual for a complete discussion of testing your autochanger.
#
#
In case, Bareos does not work well with the Autochanger, it is preferable to ”hand-test” that the changer works. To
do so, we suggest you do the following commands:
Make sure Bareos is not running.
/usr/lib/bareos/scripts/mtx-changer /dev/sg0 list 0 /dev/nst0 0
This command should print:
1:
2:
3:
...
or one number per line for each slot that is occupied in your changer, and the number should be terminated by
a colon (:). If your changer has barcodes, the barcode will follow the colon. If an error message is
printed, you must resolve the problem (e.g. try a different SCSI control device name if /dev/sg0
is incorrect). For example, on FreeBSD systems, the autochanger SCSI control device is generally
/dev/pass2.
/usr/lib/bareos/scripts/mtx-changer /dev/sg0 listall 0 /dev/nst0 0
This command should print:
Drive content: D:Drive num:F:Slot loaded:Volume Name
D:0:F:2:vol2 or D:Drive num:E
D:1:F:42:vol42
D:3:E
Slot content:
S:1:F:vol1 S:Slot num:F:Volume Name
S:2:E or S:Slot num:E
S:3:F:vol4
Import/Export tray slots:
I:10:F:vol10 I:Slot num:F:Volume Name
I:11:E or I:Slot num:E
I:12:F:vol40
/usr/lib/bareos/scripts/mtx-changer /dev/sg0 transfer 1 2
This command should transfer a volume from source (1) to destination (2)
/usr/lib/bareos/scripts/mtx-changer /dev/sg0 slots
This command should return the number of slots in your autochanger.
/usr/lib/bareos/scripts/mtx-changer /dev/sg0 unload 1 /dev/nst0 0
If a tape is loaded from slot 1, this should cause it to be unloaded.
/usr/lib/bareos/scripts/mtx-changer /dev/sg0 load 3 /dev/nst0 0
Assuming you have a tape in slot 3, it will be loaded into drive (0).
/usr/lib/bareos/scripts/mtx-changer /dev/sg0 loaded 0 /dev/nst0 0
It should print ”3” Note, we have used an ”illegal” slot number 0. In this case, it is simply ignored because the slot
number is not used. However, it must be specified because the drive parameter at the end of the command is needed
to select the correct drive.
/usr/lib/bareos/scripts/mtx-changer /dev/sg0 unload 3 /dev/nst0 0
will unload the tape into slot 3.
Once all the above commands work correctly, assuming that you have the right Changer Command in your
configuration, Bareos should be able to operate the changer. The only remaining area of problems will be if your
autoloader needs some time to get the tape loaded after issuing the command. After the mtx-changer script
returns, Bareos will immediately rewind and read the tape. If Bareos gets rewind I/O errors after a tape change, you
will probably need to configure the load_sleep paramenter in the config file /etc/bareos/mtx-changer.conf. You
can test whether or not you need a sleep by putting the following commands into a file and running it as a
script:
#!/bin/sh
/usr/lib/bareos/scripts/mtx-changer /dev/sg0 unload 1 /dev/nst0 0
/usr/lib/bareos/scripts/mtx-changer /dev/sg0 load 3 /dev/nst0 0
mt -f /dev/st0 rewind
mt -f /dev/st0 weof
If the above script runs, you probably have no timing problems. If it does not run, start by putting a sleep 30 or
possibly a sleep 60 in the script just after the mtx-changer load command. If that works, then you should configure
the load_sleep paramenter in the config file /etc/bareos/mtx-changer.conf to the specified value so that it will
be effective when Bareos runs.
A second problem that comes up with a small number of autochangers is that they need to have the cartridge
ejected before it can be removed. If this is the case, the load 3 will never succeed regardless of how long you wait. If
this seems to be your problem, you can insert an eject just after the unload so that the script looks
like:
#!/bin/sh
/usr/lib/bareos/scripts/mtx-changer /dev/sg0 unload 1 /dev/nst0 0
mt -f /dev/st0 offline
/usr/lib/bareos/scripts/mtx-changer /dev/sg0 load 3 /dev/nst0 0
mt -f /dev/st0 rewind
mt -f /dev/st0 weof
If this solves your problems, set the parameter offline in the config file /etc/bareos/mtx-changer.conf to
”1”.
#
#
It is possible to configure Bareos in a way, that job information are still stored in the Bareos catalog, while the
individual file information are already pruned.
If all File records are pruned from the catalog for a Job, normally Bareos can restore only all files saved. That is
there is no way using the catalog to select individual files. With this new feature, Bareos will ask if you want to
specify a Regex expression for extracting only a part of the full backup.
Building directory tree for JobId(s) 1,3 ...
There were no files inserted into the tree, so file selection
is not possible.Most likely your retention policy pruned the files
Do you want to restore all the files? (yes|no): no
Regexp matching files to restore? (empty to abort): /etc/.*
Bootstrap records written to /tmp/regress/working/zog4-dir.restore.1.bsr
See also FileRegex bsr option for more information.
#
The most frequent problems users have restoring files are error messages such as:
04-Jan 00:33 z217-sd: RestoreFiles.2005-01-04_00.31.04 Error:
block.c:868 Volume data error at 20:0! Short block of 512 bytes on
device /dev/tape discarded.
or
04-Jan 00:33 z217-sd: RestoreFiles.2005-01-04_00.31.04 Error:
block.c:264 Volume data error at 20:0! Wanted ID: "BB02", got ".".
Buffer discarded.
Both these kinds of messages indicate that you were probably running your tape drive in fixed block mode rather
than variable block mode. Fixed block mode will work with any program that reads tapes sequentially such as tar,
but Bareos repositions the tape on a block basis when restoring files because this will speed up the restore by orders
of magnitude when only a few files are being restored. There are several ways that you can attempt to recover from
this unfortunate situation.
Try the following things, each separately, and reset your Device resource to what it is now after each individual
test:
- Set ”Block Positioning = no” in your Device resource and try the restore. This is a new directive and
untested.
- Set ”Minimum Block Size = 512” and ”Maximum Block Size = 512” and try the restore. If you are
able to determine the block size your drive was previously using, you should try that size if 512 does
not work. This is a really horrible solution, and it is not at all recommended to continue backing up
your data without correcting this condition. Please see the Tape Drive section for more on this.
- Try editing the restore.bsr file at the Run xxx yes/mod/no prompt before starting the restore job and
remove all the VolBlock statements. These are what causes Bareos to reposition the tape, and where
problems occur if you have a fixed block size set for your drive. The VolFile commands also cause
repositioning, but this will work regardless of the block size.
- Use bextract to extract the files you want – it reads the Volume sequentially if you use the include list
feature, or if you use a .bsr file, but remove all the VolBlock statements after the .bsr file is created (at
the Run yes/mod/no) prompt but before you start the restore.
#
Restoring files is generally much slower than backing them up for several reasons. The first is that during a backup
the tape is normally already positioned and Bareos only needs to write. On the other hand, because restoring files is
done so rarely, Bareos keeps only the start file and block on the tape for the whole job rather than on a file by file
basis which would use quite a lot of space in the catalog.
Bareos will forward space to the correct file mark on the tape for the Job, then forward space to the correct block,
and finally sequentially read each record until it gets to the correct one(s) for the file or files you want to restore.
Once the desired files are restored, Bareos will stop reading the tape.
Finally, instead of just reading a file for backup, during the restore, Bareos must create the file, and the operating
system must allocate disk space for the file as Bareos is restoring it.
For all the above reasons the restore process is generally much slower than backing up (sometimes it takes three
times as long).
#
This and the following sections will try to present a few of the kinds of problems that can come up making restoring
more difficult. We will try to provide a few ideas how to get out of these problem situations. In addition to what is
presented here, there is more specific information on restoring a Client and your Server in the Disaster Recovery
Using Bareos chapter of this manual.
-
Problem
- My database is broken.
-
Solution
- For SQLite, use the vacuum command to try to fix the database. For either MySQL or PostgreSQL,
see the vendor’s documentation. They have specific tools that check and repair databases, see the
Catalog Maintenance sections of this manual for links to vendor information.
Assuming the above does not resolve the problem, you will need to restore or rebuild your catalog.
Note, if it is a matter of some inconsistencies in the Bareos tables rather than a broken database,
then running bareos-dbcheck might help, but you will need to ensure that your database indexes are
properly setup.
-
Problem
- How do I restore my catalog?
-
Solution with a Catalog backup
- If you have backed up your database nightly (as you should) and you
have made a bootstrap file, you can immediately load back your database (or the ASCII SQL
output). Make a copy of your current database, then re-initialize it, by running the following
scripts:
./drop_bareos_tables
./make_bareos_tables
After re-initializing the database, you should be able to run Bareos. If you now try to use the restore
command, it will not work because the database will be empty. However, you can manually run a restore job
and specify your bootstrap file. You do so by entering the run command in the console and selecting the
restore job. If you are using the default bareos-dir.conf, this Job will be named RestoreFiles. Most likely it
will prompt you with something such as:
Run Restore job
JobName: RestoreFiles
Bootstrap: /home/user/bareos/working/restore.bsr
Where: /tmp/bareos-restores
Replace: always
FileSet: Full Set
Client: rufus-fd
Storage: File
When: 2005-07-10 17:33:40
Catalog: MyCatalog
Priority: 10
OK to run? (yes/mod/no):
A number of the items will be different in your case. What you want to do is: to use the mod option to change
the Bootstrap to point to your saved bootstrap file; and to make sure all the other items such as Client,
Storage, Catalog, and Where are correct. The FileSet is not used when you specify a bootstrap file. Once you
have set all the correct values, run the Job and it will restore the backup of your database, which is most likely
an ASCII dump.
You will then need to follow the instructions for your database type to recreate the database from the ASCII
backup file. See the Catalog Maintenance chapter of this manual for examples of the command needed to
restore a database from an ASCII dump (they are shown in the Compacting Your XXX Database
sections).
Also, please note that after you restore your database from an ASCII backup, you do NOT want to do
a make_bareos_tables command, or you will probably erase your newly restored database
tables.
-
Solution with a Job listing
- If you did save your database but did not make a bootstrap file, then recovering
the database is more difficult. You will probably need to use bextract to extract the backup
copy. First you should locate the listing of the job report from the last catalog backup. It has
important information that will allow you to quickly find your database file. For example, in the
job report for the CatalogBackup shown below, the critical items are the Volume name(s), the
Volume Session Id and the Volume Session Time. If you know those, you can easily restore your
Catalog.
22-Apr 10:22 HeadMan: Start Backup JobId 7510,
Job=CatalogBackup.2005-04-22_01.10.0
22-Apr 10:23 HeadMan: Bareos 1.37.14 (21Apr05): 22-Apr-2005 10:23:06
JobId: 7510
Job: CatalogBackup.2005-04-22_01.10.00
Backup Level: Full
Client: Polymatou
FileSet: "CatalogFile" 2003-04-10 01:24:01
Pool: "Default"
Storage: "DLTDrive"
Start time: 22-Apr-2005 10:21:00
End time: 22-Apr-2005 10:23:06
FD Files Written: 1
SD Files Written: 1
FD Bytes Written: 210,739,395
SD Bytes Written: 210,739,521
Rate: 1672.5 KB/s
Software Compression: None
Volume name(s): DLT-22Apr05
Volume Session Id: 11
Volume Session Time: 1114075126
Last Volume Bytes: 1,428,240,465
Non-fatal FD errors: 0
SD Errors: 0
FD termination status: OK
SD termination status: OK
Termination: Backup OK
From the above information, you can manually create a bootstrap file, and then follow the instructions given
above for restoring your database. A reconstructed bootstrap file for the above backup Job would look like the
following:
Volume="DLT-22Apr05"
VolSessionId=11
VolSessionTime=1114075126
FileIndex=1-1
Where we have inserted the Volume name, Volume Session Id, and Volume Session Time that correspond to
the values in the job report. We’ve also used a FileIndex of one, which will always be the case providing that
there was only one file backed up in the job.
The disadvantage of this bootstrap file compared to what is created when you ask for one to be written, is that
there is no File and Block specified, so the restore code must search all data in the Volume to find
the requested file. A fully specified bootstrap file would have the File and Blocks specified as
follows:
Volume="DLT-22Apr05"
VolSessionId=11
VolSessionTime=1114075126
VolFile=118-118
VolBlock=0-4053
FileIndex=1-1
Once you have restored the ASCII dump of the database, you will then to follow the instructions for your
database type to recreate the database from the ASCII backup file. See the Catalog Maintenance chapter of
this manual for examples of the command needed to restore a database from an ASCII dump (they are shown
in the Compacting Your XXX Database sections).
Also, please note that after you restore your database from an ASCII backup, you do NOT want to do
a make_bareos_tables command, or you will probably erase your newly restored database
tables.
-
Solution without a Job Listing
- If you do not have a job listing, then it is a bit more difficult. Either you use the
bscan program to scan the contents of your tape into a database, which can be very time consuming depending
on the size of the tape, or you can use the bls program to list everything on the tape, and reconstruct a
bootstrap file from the bls listing for the file or files you want following the instructions given
above.
There is a specific example of how to use bls below.
-
Problem
- Trying to restore the last known good full backup by specifying item 3 on the restore menu then the
JobId to restore, but Bareos then reports:
1 Job 0 Files
and restores nothing.
-
Solution
- Most likely the File records were pruned from the database either due to the File Retention period
expiring or by explicitly purging the Job. By using the ”llist jobid=nn” command, you can obtain all the
important information about the job:
llist jobid=120
JobId: 120
Job: save.2005-12-05_18.27.33
Job.Name: save
PurgedFiles: 0
Type: B
Level: F
Job.ClientId: 1
Client.Name: Rufus
JobStatus: T
SchedTime: 2005-12-05 18:27:32
StartTime: 2005-12-05 18:27:35
EndTime: 2005-12-05 18:27:37
JobTDate: 1133803657
VolSessionId: 1
VolSessionTime: 1133803624
JobFiles: 236
JobErrors: 0
JobMissingFiles: 0
Job.PoolId: 4
Pool.Name: Full
Job.FileSetId: 1
FileSet.FileSet: BackupSet
Then you can find the Volume(s) used by doing:
sql
select VolumeName from JobMedia,Media where JobId=1 and JobMedia.MediaId=Media.MediaId;
Finally, you can create a bootstrap file as described in the previous problem above using this
information.
Bareos will ask you if you would like to restore all the files in the job, and it will collect the above information
and write the bootstrap file for you.
-
Problem
- You don’t have a bootstrap file, and you don’t have the Job report for the backup of your
database, but you did backup the database, and you know the Volume to which it was backed
up.
-
Solution
- Either bscan the tape (see below for bscanning), or better use bls to find where it is on the tape, then
use bextract to restore the database. For example,
./bls -j -V DLT-22Apr05 /dev/nst0
Might produce the following output:
bls: butil.c:258 Using device: "/dev/nst0" for reading.
21-Jul 18:34 bls: Ready to read from volume "DLT-22Apr05" on device "DLTDrive"
(/dev/nst0).
Volume Record: File:blk=0:0 SessId=11 SessTime=1114075126 JobId=0 DataLen=164
...
Begin Job Session Record: File:blk=118:0 SessId=11 SessTime=1114075126
JobId=7510
Job=CatalogBackup.2005-04-22_01.10.0 Date=22-Apr-2005 10:21:00 Level=F Type=B
End Job Session Record: File:blk=118:4053 SessId=11 SessTime=1114075126
JobId=7510
Date=22-Apr-2005 10:23:06 Level=F Type=B Files=1 Bytes=210,739,395 Errors=0
Status=T
...
21-Jul 18:34 bls: End of Volume at file 201 on device "DLTDrive" (/dev/nst0),
Volume "DLT-22Apr05"
21-Jul 18:34 bls: End of all volumes.
Of course, there will be many more records printed, but we have indicated the essential lines of output. From
the information on the Begin Job and End Job Session Records, you can reconstruct a bootstrap file such as
the one shown above.
-
Problem
- How can I find where a file is stored?
-
Solution
- Normally, it is not necessary, you just use the restore command to restore the most recently saved
version (menu option 5), or a version saved before a given date (menu option 8). If you know the JobId of the
job in which it was saved, you can use menu option 3 to enter that JobId.
If you would like to know the JobId where a file was saved, select restore menu option 2.
You can also use the query command to find information such as:
*query
Available queries:
1: List up to 20 places where a File is saved regardless of the
directory
2: List where the most recent copies of a file are saved
3: List last 20 Full Backups for a Client
4: List all backups for a Client after a specified time
5: List all backups for a Client
6: List Volume Attributes for a selected Volume
7: List Volumes used by selected JobId
8: List Volumes to Restore All Files
9: List Pool Attributes for a selected Pool
10: List total files/bytes by Job
11: List total files/bytes by Volume
12: List Files for a selected JobId
13: List Jobs stored on a selected MediaId
14: List Jobs stored for a given Volume name
15: List Volumes Bareos thinks are in changer
16: List Volumes likely to need replacement from age or errors
Choose a query (1-16):
-
Problem
- I didn’t backup my database. What do I do now?
-
Solution
- This is probably the worst of all cases, and you will probably have to re-create your database from
scratch and then bscan in all your volumes, which is a very long, painful, and inexact process.
There are basically three steps to take:
- Ensure that your SQL server is running (MySQL or PostgreSQL) and that the Bareos database
(normally bareos) exists. See the Prepare Bareos database chapter of the manual.
- Ensure that the Bareos databases are created. This is also described at the above link.
- Start and stop the Bareos Director using the propriate bareos-dir.conf file so that it can create the
Client and Storage records which are not stored on the Volumes. Without these records, scanning
is unable to connect the Job records to the proper client.
When the above is complete, you can begin bscanning your Volumes. Please see the bscan chapter for more
details.
#
This chapter describes, how to debug Bareos, when the program crashes. If you are just interested about how to get
more information about a running Bareos daemon, please read Debug Messages.
If you are running on a Linux system, and you have a set of working configuration files, it is very
unlikely that Bareos will crash. As with all software, however, it is inevitable that someday, it may
crash.
This chapter explains what you should do if one of the three Bareos daemons (Director, File, Storage) crashes.
When we speak of crashing, we mean that the daemon terminates abnormally because of an error. There are many
cases where Bareos detects errors (such as PIPE errors) and will fail a job. These are not considered crashes. In
addition, under certain conditions, Bareos will detect a fatal in the configuration, such as lack of permission to
read/write the working directory. In that case, Bareos will force itself to crash with a SEGFAULT. However,
before crashing, Bareos will normally display a message indicating why. For more details, please read
on.
#
Each of the three Bareos daemons has a built-in exception handler which, in case of an error, will attempt to
produce a traceback. If successful the traceback will be emailed to you.
For this to work, you need to ensure that a few things are setup correctly on your system:
- You must have a version of Bareos with debug information and not stripped of debugging symbols.
When using a packaged version of Bareos, this requires to install the Bareos debug packages
(bareos-debug on RPM based systems, bareos-dbg on Debian based systems).
- On Linux, gdb (the GNU debugger) must be installed. On some systems such as Solaris, gdb may be
replaced by dbx.
- By default, btraceback uses bsmtp to send the traceback via email. Therefore it expects a local mail
transfer daemon running. It send the traceback to root@localhost via localhost.
- Some Linux distributions, e.g. Ubuntu, disable the possibility to examine the memory of other processes.
While this is a good idea for hardening a system, our debug mechanismen will fail. To disable this feature, run
(as root):
root@linux:~#
test -e /proc/sys/kernel/yama/ptrace_scope && echo 0 > /proc/sys/kernel/yama/ptrace_scope
Commands K.1:
disable ptrace protection to enable debugging (required on Ubuntu Linux)
If all the above conditions are met, the daemon that crashes will produce a traceback report and email it. If the
above conditions are not true, you can run the debugger by hand as described below.
#
To ”manually” test the traceback feature, you simply start Bareos then obtain the PID of the main daemon thread
(there are multiple threads). The output produced here will look different depending on what OS and what version
of the kernel you are running.
root@linux:~#
ps fax | grep bareos-dir
2103 ? S 0:00 /usr/sbin/bareos-dir
Commands K.2:
get the process ID of a running Bareos daemon
which in this case is 2103. Then while Bareos is running, you call the program giving it the path to the Bareos
executable and the PID. In this case, it is:
root@linux:~#
btraceback /usr/sbin/bareos-dir 2103
Commands K.3:
get traceback of running Bareos director daemon
It should produce an email showing you the current state of the daemon (in this case the Director), and then exit
leaving Bareos running as if nothing happened. If this is not the case, you will need to correct the problem by
modifying the btraceback script.
#
It should be possible to produce a similar traceback on systems other than Linux, either using gdb or some other
debugger. Solaris with dbx loaded works quite fine. On other systems, you will need to modify the btraceback
program to invoke the correct debugger, and possibly correct the btraceback.gdb script to have appropriate
commands for your debugger. Please keep in mind that for any debugger to work, it will most likely need to run as
root.
#
If for some reason you cannot get the automatic traceback, or if you want to interactively examine the variable
contents after a crash, you can run Bareos under the debugger. Assuming you want to run the Storage daemon
under the debugger (the technique is the same for the other daemons, only the name changes), you would do the
following:
- The Director and the File daemon should be running but the Storage daemon should not.
- Start the Storage daemon under the debugger:
root@linux:~#
gdb --args /usr/sbin/bareos-sd -f -s -d 200
(gdb) run
Commands K.4:
run the Bareos Storage daemon in the debugger
Parameter:
-
-f
- foreground
-
-s
- no signals
-
-d nnn
- debug level
See section daemon command line options for a detailed list of options.
- At this point, Bareos will be fully operational.
- In another shell command window, start the Console program and do what is necessary to cause Bareos to
die.
- When Bareos crashes, the gdb shell window will become active and gdb will show you the error that
occurred.
- To get a general traceback of all threads, issue the following command:
(gdb) thread apply all bt
Commands K.5:
run the Bareos Storage daemon in the debugger
After that you can issue any debugging command.
#
The technical changelog is automatically generated from the Bareos bug tracking system, see
http://bugs.bareos.org/changelog_page.php.
Please note, that some of the subreleases are only internal development releases.
Open issues for a specific version are shown at http://bugs.bareos.org/roadmap_page.php.
The overview about new feature of a release are shown at https://github.com/bareos/bareos and in the Index of
this document.
This chapter concentrates on things to do when updating an existing Bareos installation.
Please note! While all the source code is published on GitHub, the releases of packages on http://download.bareos.org
is limited to the initial versions of a major release. Later maintenance releases are only published on
https://download.bareos.com.
This release contains several bugfixes and enhancements. Excerpt:
- Ticket #892 bareos-storage-droplet: improve error handling on unavailable backend.
- Ticket #902 bareos-storage-droplet: improve job status handling (terminate job after all data is
written).
- Ticket #967 Windows: overwrite symbolic links on restore.
- Ticket #983 Bareos Storage Daemon: prevent sporadic crash when Collect Job Statistics Sd
Storage = yes.
- SLES 12sp2 and SLES 12sp3: provide bareos-storage-ceph and bareos-filedaemon-ceph-plugin
packages.
This release contains several bugfixes and enhancements. Excerpt:
- added platforms: Fedora 27, Fedora 28, openSUSE 15.0, Ubuntu 18.04 and Univention 4.3.
- Univention 4.3: fixes integration.
- Ticket #872 adapted to new Ceph API.
- Ticket #943 use tirpc if Sun-RPC is not provided.
- Ticket #964 fixes the predefined queries.
- Ticket #969 fixes a problem of restoring more files then selected in Bareos Webui/BVFS.
- Bareos Director: fixes for a crash after reload in the statistics thread (Ticket #695, Ticket #903).
- bareos-dbcheck: cleanup and speedup for some some of the checks.
- adapted for PostgreSQL 10.
- gfapi: stale file handles are treated as warnings
This release contains several bugfixes and enhancements. Excerpt:
- Bareos File Daemon is ready for AIX 7.1.0.0.
- VMware Plugin is also provided for Debian 9.
- NDMP fixes
- Virtual Backup fixes
- bareos-storage-droplet: improvements
- bareos-dbcheck improvements and fixes: with older versions it could happen, that it destroys
structures required by .bvfs_* .
- Ticket #850 fixes a bug on Univention: fixes a problem of regenerating passwords when resyncing
settings.
- Ticket #890 .bvfs_update fix. Before there have been cases where it did not update the cache.
- .bvfs_lsdirs make limit- and offset-option work correctly.
- .bvfs_lsdirs show special directory (like @bpipe@/) on the same level as /.
- Ticket #895 added description to the output of show filesets.
- Bareos Webui: Restore Browser fixes
- There was the possibility of an endless loop if the BVFS API delivers unexpected results. This
has been fixed. See bugreports Ticket #887 and Ticket #893 for details.
- Ticket #905 fixes a problem with file names containing quotes.
- NDMP Block Size Dir
Client changed type from positive-integer to Size32. This should not affect any configuration,
but is more consistent with other block size configuration directives.
This release contains several enhancements. Excerpt:
- Bareos Distribution (packages)
- python-bareos is included in the core distribution.
- bareos-storage-droplet is a storage backend for the droplet library. Most notably it allows
backup and restores to a S3 environment. Included as beta since version 17.2.4. Don’t use in
productive environment!
- bat has been removed, see section bat.
- platforms:
- Windows Clients are still supported since Windows Vista.
- MacOS: added to build chain.
- Bareos File Daemon is ready for HP-UX 11.31 (ia64).
- Linux Distribution: Bareos tries to provide packages for all current platforms. For details,
refer to Packages for the different Linux platforms.
- Linux RPM packages: allow read access to /etc/bareos/ for all users (however, relevant files are still only
readable for the user bareos). This allows other programs associated with Bareos to also use this
directory.
- Denormalization of the File database table
- The denormalization of the File database table leads to enormous performance improvements in
installation, which covering a lot of file (millions and more).
- For the denormalization the database schema must be modified. Please note! Updating the database
to schema version ≥ 2170 will increase the required disk space. Especially it will require around
twice the amount of the current database disk space during the migration.
- The Filename database table does no longer exists. Therefore the .bvfs_* commands do no
longer output the FilenameId column.
- NDMP_NATIVE support has been added. This include the NDMP features DAR and DDAR. For details see
NDMP_NATIVE.
- Updated the package bareos-vmware-plugin to utilize the Virtual Disk Development Kit (VDDK)
6.5.x. This includes support for VMware vSphere® 6.5 and the next major release (except new
features) and backward compatible with VMware vSphere® 5.5 and 6.0. For details see VMware
Plugin.
- Soft Quota: automatic quota grace period reset if a job does not exceed the quota.
- bareos-dbcheck: disable all interactive questions in batch mode.
- list files: also show deleted files (accurate mode).
- list jobstatastics: added.
- purge : added confirmation.
- list volumes: fix limit and offset handling.
- Ticket #629 Windows: restore directory attributes.
- Ticket #639 tape: fix block size handling, AWS VTL iSCSI devices
- Ticket #705 support for MySQL 5.7
- Ticket #719 allow long JSON messages (has been increased from 100KB to 2GB).
- Ticket #793 Virtual Backups: skip jobs with no files.
This release contains several bugfixes and enhancements. Excerpt:
- gfapi-fd Plugin
- Allow to use non-accurate backups with glusterfind
- Fix backups with empty glusterfind filelist.
- Explicitly close glfs fd on IO-open
- Don’t reinitialize the connection to gluster
- Fix parsing of missing basedir argument
- Handle non-fatal Gluster problems properly
- Reset JobStatus to previous JobStatus in status SD and FD loops to fix status all output
- Backport ceph: ported cephfs-fd and cephfs_device to new api
- Ticket #967 Windows: Symbolic links are now replaceable during restore
This release contains several bugfixes and enhancements. Excerpt:
- Fixes a Director crash, when enabling debugging output
- .bvfs_lsdirs : improve performance, especially when having a large number of directories
- To optimize the performance of the SQL query used by .bvfs_lsdirs , it is important to have
the following indexes:
- PostgreSQL
- CREATE INDEX file_jpfnidpart_idx ON File(PathId,JobId,
FilenameId) WHERE FileIndex = 0;
- If the index file_jfnidpart_idx mentioned in 16.2.6 release notes exist, drop it:
DROP INDEX file_jfnidpart_idx;
- MySQL/MariaDB
- CREATE INDEX PathId_JobId_FileNameId_FileIndex ON File(PathId,JobId,
FilenameId,FileIndex);
- If the index PathId_JobId_FileIndex_FileNameId mentioned in 16.2.6 release notes exist,
drop it:
DROP INDEX PathId_JobId_FileIndex_FileNameId ON File;
- Utilize OpenSSL ≥ 1.1 if available
- Windows: fixes silent upgrade (winbareos-*.exe /S)
- Windows: restore attributes also on directories (not only on files)
- Fixes problem with SHA1 signature when compiled without OpenSSL (not relevant for bareos.org/bareos.com
packages)
- Packages for openSUSE Leap 42.3 and Fedora 26 have been added.
- Packages for AIX and current HP-UX 11.31
This release contains several bugfixes and enhancements. Excerpt:
- Prevent from director crash when using incorrect paramaters of .bvfs_* commands.
- Director now closes all configuration files when reloading failed.
- Storage daemon now closes the network connection when MaximumConcurrentJobs reached.
- New directive LanAddress was added to the Client and Storage Resources of the director to facilitate
a network topology where client and storage are situated inside of a LAN, but the Director is outside
of that LAN. See Using different IP Adresses for SD – FD Communication for details.
- A Problem in the storage abstraction layer was fixed where the director picked the wrong storage
daemon when multiple storages/storage daemons were used.
- The device spool size calculation when using secure erase was fixed.
- .bvfs_lsdirs no longer shows empty directories from accurate jobs.
- Please note! This decreases performance if your environment has a large numbers of directories.
Creating an index improves the performance.
- PostgreSQL
- When using PostgreSQL, creating the following partial improves the performance sufficiently:
CREATE INDEX file_jfnidpart_
idx ON File(JobId, FilenameId) WHERE FileIndex = 0;
- Run following command to create the partial index:
su - postgres -c ’echo "CREATE INDEX file_jfnidpart_
idx ON File(JobId, FilenameId) WHERE FileIndex = 0; ANALYZE File;
" | psql bareos’
- MySQL/MariaDB
- When using MySQL or MariaDB, creating the following index improves the performance:
CREATE INDEX PathId_JobId_FileIndex_FileNameId ON File(PathId,JobId,
FileIndex,FilenameId);
- Run following command to create the index:
echo "CREATE INDEX PathId_JobId_FileIndex_FileNameId ON File(PathId,JobId,
FileIndex,FilenameId);" | mysql -u root bareos
- However, with larger amounts of directories and/or involved jobs, even with this index the
performance of .bvfs_lsdirs may still be insufficient. We are working on optimizing the
SQL query for MySQL/MariaDB to solve this problem.
- Packages for Univention UCS 4.2 have been added.
- Packages for Debian 9 (Stretch) have been added.
- WebUI: The post install script of the bareos-webui RPM package for RHEL/CentOS was fixed, it no longer
tries to run a2enmod which does not exist on RHEL/CentOS.
- WebUI: The login form no longer allows redirects to arbitrary URLs
- WebUI: The used ZendFramework components were updated from version 2.4.10 to 2.4.11.
- WebUI: jQuery was updated from version 1.12.4 to version 3.2.0., some outdated browsers like Internet
Explorer 6-8, Opera 12.1x or Safari 5.1+ will no longer be supported, see jQuery Browser Support for
details.
This release contains several bugfixes and enhancements. Excerpt:
- NDMP: critical bugfix when restoring large files.
- truncate command allows to free space on disk storages (replaces an purged volume by an empty
volume).
- Some fixes were added regarding director crashes, Windows backups (VSS), soft-quota reset and API
(bvfs) problems.
- WebUI: handle file names containing special characters, hostnames starting with numbers and long
logfiles.
- WebUI: adds translations for Chinese, Italian and Spanish.
First stable release of the Bareos 16.2 branch.
- Configuration
- Strict ACL handling
- Bareos Console acls do no longer automatically matches substrings (to avoid that e.g. Pool ACL
Dir
Console = Full also matches VirtualFullDir
Pool). To configure the ACL to work as before, Pool
ACL Dir
Console = .*Full.* must be set. Unfortunately the Bareos Webui 15.2 webuiDir
Profile did use
Command ACL Dir
Console = .bvfs*, which is also no longer works as intended. Moreover, to use all
of Bareos Webui 16.2 features, some additional commands must be permitted, so best use the
new webui-adminDir
Profile.
- Bareos Webui
- Updating from Bareos 15.2: Adapt webuiDir
Profile (from bareos 15.2) to allow all commands of
webui-adminDir
Profile (Command ACL Dir
Console). Alternately modify all ConsoleDirs currently using
webuiDir
Profile to use webui-adminDir
Profile instead.
- While RHEL 6 and CentOS 6 are still platforms supported by Bareos, the package bareos-webui
is not available for these platforms, as the required ZendFramework 2.4 do require PHP >= 5.3.17
(5.3.23). However, it is possible to use bareos-webui 15.2 against bareos-director 16.2. Also
here, the profile must be adapted.
For upgrading from 14.2, please see release notes for 15.2.1.
This release contains several bugfixes and enhancements. Excerpt:
- Automatic mount of disks by SD
- NDMP performance enhancements
- Windows: sparse file restore
- Director memory leak caused by frequent bconsole calls
For upgrading from 14.2, please see releasenotes for 15.2.1.
This release contains several bugfixes and enhancements. Excerpt:
- VMWare plugin can now restore to VMDK file
- Ceph support for SLES12 included
- Multiple gfapi and ceph enhancements
- NDMP enhancements and bugfixes
- Windows: multiple VSS Jobs can now run concurrently in one FD, installer fixes
- bpipe: fix stderr/stdout problems
- reload command enhancements (limitations eliminated)
- label barcodes now can run without interaction
First stable release of the Bareos 15.2 branch.
When coming from bareos-14.2.x, the following things have changed (same as in bareos-15.2.1):
Beta release.
It is known, that drop_database scripts will not longer work on PostgreSQL < 8.4. However, as drop_database
scripts are very seldom needed, package dependencies do not yet enforce PostgreSQL >= 8.4. We plan to ensure this
in future version of Bareos.
This release contains several bugfixes. Excerpt:
- bareos-dir
- Fixes pretty printing of Fileset options block
Ticket #591: config pretty-printer does not print filesets correctly
- run command: fixes changing the pool when changing the backup level in interactive mode
Ticket #633: Interactive run doesn’t update pool on level change
- Ignore the Fileset option DriveType on non Windows systems
Ticket #644: Setting DriveType causes empty backups on Linux
- Suppress already queued jobs for disabled schedules
Ticket #659: Suppress already queued jobs for disabled schedules
- NDMP
- Fixes cancel of NDMP jobs
Ticket #604: Cancel a NDMP Job causes the sd to crash
- bpipe-fd plugin
- Only take stdout into account, ignore stderr (like earlier versions)
Ticket #632: fd-bpipe plugin merges stderr with stdout, which can result in corrupted backups
- win32
- Fix symlink and junction support
Ticket #575: charset problem in symlinks/junctions windows restore
Ticket #615: symlinks/junctions wrong target path on restore (wide chars)
- Fixes quoting for bmail.exe in bareos-dir.conf
Ticket #581: Installer is setting up a wrong path to bmail.exe without quotes / bmail not called
- Fix crash on restore of sparse files
Ticket #640: File daemon crashed after restoring sparse file on windows
- win32 mssql plugin
- Allow connecting to non default instance
Ticket #383: mssqldvi problem with connection to mssql not default instance
- Fix backup/restore of incremental backups
Ticket #588: Incremental MSSQL backup fails when database name contains spaces
This release contains several bugfixes.
This release contains several bugfixes and added the platforms Debian 8 and Fedora 21.
This release contains several bugfixes, including one major bugfix (Ticket #437), relevant for those of you using
backup to disk with autolabeling enabled.
It can lead to loss of a 64k block of data when all of this conditions apply:
- backups are written to disk (tape backups are not affected)
- autolabelling is enabled
- a backup spans over multiple volumes
- the additional volumes are newly created and labeled during the backup
If existing volumes are used for backups spanning over multiple volumes, the problem does not occur.
We recommend to update to the latest packages as soon as possible.
If an update is not possible immediately, autolabeling should be disabled and volumes should be labelled manually
until the update can be installed.
If you are affected by the 64k bug, we recommend that you schedule a full backup after fixing the problem in order
to get a proper full backup of all files.
First stable release of the Bareos 14.2 branch.
Beta release.
This release contains several bugfixes.
It is known, that drop_database scripts will not longer work on PostgreSQL < 8.4. However, as drop_database
scripts are very seldom needed, package dependencies do not yet enforce PostgreSQL >= 8.4. We plan to ensure this
in future version of Bareos.
This release contains several bugfixes.
Code Release | 2013-03-03 |
Database Version | 2001 (unchanged) |
| |
Code Release | 2013-02-06 |
Database Version | 2001 (initial) |
| |
This have been the initial release of Bareos.
Information about migrating from Bacula to Bareos are available at Howto upgrade from Bacula to Bareos and in
section Compatibility between Bareos and Bacula.
#
#
There are a number of different licenses that are used in Bareos.
The GNU Free Documentation License (FDL) is used for this manual, which is a free and open license. This means
that you may freely reproduce it and even make changes to it.
The vast bulk of the source code is released under the GNU Affero General Public License (AGPL) version
3.
Most of this code is copyrighted: Copyright ©2000-2012 Free Software Foundation Europe e.V.
All new code is copyrighted: Copyright ©2013-2013 Bareos GmbH & Co. KG
Portions may be copyrighted by other people. These files are released under different licenses which are compatible
with the AGPL license.
Some of the Bareos library source code is released under the GNU Lesser General Public License (LGPL).
This permits third parties to use these parts of our code in their proprietary programs to interface to
Bareos.
Some of the Bareos code, or code that Bareos references, has been released to the public domain. E.g. md5.c,
SQLite.
Bareos® is a registered trademark of Bareos GmbH & Co. KG.
Bacula® is a registered trademark of Kern Sibbald.
NO WARRANTY
BECAUSE THE PROGRAM IS LICENSED FREE OF CHARGE, THERE IS NO WARRANTY FOR THE
PROGRAM, TO THE EXTENT PERMITTED BY APPLICABLE LAW. EXCEPT WHEN OTHERWISE
STATED IN WRITING THE COPYRIGHT HOLDERS AND/OR OTHER PARTIES PROVIDE THE
PROGRAM ”AS IS” WITHOUT WARRANTY OF ANY KIND, EITHER EXPRESSED OR IMPLIED,
INCLUDING, BUT NOT LIMITED TO, THE IMPLIED WARRANTIES OF MERCHANTABILITY AND
FITNESS FOR A PARTICULAR PURPOSE. THE ENTIRE RISK AS TO THE QUALITY AND
PERFORMANCE OF THE PROGRAM IS WITH YOU. SHOULD THE PROGRAM PROVE DEFECTIVE, YOU
ASSUME THE COST OF ALL NECESSARY SERVICING, REPAIR OR CORRECTION.
IN NO EVENT UNLESS REQUIRED BY APPLICABLE LAW OR AGREED TO IN WRITING WILL ANY
COPYRIGHT HOLDER, OR ANY OTHER PARTY WHO MAY MODIFY AND/OR REDISTRIBUTE THE
PROGRAM AS PERMITTED ABOVE, BE LIABLE TO YOU FOR DAMAGES, INCLUDING ANY GENERAL,
SPECIAL, INCIDENTAL OR CONSEQUENTIAL DAMAGES ARISING OUT OF THE USE OR INABILITY
TO USE THE PROGRAM (INCLUDING BUT NOT LIMITED TO LOSS OF DATA OR DATA
BEING RENDERED INACCURATE OR LOSSES SUSTAINED BY YOU OR THIRD PARTIES OR A
FAILURE OF THE PROGRAM TO OPERATE WITH ANY OTHER PROGRAMS), EVEN IF
SUCH HOLDER OR OTHER PARTY HAS BEEN ADVISED OF THE POSSIBILITY OF SUCH
DAMAGES.
Certain words and/or products are Copyrighted or Trademarked such as Windows (by Microsoft).
Since they are numerous, and we are not necessarily aware of the details of each, we don’t try to list
them here. However, we acknowledge all such Copyrights and Trademarks, and if any copyright or
trademark holder wishes a specific acknowledgment, notify us, and we will be happy to add it where
appropriate.
#
GNU Free Documentation License
Version 1.3, 3 November 2008
Copyright (C) 2000, 2001, 2002, 2007, 2008 Free Software Foundation, Inc.
<http://fsf.org/>
Everyone is permitted to copy and distribute verbatim copies
of this license document, but changing it is not allowed.
0. PREAMBLE
The purpose of this License is to make a manual, textbook, or other
functional and useful document "free" in the sense of freedom: to
assure everyone the effective freedom to copy and redistribute it,
with or without modifying it, either commercially or noncommercially.
Secondarily, this License preserves for the author and publisher a way
to get credit for their work, while not being considered responsible
for modifications made by others.
This License is a kind of "copyleft", which means that derivative
works of the document must themselves be free in the same sense. It
complements the GNU General Public License, which is a copyleft
license designed for free software.
We have designed this License in order to use it for manuals for free
software, because free software needs free documentation: a free
program should come with manuals providing the same freedoms that the
software does. But this License is not limited to software manuals;
it can be used for any textual work, regardless of subject matter or
whether it is published as a printed book. We recommend this License
principally for works whose purpose is instruction or reference.
1. APPLICABILITY AND DEFINITIONS
This License applies to any manual or other work, in any medium, that
contains a notice placed by the copyright holder saying it can be
distributed under the terms of this License. Such a notice grants a
world-wide, royalty-free license, unlimited in duration, to use that
work under the conditions stated herein. The "Document", below,
refers to any such manual or work. Any member of the public is a
licensee, and is addressed as "you". You accept the license if you
copy, modify or distribute the work in a way requiring permission
under copyright law.
A "Modified Version" of the Document means any work containing the
Document or a portion of it, either copied verbatim, or with
modifications and/or translated into another language.
A "Secondary Section" is a named appendix or a front-matter section of
the Document that deals exclusively with the relationship of the
publishers or authors of the Document to the Document’s overall
subject (or to related matters) and contains nothing that could fall
directly within that overall subject. (Thus, if the Document is in
part a textbook of mathematics, a Secondary Section may not explain
any mathematics.) The relationship could be a matter of historical
connection with the subject or with related matters, or of legal,
commercial, philosophical, ethical or political position regarding
them.
The "Invariant Sections" are certain Secondary Sections whose titles
are designated, as being those of Invariant Sections, in the notice
that says that the Document is released under this License. If a
section does not fit the above definition of Secondary then it is not
allowed to be designated as Invariant. The Document may contain zero
Invariant Sections. If the Document does not identify any Invariant
Sections then there are none.
The "Cover Texts" are certain short passages of text that are listed,
as Front-Cover Texts or Back-Cover Texts, in the notice that says that
the Document is released under this License. A Front-Cover Text may
be at most 5 words, and a Back-Cover Text may be at most 25 words.
A "Transparent" copy of the Document means a machine-readable copy,
represented in a format whose specification is available to the
general public, that is suitable for revising the document
straightforwardly with generic text editors or (for images composed of
pixels) generic paint programs or (for drawings) some widely available
drawing editor, and that is suitable for input to text formatters or
for automatic translation to a variety of formats suitable for input
to text formatters. A copy made in an otherwise Transparent file
format whose markup, or absence of markup, has been arranged to thwart
or discourage subsequent modification by readers is not Transparent.
An image format is not Transparent if used for any substantial amount
of text. A copy that is not "Transparent" is called "Opaque".
Examples of suitable formats for Transparent copies include plain
ASCII without markup, Texinfo input format, LaTeX input format, SGML
or XML using a publicly available DTD, and standard-conforming simple
HTML, PostScript or PDF designed for human modification. Examples of
transparent image formats include PNG, XCF and JPG. Opaque formats
include proprietary formats that can be read and edited only by
proprietary word processors, SGML or XML for which the DTD and/or
processing tools are not generally available, and the
machine-generated HTML, PostScript or PDF produced by some word
processors for output purposes only.
The "Title Page" means, for a printed book, the title page itself,
plus such following pages as are needed to hold, legibly, the material
this License requires to appear in the title page. For works in
formats which do not have any title page as such, "Title Page" means
the text near the most prominent appearance of the work’s title,
preceding the beginning of the body of the text.
The "publisher" means any person or entity that distributes copies of
the Document to the public.
A section "Entitled XYZ" means a named subunit of the Document whose
title either is precisely XYZ or contains XYZ in parentheses following
text that translates XYZ in another language. (Here XYZ stands for a
specific section name mentioned below, such as "Acknowledgements",
"Dedications", "Endorsements", or "History".) To "Preserve the Title"
of such a section when you modify the Document means that it remains a
section "Entitled XYZ" according to this definition.
The Document may include Warranty Disclaimers next to the notice which
states that this License applies to the Document. These Warranty
Disclaimers are considered to be included by reference in this
License, but only as regards disclaiming warranties: any other
implication that these Warranty Disclaimers may have is void and has
no effect on the meaning of this License.
2. VERBATIM COPYING
You may copy and distribute the Document in any medium, either
commercially or noncommercially, provided that this License, the
copyright notices, and the license notice saying this License applies
to the Document are reproduced in all copies, and that you add no
other conditions whatsoever to those of this License. You may not use
technical measures to obstruct or control the reading or further
copying of the copies you make or distribute. However, you may accept
compensation in exchange for copies. If you distribute a large enough
number of copies you must also follow the conditions in section 3.
You may also lend copies, under the same conditions stated above, and
you may publicly display copies.
3. COPYING IN QUANTITY
If you publish printed copies (or copies in media that commonly have
printed covers) of the Document, numbering more than 100, and the
Document’s license notice requires Cover Texts, you must enclose the
copies in covers that carry, clearly and legibly, all these Cover
Texts: Front-Cover Texts on the front cover, and Back-Cover Texts on
the back cover. Both covers must also clearly and legibly identify
you as the publisher of these copies. The front cover must present
the full title with all words of the title equally prominent and
visible. You may add other material on the covers in addition.
Copying with changes limited to the covers, as long as they preserve
the title of the Document and satisfy these conditions, can be treated
as verbatim copying in other respects.
If the required texts for either cover are too voluminous to fit
legibly, you should put the first ones listed (as many as fit
reasonably) on the actual cover, and continue the rest onto adjacent
pages.
If you publish or distribute Opaque copies of the Document numbering
more than 100, you must either include a machine-readable Transparent
copy along with each Opaque copy, or state in or with each Opaque copy
a computer-network location from which the general network-using
public has access to download using public-standard network protocols
a complete Transparent copy of the Document, free of added material.
If you use the latter option, you must take reasonably prudent steps,
when you begin distribution of Opaque copies in quantity, to ensure
that this Transparent copy will remain thus accessible at the stated
location until at least one year after the last time you distribute an
Opaque copy (directly or through your agents or retailers) of that
edition to the public.
It is requested, but not required, that you contact the authors of the
Document well before redistributing any large number of copies, to
give them a chance to provide you with an updated version of the
Document.
4. MODIFICATIONS
You may copy and distribute a Modified Version of the Document under
the conditions of sections 2 and 3 above, provided that you release
the Modified Version under precisely this License, with the Modified
Version filling the role of the Document, thus licensing distribution
and modification of the Modified Version to whoever possesses a copy
of it. In addition, you must do these things in the Modified Version:
A. Use in the Title Page (and on the covers, if any) a title distinct
from that of the Document, and from those of previous versions
(which should, if there were any, be listed in the History section
of the Document). You may use the same title as a previous version
if the original publisher of that version gives permission.
B. List on the Title Page, as authors, one or more persons or entities
responsible for authorship of the modifications in the Modified
Version, together with at least five of the principal authors of the
Document (all of its principal authors, if it has fewer than five),
unless they release you from this requirement.
C. State on the Title page the name of the publisher of the
Modified Version, as the publisher.
D. Preserve all the copyright notices of the Document.
E. Add an appropriate copyright notice for your modifications
adjacent to the other copyright notices.
F. Include, immediately after the copyright notices, a license notice
giving the public permission to use the Modified Version under the
terms of this License, in the form shown in the Addendum below.
G. Preserve in that license notice the full lists of Invariant Sections
and required Cover Texts given in the Document’s license notice.
H. Include an unaltered copy of this License.
I. Preserve the section Entitled "History", Preserve its Title, and add
to it an item stating at least the title, year, new authors, and
publisher of the Modified Version as given on the Title Page. If
there is no section Entitled "History" in the Document, create one
stating the title, year, authors, and publisher of the Document as
given on its Title Page, then add an item describing the Modified
Version as stated in the previous sentence.
J. Preserve the network location, if any, given in the Document for
public access to a Transparent copy of the Document, and likewise
the network locations given in the Document for previous versions
it was based on. These may be placed in the "History" section.
You may omit a network location for a work that was published at
least four years before the Document itself, or if the original
publisher of the version it refers to gives permission.
K. For any section Entitled "Acknowledgements" or "Dedications",
Preserve the Title of the section, and preserve in the section all
the substance and tone of each of the contributor acknowledgements
and/or dedications given therein.
L. Preserve all the Invariant Sections of the Document,
unaltered in their text and in their titles. Section numbers
or the equivalent are not considered part of the section titles.
M. Delete any section Entitled "Endorsements". Such a section
may not be included in the Modified Version.
N. Do not retitle any existing section to be Entitled "Endorsements"
or to conflict in title with any Invariant Section.
O. Preserve any Warranty Disclaimers.
If the Modified Version includes new front-matter sections or
appendices that qualify as Secondary Sections and contain no material
copied from the Document, you may at your option designate some or all
of these sections as invariant. To do this, add their titles to the
list of Invariant Sections in the Modified Version’s license notice.
These titles must be distinct from any other section titles.
You may add a section Entitled "Endorsements", provided it contains
nothing but endorsements of your Modified Version by various
parties--for example, statements of peer review or that the text has
been approved by an organization as the authoritative definition of a
standard.
You may add a passage of up to five words as a Front-Cover Text, and a
passage of up to 25 words as a Back-Cover Text, to the end of the list
of Cover Texts in the Modified Version. Only one passage of
Front-Cover Text and one of Back-Cover Text may be added by (or
through arrangements made by) any one entity. If the Document already
includes a cover text for the same cover, previously added by you or
by arrangement made by the same entity you are acting on behalf of,
you may not add another; but you may replace the old one, on explicit
permission from the previous publisher that added the old one.
The author(s) and publisher(s) of the Document do not by this License
give permission to use their names for publicity for or to assert or
imply endorsement of any Modified Version.
5. COMBINING DOCUMENTS
You may combine the Document with other documents released under this
License, under the terms defined in section 4 above for modified
versions, provided that you include in the combination all of the
Invariant Sections of all of the original documents, unmodified, and
list them all as Invariant Sections of your combined work in its
license notice, and that you preserve all their Warranty Disclaimers.
The combined work need only contain one copy of this License, and
multiple identical Invariant Sections may be replaced with a single
copy. If there are multiple Invariant Sections with the same name but
different contents, make the title of each such section unique by
adding at the end of it, in parentheses, the name of the original
author or publisher of that section if known, or else a unique number.
Make the same adjustment to the section titles in the list of
Invariant Sections in the license notice of the combined work.
In the combination, you must combine any sections Entitled "History"
in the various original documents, forming one section Entitled
"History"; likewise combine any sections Entitled "Acknowledgements",
and any sections Entitled "Dedications". You must delete all sections
Entitled "Endorsements".
6. COLLECTIONS OF DOCUMENTS
You may make a collection consisting of the Document and other
documents released under this License, and replace the individual
copies of this License in the various documents with a single copy
that is included in the collection, provided that you follow the rules
of this License for verbatim copying of each of the documents in all
other respects.
You may extract a single document from such a collection, and
distribute it individually under this License, provided you insert a
copy of this License into the extracted document, and follow this
License in all other respects regarding verbatim copying of that
document.
7. AGGREGATION WITH INDEPENDENT WORKS
A compilation of the Document or its derivatives with other separate
and independent documents or works, in or on a volume of a storage or
distribution medium, is called an "aggregate" if the copyright
resulting from the compilation is not used to limit the legal rights
of the compilation’s users beyond what the individual works permit.
When the Document is included in an aggregate, this License does not
apply to the other works in the aggregate which are not themselves
derivative works of the Document.
If the Cover Text requirement of section 3 is applicable to these
copies of the Document, then if the Document is less than one half of
the entire aggregate, the Document’s Cover Texts may be placed on
covers that bracket the Document within the aggregate, or the
electronic equivalent of covers if the Document is in electronic form.
Otherwise they must appear on printed covers that bracket the whole
aggregate.
8. TRANSLATION
Translation is considered a kind of modification, so you may
distribute translations of the Document under the terms of section 4.
Replacing Invariant Sections with translations requires special
permission from their copyright holders, but you may include
translations of some or all Invariant Sections in addition to the
original versions of these Invariant Sections. You may include a
translation of this License, and all the license notices in the
Document, and any Warranty Disclaimers, provided that you also include
the original English version of this License and the original versions
of those notices and disclaimers. In case of a disagreement between
the translation and the original version of this License or a notice
or disclaimer, the original version will prevail.
If a section in the Document is Entitled "Acknowledgements",
"Dedications", or "History", the requirement (section 4) to Preserve
its Title (section 1) will typically require changing the actual
title.
9. TERMINATION
You may not copy, modify, sublicense, or distribute the Document
except as expressly provided under this License. Any attempt
otherwise to copy, modify, sublicense, or distribute it is void, and
will automatically terminate your rights under this License.
However, if you cease all violation of this License, then your license
from a particular copyright holder is reinstated (a) provisionally,
unless and until the copyright holder explicitly and finally
terminates your license, and (b) permanently, if the copyright holder
fails to notify you of the violation by some reasonable means prior to
60 days after the cessation.
Moreover, your license from a particular copyright holder is
reinstated permanently if the copyright holder notifies you of the
violation by some reasonable means, this is the first time you have
received notice of violation of this License (for any work) from that
copyright holder, and you cure the violation prior to 30 days after
your receipt of the notice.
Termination of your rights under this section does not terminate the
licenses of parties who have received copies or rights from you under
this License. If your rights have been terminated and not permanently
reinstated, receipt of a copy of some or all of the same material does
not give you any rights to use it.
10. FUTURE REVISIONS OF THIS LICENSE
The Free Software Foundation may publish new, revised versions of the
GNU Free Documentation License from time to time. Such new versions
will be similar in spirit to the present version, but may differ in
detail to address new problems or concerns. See
http://www.gnu.org/copyleft/.
Each version of the License is given a distinguishing version number.
If the Document specifies that a particular numbered version of this
License "or any later version" applies to it, you have the option of
following the terms and conditions either of that specified version or
of any later version that has been published (not as a draft) by the
Free Software Foundation. If the Document does not specify a version
number of this License, you may choose any version ever published (not
as a draft) by the Free Software Foundation. If the Document
specifies that a proxy can decide which future versions of this
License can be used, that proxy’s public statement of acceptance of a
version permanently authorizes you to choose that version for the
Document.
11. RELICENSING
"Massive Multiauthor Collaboration Site" (or "MMC Site") means any
World Wide Web server that publishes copyrightable works and also
provides prominent facilities for anybody to edit those works. A
public wiki that anybody can edit is an example of such a server. A
"Massive Multiauthor Collaboration" (or "MMC") contained in the site
means any set of copyrightable works thus published on the MMC site.
"CC-BY-SA" means the Creative Commons Attribution-Share Alike 3.0
license published by Creative Commons Corporation, a not-for-profit
corporation with a principal place of business in San Francisco,
California, as well as future copyleft versions of that license
published by that same organization.
"Incorporate" means to publish or republish a Document, in whole or in
part, as part of another Document.
An MMC is "eligible for relicensing" if it is licensed under this
License, and if all works that were first published under this License
somewhere other than this MMC, and subsequently incorporated in whole or
in part into the MMC, (1) had no cover texts or invariant sections, and
(2) were thus incorporated prior to November 1, 2008.
The operator of an MMC Site may republish an MMC contained in the site
under CC-BY-SA on the same site at any time before August 1, 2009,
provided the MMC is eligible for relicensing.
ADDENDUM: How to use this License for your documents
To use this License in a document you have written, include a copy of
the License in the document and put the following copyright and
license notices just after the title page:
Copyright (c) YEAR YOUR NAME.
Permission is granted to copy, distribute and/or modify this document
under the terms of the GNU Free Documentation License, Version 1.3
or any later version published by the Free Software Foundation;
with no Invariant Sections, no Front-Cover Texts, and no Back-Cover Texts.
A copy of the license is included in the section entitled "GNU
Free Documentation License".
If you have Invariant Sections, Front-Cover Texts and Back-Cover Texts,
replace the "with...Texts." line with this:
with the Invariant Sections being LIST THEIR TITLES, with the
Front-Cover Texts being LIST, and with the Back-Cover Texts being LIST.
If you have Invariant Sections without Cover Texts, or some other
combination of the three, merge those two alternatives to suit the
situation.
If your document contains nontrivial examples of program code, we
recommend releasing these examples in parallel under your choice of
free software license, such as the GNU General Public License,
to permit their use in free software.
#
GNU AFFERO GENERAL PUBLIC LICENSE
Version 3, 19 November 2007
Copyright (C) 2007 Free Software Foundation, Inc. <http://fsf.org/>
Everyone is permitted to copy and distribute verbatim copies
of this license document, but changing it is not allowed.
Preamble
The GNU Affero General Public License is a free, copyleft license for
software and other kinds of works, specifically designed to ensure
cooperation with the community in the case of network server software.
The licenses for most software and other practical works are designed
to take away your freedom to share and change the works. By contrast,
our General Public Licenses are intended to guarantee your freedom to
share and change all versions of a program--to make sure it remains free
software for all its users.
When we speak of free software, we are referring to freedom, not
price. Our General Public Licenses are designed to make sure that you
have the freedom to distribute copies of free software (and charge for
them if you wish), that you receive source code or can get it if you
want it, that you can change the software or use pieces of it in new
free programs, and that you know you can do these things.
Developers that use our General Public Licenses protect your rights
with two steps: (1) assert copyright on the software, and (2) offer
you this License which gives you legal permission to copy, distribute
and/or modify the software.
A secondary benefit of defending all users’ freedom is that
improvements made in alternate versions of the program, if they
receive widespread use, become available for other developers to
incorporate. Many developers of free software are heartened and
encouraged by the resulting cooperation. However, in the case of
software used on network servers, this result may fail to come about.
The GNU General Public License permits making a modified version and
letting the public access it on a server without ever releasing its
source code to the public.
The GNU Affero General Public License is designed specifically to
ensure that, in such cases, the modified source code becomes available
to the community. It requires the operator of a network server to
provide the source code of the modified version running there to the
users of that server. Therefore, public use of a modified version, on
a publicly accessible server, gives the public access to the source
code of the modified version.
An older license, called the Affero General Public License and
published by Affero, was designed to accomplish similar goals. This is
a different license, not a version of the Affero GPL, but Affero has
released a new version of the Affero GPL which permits relicensing under
this license.
The precise terms and conditions for copying, distribution and
modification follow.
TERMS AND CONDITIONS
0. Definitions.
"This License" refers to version 3 of the GNU Affero General Public License.
"Copyright" also means copyright-like laws that apply to other kinds of
works, such as semiconductor masks.
"The Program" refers to any copyrightable work licensed under this
License. Each licensee is addressed as "you". "Licensees" and
"recipients" may be individuals or organizations.
To "modify" a work means to copy from or adapt all or part of the work
in a fashion requiring copyright permission, other than the making of an
exact copy. The resulting work is called a "modified version" of the
earlier work or a work "based on" the earlier work.
A "covered work" means either the unmodified Program or a work based
on the Program.
To "propagate" a work means to do anything with it that, without
permission, would make you directly or secondarily liable for
infringement under applicable copyright law, except executing it on a
computer or modifying a private copy. Propagation includes copying,
distribution (with or without modification), making available to the
public, and in some countries other activities as well.
To "convey" a work means any kind of propagation that enables other
parties to make or receive copies. Mere interaction with a user through
a computer network, with no transfer of a copy, is not conveying.
An interactive user interface displays "Appropriate Legal Notices"
to the extent that it includes a convenient and prominently visible
feature that (1) displays an appropriate copyright notice, and (2)
tells the user that there is no warranty for the work (except to the
extent that warranties are provided), that licensees may convey the
work under this License, and how to view a copy of this License. If
the interface presents a list of user commands or options, such as a
menu, a prominent item in the list meets this criterion.
1. Source Code.
The "source code" for a work means the preferred form of the work
for making modifications to it. "Object code" means any non-source
form of a work.
A "Standard Interface" means an interface that either is an official
standard defined by a recognized standards body, or, in the case of
interfaces specified for a particular programming language, one that
is widely used among developers working in that language.
The "System Libraries" of an executable work include anything, other
than the work as a whole, that (a) is included in the normal form of
packaging a Major Component, but which is not part of that Major
Component, and (b) serves only to enable use of the work with that
Major Component, or to implement a Standard Interface for which an
implementation is available to the public in source code form. A
"Major Component", in this context, means a major essential component
(kernel, window system, and so on) of the specific operating system
(if any) on which the executable work runs, or a compiler used to
produce the work, or an object code interpreter used to run it.
The "Corresponding Source" for a work in object code form means all
the source code needed to generate, install, and (for an executable
work) run the object code and to modify the work, including scripts to
control those activities. However, it does not include the work’s
System Libraries, or general-purpose tools or generally available free
programs which are used unmodified in performing those activities but
which are not part of the work. For example, Corresponding Source
includes interface definition files associated with source files for
the work, and the source code for shared libraries and dynamically
linked subprograms that the work is specifically designed to require,
such as by intimate data communication or control flow between those
subprograms and other parts of the work.
The Corresponding Source need not include anything that users
can regenerate automatically from other parts of the Corresponding
Source.
The Corresponding Source for a work in source code form is that
same work.
2. Basic Permissions.
All rights granted under this License are granted for the term of
copyright on the Program, and are irrevocable provided the stated
conditions are met. This License explicitly affirms your unlimited
permission to run the unmodified Program. The output from running a
covered work is covered by this License only if the output, given its
content, constitutes a covered work. This License acknowledges your
rights of fair use or other equivalent, as provided by copyright law.
You may make, run and propagate covered works that you do not
convey, without conditions so long as your license otherwise remains
in force. You may convey covered works to others for the sole purpose
of having them make modifications exclusively for you, or provide you
with facilities for running those works, provided that you comply with
the terms of this License in conveying all material for which you do
not control copyright. Those thus making or running the covered works
for you must do so exclusively on your behalf, under your direction
and control, on terms that prohibit them from making any copies of
your copyrighted material outside their relationship with you.
Conveying under any other circumstances is permitted solely under
the conditions stated below. Sublicensing is not allowed; section 10
makes it unnecessary.
3. Protecting Users’ Legal Rights From Anti-Circumvention Law.
No covered work shall be deemed part of an effective technological
measure under any applicable law fulfilling obligations under article
11 of the WIPO copyright treaty adopted on 20 December 1996, or
similar laws prohibiting or restricting circumvention of such
measures.
When you convey a covered work, you waive any legal power to forbid
circumvention of technological measures to the extent such circumvention
is effected by exercising rights under this License with respect to
the covered work, and you disclaim any intention to limit operation or
modification of the work as a means of enforcing, against the work’s
users, your or third parties’ legal rights to forbid circumvention of
technological measures.
4. Conveying Verbatim Copies.
You may convey verbatim copies of the Program’s source code as you
receive it, in any medium, provided that you conspicuously and
appropriately publish on each copy an appropriate copyright notice;
keep intact all notices stating that this License and any
non-permissive terms added in accord with section 7 apply to the code;
keep intact all notices of the absence of any warranty; and give all
recipients a copy of this License along with the Program.
You may charge any price or no price for each copy that you convey,
and you may offer support or warranty protection for a fee.
5. Conveying Modified Source Versions.
You may convey a work based on the Program, or the modifications to
produce it from the Program, in the form of source code under the
terms of section 4, provided that you also meet all of these conditions:
a) The work must carry prominent notices stating that you modified
it, and giving a relevant date.
b) The work must carry prominent notices stating that it is
released under this License and any conditions added under section
7. This requirement modifies the requirement in section 4 to
"keep intact all notices".
c) You must license the entire work, as a whole, under this
License to anyone who comes into possession of a copy. This
License will therefore apply, along with any applicable section 7
additional terms, to the whole of the work, and all its parts,
regardless of how they are packaged. This License gives no
permission to license the work in any other way, but it does not
invalidate such permission if you have separately received it.
d) If the work has interactive user interfaces, each must display
Appropriate Legal Notices; however, if the Program has interactive
interfaces that do not display Appropriate Legal Notices, your
work need not make them do so.
A compilation of a covered work with other separate and independent
works, which are not by their nature extensions of the covered work,
and which are not combined with it such as to form a larger program,
in or on a volume of a storage or distribution medium, is called an
"aggregate" if the compilation and its resulting copyright are not
used to limit the access or legal rights of the compilation’s users
beyond what the individual works permit. Inclusion of a covered work
in an aggregate does not cause this License to apply to the other
parts of the aggregate.
6. Conveying Non-Source Forms.
You may convey a covered work in object code form under the terms
of sections 4 and 5, provided that you also convey the
machine-readable Corresponding Source under the terms of this License,
in one of these ways:
a) Convey the object code in, or embodied in, a physical product
(including a physical distribution medium), accompanied by the
Corresponding Source fixed on a durable physical medium
customarily used for software interchange.
b) Convey the object code in, or embodied in, a physical product
(including a physical distribution medium), accompanied by a
written offer, valid for at least three years and valid for as
long as you offer spare parts or customer support for that product
model, to give anyone who possesses the object code either (1) a
copy of the Corresponding Source for all the software in the
product that is covered by this License, on a durable physical
medium customarily used for software interchange, for a price no
more than your reasonable cost of physically performing this
conveying of source, or (2) access to copy the
Corresponding Source from a network server at no charge.
c) Convey individual copies of the object code with a copy of the
written offer to provide the Corresponding Source. This
alternative is allowed only occasionally and noncommercially, and
only if you received the object code with such an offer, in accord
with subsection 6b.
d) Convey the object code by offering access from a designated
place (gratis or for a charge), and offer equivalent access to the
Corresponding Source in the same way through the same place at no
further charge. You need not require recipients to copy the
Corresponding Source along with the object code. If the place to
copy the object code is a network server, the Corresponding Source
may be on a different server (operated by you or a third party)
that supports equivalent copying facilities, provided you maintain
clear directions next to the object code saying where to find the
Corresponding Source. Regardless of what server hosts the
Corresponding Source, you remain obligated to ensure that it is
available for as long as needed to satisfy these requirements.
e) Convey the object code using peer-to-peer transmission, provided
you inform other peers where the object code and Corresponding
Source of the work are being offered to the general public at no
charge under subsection 6d.
A separable portion of the object code, whose source code is excluded
from the Corresponding Source as a System Library, need not be
included in conveying the object code work.
A "User Product" is either (1) a "consumer product", which means any
tangible personal property which is normally used for personal, family,
or household purposes, or (2) anything designed or sold for incorporation
into a dwelling. In determining whether a product is a consumer product,
doubtful cases shall be resolved in favor of coverage. For a particular
product received by a particular user, "normally used" refers to a
typical or common use of that class of product, regardless of the status
of the particular user or of the way in which the particular user
actually uses, or expects or is expected to use, the product. A product
is a consumer product regardless of whether the product has substantial
commercial, industrial or non-consumer uses, unless such uses represent
the only significant mode of use of the product.
"Installation Information" for a User Product means any methods,
procedures, authorization keys, or other information required to install
and execute modified versions of a covered work in that User Product from
a modified version of its Corresponding Source. The information must
suffice to ensure that the continued functioning of the modified object
code is in no case prevented or interfered with solely because
modification has been made.
If you convey an object code work under this section in, or with, or
specifically for use in, a User Product, and the conveying occurs as
part of a transaction in which the right of possession and use of the
User Product is transferred to the recipient in perpetuity or for a
fixed term (regardless of how the transaction is characterized), the
Corresponding Source conveyed under this section must be accompanied
by the Installation Information. But this requirement does not apply
if neither you nor any third party retains the ability to install
modified object code on the User Product (for example, the work has
been installed in ROM).
The requirement to provide Installation Information does not include a
requirement to continue to provide support service, warranty, or updates
for a work that has been modified or installed by the recipient, or for
the User Product in which it has been modified or installed. Access to a
network may be denied when the modification itself materially and
adversely affects the operation of the network or violates the rules and
protocols for communication across the network.
Corresponding Source conveyed, and Installation Information provided,
in accord with this section must be in a format that is publicly
documented (and with an implementation available to the public in
source code form), and must require no special password or key for
unpacking, reading or copying.
7. Additional Terms.
"Additional permissions" are terms that supplement the terms of this
License by making exceptions from one or more of its conditions.
Additional permissions that are applicable to the entire Program shall
be treated as though they were included in this License, to the extent
that they are valid under applicable law. If additional permissions
apply only to part of the Program, that part may be used separately
under those permissions, but the entire Program remains governed by
this License without regard to the additional permissions.
When you convey a copy of a covered work, you may at your option
remove any additional permissions from that copy, or from any part of
it. (Additional permissions may be written to require their own
removal in certain cases when you modify the work.) You may place
additional permissions on material, added by you to a covered work,
for which you have or can give appropriate copyright permission.
Notwithstanding any other provision of this License, for material you
add to a covered work, you may (if authorized by the copyright holders of
that material) supplement the terms of this License with terms:
a) Disclaiming warranty or limiting liability differently from the
terms of sections 15 and 16 of this License; or
b) Requiring preservation of specified reasonable legal notices or
author attributions in that material or in the Appropriate Legal
Notices displayed by works containing it; or
c) Prohibiting misrepresentation of the origin of that material, or
requiring that modified versions of such material be marked in
reasonable ways as different from the original version; or
d) Limiting the use for publicity purposes of names of licensors or
authors of the material; or
e) Declining to grant rights under trademark law for use of some
trade names, trademarks, or service marks; or
f) Requiring indemnification of licensors and authors of that
material by anyone who conveys the material (or modified versions of
it) with contractual assumptions of liability to the recipient, for
any liability that these contractual assumptions directly impose on
those licensors and authors.
All other non-permissive additional terms are considered "further
restrictions" within the meaning of section 10. If the Program as you
received it, or any part of it, contains a notice stating that it is
governed by this License along with a term that is a further
restriction, you may remove that term. If a license document contains
a further restriction but permits relicensing or conveying under this
License, you may add to a covered work material governed by the terms
of that license document, provided that the further restriction does
not survive such relicensing or conveying.
If you add terms to a covered work in accord with this section, you
must place, in the relevant source files, a statement of the
additional terms that apply to those files, or a notice indicating
where to find the applicable terms.
Additional terms, permissive or non-permissive, may be stated in the
form of a separately written license, or stated as exceptions;
the above requirements apply either way.
8. Termination.
You may not propagate or modify a covered work except as expressly
provided under this License. Any attempt otherwise to propagate or
modify it is void, and will automatically terminate your rights under
this License (including any patent licenses granted under the third
paragraph of section 11).
However, if you cease all violation of this License, then your
license from a particular copyright holder is reinstated (a)
provisionally, unless and until the copyright holder explicitly and
finally terminates your license, and (b) permanently, if the copyright
holder fails to notify you of the violation by some reasonable means
prior to 60 days after the cessation.
Moreover, your license from a particular copyright holder is
reinstated permanently if the copyright holder notifies you of the
violation by some reasonable means, this is the first time you have
received notice of violation of this License (for any work) from that
copyright holder, and you cure the violation prior to 30 days after
your receipt of the notice.
Termination of your rights under this section does not terminate the
licenses of parties who have received copies or rights from you under
this License. If your rights have been terminated and not permanently
reinstated, you do not qualify to receive new licenses for the same
material under section 10.
9. Acceptance Not Required for Having Copies.
You are not required to accept this License in order to receive or
run a copy of the Program. Ancillary propagation of a covered work
occurring solely as a consequence of using peer-to-peer transmission
to receive a copy likewise does not require acceptance. However,
nothing other than this License grants you permission to propagate or
modify any covered work. These actions infringe copyright if you do
not accept this License. Therefore, by modifying or propagating a
covered work, you indicate your acceptance of this License to do so.
10. Automatic Licensing of Downstream Recipients.
Each time you convey a covered work, the recipient automatically
receives a license from the original licensors, to run, modify and
propagate that work, subject to this License. You are not responsible
for enforcing compliance by third parties with this License.
An "entity transaction" is a transaction transferring control of an
organization, or substantially all assets of one, or subdividing an
organization, or merging organizations. If propagation of a covered
work results from an entity transaction, each party to that
transaction who receives a copy of the work also receives whatever
licenses to the work the party’s predecessor in interest had or could
give under the previous paragraph, plus a right to possession of the
Corresponding Source of the work from the predecessor in interest, if
the predecessor has it or can get it with reasonable efforts.
You may not impose any further restrictions on the exercise of the
rights granted or affirmed under this License. For example, you may
not impose a license fee, royalty, or other charge for exercise of
rights granted under this License, and you may not initiate litigation
(including a cross-claim or counterclaim in a lawsuit) alleging that
any patent claim is infringed by making, using, selling, offering for
sale, or importing the Program or any portion of it.
11. Patents.
A "contributor" is a copyright holder who authorizes use under this
License of the Program or a work on which the Program is based. The
work thus licensed is called the contributor’s "contributor version".
A contributor’s "essential patent claims" are all patent claims
owned or controlled by the contributor, whether already acquired or
hereafter acquired, that would be infringed by some manner, permitted
by this License, of making, using, or selling its contributor version,
but do not include claims that would be infringed only as a
consequence of further modification of the contributor version. For
purposes of this definition, "control" includes the right to grant
patent sublicenses in a manner consistent with the requirements of
this License.
Each contributor grants you a non-exclusive, worldwide, royalty-free
patent license under the contributor’s essential patent claims, to
make, use, sell, offer for sale, import and otherwise run, modify and
propagate the contents of its contributor version.
In the following three paragraphs, a "patent license" is any express
agreement or commitment, however denominated, not to enforce a patent
(such as an express permission to practice a patent or covenant not to
sue for patent infringement). To "grant" such a patent license to a
party means to make such an agreement or commitment not to enforce a
patent against the party.
If you convey a covered work, knowingly relying on a patent license,
and the Corresponding Source of the work is not available for anyone
to copy, free of charge and under the terms of this License, through a
publicly available network server or other readily accessible means,
then you must either (1) cause the Corresponding Source to be so
available, or (2) arrange to deprive yourself of the benefit of the
patent license for this particular work, or (3) arrange, in a manner
consistent with the requirements of this License, to extend the patent
license to downstream recipients. "Knowingly relying" means you have
actual knowledge that, but for the patent license, your conveying the
covered work in a country, or your recipient’s use of the covered work
in a country, would infringe one or more identifiable patents in that
country that you have reason to believe are valid.
If, pursuant to or in connection with a single transaction or
arrangement, you convey, or propagate by procuring conveyance of, a
covered work, and grant a patent license to some of the parties
receiving the covered work authorizing them to use, propagate, modify
or convey a specific copy of the covered work, then the patent license
you grant is automatically extended to all recipients of the covered
work and works based on it.
A patent license is "discriminatory" if it does not include within
the scope of its coverage, prohibits the exercise of, or is
conditioned on the non-exercise of one or more of the rights that are
specifically granted under this License. You may not convey a covered
work if you are a party to an arrangement with a third party that is
in the business of distributing software, under which you make payment
to the third party based on the extent of your activity of conveying
the work, and under which the third party grants, to any of the
parties who would receive the covered work from you, a discriminatory
patent license (a) in connection with copies of the covered work
conveyed by you (or copies made from those copies), or (b) primarily
for and in connection with specific products or compilations that
contain the covered work, unless you entered into that arrangement,
or that patent license was granted, prior to 28 March 2007.
Nothing in this License shall be construed as excluding or limiting
any implied license or other defenses to infringement that may
otherwise be available to you under applicable patent law.
12. No Surrender of Others’ Freedom.
If conditions are imposed on you (whether by court order, agreement or
otherwise) that contradict the conditions of this License, they do not
excuse you from the conditions of this License. If you cannot convey a
covered work so as to satisfy simultaneously your obligations under this
License and any other pertinent obligations, then as a consequence you may
not convey it at all. For example, if you agree to terms that obligate you
to collect a royalty for further conveying from those to whom you convey
the Program, the only way you could satisfy both those terms and this
License would be to refrain entirely from conveying the Program.
13. Remote Network Interaction; Use with the GNU General Public License.
Notwithstanding any other provision of this License, if you modify the
Program, your modified version must prominently offer all users
interacting with it remotely through a computer network (if your version
supports such interaction) an opportunity to receive the Corresponding
Source of your version by providing access to the Corresponding Source
from a network server at no charge, through some standard or customary
means of facilitating copying of software. This Corresponding Source
shall include the Corresponding Source for any work covered by version 3
of the GNU General Public License that is incorporated pursuant to the
following paragraph.
Notwithstanding any other provision of this License, you have
permission to link or combine any covered work with a work licensed
under version 3 of the GNU General Public License into a single
combined work, and to convey the resulting work. The terms of this
License will continue to apply to the part which is the covered work,
but the work with which it is combined will remain governed by version
3 of the GNU General Public License.
14. Revised Versions of this License.
The Free Software Foundation may publish revised and/or new versions of
the GNU Affero General Public License from time to time. Such new versions
will be similar in spirit to the present version, but may differ in detail to
address new problems or concerns.
Each version is given a distinguishing version number. If the
Program specifies that a certain numbered version of the GNU Affero General
Public License "or any later version" applies to it, you have the
option of following the terms and conditions either of that numbered
version or of any later version published by the Free Software
Foundation. If the Program does not specify a version number of the
GNU Affero General Public License, you may choose any version ever published
by the Free Software Foundation.
If the Program specifies that a proxy can decide which future
versions of the GNU Affero General Public License can be used, that proxy’s
public statement of acceptance of a version permanently authorizes you
to choose that version for the Program.
Later license versions may give you additional or different
permissions. However, no additional obligations are imposed on any
author or copyright holder as a result of your choosing to follow a
later version.
15. Disclaimer of Warranty.
THERE IS NO WARRANTY FOR THE PROGRAM, TO THE EXTENT PERMITTED BY
APPLICABLE LAW. EXCEPT WHEN OTHERWISE STATED IN WRITING THE COPYRIGHT
HOLDERS AND/OR OTHER PARTIES PROVIDE THE PROGRAM "AS IS" WITHOUT WARRANTY
OF ANY KIND, EITHER EXPRESSED OR IMPLIED, INCLUDING, BUT NOT LIMITED TO,
THE IMPLIED WARRANTIES OF MERCHANTABILITY AND FITNESS FOR A PARTICULAR
PURPOSE. THE ENTIRE RISK AS TO THE QUALITY AND PERFORMANCE OF THE PROGRAM
IS WITH YOU. SHOULD THE PROGRAM PROVE DEFECTIVE, YOU ASSUME THE COST OF
ALL NECESSARY SERVICING, REPAIR OR CORRECTION.
16. Limitation of Liability.
IN NO EVENT UNLESS REQUIRED BY APPLICABLE LAW OR AGREED TO IN WRITING
WILL ANY COPYRIGHT HOLDER, OR ANY OTHER PARTY WHO MODIFIES AND/OR CONVEYS
THE PROGRAM AS PERMITTED ABOVE, BE LIABLE TO YOU FOR DAMAGES, INCLUDING ANY
GENERAL, SPECIAL, INCIDENTAL OR CONSEQUENTIAL DAMAGES ARISING OUT OF THE
USE OR INABILITY TO USE THE PROGRAM (INCLUDING BUT NOT LIMITED TO LOSS OF
DATA OR DATA BEING RENDERED INACCURATE OR LOSSES SUSTAINED BY YOU OR THIRD
PARTIES OR A FAILURE OF THE PROGRAM TO OPERATE WITH ANY OTHER PROGRAMS),
EVEN IF SUCH HOLDER OR OTHER PARTY HAS BEEN ADVISED OF THE POSSIBILITY OF
SUCH DAMAGES.
17. Interpretation of Sections 15 and 16.
If the disclaimer of warranty and limitation of liability provided
above cannot be given local legal effect according to their terms,
reviewing courts shall apply local law that most closely approximates
an absolute waiver of all civil liability in connection with the
Program, unless a warranty or assumption of liability accompanies a
copy of the Program in return for a fee.
END OF TERMS AND CONDITIONS
How to Apply These Terms to Your New Programs
If you develop a new program, and you want it to be of the greatest
possible use to the public, the best way to achieve this is to make it
free software which everyone can redistribute and change under these terms.
To do so, attach the following notices to the program. It is safest
to attach them to the start of each source file to most effectively
state the exclusion of warranty; and each file should have at least
the "copyright" line and a pointer to where the full notice is found.
<one line to give the program’s name and a brief idea of what it does.>
Copyright (C) <year> <name of author>
This program is free software: you can redistribute it and/or modify
it under the terms of the GNU Affero General Public License as published by
the Free Software Foundation, either version 3 of the License, or
(at your option) any later version.
This program is distributed in the hope that it will be useful,
but WITHOUT ANY WARRANTY; without even the implied warranty of
MERCHANTABILITY or FITNESS FOR A PARTICULAR PURPOSE. See the
GNU Affero General Public License for more details.
You should have received a copy of the GNU Affero General Public License
along with this program. If not, see <http://www.gnu.org/licenses/>.
Also add information on how to contact you by electronic and paper mail.
If your software can interact with users remotely through a computer
network, you should also make sure that it provides a way for users to
get its source. For example, if your program is a web application, its
interface could display a "Source" link that leads users to an archive
of the code. There are many ways you could offer source, and different
solutions will be better for different programs; see section 13 for the
specific requirements.
You should also get your employer (if you work as a programmer) or school,
if any, to sign a "copyright disclaimer" for the program, if necessary.
For more information on this, and how to apply and follow the GNU AGPL, see
<http://www.gnu.org/licenses/>.
#
GNU LESSER GENERAL PUBLIC LICENSE
Version 3, 29 June 2007
Copyright (C) 2007 Free Software Foundation, Inc. <http://fsf.org/>
Everyone is permitted to copy and distribute verbatim copies
of this license document, but changing it is not allowed.
This version of the GNU Lesser General Public License incorporates
the terms and conditions of version 3 of the GNU General Public
License, supplemented by the additional permissions listed below.
0. Additional Definitions.
As used herein, "this License" refers to version 3 of the GNU Lesser
General Public License, and the "GNU GPL" refers to version 3 of the GNU
General Public License.
"The Library" refers to a covered work governed by this License,
other than an Application or a Combined Work as defined below.
An "Application" is any work that makes use of an interface provided
by the Library, but which is not otherwise based on the Library.
Defining a subclass of a class defined by the Library is deemed a mode
of using an interface provided by the Library.
A "Combined Work" is a work produced by combining or linking an
Application with the Library. The particular version of the Library
with which the Combined Work was made is also called the "Linked
Version".
The "Minimal Corresponding Source" for a Combined Work means the
Corresponding Source for the Combined Work, excluding any source code
for portions of the Combined Work that, considered in isolation, are
based on the Application, and not on the Linked Version.
The "Corresponding Application Code" for a Combined Work means the
object code and/or source code for the Application, including any data
and utility programs needed for reproducing the Combined Work from the
Application, but excluding the System Libraries of the Combined Work.
1. Exception to Section 3 of the GNU GPL.
You may convey a covered work under sections 3 and 4 of this License
without being bound by section 3 of the GNU GPL.
2. Conveying Modified Versions.
If you modify a copy of the Library, and, in your modifications, a
facility refers to a function or data to be supplied by an Application
that uses the facility (other than as an argument passed when the
facility is invoked), then you may convey a copy of the modified
version:
a) under this License, provided that you make a good faith effort to
ensure that, in the event an Application does not supply the
function or data, the facility still operates, and performs
whatever part of its purpose remains meaningful, or
b) under the GNU GPL, with none of the additional permissions of
this License applicable to that copy.
3. Object Code Incorporating Material from Library Header Files.
The object code form of an Application may incorporate material from
a header file that is part of the Library. You may convey such object
code under terms of your choice, provided that, if the incorporated
material is not limited to numerical parameters, data structure
layouts and accessors, or small macros, inline functions and templates
(ten or fewer lines in length), you do both of the following:
a) Give prominent notice with each copy of the object code that the
Library is used in it and that the Library and its use are
covered by this License.
b) Accompany the object code with a copy of the GNU GPL and this license
document.
4. Combined Works.
You may convey a Combined Work under terms of your choice that,
taken together, effectively do not restrict modification of the
portions of the Library contained in the Combined Work and reverse
engineering for debugging such modifications, if you also do each of
the following:
a) Give prominent notice with each copy of the Combined Work that
the Library is used in it and that the Library and its use are
covered by this License.
b) Accompany the Combined Work with a copy of the GNU GPL and this license
document.
c) For a Combined Work that displays copyright notices during
execution, include the copyright notice for the Library among
these notices, as well as a reference directing the user to the
copies of the GNU GPL and this license document.
d) Do one of the following:
0) Convey the Minimal Corresponding Source under the terms of this
License, and the Corresponding Application Code in a form
suitable for, and under terms that permit, the user to
recombine or relink the Application with a modified version of
the Linked Version to produce a modified Combined Work, in the
manner specified by section 6 of the GNU GPL for conveying
Corresponding Source.
1) Use a suitable shared library mechanism for linking with the
Library. A suitable mechanism is one that (a) uses at run time
a copy of the Library already present on the user’s computer
system, and (b) will operate properly with a modified version
of the Library that is interface-compatible with the Linked
Version.
e) Provide Installation Information, but only if you would otherwise
be required to provide such information under section 6 of the
GNU GPL, and only to the extent that such information is
necessary to install and execute a modified version of the
Combined Work produced by recombining or relinking the
Application with a modified version of the Linked Version. (If
you use option 4d0, the Installation Information must accompany
the Minimal Corresponding Source and Corresponding Application
Code. If you use option 4d1, you must provide the Installation
Information in the manner specified by section 6 of the GNU GPL
for conveying Corresponding Source.)
5. Combined Libraries.
You may place library facilities that are a work based on the
Library side by side in a single library together with other library
facilities that are not Applications and are not covered by this
License, and convey such a combined library under terms of your
choice, if you do both of the following:
a) Accompany the combined library with a copy of the same work based
on the Library, uncombined with any other library facilities,
conveyed under the terms of this License.
b) Give prominent notice with the combined library that part of it
is a work based on the Library, and explaining where to find the
accompanying uncombined form of the same work.
6. Revised Versions of the GNU Lesser General Public License.
The Free Software Foundation may publish revised and/or new versions
of the GNU Lesser General Public License from time to time. Such new
versions will be similar in spirit to the present version, but may
differ in detail to address new problems or concerns.
Each version is given a distinguishing version number. If the
Library as you received it specifies that a certain numbered version
of the GNU Lesser General Public License "or any later version"
applies to it, you have the option of following the terms and
conditions either of that published version or of any later version
published by the Free Software Foundation. If the Library as you
received it does not specify a version number of the GNU Lesser
General Public License, you may choose any version of the GNU Lesser
General Public License ever published by the Free Software Foundation.
If the Library as you received it specifies that a proxy can decide
whether future versions of the GNU Lesser General Public License shall
apply, that proxy’s public statement of acceptance of any version is
permanent authorization for you to choose that version for the
Library.
Adding a Client, 1
Administrator, 2
Algorithm
New Volume, 3
Recycling, 4
Always Incremental, 5
Always Incremental Backup
Limitation
Only suitable for file based backups, 6
Apache
bareos-webui, 7
Attributes
Restoring Directory, 8
auditing, 9
Authorization
Names and Passwords, 10
Autochanger
Interface, 11
mtx-changer, 12
Support, 13
Testing, 14
Using the, 15
Automated Disk Backup, 16
Automatic
Pruning, 17
Pruning and Recycling Example, 18
AutoPrune, 19
Backup, 20
Bareos database, 21
Catalog, 22
of Third Party Databases, 23
One Tape, 24
Partitions, 25
Raw Partitions, 26
Backup Strategies, 27
Bacula, 28
Barcode Support, 29
Bareos
Installing, 30
Upgrading, 31
Bareos Console, 32
Bareos Copyright, Trademark, and Licenses, 33
bareos-12.4.1
Release Notes, 34
setbandwidth, 35
bareos-12.4.2
Release Notes, 36
bareos-12.4.3
Release Notes, 37
bareos-12.4.4
Release Notes, 38
status scheduler, 39
status subscriptions, 40
Subscriptions, 41
Windows
silent installation, 42
Windows Installation
SILENTKEEPCONFIG, 43
bareos-12.4.5
Release Notes, 44
Windows
dedupclication, 45
Encrypted Filesystems (EFS), 46
file attributes, 47
Reparse points, 48
bareos-12.4.6
Release Notes, 49
bareos-12.4.8
Release Notes, 50
bareos-13.2.0
Copy and Migration Jobs between different Storage Daemons, 51
MSSQL, 52
NDMP Log Level, 53
NDMP Snooping, 54
Passive, 55
Protocol, 56
bareos-13.2.2
Release Notes, 57
bareos-13.2.3
MySQL password from configuration file, 58
Release Notes, 59
bareos-13.2.4
Release Notes, 60
bareos-13.2.5
Release Notes, 61
bareos-13.3.0
Director Job Resource isn’t required for Copy or Migrate jobs, 62
bareos-13.4.0
Auto Deflate, 63
Auto Deflate Algorithm, 64
Auto Deflate Level, 65
Auto Inflate, 66
Auto XFlate On Replication, 67
Catalog, 68
Job catalog overwritten by Pool catalog, 69
bareos-14.2.0
Absolute Job Timeout, 70
Audit Events, 71
Auditing, 72
dbconfig-common (Debian), 73, 74, 75
Label Block Size, 76
Maximum Block Size, 77, 78
Plugin Directory, 79
Plugin Names, 80
Save File History, 81
Statistics Collect Interval, 82
Windows
FilesNotToBackup, 83
bareos-14.2.1
Windows Installation
DBADMINPASSWORD, 84
DBADMINUSER, 85
INSTALLDIRECTOR, 86
INSTALLSTORAGE, 87
WRITELOGS, 88
bareos-14.2.2
AutoExclude, 89
Ceph (Rados), 90
GlusterFS (gfapi), 91
MSSQL: serveraddress, 92
Release Notes, 93
bareos-14.2.3
Profile, 94
Release Notes, 95
bareos-14.2.4
Release Notes, 96
bareos-14.2.5
Release Notes, 97
bareos-14.2.6
Release Notes, 98
bareos-14.2.7
Release Notes, 99
bareos-14.4.0
Max Virtual Full Interval, 100
multiple Python plugins, 101
Syslog Level, 102
bareos-15.1.0
Exit On Fatal, 103
Reconnect, 104
bareos-15.2.0
bareos-webui, 105
bat vs. bareos-webui, 106
CEPH Rados Plugin, 107
Ceph Storage, 108
Cephfs Plugin, 109
Compatible = no, 110, 111, 112
Device Options, 113, 114, 115, 116
GlusterFS Plugin, 117
GlusterFS Storage, 118
LDAP Plugin, 119
requires
jansson, 120, 121, 122, 123
VMware Plugin, 124
bareos-15.2.1
Secure Erase Command, 125, 126, 127
bareos-15.2.2
Release Notes, 128
bareos-15.2.3
Add additional python plugin options, 129
Log Timestamp Format, 130, 131, 132
Maximum Connections, 133, 134
Release Notes, 135
VMware Plugin: restore to VMDK files, 136, 137
bareos-15.2.4
File History Size, 138
Release Notes, 139
bareos-16.2.0
Webui offers limited support for multiple catalogs, 140
bareos-16.2.1
Including configuration files by wildcard, 141
bareos-16.2.2
/etc/bareos-webui/configuration.ini, 142
Client Initiated Connection, 143
Connection From Client To Director, 144, 145
Connection From Director To Client, 146, 147
Port, 148
Subdirectory Configuration Scheme, 149
bareos-16.2.4
ACL: strict regular expression handling, 150
Always Incremental, 151, 152
Always Incremental Job Retention, 153
Always Incremental Keep Number, 154
Always Incremental Max Full Age, 155
bareos-webui incorporates Zend Framework 2, 156
Client resource files, 157
configure add, 158, 159
configure export, 160
Job Type Consolidate, 161
Max Full Consolidations, 162
MySQL Incremental Backup Plugin for using Percona xtrabackup, 163
NDMP Changer Device, 164
Release Notes, 165
Subdirectory Configuration Scheme used as Default, 166, 167, 168
bareos-16.2.5
bareos-dbcheck -b -v, 169
Release Notes, 170
truncate command, 171
bareos-16.2.6
Lan Address, 172, 173
Release Notes, 174
bareos-16.2.7
Release Notes, 175
bareos-16.2.8
Release Notes, 176
bareos-17.2.0
bat: removed from core distribution, 177
bareos-17.2.3
NDMP BAREOS, 178
NDMP NATIVE, 179, 180
bareos-17.2.4
Release Notes, 181
VMware Plugin: transport=nbdssl, 182
VMware Plugin: vcthumbprint, 183
VMware Plugin: VDDK 6.5.2, 184
bareos-17.2.5
Release Notes, 185
bareos-17.2.6
Release Notes, 186
bareos-17.2.7
Droplet, 187, 188
Release Notes, 189
bareos-dbcheck, 190
Base Jobs, 191
bconsole, 192
bcopy, 193
bextract, 194
block size, 195
Blocksize
optimize, 196
bls, 197
block size, 198
Label, 199
Listing Blocks, 200
Listing Jobs, 201
Bootstrap, 202
Automatic Generation, 203
bscan, 204
Client, 205
Count, 206
Example, 207
File, 208
File Format, 209
FileIndex, 210
FileRegex, 211
Job, 212
JobId, 213
Slot, 214
Stream, 215
VolBlock, 216
VolFile, 217
VolSessionId, 218
VolSessionTime, 219
Volume, 220
Bootstrap File, 221
bpipe
MySQL backup, 222
PostgreSQL backup, 223
bpluginfo, 224
bregex, 225
Broken pipe, 226
bscan, 227, 228
after, 229
bootstrap, 230
Correct Volume File Count, 231
Recreate Catalog, 232
bscrypto, 233
bsmtp, 234
btape, 235
bwild, 236
Cartridges
Changing, 237
Catalog, 238, 239
database check, 240
Job, 241
JobStatus, 242
Media
VolWrites, 243
Recreate Using bscan, 244
Restore, 245
Using bscan to Compare a Volume to an existing, 246
Catalog Maintenance, 247
Catalog Resource, 248
Ceph
Cephfs Plugin, 249
Rados Plugin, 250
Ceph Object Store
Rados, 251, 252, 253
Character Sets, 254
Client, 255
Adding a Second, 256
Client Resource, 257, 258, 259
Client/File daemon Configuration, 260
Command
bareos-dbcheck, 261
bareos-dir, 262
bareos-fd, 263
bareos-sd, 264
bat, 265
bconsole, 266
exit, 267
bcopy, 268
bextract, 269
block size, 270
bls, 271
block size, 272
bpluginfo, 273
bregex, 274
bscan, 275, 276
bscrypto, 277
bsmtp, 278
btape, 279
bwild, 280
mtx-changer, 281
Command Line Options
Daemon, 282
Communications Encryption, 283
Compatibility
Backward, 284
Bacula, 285
Concurrent Disk Jobs, 286
Concurrent Jobs, 287, 288, 289
Configuration
bconsole, 290, 291
Client/File daemon, 292
Comments, 293
Console, 294, 295
Data Types, 296
Director, 297
Example, 298
Directories, 299
Files, 300
Including Files, 301
Monitor, 302
Naming Convention, 303
Resource, 304
Storage Daemon, 305
Subdirectories, 306
Tray Monitor, 307
WebUI, 308
Console, 309
Adding a Volume to a Pool, 310
Command
. commands, 311
@# anything, 312
@exit, 313
@help, 314
@input <filename>, 315
@output <filename> <w|a>, 316
@quit, 317
@separator, 318
@sleep <seconds>, 319
@tee <filename> <w|a>, 320
@time, 321
@version, 322
add, 323
autodisplay on/off, 324
automount on/off, 325
cancel jobid, 326
configure add, 327
configure export, 328
create pool, 329
delete, 330
disable, 331
enable, 332
estimate, 333
exit, 334
export, 335
gui, 336
help, 337
import, 338
label, 339
list, 340
list files jobid, 341
list jobid, 342
list jobmedia, 343
list jobs, 344
list jobtotals, 345
list pools, 346
list volumes, 347
llist, 348
memory, 349
messages, 350, 351
mount, 352
move, 353
prune, 354
purge, 355
query, 356
quit, 357
relabel, 358, 359
release, 360
reload, 361
rerun, 362
resolve, 363
restore, 364, 365
run, 366
setbandwidth, 367
setdebug, 368
setip, 369
show, 370
sqlquery, 371
status, 372, 373
status dir, 374
status jobid, 375
time, 376
trace, 377
truncate, 378
umount, 379
unmount, 380
update, 381
update slots, 382
use, 383
var, 384
version, 385
wait, 386
Commands
Useful, 387
File Selection, 388, 389
?, 390
cd, 391
count, 392
dir, 393
done, 394
estimate, 395
exit, 396
find, 397
help, 398
ls, 399
lsmark, 400
mark, 401
pwd, 402
quit, 403
unmark, 404
Keywords, 405
Running from a Shell, 406
Console Configuration, 407
Console Resource, 408, 409
Copy, 410
NDMP, 411
Counter Resource, 412
Crash, 413
Critical Items, 414
Critical Items to Implement Before Production, 415
Customizing the Configuration, 416
Daemon, 417
Command Line Options, 418
Start, 419
Daily Tape Rotation, 420
Data Encryption, 421
Data Spooling, 422
Directives, 423
Data Type, 424
yes|no, 425
acl, 426
audit command list, 427
auth-type, 428
boolean, 429
integer, 430
job protocol, 431
long integer, 432
name, 433
net-address, 434
net-addresses, 435
net-port, 436
password, 437
path, 438
positive integer, 439
resource, 440
size, 441
speed, 442
string, 443
string list, 444
strname, 445
time, 446
Database
Backup Bareos database, 447
Backup Of Third Party, 448
MSSQL, 449
MySQL, 450
Backup, 451
Compacting, 452
MySQL Server Has Gone Away, 453
MySQL Table is Full, 454
PostgreSQL, 455
Backup, 456
Compacting, 457
Repairing Your MySQL, 458
Repairing Your PostgreSQL, 459
Database Size, 460
Debug
crash, 461
setdebug, 462
Windows, 463
Decrypting with a Master Key, 464
Design
Limitations, 465
Device Configuration Records, 466
Devices
Detecting, 467
Multiple, 468
SCSI, 469
Devices that require a mount (USB), 470
Differential, 471
Differential Pool, 472
Directive, 473
Director, 474
Configuration, 475
Resource Types, 476
Director Resource, 477, 478, 479, 480
Disaster
Before, 481
Recovery, 482
bextract, 483
Catalog, 484
Linux, 485
Disclaimer, 486
Disk
Automated Backup, 487
Freeing disk space, 488
Disk Volumes, 489
Drive
Verify using btape, 490
Droplet, 491, 492
Droplet (S3), 493
Edit Codes for Mount and Unmount Directives, 494
Encryption
Communication, 495
Data, 496
Decrypting with a Master Key, 497
Generating Private/Public Encryption Keypairs, 498
Technical Details, 499
Transport, 500
Errors
integer out of range, 501
Restore, 502
Example
Automatic Pruning and Recycling, 503
Bootstrap, 504
Data Encryption Configuration File, 505
FileSet, 506
Migration Jobs, 507
TLS Configuration Files, 508
Excluding Files and Directories, 509
Fifo, 510, 511
File, 512, 513
Bootstrap, 514
File Attributes, 515
File Daemon, see Client, 517
File Deduplication, 518
File Relocation
using, 519
File Retention, 520
File Selection Commands, 521
Files
Automatic Generation of Bootstrap, 522
Including other Configuration, 523
Restoring Your, 524
FileSet
Example, 525
Resource, 526
Testing Your, 527
Windows, 528
Windows Example, 529
Firewall
Windows, 530
Full Pool, 531
GFAPI (GlusterFS), 532, 533, 534
GlusterFS
GFAPI, 535, 536, 537
Plugin, 538
Icinga, 539
Implementation
What is implemented, 540
Including other Configuration Files, 541
Incremental, 542
Incremental Pool, 543
Installation
Linux, 544
MacOS, 545
Windows, 546
Items to Note, 547
Jansson
see JSON 548
Job, 549
Catalog, 550
Concurrent Jobs, 551
JobDefs Resource, 552
JobStatus, 553
Resource, 554
Retention, 555
AutoPrune, 556
Running a, 557
Statistics, 558
JSON, 559
Label
| Automatic Volume Labeling, 560
Label Media, 561
Specifying Slots When Labeling, 562
Tape Labels, 563
Understanding Labels, 564
Lan Address, 565
libwrappers, 566
License
AGPL, 567
Bareos Copyright Trademark Licenses, 568
FDL, 569
LGPL, 570
Public Domain, 571
Limitation
Always Incremental Backup
Only suitable for file based backups, 572
NDMP
64-bit system recommended, 573
A NDMP fileset should only contain a single File directive and Meta options, 574
File information are not available in the Bareos backup stream, 575
No single file restore on merged backups, 576
NDMP_NATIVE
Only use the first tape drive will be used, 577
VMware Plugin
Normal VM disks can not be excluded from the backup, 578
Restore can only be done to the same VM or to local VMDK files, 579
Virtual Disks have to be smaller than 2TB, 580
VM configuration is not backed up, 581
Windows
Bareos Director does not support MySQL database backend, 582
Bareos Storage Daemon only support backup to disk, not to tape, 583
The default installation of Bareos Webui is only suitable for local access, 584
Listing Blocks with bls, 585
Listing Jobs with bls, 586
Magazines
Dealing with Multiple, 587
Maintenance
Catalog, 588
MariaDB, see MySQL
Messages
Resource, 590
type
alert, 591
all, 592
audit, 593
error, 594
fatal, 595
info, 596
mount, 597
notsaved, 598
restored, 599
security, 600
skipped, 601
terminate, 602
volmgmt, 603
warning, 604
Messages Resource, 605, 606, 607
Migration, 608
Important Migration Considerations, 609
Monitor, 610
Monitor Configuration, 611
Monitor Resource, 612
Mount and Unmount: use variables in directives, 613
MSSQL Backup, 614
Multiple Devices, 615
Multiple Storage Devices, 616
MySQL, 617
Backup, 618, 619
MySQL Server Has Gone Away, 620
MySQL Table is Full, 621
Nagios, see Icinga
NDMP
Copy jobs, 623
Environment variables, 624
Example
NDMP_BAREOS, 625
NDMP_NATIVE, 626
File History, 627, 628
Level, 629
Limitation
64-bit system recommended, 630
A NDMP fileset should only contain a single File directive and Meta options, 631
File information are not available in the Bareos backup stream, 632
No single file restore on merged backups, 633
Overview, 634
NDMP_NATIVE
Limitation
Only use the first tape drive will be used, 635
New Volume Algorithm, 636
nginx
bareos-webui, 637
One Tape Backup, 638
Package
bareos, 639, 640, 641, 642, 643, 644, 645, 646
bareos-bat, 647, 648, 649, 650, 651, 652
bareos-bconsole, 653, 654, 655, 656, 657, 658, 659
bareos-client, 660, 661, 662, 663, 664, 665
bareos-common, 666, 667, 668, 669, 670, 671
bareos-database-*, 672, 673
bareos-database-common, 674, 675, 676, 677, 678, 679, 680
bareos-database-mysql, 681, 682, 683, 684, 685, 686, 687, 688
bareos-database-postgresql, 689, 690, 691, 692, 693, 694, 695, 696, 697
bareos-database-sqlite3, 698, 699, 700, 701, 702, 703, 704, 705
bareos-database-tools, 706, 707, 708, 709, 710, 711
bareos-dbg, 712, 713
bareos-debug, 714
bareos-debuginfo, 715
bareos-director, 716, 717, 718, 719, 720, 721, 722, 723
bareos-director-python-plugin, 724, 725, 726, 727, 728, 729, 730, 731
bareos-filedaemon, 732, 733, 734, 735, 736, 737, 738, 739, 740, 741, 742
bareos-filedaemon-ceph-plugin, 743, 744, 745, 746, 747, 748, 749
bareos-filedaemon-glusterfs-plugin, 750, 751, 752, 753, 754
bareos-filedaemon-ldap-python-plugin, 755, 756, 757, 758, 759, 760, 761
bareos-filedaemon-python-plugin, 762, 763, 764, 765, 766, 767, 768
bareos-regress-config, 769, 770, 771, 772, 773, 774
bareos-storage, 775, 776, 777, 778, 779, 780, 781, 782, 783
bareos-storage-ceph, 784, 785, 786, 787, 788, 789
bareos-storage-droplet, 790, 791, 792, 793, 794, 795, 796, 797, 798, 799
bareos-storage-fifo, 800, 801, 802, 803, 804, 805
bareos-storage-glusterfs, 806, 807, 808, 809, 810
bareos-storage-python-plugin, 811, 812, 813, 814, 815, 816
bareos-storage-tape, 817, 818, 819, 820, 821, 822, 823, 824, 825, 826
bareos-tools, 827, 828, 829, 830, 831, 832
bareos-tray-monitor, 833
bareos-traymonitor, 834, 835, 836, 837, 838, 839, 840, 841, 842, 843
bareos-vadp-dumper, 844, 845, 846, 847
bareos-vmware-plugin, 848, 849, 850, 851, 852, 853
bareos-vmware-plugin-compat, 854
bareos-vmware-vix-disklib, 855, 856, 857, 858
bareos-vmware-vix-disklib5, 859
bareos-webui, 860, 861, 862, 863, 864, 865, 866, 867, 868, 869, 870, 871, 872, 873
bat, 874
dbconfig-common, 875, 876, 877, 878, 879, 880, 881, 882, 883, 884, 885, 886
libdroplet, 887, 888, 889, 890, 891, 892
libfastlz, 893, 894, 895, 896, 897, 898
libjansson4, 899, 900, 901
libjansson4-32bit, 902
libjansson4-x86, 903
lzo, 904
python-bareos, 905, 906, 907, 908, 909, 910, 911
python-py, 912
python-pyvmomi, 913
python-requests, 914
python-six, 915
tirpc, 916
univention-bareos, 917
winbareos, 918
Passwords, 919
Percona xtrabackup, 920
Periods
Setting Retention, 921
Platform
AIX, 922
7.1.0.0, 923
Arch Linux, 924
CentOS, 925
5, 926
6, 927, 928
7, 929
Debian, 930
6, 931
7, 932
8, 933, 934, 935
9, 936, 937
dbconfig-common, 938
Debian.org, 939
Fedora, 940
20, 941
21, 942, 943
22, 944
23, 945
24, 946
25, 947
26, 948
27, 949, 950
28, 951
FreeBSD, 952
Gentoo, 953
HP-UX, 954
Linux, 955
Mac
OS X, 956
openSUSE, 957
13.1, 958
13.2, 959
15.0, 960
42.1, 961
42.2, 962
42.3, 963
RHEL, 964
4, 965
5, 966, 967
6, 968, 969
7, 970
SLES, 971
10sp4, 972
11sp4, 973
12sp1, 974
12sp2, 975, 976
12sp3, 977, 978
Solaris, 979
Debug, 980
Ubuntu, 981
10.04, 982
12.04, 983
14.04, 984
16.04, 985
18.04, 986
8.04, 987
dbconfig-common, 988
Debug, 989
Universe, 990
Univention, 991, 992, 993
4.0, 994
4.2, 995
4.3, 996, 997
Univention Corporate Server, see Platform, Univention
Windows, 999, 1000
Plugin, 1001
autoxflate-sd, 1002
bpipe, 1003
ceph
cephfs, 1004
rados, 1005
glusterfs, 1006
ldap, 1007
MSSQL backup, 1008
MySQL Backup, 1009, 1010
PostgreSQL Backup, 1011
Python
Director, 1012
File Daemon, 1013
Storage Daemon, 1014
scsicrypto-sd, 1015
scsitapealert-sd, 1016
VMware, 1017
Pool, 1018
Differential, 1019
Full, 1020
Incremental, 1021
Options to Limit the Volume Usage, 1022
Overview, 1023
Scratch, 1024
Pool Resource, 1025
Pools
Understanding, 1026
PostgreSQL, 1027
Backup, 1028
Problem
Authorization Errors, 1029
Autochanger, 1030
Cannot Access a Client, 1031
Connecting from the FD to the SD, 1032
mtx-changer, 1033
Repair Catalog, 1034
Restore
pruned job, 1035
slow, 1036
Restoring Files, 1037
Tape, 1038
fixed mode, 1039
variable mode, 1040
Windows, 1041
VSS, 1042
Windows Backup, 1043
Windows Ownership and Permissions, 1044
Windows Restore, 1045
Production
Critical Items to Implement Before, 1046
Profile Resource, 1047
Program
Quitting the Console, 1048
Pruning
Automatic, 1049
Example, 1050
Directives, 1051
quit, 1052
Quitting the Console Program, 1053
Rados, 1054
Rados (Ceph Object Store), 1055, 1056, 1057
Recommended Items, 1058
Recovery
Disaster Recovery, 1059
Recycle
Algorithm, 1060
Automatic
Example, 1061
Automatic Volume, 1062
Manual, 1063
Recycle Status, 1064
Recycling
Restricting the Number of Volumes and Recycling, 1065
Regex, 1066
Releases, 1067, 1068
Repairing Your MySQL Database, 1069
Repairing Your PostgreSQL Database, 1070
Requirements
System, 1071
Resource, 1072
Catalog, 1073
Client, 1074, 1075, 1076
Console, 1077, 1078
Counter, 1079
Director, 1080, 1081, 1082, 1083
Example Restore Job, 1084
FileSet, 1085
Job, 1086
JobDefs, 1087
Messages, 1088, 1089, 1090, 1091
Monitor, 1092
Pool, 1093
Profile, 1094
Schedule, 1095
Storage, 1096, 1097
Resource Types, 1098
Restore, 1099, 1100, 1101
Bareos Server, 1102
by filename, 1103
Catalog, 1104
Files
Problem, 1105
pruned job, 1106
slow, 1107
Restore Directories, 1108
Restore Errors, 1109
Restoring Directory Attributes, 1110
Restoring on Windows, 1111
Restoring Your Files, 1112
Restricting the Number of Volumes and Recycling, 1113
Restrictions
Current Implementation, 1114
Design Limitations, 1115
Retention, 1116
File, 1117
Job, 1118
Retention Period, 1119
Rotation
Daily Tape, 1120
Running a Job, 1121
Running Concurrent Jobs, 1122
RunScript
Example, 1123, 1124
S3
Droplet, 1125
Scan, 1126
Schedule, 1127
Resource, 1128
Technical Notes on Schedules, 1129
Understanding Schedules, 1130
Scratch Pool, 1131
SCSI devices, 1132
Security, 1133
Tray Monitor, 1134
Using Bareos to Improve Computer, 1135
SELinux
bareos-webui, 1136
Service, 1137
Session, 1138
Setting Retention Periods, 1139
Simultaneous Jobs, 1140
Size
Database, 1141
Slots, 1142
Specifying Slots When Labeling, 1143
Spooling
Data, 1144
SSL, 1145
Starting the Daemons, 1146
Statistics, 1147
Storage Coordinates, 1148
Storage Daemon, 1149
Configuration, 1150
Storage Device
Multiple, 1151
Storage Resource, 1152, 1153
Strategy
Backup, 1154
Support
Autochanger, 1155
Barcode, 1156
Operating Systems, 1157
System Requirements, 1158
Systems
Supported Operating Systems, 1159
Tape, 1160, 1161
Format, 1162
Label
ANSI, 1163
IBM, 1164
LTFS, 1165
Manually Changing, 1166
speed, 1167
TCP Wrappers, 1168
Terminology, 1169
Testing
Configuration Files, 1170
Testing Your FileSet, 1171
TLS, 1172
TLS Configuration Files, 1173
Tools
Volume Utility, 1174
Traceback, 1175
Test, 1176
Trademark, 1177
Transport Encryption, 1178
Tray Monitor
Configuration, 1179
Tray Monitor Security, 1180
Tuning
blocksize, 1181
Tape, 1182
Tutorial, 1183
Types
Director Resource, 1184
Resource, 1185
Upgrade from Bacula to Bareos, 1186
Verify, 1187
Details, 1188
Differences, 1189
Example, 1190
File Integrity, 1191
Running, 1192
Version numbers, 1193
VMware Plugin, 1194
Limitation
Normal VM disks can not be excluded from the backup, 1195
Restore can only be done to the same VM or to local VMDK files, 1196
Virtual Disks have to be smaller than 2TB, 1197
VM configuration is not backed up, 1198
VMDK files, 1199
Volume, 1200
File Count, 1201
Labeling
Automatic, 1202
Management, 1203
Key Concepts and Resource Records, 1204
Recycle
Automatic, 1205
Manual, 1206
Volume Utility Tools, 1207
Volumes
Specifying, 1208
Understanding, 1209
Using Pools to Manage, 1210
VSS
Enable, 1211
Webui, 1212
Install, 1213
Windows, 1214
Backup Problems, 1215
bextract, 1216
Compatibility Considerations, 1217
Configuration Files
UTF-8, 1218
Dealing with Problems, 1219
Debug, 1220
File Daemon
Command Line Options, 1221
Installation, 1222
FileSet, 1223
Example, 1224
Firewall, 1225
Limitation
Bareos Director does not support MySQL database backend, 1226
Bareos Storage Daemon only support backup to disk, not to tape, 1227
The default installation of Bareos Webui is only suitable for local access, 1228
Ownership and Permissions Problems, 1229
Problem
VSS, 1230
Restore Problem, 1231
Restoring on, 1232
Run Script, 1233
Volume Shadow Copy Service, 1234
VSS, 1235
Problem, 1236
Wrappers
TCP, 1237
xtrabackup, 1238
|
Accurate, 1, 2
aclsupport, 3
Admin, 4
always, 5
Backup, 6
basejob, 7
Catalog, 8
checkfilechanges, 9
Clone a Job, 10
Command Line Options, 11
compression, 12
Configuration Directive
Absolute Job Timeout, 13, 14
Accurate, 15, 16, 17, 18, 19
Action On Purge, 20, 21, 22
Add Prefix, 23, 24, 25
Add Suffix, 26, 27
Address, 28, 29, 30, 31, 32, 33, 34, 35
Allow Client Connect, 36, 37
Allow Compression, 38, 39, 40
Allow Duplicate Jobs, 41, 42, 43, 44, 45
Allow Higher Duplicates, 46, 47
Allow Mixed Priority, 48, 49
Always Incremental, 50, 51, 52, 53
Always Incremental Job Retention, 54, 55, 56, 57, 58, 59, 60, 61, 62
Always Incremental Keep Number, 63, 64, 65, 66, 67, 68
Always Incremental Max Full Age, 69, 70, 71, 72, 73, 74, 75, 76, 77, 78, 79, 80
Append, 81, 82, 83
Audit Events, 84, 85
Auditing, 86, 87, 88, 89
Auth Type, 90, 91, 92, 93, 94
Auto Changer, 95, 96, 97, 98, 99, 100
Auto Prune, 101, 102, 103, 104, 105, 106, 107, 108, 109, 110, 111, 112, 113, 114, 115, 116, 117, 118
AutoExclude, 119
Backend Directory, 120, 121
Backup Format, 122, 123, 124
Base, 125, 126
Bootstrap, 127, 128
Cache Status Interval, 129, 130
Cancel Lower Level Duplicates, 131, 132, 133
Cancel Queued Duplicates, 134, 135, 136, 137
Cancel Running Duplicates, 138, 139, 140, 141
Catalog, 142, 143, 144, 145, 146, 147, 148, 149, 150, 151
Catalog ACL, 152, 153, 154, 155
Catalog Files, 156, 157
Cleaning Prefix, 158, 159, 160
Client, 161, 162, 163
Client ACL, 164, 165, 166, 167
Client Run After Job, 168, 169, 170
Client Run Before Job, 171, 172, 173, 174, 175
Collect Statistics, 176, 177, 178
Command ACL, 179, 180, 181, 182, 183, 184, 185, 186
Connection From Client To Director, 187, 188, 189, 190
Connection From Director To Client, 191, 192, 193
Console, 194, 195, 196
DB Address, 197, 198, 199, 200, 201, 202, 203, 204
DB Driver, 205, 206, 207
DB Name, 208, 209, 210
DB Password, 211, 212, 213, 214
DB Port, 215, 216, 217
DB Socket, 218, 219, 220, 221
DB User, 222, 223, 224, 225
Description, 226, 227, 228, 229, 230, 231, 232, 233, 234, 235, 236, 237, 238, 239, 240, 241, 242, 243, 244, 245, 246, 247, 248, 249
Device, 250, 251, 252, 253, 254, 255
Differential Backup Pool, 256, 257
Differential Max Runtime, 258, 259, 260
Differential Max Wait Time, 261, 262
Dir Address, 263, 264, 265
Dir Addresses, 266, 267, 268, 269, 270
Dir Plugin Options, 271, 272
Dir Port, 273, 274, 275, 276
Dir Source Address, 277, 278
Director, 279, 280
Disable Batch Insert, 281, 282
Enable VSS, 283, 284, 285
Enabled, 286, 287, 288, 289, 290, 291, 292, 293
Exclude, 294, 295, 296
Exit On Fatal, 297, 298
FD Address, 299, 300
FD Connect Timeout, 301, 302
FD Password, 303, 304
FD Plugin Options, 305, 306
FD Port, 307, 308
File, 309, 310, 311, 312
File History Size, 313, 314, 315, 316, 317
File Retention, 318, 319, 320, 321, 322, 323, 324, 325
File Set, 326, 327
File Set ACL, 328, 329, 330, 331
Full Backup Pool, 332, 333
Full Max Runtime, 334, 335, 336
Full Max Wait Time, 337, 338
Hard Quota, 339, 340
Heartbeat Interval, 341, 342, 343, 344, 345, 346, 347, 348, 349
Idle Timeout, 350, 351
Ignore File Set Changes, 352, 353, 354
Inc Connections, 355, 356
Include, 357, 358, 359, 360, 361, 362, 363, 364
Incremental Backup Pool, 365, 366
Incremental Max Runtime, 367, 368, 369
Incremental Max Wait Time, 370, 371
Job ACL, 372, 373, 374, 375
Job Defs, 376, 377, 378
Job Retention, 379, 380, 381, 382, 383, 384, 385, 386, 387, 388
Job To Verify, 389, 390
Key Encryption Key, 391, 392, 393
Label Format, 394, 395, 396, 397, 398, 399, 400, 401
Label Type, 402, 403, 404, 405, 406
Lan Address, 407, 408, 409, 410, 411, 412, 413, 414
Level, 415, 416, 417, 418, 419
Log Timestamp Format, 420, 421
Mail, 422, 423, 424, 425
Mail Command, 426, 427, 428, 429, 430, 431, 432
Mail On Error, 433, 434, 435
Mail On Success, 436, 437, 438
Max Concurrent Copies, 439, 440
Max Connections, 441, 442
Max Diff Interval, 443, 444
Max Full Consolidations, 445, 446, 447, 448, 449, 450, 451
Max Full Interval, 452, 453
Max Run Sched Time, 454, 455
Max Run Time, 456, 457
Max Start Delay, 458, 459
Max Virtual Full Interval, 460, 461
Max Wait Time, 462, 463
Maximum, 464, 465
Maximum Bandwidth, 466, 467
Maximum Bandwidth Per Job, 468, 469, 470, 471
Maximum Block Size, 472, 473, 474, 475, 476, 477
Maximum Concurrent Jobs, 478, 479, 480, 481, 482, 483, 484, 485, 486, 487, 488, 489, 490
Maximum Concurrent Read Jobs, 491, 492
Maximum Connections, 493, 494
Maximum Console Connections, 495, 496
Maximum Volume Bytes, 497, 498, 499, 500, 501, 502, 503
Maximum Volume Files, 504, 505
Maximum Volume Jobs, 506, 507, 508, 509, 510, 511
Maximum Volumes, 512, 513, 514, 515, 516
Media Type, 517, 518, 519, 520, 521, 522, 523, 524, 525
Messages, 526, 527, 528, 529, 530
Migration High Bytes, 531, 532, 533, 534, 535, 536
Migration Low Bytes, 537, 538, 539, 540
Migration Time, 541, 542, 543, 544
Min Connections, 545, 546
Minimum, 547, 548
Minimum Block Size, 549, 550, 551, 552
Multiple Connections, 553, 554
Name, 555, 556, 557, 558, 559, 560, 561, 562, 563, 564, 565, 566, 567, 568, 569, 570, 571, 572, 573, 574, 575, 576, 577, 578, 579, 580, 581, 582
NDMP Block Size, 583, 584, 585
NDMP Changer Device, 586, 587, 588
NDMP Log Level, 589, 590, 591, 592, 593, 594
NDMP Snooping, 595, 596, 597
NDMP Use LMDB, 598, 599
Next Pool, 600, 601, 602, 603, 604, 605, 606, 607, 608, 609, 610, 611, 612
Omit Defaults, 613, 614
Operator, 615, 616, 617
Operator Command, 618, 619, 620
Optimize For Size, 621, 622, 623, 624, 625
Optimize For Speed, 626, 627, 628
Paired Storage, 629, 630
Passive, 631, 632, 633
Password, 634, 635, 636, 637, 638, 639, 640, 641, 642, 643, 644, 645
Pid Directory, 646, 647
Plugin Directory, 648, 649
Plugin Names, 650, 651
Plugin Options, 652, 653
Plugin Options ACL, 654, 655, 656, 657
Pool, 658, 659, 660, 661, 662, 663
Pool ACL, 664, 665, 666, 667, 668, 669
Pool Type, 670, 671
Port, 672, 673, 674, 675, 676
Prefer Mounted Volumes, 677, 678, 679
Prefix Links, 680, 681
Priority, 682, 683, 684, 685
Profile, 686, 687, 688
Protocol, 689, 690, 691, 692, 693, 694, 695, 696, 697, 698, 699, 700, 701, 702
Prune Files, 703, 704
Prune Jobs, 705, 706
Prune Volumes, 707, 708
Purge Migration Job, 709, 710, 711
Purge Oldest Volume, 712, 713, 714, 715, 716
Query File, 717, 718
Quota Include Failed Jobs, 719, 720
Reconnect, 721, 722
Recycle, 723, 724, 725, 726, 727, 728
Recycle Current Volume, 729, 730, 731, 732, 733, 734
Recycle Oldest Volume, 735, 736, 737, 738, 739, 740
Recycle Pool, 741, 742, 743
Regex Where, 744, 745
Replace, 746, 747
Rerun Failed Levels, 748, 749
Reschedule Interval, 750, 751, 752
Reschedule On Error, 753, 754
Reschedule Times, 755, 756, 757
Run, 758, 759, 760, 761, 762, 763
Run ACL, 764, 765
Run After Failed Job, 766, 767, 768
Run After Job, 769, 770, 771, 772
Run Before Job, 773, 774, 775, 776, 777, 778, 779
Run Script, 780, 781, 782, 783, 784, 785, 786, 787, 788, 789, 790, 791, 792, 793, 794
Save File History, 795, 796, 797
Schedule, 798, 799
Schedule ACL, 800, 801, 802, 803
Scratch Pool, 804, 805
Scripts Directory, 806, 807
SD Address, 808, 809
SD Connect Timeout, 810, 811
SD Password, 812, 813
SD Plugin Options, 814, 815
SD Port, 816, 817
Sdd Port, 818, 819
Secure Erase Command, 820, 821, 822
Selection Pattern, 823, 824, 825, 826, 827, 828, 829, 830, 831
Selection Type, 832, 833, 834, 835, 836, 837, 838, 839, 840, 841, 842, 843, 844, 845
Soft Quota, 846, 847, 848
Soft Quota Grace Period, 849, 850, 851
Spool Attributes, 852, 853, 854
Spool Data, 855, 856, 857, 858
Spool Size, 859, 860, 861
Statistics Collect Interval, 862, 863, 864
Statistics Retention, 865, 866, 867
Stderr, 868, 869
Stdout, 870, 871
Storage, 872, 873, 874, 875, 876, 877, 878, 879
Storage ACL, 880, 881, 882, 883
Strict Quotas, 884, 885
Strip Prefix, 886, 887, 888
Sub Sys Directory, 889, 890
Subscriptions, 891, 892, 893, 894
Syslog, 895, 896
Timestamp Format, 897, 898
TLS Allowed CN, 899, 900, 901, 902, 903, 904, 905, 906
TLS Authenticate, 907, 908, 909, 910, 911, 912, 913, 914
TLS CA Certificate Dir, 915, 916, 917, 918, 919, 920, 921, 922
TLS CA Certificate File, 923, 924, 925, 926, 927, 928, 929, 930
TLS Certificate, 931, 932, 933, 934, 935, 936, 937, 938
TLS Certificate Revocation List, 939, 940, 941, 942, 943, 944, 945, 946
TLS Cipher List, 947, 948, 949, 950, 951, 952, 953, 954
TLS DH File, 955, 956, 957, 958, 959, 960, 961, 962
TLS Enable, 963, 964, 965, 966, 967, 968, 969, 970
TLS Key, 971, 972, 973, 974, 975, 976, 977, 978
TLS Psk Enable, 979, 980, 981, 982, 983, 984, 985, 986
TLS Psk Require, 987, 988, 989, 990, 991, 992, 993, 994
| TLSRequire, 995, 996, 997, 998, 999, 1000, 1001, 1002
TLS Verify Peer, 1003, 1004, 1005, 1006, 1007, 1008, 1009, 1010
Type, 1011, 1012, 1013, 1014, 1015, 1016, 1017, 1018, 1019, 1020
Use Catalog, 1021, 1022
Use Pam Authentication, 1023, 1024
Use Volume Once, 1025, 1026
User, 1027, 1028
Username, 1029, 1030, 1031, 1032, 1033
Validate Timeout, 1034, 1035
Ver Id, 1036, 1037
Verify Job, 1038, 1039
Virtual Full Backup Pool, 1040, 1041
Volume Retention, 1042, 1043, 1044, 1045, 1046, 1047, 1048, 1049, 1050, 1051, 1052, 1053, 1054, 1055
Volume Use Duration, 1056, 1057, 1058, 1059, 1060
Where, 1061, 1062, 1063
Where ACL, 1064, 1065, 1066, 1067
Working Directory, 1068, 1069
Wrap Counter, 1070, 1071, 1072
Write Bootstrap, 1073, 1074, 1075, 1076
Write Part After Job, 1077, 1078
Write Verify List, 1079, 1080
Configuration File Example, 1081
Console
Default Console, 1082
Named Console, 1083
Restricted Console, 1084
days, 1085
Differential, 1086
DifferentialPool, 1087
Directive
Accurate, 1088
accurate, 1089
aclsupport, 1090
basejob, 1091
checkfilechanges, 1092
compression, 1093
DifferentialPool, 1094
DriveType, 1095
Exclude Dir Containing, 1096
File, 1097
fstype, 1098
FullPool, 1099
hardlinks, 1100
hfsplussupport, 1101
honornodumpflag, 1102
ignore case, 1103
IncrementalPool, 1104
keepatime, 1105
Level, 1106, 1107
Messages, 1108
meta, 1109
mtimeonly, 1110
noatime, 1111
onefs, 1112
Options, 1113
Plugin, 1114
Pool, 1115
portable, 1116
readfifo, 1117
recurse, 1118
regex, 1119
regexdir, 1120
regexfile, 1121
shadowing, 1122
signature, 1123
size, 1124
sparse, 1125
Spool Data, 1126
Storage, 1127
strippath, 1128
TLS Allowed CN, 1129
TLS CA Certificate Dir, 1130
TLS CA Certificate File, 1131
TLS Certificate, 1132
TLS DH File, 1133
TLS Enable, 1134
TLS Key, 1135
TLS Require, 1136
TLS Verify Peer, 1137
verify, 1138
wild, 1139
wilddir, 1140
wildfile, 1141
xattrsupport, 1142
DiskToCatalog, 1143
DriveType, 1144
Enable VSS, 1145
Exclude Dir Containing, 1146
Exit Status, 1147
File, 1148
fstype, 1149
Full, 1150
FullPool, 1151
hardlinks, 1152
hfsplussupport, 1153
honornodumpflag, 1154
hours, 1155
ifnewer, 1156
ifolder, 1157
ignore case, 1158
Incremental, 1159
IncrementalPool, 1160
InitCatalog, 1161
keepatime, 1162
Level, 1163, 1164
MD5, 1165
Messages, 1166
destination, 1167
meta, 1168
minutes, 1169
months, 1170
mtimeonly, 1171
Named Console, 1172
never, 1173
noatime, 1174
onefs, 1175
Options, 1176
Plugin, 1177
Pool, 1178
portable, 1179
quarters, 1180
readfifo, 1181
recurse, 1182
regex, 1183
regexdir, 1184
regexfile, 1185
Resource Types, 1186
Restore, 1187
seconds, 1188
SHA1, 1189
SHA256, 1190
SHA512, 1191
shadowing, 1192
signature, 1193
MD5, 1194
SHA1, 1195
SHA256, 1196
SHA512, 1197
size, 1198
sparse, 1199
SpoolData, 1200
Storage, 1201
strippath, 1202
TLS Allowed CN, 1203
TLS CA Certificate Dir, 1204
TLS CA Certificate File, 1205
TLS Certificate, 1206
TLS DH File, 1207
TLS Enable, 1208
TLS Key, 1209
TLS Require, 1210
TLS Verify Peer, 1211
Verify, 1212
verify, 1213
VirtualFull Backup, 1214
VolumeToCatalog, 1215
weeks, 1216
wild, 1217
wilddir, 1218
wildfile, 1219
Windows
Enable VSS, 1220
xattrsupport, 1221
years, 1222
|
Autochanger Resource, 1
Backend
Droplet, 2, 3, 4
S3, 5
Droplet (S3), 6
Fifo, 7, 8
File, 9, 10
GFAPI (GlusterFS), 11, 12, 13
Rados, 14
Rados (Ceph Object Store), 15, 16, 17
Tape, 18, 19
bareos-storage-droplet, 20
Command Line Options, 21
Configuration, 22
Configuration Directive
Absolute Job Timeout, 23, 24
Alert Command, 25, 26, 27
Allow Bandwidth Bursting, 28, 29
Always Open, 30, 31, 32, 33, 34
Archive Device, 35, 36, 37, 38, 39, 40, 41, 42, 43, 44, 45, 46, 47, 48, 49, 50, 51, 52
Auth Type, 53, 54
Auto Deflate, 55, 56, 57
Auto Deflate Algorithm, 58, 59, 60
Auto Deflate Level, 61, 62, 63
Auto Inflate, 64, 65, 66
Auto Select, 67, 68
Auto XFlate On Replication, 69, 70, 71
Autochanger, 72, 73, 74, 75, 76, 77
Automatic Mount, 78, 79, 80
Backend Directory, 81, 82
Backward Space File, 83, 84
Backward Space Record, 85, 86
Block Checksum, 87, 88
Block Positioning, 89, 90
Bsf At Eom, 91, 92, 93
Changer Command, 94, 95, 96, 97, 98, 99, 100, 101, 102
Changer Device, 103, 104, 105, 106, 107, 108, 109, 110, 111, 112, 113, 114
Check Labels, 115, 116, 117, 118
Client Connect Wait, 119, 120
Close On Poll, 121, 122
Collect Device Statistics, 123, 124
Collect Job Statistics, 125, 126, 127
Collect Statistics, 128, 129
Compatible, 130, 131, 132, 133
Description, 134, 135, 136, 137, 138, 139, 140, 141, 142, 143
Device, 144, 145
Device Options, 146, 147, 148, 149, 150, 151, 152, 153, 154, 155, 156, 157
Device Reserve By Media Type, 158, 159
Device Type, 160, 161, 162, 163, 164, 165, 166, 167, 168
Diagnostic Device, 169, 170
Drive Crypto Enabled, 171, 172, 173
Drive Index, 174, 175, 176, 177, 178
Drive Tape Alert Enabled, 179, 180
Fast Forward Space File, 181, 182
FD Connect Timeout, 183, 184
File Device Concurrent Read, 185, 186
Forward Space File, 187, 188
Forward Space Record, 189, 190
Free Space Command, 191, 192
Hardware End Of File, 193, 194
Hardware End Of Medium, 195, 196
Heartbeat Interval, 197, 198
Key Encryption Key, 199, 200, 201
Label Block Size, 202, 203, 204, 205
Label Media, 206, 207, 208
Label Type, 209, 210, 211, 212
Log Level, 213, 214
Log Timestamp Format, 215, 216
Maximum Bandwidth Per Job, 217, 218, 219, 220
Maximum Block Size, 221, 222, 223, 224, 225, 226, 227, 228, 229
Maximum Changer Wait, 230, 231, 232
Maximum Concurrent Jobs, 233, 234, 235, 236, 237, 238, 239
Maximum Connections, 240, 241
Maximum File Size, 242, 243, 244, 245
Maximum Job Spool Size, 246, 247, 248
Maximum Network Buffer Size, 249, 250, 251, 252
Maximum Open Volumes, 253, 254
Maximum Open Wait, 255, 256, 257, 258
Maximum Part Size, 259, 260
Maximum Rewind Wait, 261, 262
Maximum Spool Size, 263, 264, 265, 266, 267
Maximum Volume Size, 268, 269
Media Type, 270, 271, 272, 273, 274, 275, 276, 277
Messages, 278, 279
Minimum Block Size, 280, 281, 282
Monitor, 283, 284
Mount Command, 285, 286, 287, 288
Mount Point, 289, 290, 291, 292
Name, 293, 294, 295, 296, 297, 298, 299, 300, 301, 302, 303, 304, 305, 306, 307, 308
NDMP Address, 309, 310
NDMP Addresses, 311, 312
NDMP Enable, 313, 314, 315
NDMP Log Level, 316, 317, 318
NDMP Port, 319, 320
NDMP Snooping, 321, 322, 323
| No Rewind On Close, 324, 325
Offline On Unmount, 326, 327
Password, 328, 329, 330, 331
Pid Directory, 332, 333
Plugin Directory, 334, 335, 336, 337
Plugin Names, 338, 339
Query Crypto Status, 340, 341, 342
Random Access, 343, 344
Removable Media, 345, 346
Requires Mount, 347, 348, 349
Scripts Directory, 350, 351
SD Address, 352, 353, 354
SD Addresses, 355, 356, 357
SD Connect Timeout, 358, 359
SD Port, 360, 361, 362
SD Source Address, 363, 364
Secure Erase Command, 365, 366, 367
Spool Directory, 368, 369, 370
Statistics Collect Interval, 371, 372
Sub Sys Directory, 373, 374
TLS Allowed CN, 375, 376, 377, 378
TLS Authenticate, 379, 380, 381, 382
TLS CA Certificate Dir, 383, 384, 385, 386
TLS CA Certificate File, 387, 388, 389, 390
TLS Certificate, 391, 392, 393, 394
TLS Certificate Revocation List, 395, 396, 397, 398
TLS Cipher List, 399, 400, 401, 402
TLS DH File, 403, 404, 405, 406
TLS Enable, 407, 408, 409, 410
TLS Key, 411, 412, 413, 414
TLS Psk Enable, 415, 416, 417, 418
TLS Psk Require, 419, 420, 421, 422
TLS Require, 423, 424, 425, 426
TLS Verify Peer, 427, 428, 429, 430
Two Eof, 431, 432
Unmount Command, 433, 434, 435, 436
Use Mtiocget, 437, 438
Username, 439, 440
Ver Id, 441, 442
Volume Capacity, 443, 444
Volume Poll Interval, 445, 446
Working Directory, 447, 448
Write Part Command, 449, 450
Device
Resource, 451
Director
Resource, 452
Disk
Freeing disk space, 453
mtx-changer list, 454
mtx-changer listall, 455, 456
mtx-changer load, 457
mtx-changer loaded, 458
mtx-changer slots, 459
mtx-changer unload, 460, 461
NDMP
Resource, 462
Platform
Linux
Privileges, 463
Solaris
Privileges, 464
Resource
Autochanger, 465
Device, 466
Director, 467
NDMP, 468
Storage, 469
Storage
Resource, 470
|
Command Line Options, 1
Configuration Directive
Absolute Job Timeout, 2, 3
Address, 4, 5, 6
Allow Bandwidth Bursting, 7, 8
Allowed Job Command, 9, 10, 11, 12, 13
Allowed Script Dir, 14, 15, 16, 17, 18, 19
Always Use LMDB, 20, 21
Compatible, 22, 23, 24, 25, 26, 27, 28, 29, 30
Connection From Client To Director, 31, 32, 33, 34
Connection From Director To Client, 35, 36, 37
Description, 38, 39, 40, 41
FD Address, 42, 43
FD Addresses, 44, 45
FD Port, 46, 47
FD Source Address, 48, 49
Heartbeat Interval, 50, 51
LMDB Threshold, 52, 53
Log Timestamp Format, 54, 55
Maximum Bandwidth Per Job, 56, 57, 58, 59
Maximum Concurrent Jobs, 60, 61, 62
Maximum Connections, 63, 64
Maximum Network Buffer Size, 65, 66
Messages, 67, 68
Monitor, 69, 70
Name, 71, 72, 73, 74
Password, 75, 76, 77, 78
Pid Directory, 79, 80
Pki Cipher, 81, 82
Pki Encryption, 83, 84
Pki Key Pair, 85, 86
Pki Master Key, 87, 88
Pki Signatures, 89, 90
Pki Signer, 91, 92
Plugin Directory, 93, 94, 95
Plugin Names, 96, 97
| Port, 98, 99
Scripts Directory, 100, 101
SD Connect Timeout, 102, 103
Secure Erase Command, 104, 105, 106
Sub Sys Directory, 107, 108
TLS Allowed CN, 109, 110, 111, 112
TLS Authenticate, 113, 114, 115, 116
TLS CA Certificate Dir, 117, 118, 119, 120
TLS CA Certificate File, 121, 122, 123, 124
TLS Certificate, 125, 126, 127, 128
TLS Certificate Revocation List, 129, 130, 131, 132
TLS Cipher List, 133, 134, 135, 136
TLS DH File, 137, 138, 139, 140
TLS Enable, 141, 142, 143, 144
TLS Key, 145, 146, 147, 148
TLS Psk Enable, 149, 150, 151, 152
TLS Psk Require, 153, 154, 155, 156
TLS Require, 157, 158, 159, 160
TLS Verify Peer, 161, 162, 163, 164
Ver Id, 165, 166
Working Directory, 167, 168
Windows
Exclude Files from Backup, 169
Junction points, 170
Problem
VSS, 171
Symbolic links, 172
Volume Mount Points (VMP), 173
|
Command Line Options, 1
Configuration Directive
Address, 2, 3, 4, 5, 6, 7, 8, 9
Description, 10, 11, 12, 13, 14, 15, 16, 17, 18, 19, 20, 21
Dir Connect Timeout, 22, 23
Dir Port, 24, 25, 26, 27
Director, 28, 29
FD Connect Timeout, 30, 31
FD Port, 32, 33
Heartbeat Interval, 34, 35, 36, 37
History File, 38, 39
History Length, 40, 41
Name, 42, 43, 44, 45, 46, 47, 48, 49, 50, 51, 52, 53
Password, 54, 55, 56, 57, 58, 59, 60, 61, 62, 63, 64
Rc File, 65, 66
Refresh Interval, 67, 68
SD Address, 69, 70
SD Connect Timeout, 71, 72
SD Password, 73, 74
| SD Port, 75, 76
TLS Allowed CN, 77, 78, 79, 80, 81, 82, 83, 84, 85, 86, 87, 88
TLS Authenticate, 89, 90, 91, 92, 93, 94, 95, 96, 97, 98, 99, 100
TLS CA Certificate Dir, 101, 102, 103, 104, 105, 106, 107, 108, 109, 110, 111, 112
TLS CA Certificate File, 113, 114, 115, 116, 117, 118, 119, 120, 121, 122, 123, 124
TLS Certificate, 125, 126, 127, 128, 129, 130, 131, 132, 133, 134, 135, 136
TLS Certificate Revocation List, 137, 138, 139, 140, 141, 142, 143, 144, 145, 146, 147, 148
TLS Cipher List, 149, 150, 151, 152, 153, 154, 155, 156, 157, 158, 159, 160
TLS DH File, 161, 162, 163, 164, 165, 166, 167, 168, 169, 170, 171, 172
TLS Enable, 173, 174, 175, 176, 177, 178, 179, 180, 181, 182, 183, 184
TLS Key, 185, 186, 187, 188, 189, 190, 191, 192, 193, 194, 195, 196
TLS Psk Enable, 197, 198, 199, 200, 201, 202, 203, 204, 205, 206, 207, 208
TLS Psk Require, 209, 210, 211, 212, 213, 214, 215, 216, 217, 218, 219, 220
TLS Require, 221, 222, 223, 224, 225, 226, 227, 228, 229, 230, 231, 232
TLS Verify Peer, 233, 234, 235, 236, 237, 238, 239, 240, 241, 242, 243, 244
Use Pam Authentication, 245, 246
|